2019 FORD F-550 tow
[x] Cancel search: towPage 414 of 666
Rear
Note:
Jack at the specified locations to
avoid damage to the vehicle.
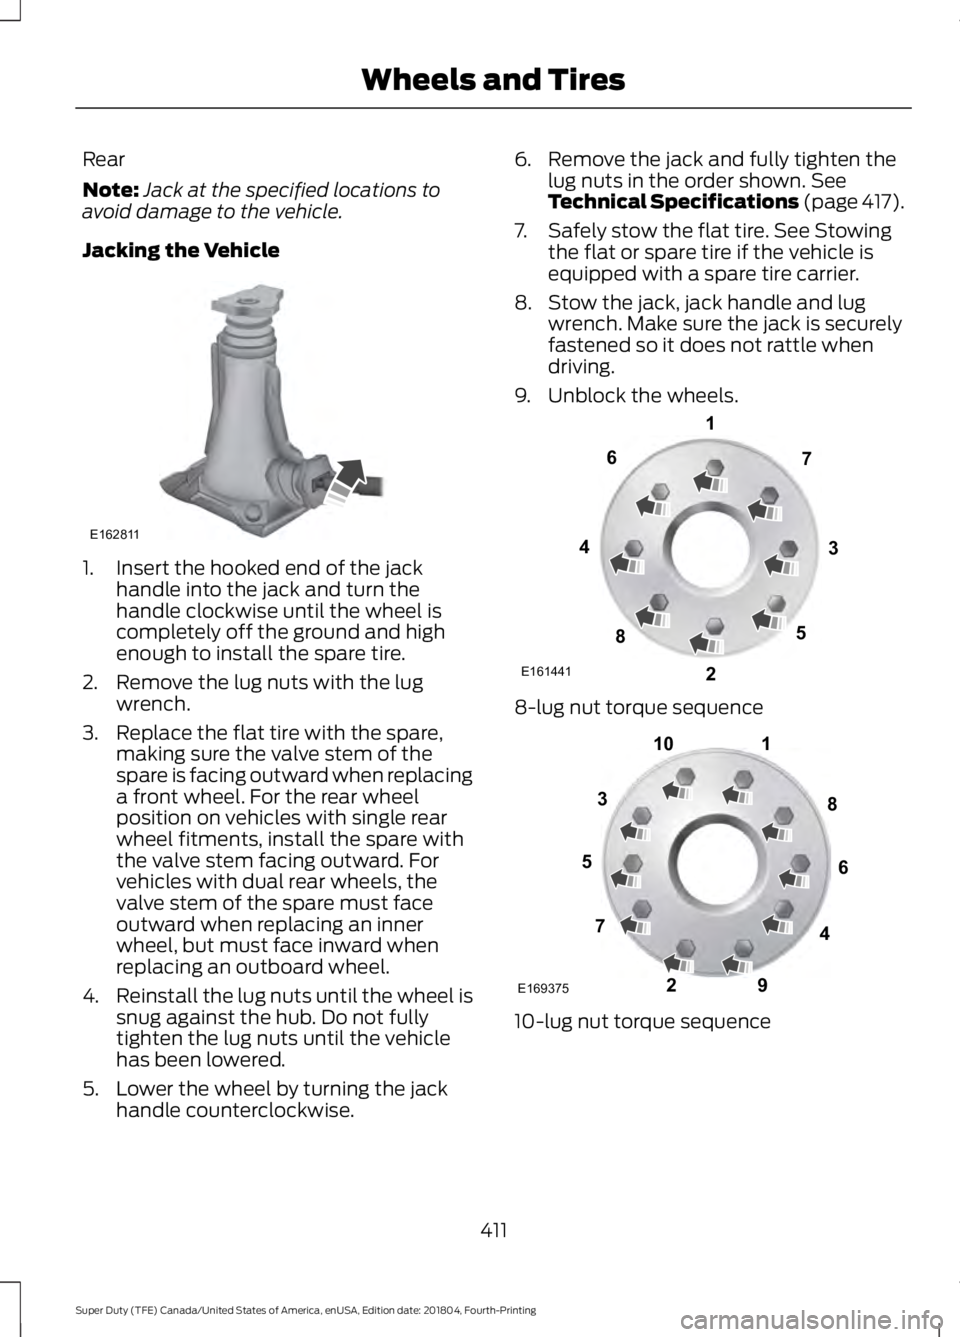
Jacking the Vehicle 1. Insert the hooked end of the jack
handle into the jack and turn the
handle clockwise until the wheel is
completely off the ground and high
enough to install the spare tire.
2. Remove the lug nuts with the lug wrench.
3. Replace the flat tire with the spare, making sure the valve stem of the
spare is facing outward when replacing
a front wheel. For the rear wheel
position on vehicles with single rear
wheel fitments, install the spare with
the valve stem facing outward. For
vehicles with dual rear wheels, the
valve stem of the spare must face
outward when replacing an inner
wheel, but must face inward when
replacing an outboard wheel.
4. Reinstall the lug nuts until the wheel is
snug against the hub. Do not fully
tighten the lug nuts until the vehicle
has been lowered.
5. Lower the wheel by turning the jack handle counterclockwise. 6. Remove the jack and fully tighten the
lug nuts in the order shown. See
Technical Specifications (page 417).
7. Safely stow the flat tire. See Stowing the flat or spare tire if the vehicle is
equipped with a spare tire carrier.
8. Stow the jack, jack handle and lug wrench. Make sure the jack is securely
fastened so it does not rattle when
driving.
9. Unblock the wheels. 8-lug nut torque sequence
10-lug nut torque sequence
411
Super Duty (TFE) Canada/United States of America, enUSA, Edition date: 201804, Fourth-Printing Wheels and TiresE162811 E161441
13
4
27
6
5
8 1
2
3
4
5
6
7 8
9
10
E169375
Page 415 of 666
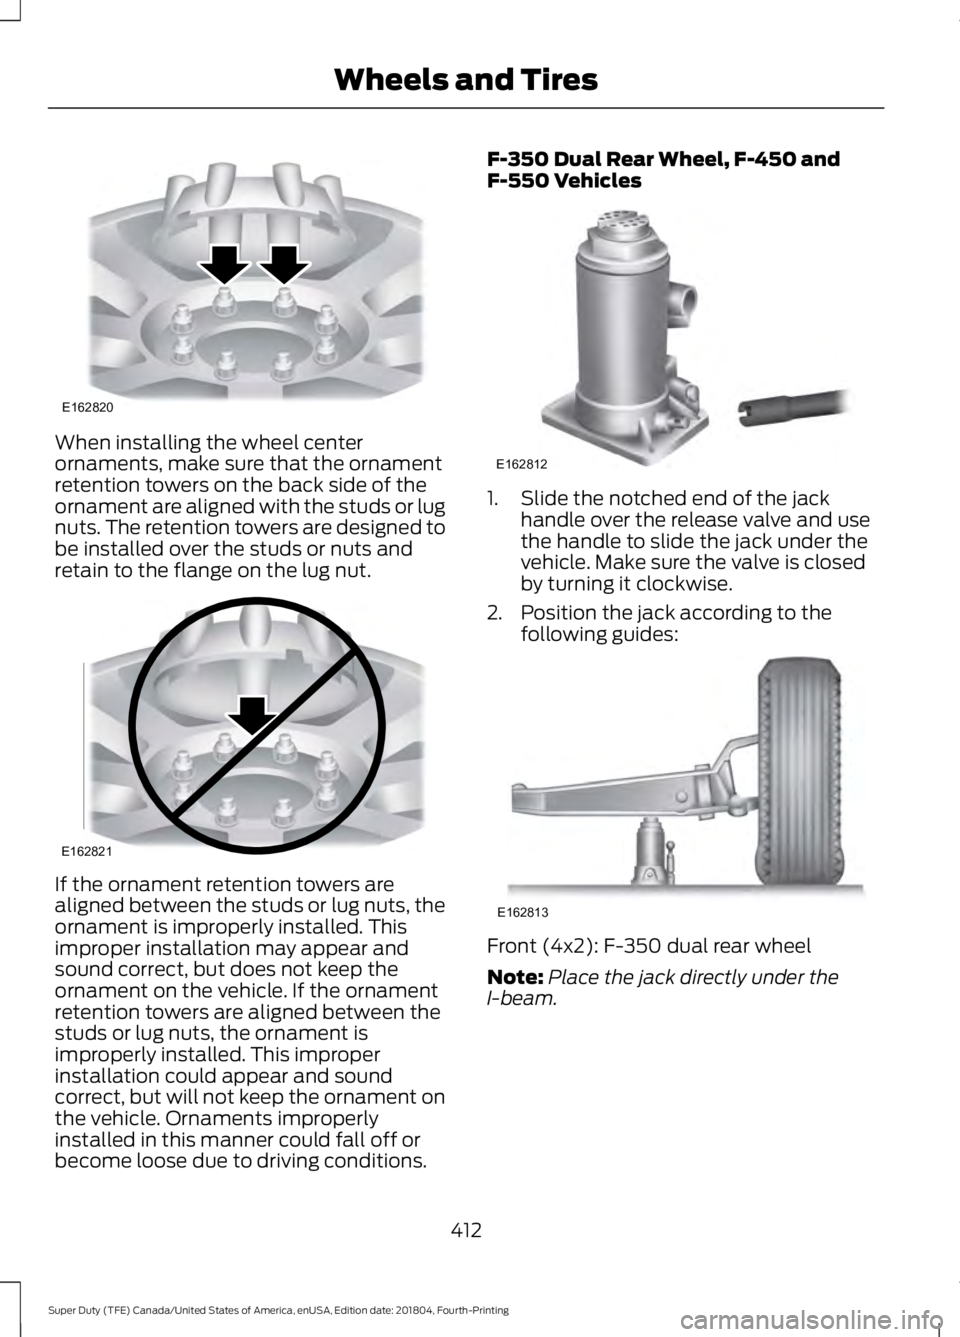
When installing the wheel center
ornaments, make sure that the ornament
retention towers on the back side of the
ornament are aligned with the studs or lug
nuts. The retention towers are designed to
be installed over the studs or nuts and
retain to the flange on the lug nut.
If the ornament retention towers are
aligned between the studs or lug nuts, the
ornament is improperly installed. This
improper installation may appear and
sound correct, but does not keep the
ornament on the vehicle. If the ornament
retention towers are aligned between the
studs or lug nuts, the ornament is
improperly installed. This improper
installation could appear and sound
correct, but will not keep the ornament on
the vehicle. Ornaments improperly
installed in this manner could fall off or
become loose due to driving conditions. F-350 Dual Rear Wheel, F-450 and
F-550 Vehicles
1. Slide the notched end of the jack
handle over the release valve and use
the handle to slide the jack under the
vehicle. Make sure the valve is closed
by turning it clockwise.
2. Position the jack according to the following guides: Front (4x2): F-350 dual rear wheel
Note:
Place the jack directly under the
I-beam.
412
Super Duty (TFE) Canada/United States of America, enUSA, Edition date: 201804, Fourth-Printing Wheels and TiresE162820 E162821 E162812 E162813
Page 417 of 666

Jacking the Vehicle
1. Insert the jack handle into the pump
linkage.
2. Use an up-and-down motion with the jack handle to raise the wheel
completely off the ground.
Note: Hydraulic jacks are equipped with a
pressure relief valve that prevents lifting
loads which exceed the jack's rated
capacity.
3. Remove the lug nuts with the lug wrench.
4. Replace the flat tire with the spare, making sure the valve stem of the
spare is facing outward when replacing
a front wheel. For the rear wheel
positions, the valve stem of the spare
must face outward when replacing an
inner wheel, but must face inward
when replacing an outboard wheel.
5. Reinstall the lug nuts until the wheel is
snug against the hub. Do not fully
tighten the lug nuts until the vehicle
has been lowered.
6. Lower the wheel by slowly turning the release valve counterclockwise.
Opening the release valve slowly
provides a more controlled rate of
descent. 7. Remove the jack and fully tighten the
lug nuts in the order shown. See
Technical Specifications (page 417).
8. Stow the flat tire. See Stowing the flat or spare tire if the vehicle is equipped
with a spare tire carrier.
9. Stow the jack, jack handle and lug wrench. Make sure the jack is securely
fastened so it does not rattle when
driving.
10. Unblock the wheels. 8-lug nut torque sequence
10-lug nut torque sequence
414
Super Duty (TFE) Canada/United States of America, enUSA, Edition date: 201804, Fourth-Printing Wheels and TiresE162819 E161441
13
4
27
6
5
8 1
2
3
4
5
6
7 8
9
10
E169375
Page 418 of 666

Installing Dual Rear Wheel Ornaments
1. Align the ornament with the lug nuts.
A is the clip and B is the flange. 2. Hold the ornament so that all of the
retention clips are sitting on the flange
of the lug nuts. 3. Use your hand or rubber mallet to tap
the ornament in a star pattern. There
should be an even gap between the
ornament and the wheel.
4. Be sure to install all the clips on the nuts over the flanges so that there is
an even gap all around and the
retention clips are fully seated. Stowing the Flat or Spare Tire
Note:
Failure to follow spare tire stowage
instructions may result in failure of cable or
loss of spare tire.
1. Place the tire on end with the valve stem facing toward the front of the
vehicle.
415
Super Duty (TFE) Canada/United States of America, enUSA, Edition date: 201804, Fourth-Printing Wheels and TiresAB
E162822 E162823 A
C
B
D
E162824 E162825 E162826
Page 419 of 666
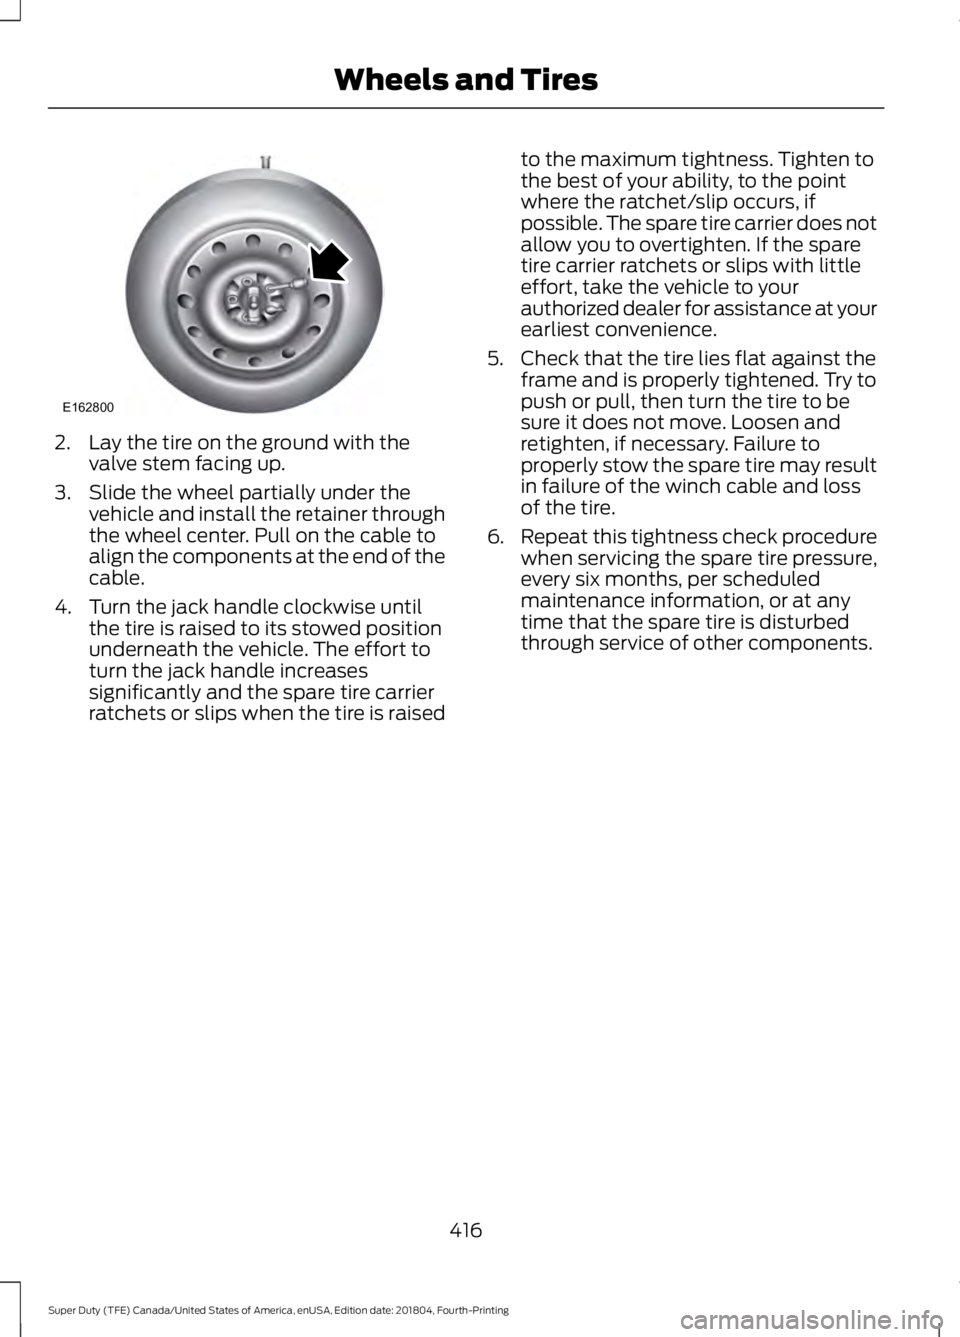
2. Lay the tire on the ground with the
valve stem facing up.
3. Slide the wheel partially under the vehicle and install the retainer through
the wheel center. Pull on the cable to
align the components at the end of the
cable.
4. Turn the jack handle clockwise until the tire is raised to its stowed position
underneath the vehicle. The effort to
turn the jack handle increases
significantly and the spare tire carrier
ratchets or slips when the tire is raised to the maximum tightness. Tighten to
the best of your ability, to the point
where the ratchet/slip occurs, if
possible. The spare tire carrier does not
allow you to overtighten. If the spare
tire carrier ratchets or slips with little
effort, take the vehicle to your
authorized dealer for assistance at your
earliest convenience.
5. Check that the tire lies flat against the frame and is properly tightened. Try to
push or pull, then turn the tire to be
sure it does not move. Loosen and
retighten, if necessary. Failure to
properly stow the spare tire may result
in failure of the winch cable and loss
of the tire.
6. Repeat this tightness check procedure
when servicing the spare tire pressure,
every six months, per scheduled
maintenance information, or at any
time that the spare tire is disturbed
through service of other components.
416
Super Duty (TFE) Canada/United States of America, enUSA, Edition date: 201804, Fourth-Printing Wheels and TiresE162800
Page 441 of 666
Specifications
Materials
Specification
Name
WSS-M2C945-B1
Motor oil (U.S.):
Motorcraft® SAE 5W-20 Premium Synthetic Blend Motor
Oil
XO-5W20-QSP
WSS-M2C945-B1
Motor oil (Canada):
Motorcraft® SAE 5W-20 Super Premium Motor Oil
CXO-5W20-LSP12
WSS-M2C946-B1
Optional motor oil (U.S.):
Motorcraft® SAE 5W-30 Premium Synthetic Blend Motor
Oil
XO-5W30-QSP
WSS-M2C946-B1
Optional motor oil (Canada):
Motorcraft® SAE 5W-30 Super Premium Motor Oil
CXO-5W30-LSP12
WSS-M97B57-A2
Engine coolant (U.S.):
Motorcraft® Yellow Prediluted Antifreeze/Coolant
VC-13DL-G
WSS-M97B57-A2
Engine coolant (Canada):
Motorcraft® Yellow Prediluted Antifreeze/Coolant
CVC-13DL-G
WSS-M6C65-A2
Brake fluid:
Motorcraft® DOT 4 Low Viscosity (LV) High Performance
Motor Vehicle Brake Fluid
PM-20
WSP-M2C197-A
Front axle fluid:
Motorcraft® SAE 80W-90 Premium Rear Axle Lubricant
XY-80W90-QL
WSS-M2C942-A
Rear axle fluid (10.50 inch axle) (E-Locker/non E-Locker):
Motorcraft® SAE 75W-85 Premium Synthetic Hypoid
Gear Lubricant
XY-75W85-QL
WSL-M2C192-A
Rear axle fluid (Dana M300 With HD Tow Option) (U.S.):
Motorcraft® SAE 75W-140 Synthetic Rear Axle Lubricant
XY-75W140-Q
WSP-M2C197-A
Rear axle fluid (Dana M300) (U.S.):
438
Super Duty (TFE) Canada/United States of America, enUSA, Edition date: 201804, Fourth-Printing Capacities and Specifications
Page 447 of 666
GENERAL INFORMATION
Radio Frequencies and Reception
Factors
AM and FM frequencies are established by
the Federal Communications Commission
(FCC) and the Canadian Radio and
Telecommunications Commission (CRTC).
Those frequencies are:
•
AM: 530-1710 kHz
• FM: 87.9-107.9 MHz
Note: Listening to loud audio for long
periods of time could damage your hearing. Radio Reception Factors
The further you travel from an AM or FM station, the
weaker the signal and the weaker the reception.
Distance and strength
Hills, mountains, tall buildings, bridges, tunnels, freeway
overpasses, parking garages, dense tree foliage and
thunderstorms can interfere with the reception.
Terrain
When you pass a ground-based broadcast repeating
tower, a stronger signal may overtake a weaker one and
result in the audio system muting.
Station overload
AUDIO UNIT - VEHICLES WITH:
AM/FM WARNING: Driving while
distracted can result in loss of vehicle
control, crash and injury. We strongly
recommend that you use extreme
caution when using any device that may
take your focus off the road. Your
primary responsibility is the safe
operation of your vehicle. We
recommend against the use of any
hand-held device while driving and
encourage the use of voice-operated
systems when possible. Make sure you
are aware of all applicable local laws
that may affect the use of electronic
devices while driving. Accessing the Auxiliary Media
Sources Press and release to access or
switch between media devices.
Accessing the Menu Press and release to access
different audio system features.
444
Super Duty (TFE) Canada/United States of America, enUSA, Edition date: 201804, Fourth-Printing Audio SystemE265277 E265038
Page 457 of 666
Note:
This receiver includes the eCos
real-time operating system. eCos is
published under the eCos License.
Satellite Radio Reception Factors Potential satellite radio reception issues
For optimal reception performance, keep the antenna
clear of snow and ice build-up and keep luggage and other
material as far away from the antenna as possible.
Antenna obstructions
Hills, mountains, tall buildings, bridges, tunnels, freeway
overpasses, parking garages, dense tree foliage and
thunderstorms can interfere with your reception.
Terrain
When you pass a ground-based broadcast-repeating
tower, a stronger signal may overtake a weaker one and
the audio system may mute.
Station overload
Your display may show ACQUIRING . . . to indicate the
interference and the audio system may mute.
Satellite radio signal interfer-
ence
SiriusXM Satellite Radio Service
Note: SiriusXM reserves the unrestricted
right to change, rearrange, add or delete
programming including canceling, moving
or adding particular channels, and its prices,
at any time, with or without notice to you.
Ford Motor Company shall not be
responsible for any such programming
changes. SiriusXM satellite radio is a
subscription-based satellite radio service
that broadcasts a variety of music, sports,
news, weather, traffic and entertainment
programming. Your factory-installed
SiriusXM satellite radio system includes
hardware and a limited subscription term,
which begins on the date of sale or lease
of your vehicle. See an authorized dealer
for availability.
For more information on extended
subscription terms (a service fee is
required), the online media player and a
complete list of SiriusXM satellite radio
channels, and other features, please visit
www.siriusxm.com in the United States,
www.siriusxm.ca in Canada, or call
SiriusXM at 1-888-539-7474.
Satellite Radio Electronic Serial
Number (ESN)
You need your ESN to activate, modify or
track your satellite radio account. When in
satellite radio mode, tune to channel 0.
454
Super Duty (TFE) Canada/United States of America, enUSA, Edition date: 201804, Fourth-Printing Audio SystemE208625