2019 FORD F-450 tailgate
[x] Cancel search: tailgatePage 4 of 666

Introduction
About This Manual
..........................................7
Symbols Glossary ............................................
8
Data Recording ...............................................
10
Perchlorate .......................................................
14
Ford Credit ........................................................
14
Replacement Parts Recommendation ........................................................................\
...
14
Special Notices ...............................................
14
Mobile Communications Equipment ........................................................................\
...
16
Export Unique Options ................................
16
Environment
Protecting the Environment .......................
17
At a Glance
Instrument Panel ...........................................
18
Child Safety
General Information .....................................
20
Installing Child Restraints ..........................
22
Booster Seats .................................................
33
Child Restraint Positioning ........................
35
Child Safety Locks .........................................
37
Seatbelts
Principle of Operation .................................
38
Fastening the Seatbelts .............................
39
Seatbelt Height Adjustment .....................
43
Seatbelt Warning Lamp and Indicator Chime ............................................................
43
Seatbelt Reminder .......................................
44
Child Restraint and Seatbelt Maintenance ...............................................
45
Seatbelt Extensions .....................................
46
Supplementary Restraints System
Principle of Operation ..................................
47Driver and Passenger Airbags
..................
48
Side Airbags ....................................................
54
Safety Canopy ™...........................................
55
Crash Sensors and Airbag Indicator ......
56
Airbag Disposal ..............................................
57
Keys and Remote Controls
General Information on Radio Frequencies .................................................
58
Remote Control .............................................
58
Replacing a Lost Key or Remote Control ........................................................................\
..
64
MyKey ™
Principle of Operation .................................
65
Creating a MyKey ..........................................
66
Clearing All MyKeys ......................................
67
Checking MyKey System Status ..............
67
Using MyKey With Remote Start Systems ........................................................
67
MyKey – Troubleshooting ..........................
67
Doors and Locks
Locking and Unlocking ...............................
69
Keyless Entry ...................................................
72
Tailgate
Tailgate Lock ...................................................
74
Removing the Tailgate .................................
74
Tailgate Step ...................................................
75
Bed Extender ...................................................
76
Security
Passive Anti-Theft System ........................
78
Anti-Theft Alarm ..........................................
80
Power Running Boards
Using Power Running Boards ...................
82
1
Super Duty (TFE) Canada/United States of America, enUSA, Edition date: 201804, Fourth-Printing Table of Contents
Page 72 of 666

LOCKING AND UNLOCKING
You can use the power door lock control
or the remote control to lock and unlock
your doors and tailgate. See Tailgate
Lock (page 74).
Power Door Locks
(If Equipped)
The power door lock control is on the driver
and front passenger door panels. Unlock.
A
Lock.
B
Remote Control
(If Equipped)
You can use the remote control at any time
your vehicle is not running.
Unlocking the Vehicle (Two-Stage
Unlock) Press the button to unlock the
driver door. Press the button
again within three seconds to
unlock all doors. The direction indicators
flash. The direction indicators flash twice
to confirm the change. The unlocking
mode applies to the remote control,
keyless entry keypad and intelligent
access. Press and hold both the lock and unlock
buttons on the remote control for four
seconds to disable or enable two-stage
unlocking. Disabling two-stage unlocking
allows your entire vehicle to unlock with
one press of the button.
Intelligent access at the driver door unlocks
your entire vehicle when you disable
two-stage unlocking.
Locking the Vehicle
Press the button to lock all
doors. The direction indicators
flash.
Press the button again within three
seconds to confirm that all the doors are
closed. The doors lock again, the horn
sounds and the direction indicators flash
if all the doors are closed.
Mislock
If any door is open, or if the hood is open
on vehicles with an anti-theft alarm or
remote start, the horn sounds twice and
the direction indicators do not flash.
Activating Intelligent Access
(If
Equipped)
General Information
You can unlock and lock the vehicle
without taking the keys out of your pocket
or purse when your intelligent access key
is within
3 ft (1 m) of your vehicle.
Intelligent access uses a sensor on the
back of the door handle for unlocking and
a separate sensor on the face of each door
handle for locking.
The system does not function if:
• Your vehicle battery has no charge.
• The key battery has no charge.
• The key frequencies are jammed.
69
Super Duty (TFE) Canada/United States of America, enUSA, Edition date: 201804, Fourth-Printing Doors and LocksE138628 E138629 E138623
Page 73 of 666

Note:
The system may not function if the
key is close to metal objects or electronic
devices, for example keys or a cell phone.
Note: If the system does not function, use
the key blade to lock and unlock your
vehicle. See Remote Control (page 58).
Unlocking Using Intelligent Access With your intelligent access key within
3 ft
(1 m) of your vehicle, touch the unlock
sensor on the back of the door handle for
a brief period and then pull on the door
handle to unlock, being careful to not
touch the lock sensor at the same time or
pulling the door handle too quickly. The
intelligent access system requires a brief
delay to authenticate your intelligent
access key fob.
Locking Using Intelligent Access With your intelligent access key within
3 ft
(1 m) of your vehicle, touch the outer door
handle lock sensor for approximately one
second to lock, being careful to not touch
the unlock sensor on the back of the door
handle at the same time. After locking, you
can immediately pull on the door handle
to confirm locking occurred without
inadvertently unlocking.
Note: Do not use the outside door handle
as a roof cargo strap. At the Electronic Tailgate (If Equipped)
Press the exterior tailgate release button
inside of the tailgate handle. The tailgate
unlocks and opens. See
Tailgate Lock
(page 74).
Smart Unlock
(If Equipped)
This feature helps to prevent you from
locking your intelligent access key inside
your vehicle ’s passenger compartment or
rear cargo area.
If you leave your key in the ignition, when
you open the driver door and lock your
vehicle with the power door lock control,
the doors lock then unlock.
You can still lock your vehicle with the key
in the ignition by:
• Using the manual lock on the inside of
the door.
• Locking the driver door with a key.
• Using the keyless entry keypad.
• Using the lock button on the remote
control.
Smart Unlocks for Intelligent
Access Keys
(If Equipped)
This feature helps to prevent you from
locking your intelligent access key inside
your vehicle ’s passenger compartment or
rear cargo area.
70
Super Duty (TFE) Canada/United States of America, enUSA, Edition date: 201804, Fourth-Printing Doors and LocksE248555 E248556 E187693
Page 76 of 666

The anti-scan feature will turn off after:
•
One minute of keypad inactivity.
• Pressing the unlock button on the
remote control.
• Switching the ignition on.
• Unlocking the vehicle using intelligent
access.
Unlocking and Locking the Doors
To Unlock the Driver Door
Enter the factory-set five-digit code or your
personal code. You must press each
number within five seconds of each other.
The interior lamps illuminate.
Note: All doors unlock if you disable the
two-stage unlocking feature. See General
Information (page 112).
To Unlock All Doors
Enter the factory-set code or your personal
code, then press
3·4 control within five
seconds.
To Lock All Doors
Press and hold
7·8 and 9·0 at the same
time with the driver door closed. You do
not need to enter the keypad code first.
To Release the Tailgate (If Equipped)
Enter the factory-set code or your personal
code, then press
5·6 control within five
seconds.
73
Super Duty (TFE) Canada/United States of America, enUSA, Edition date: 201804, Fourth-Printing Doors and Locks
Page 77 of 666

TAILGATE LOCK (IF EQUIPPED)
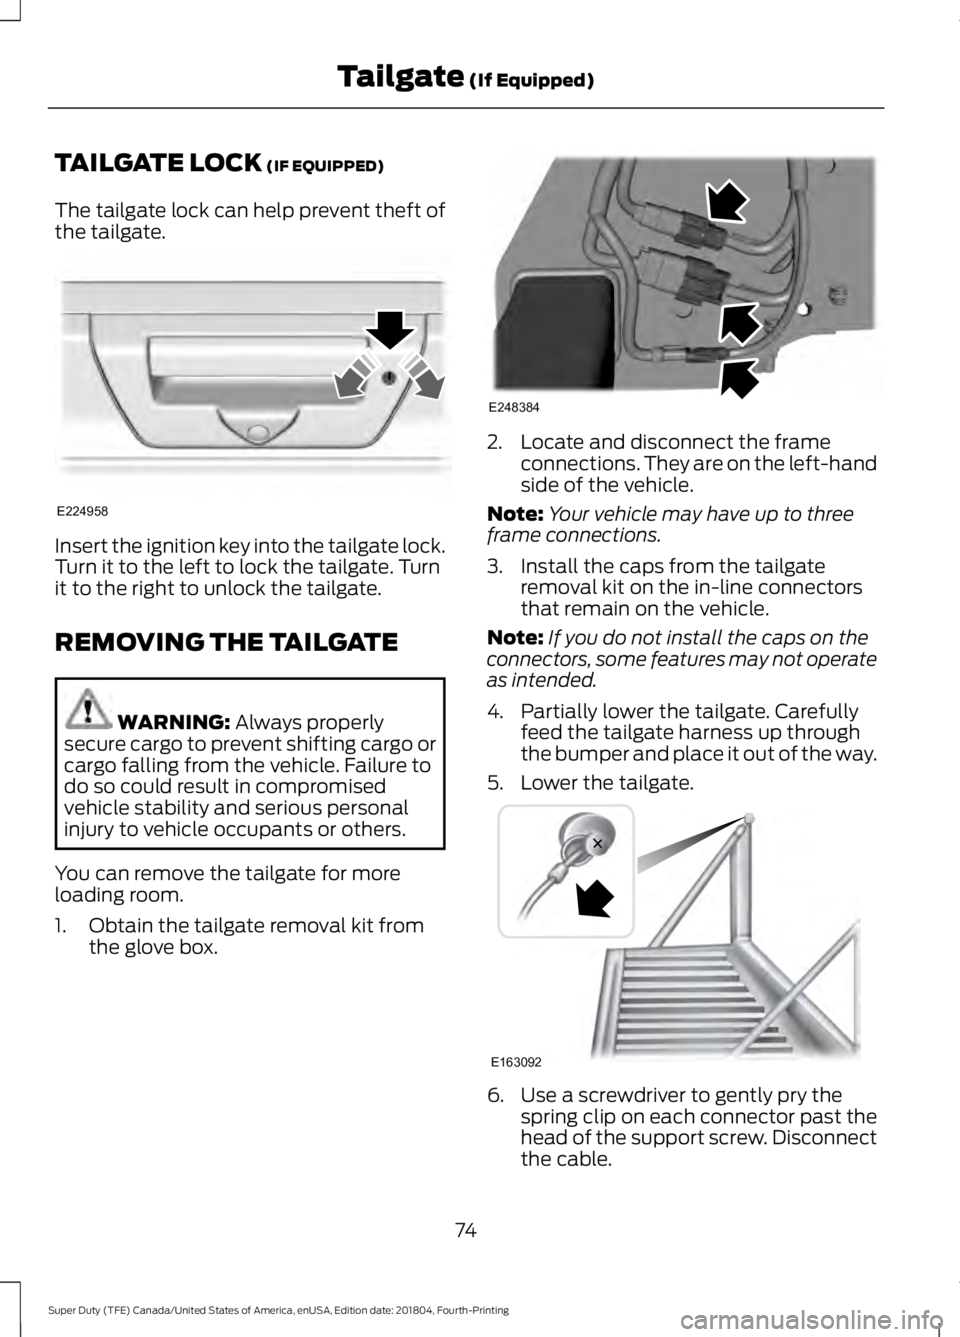
The tailgate lock can help prevent theft of
the tailgate. Insert the ignition key into the tailgate lock.
Turn it to the left to lock the tailgate. Turn
it to the right to unlock the tailgate.
REMOVING THE TAILGATE
WARNING:
Always properly
secure cargo to prevent shifting cargo or
cargo falling from the vehicle. Failure to
do so could result in compromised
vehicle stability and serious personal
injury to vehicle occupants or others.
You can remove the tailgate for more
loading room.
1. Obtain the tailgate removal kit from the glove box. 2. Locate and disconnect the frame
connections. They are on the left-hand
side of the vehicle.
Note: Your vehicle may have up to three
frame connections.
3. Install the caps from the tailgate removal kit on the in-line connectors
that remain on the vehicle.
Note: If you do not install the caps on the
connectors, some features may not operate
as intended.
4. Partially lower the tailgate. Carefully feed the tailgate harness up through
the bumper and place it out of the way.
5. Lower the tailgate. 6. Use a screwdriver to gently pry the
spring clip on each connector past the
head of the support screw. Disconnect
the cable.
74
Super Duty (TFE) Canada/United States of America, enUSA, Edition date: 201804, Fourth-Printing Tailgate
(If Equipped)E224958 E248384 E163092
Page 78 of 666

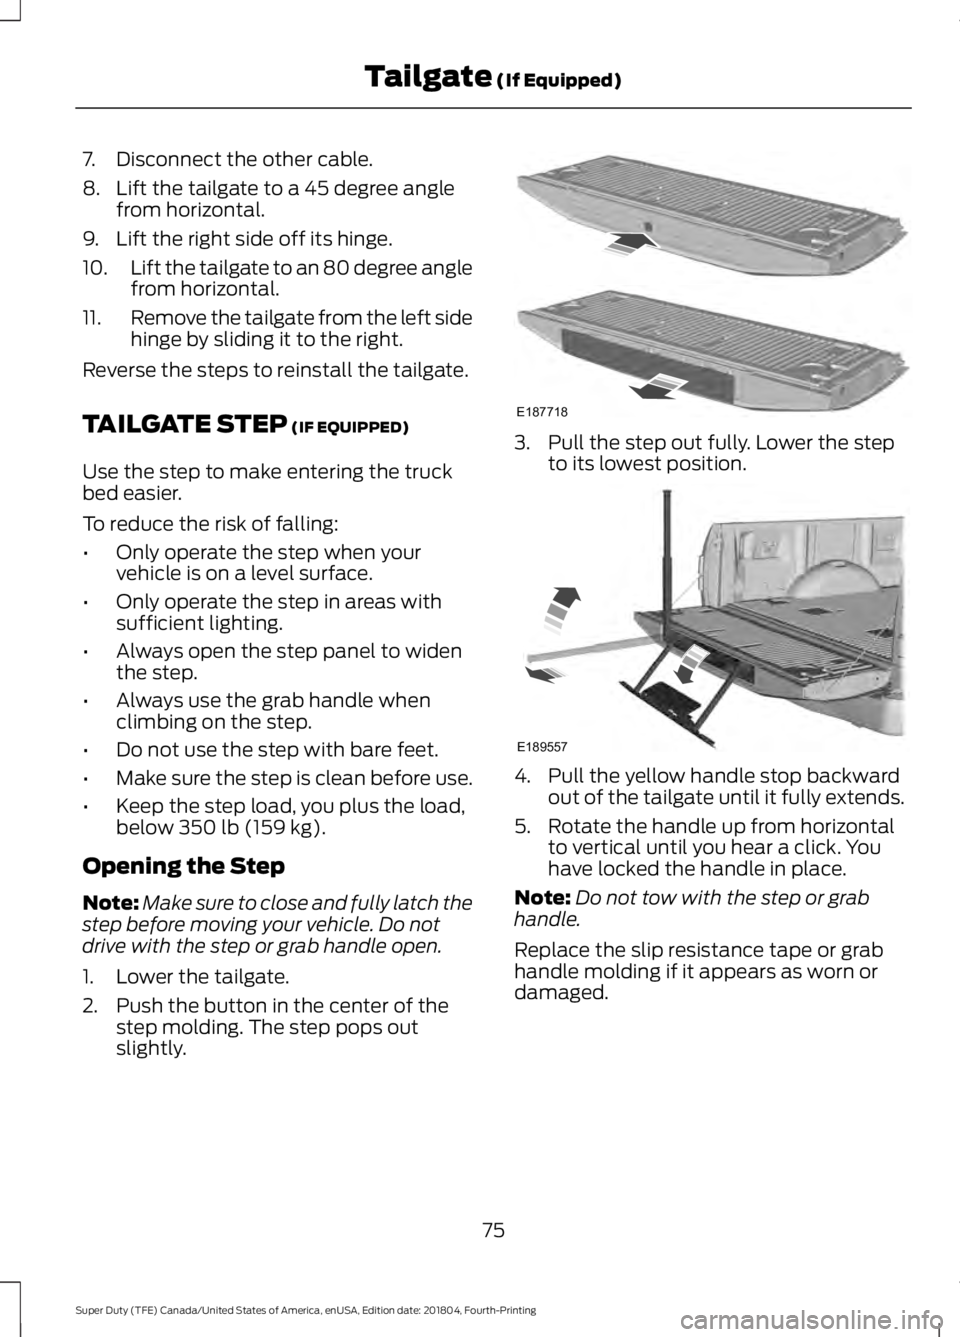
7. Disconnect the other cable.
8. Lift the tailgate to a 45 degree angle
from horizontal.
9. Lift the right side off its hinge.
10. Lift the tailgate to an 80 degree angle
from horizontal.
11. Remove the tailgate from the left side
hinge by sliding it to the right.
Reverse the steps to reinstall the tailgate.
TAILGATE STEP (IF EQUIPPED)
Use the step to make entering the truck
bed easier.
To reduce the risk of falling:
• Only operate the step when your
vehicle is on a level surface.
• Only operate the step in areas with
sufficient lighting.
• Always open the step panel to widen
the step.
• Always use the grab handle when
climbing on the step.
• Do not use the step with bare feet.
• Make sure the step is clean before use.
• Keep the step load, you plus the load,
below
350 lb (159 kg).
Opening the Step
Note: Make sure to close and fully latch the
step before moving your vehicle. Do not
drive with the step or grab handle open.
1. Lower the tailgate.
2. Push the button in the center of the step molding. The step pops out
slightly. 3. Pull the step out fully. Lower the step
to its lowest position. 4. Pull the yellow handle stop backward
out of the tailgate until it fully extends.
5. Rotate the handle up from horizontal to vertical until you hear a click. You
have locked the handle in place.
Note: Do not tow with the step or grab
handle.
Replace the slip resistance tape or grab
handle molding if it appears as worn or
damaged.
75
Super Duty (TFE) Canada/United States of America, enUSA, Edition date: 201804, Fourth-Printing Tailgate
(If Equipped)E187718 E189557
Page 79 of 666

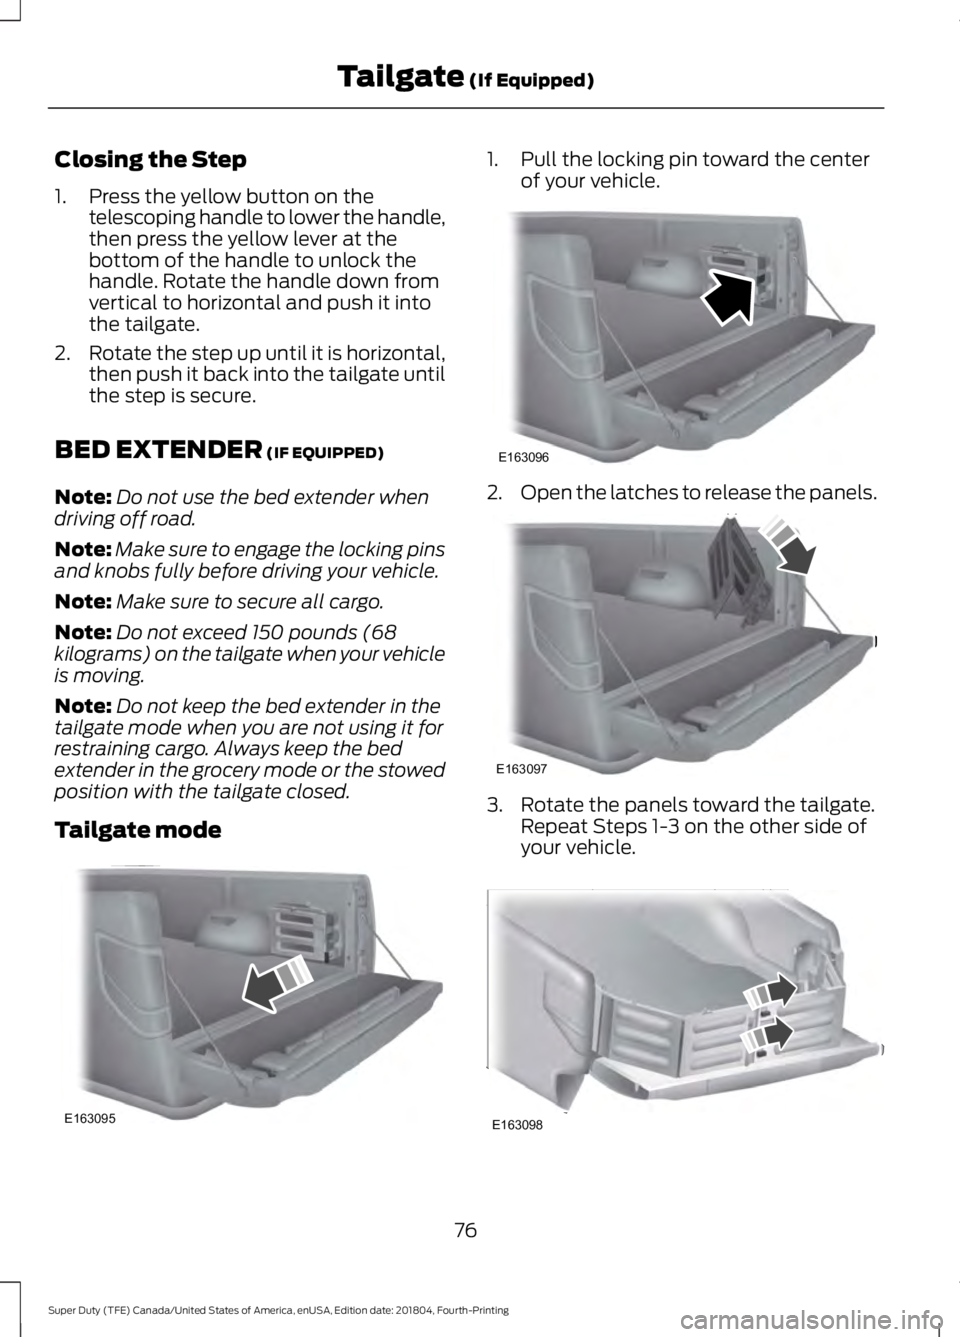
Closing the Step
1. Press the yellow button on the
telescoping handle to lower the handle,
then press the yellow lever at the
bottom of the handle to unlock the
handle. Rotate the handle down from
vertical to horizontal and push it into
the tailgate.
2. Rotate the step up until it is horizontal,
then push it back into the tailgate until
the step is secure.
BED EXTENDER (IF EQUIPPED)
Note: Do not use the bed extender when
driving off road.
Note: Make sure to engage the locking pins
and knobs fully before driving your vehicle.
Note: Make sure to secure all cargo.
Note: Do not exceed 150 pounds (68
kilograms) on the tailgate when your vehicle
is moving.
Note: Do not keep the bed extender in the
tailgate mode when you are not using it for
restraining cargo. Always keep the bed
extender in the grocery mode or the stowed
position with the tailgate closed.
Tailgate mode 1. Pull the locking pin toward the center
of your vehicle. 2.
Open the latches to release the panels. 3. Rotate the panels toward the tailgate.
Repeat Steps 1-3 on the other side of
your vehicle. 76
Super Duty (TFE) Canada/United States of America, enUSA, Edition date: 201804, Fourth-Printing Tailgate
(If Equipped)E163095 E163096 E163097 E163098
Page 80 of 666

4. Connect the two panels. Rotate both
knobs one-quarter turn clockwise to
secure the panels. 5. Make sure to insert the latch rod into
the tailgate hole. Make sure to engage
both sides of the locking pins into their
holes in the pick-up box.
Reverse the steps to store the bed
extender.
Grocery mode Follow Steps 1-4 of the tailgate mode
instructions by rotating the panels away
from the tailgate. Close the tailgate.
77
Super Duty (TFE) Canada/United States of America, enUSA, Edition date: 201804, Fourth-Printing Tailgate (If Equipped)E163099 E163100