2019 FORD F-450 brake light
[x] Cancel search: brake lightPage 12 of 666
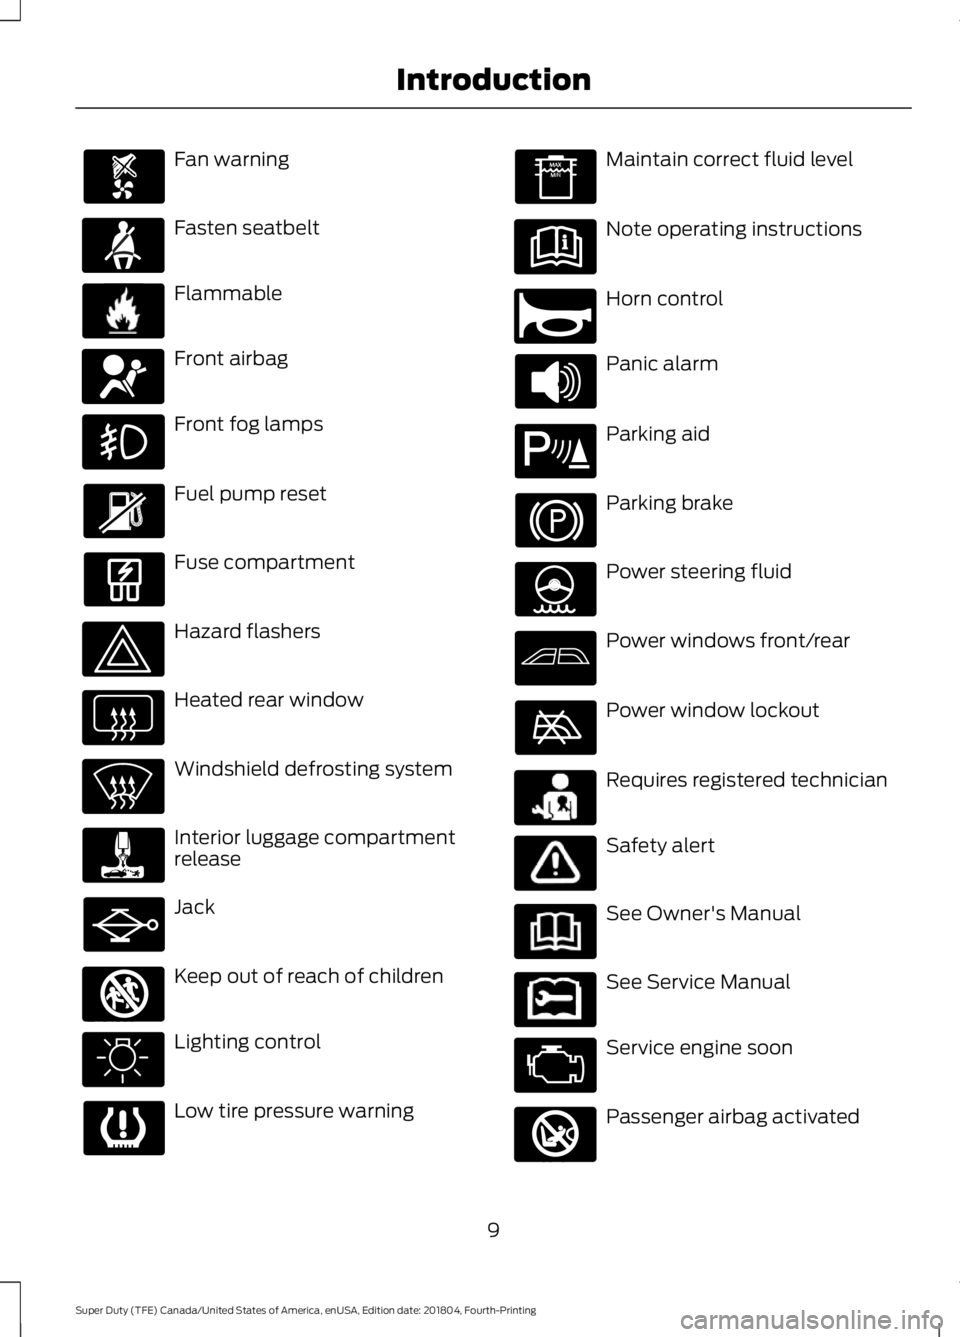
Fan warning
Fasten seatbelt
Flammable
Front airbag
Front fog lamps
Fuel pump reset
Fuse compartment
Hazard flashers
Heated rear window
Windshield defrosting system
Interior luggage compartment
release
Jack
Keep out of reach of children
Lighting control
Low tire pressure warning Maintain correct fluid level
Note operating instructions
Horn control
Panic alarm
Parking aid
Parking brake
Power steering fluid
Power windows front/rear
Power window lockout
Requires registered technician
Safety alert
See Owner's Manual
See Service Manual
Service engine soon
Passenger airbag activated
9
Super Duty (TFE) Canada/United States of America, enUSA, Edition date: 201804, Fourth-Printing Introduction E71880 E231160 E67017 E161353 E270945 E139213 E231159 E231158 E270849
Page 22 of 666
Horn.
M
Cruise control. See Cruise Control (page 241).
N
Steering wheel adjustment. See
Adjusting the Steering Wheel (page 84).
O
Parking brake release. See
Brakes (page 223).
P
Lighting control. See
Lighting Control (page 91).
Q
19
Super Duty (TFE) Canada/United States of America, enUSA, Edition date: 201804, Fourth-Printing At a Glance
Page 48 of 666
Deactivating and Activating the
Belt-Minder Feature (Driver only)
WARNING: While the system
allows you to deactivate it, this system
is designed to improve your chances of
being safely belted and surviving an
accident. We recommend you leave the
system activated for yourself and others
who may use the vehicle. To reduce the
risk of injury, do not deactivate or
activate the system while driving the
vehicle.
Note: If you are using MyKey, you cannot
disable the Belt-Minder. Also, if the
Belt-Minder has been previously disabled,
it will be re-enabled during the use of
MyKey. See
MyKey ™ (page 65).
Read Steps 1 - 4 thoroughly before
proceeding with the programming
procedure.
Before following the procedure, make sure
that:
• The parking brake is set.
• The transmission is in park (P).
• The ignition is off.
• All vehicle doors are closed.
• The driver seatbelt is unbuckled.
1. Switch the ignition on. Do not start the
engine.
2. Wait until the seatbelt warning light turns off (about one minute). You must
complete Step 3 within 30 seconds
after the seatbelt warning light turns
off.
3. Buckle then unbuckle the seatbelt three times at a moderate speed,
ending with the seatbelt in the
unbuckled state. After Step 3, the
seatbelt warning light turns on. 4. While the seatbelt warning light is on,
buckle then unbuckle the seatbelt.
After Step 4, the seatbelt warning light
flashes for confirmation.
• This will switch the feature off if it is
currently on.
• This will switch the feature on if it is
currently off.
CHILD RESTRAINT AND
SEATBELT MAINTENANCE
Inspect the vehicle seatbelts and child
safety seat systems periodically to make
sure they work properly and are not
damaged. Inspect the vehicle and child
restraint seatbelts to make sure there are
no nicks, tears or cuts. Replace if
necessary. All vehicle seatbelt assemblies,
including retractors, buckles, front seatbelt
buckle assemblies, buckle support
assemblies (slide bar-if equipped),
shoulder belt height adjusters (if
equipped), shoulder belt guide on seat
backrest (if equipped), child safety seat
LATCH and tether anchors, and attaching
hardware, should be inspected after a
crash. Read the child restraint
manufacturer's instructions for additional
inspection and maintenance information
specific to the child restraint.
We recommend that all seatbelt
assemblies in use in vehicles involved in a
crash be replaced. However, if the crash
was minor and an authorized dealer finds
that the belts do not show damage and
continue to operate properly, they do not
need to be replaced. Seatbelt assemblies
not in use during a crash should also be
inspected and replaced if either damage
or improper operation is noted.
Properly care for seatbelts. See
Vehicle
Care (page 369).
45
Super Duty (TFE) Canada/United States of America, enUSA, Edition date: 201804, Fourth-Printing Seatbelts
Page 96 of 666

Press repeatedly or press and hold until
you reach the desired level.
DAYTIME RUNNING LAMPS
WARNING: The daytime running
lamps system does not activate the rear
lamps and may not provide adequate
lighting during low visibility driving
conditions. Make sure you switch the
headlamps on, as appropriate, during all
low visibility conditions. Failure to do so
may result in a crash.
Type One - Conventional (Non-
Configurable)
The daytime running lamps turn on when:
1. Switching the ignition on.
2. The transmission is not in park (P) for vehicles with automatic transmissions,
or releasing the parking brake for
vehicles with manual transmissions.
3. The lighting control is in the off, parking
lamp or autolamps positions.
4. The headlamps are off.
Type Two - Configurable
Switch the daytime running lamps on or
off using the information display. See
Information Displays
(page 112).
The daytime running lamps turn on when:
1. The lamps are on in the information display.
2. Switching the ignition on.
3. The transmission is not in park (P) for vehicles with automatic transmissions,
or releasing the parking brake for
vehicles with manual transmissions.
4. The lighting control is in the autolamps
position.
5. The headlamps are off. The other lighting control switch positions
do not turn on the daytime running lamps.
If the daytime running lamps are off in the
information display, the lamps stay off in
all switch positions.
AUTOMATIC HIGH BEAM
CONTROL
(IF EQUIPPED)
WARNING:
The system does not
relieve you of your responsibility to drive
with due care and attention. You may
need to override the system if it does not
turn the high beams on or off.
The system turns on high beams if it is dark
enough and no other traffic is present. If it
detects an approaching vehicle ’s
headlamps or tail lamps, or street lighting
ahead, the system turns off high beams
before they can distract other road users.
Low beams remain on.
Note: The system may not operate properly
if the sensor is blocked. Keep the windshield
free from obstruction or damage.
Note: The system may not operate properly
in cold or inclement conditions. You can
switch on the high beams by overriding the
system.
Note: If the system detects a blockage, for
example bird droppings, bug splatter, snow
or ice, the system goes into low beam mode
until you clear the blockage. A message may
appear in the information display if the
camera is blocked.
Note: Using much larger tires or equipping
vehicle accessories such as snowplows can
modify your vehicle's ride height and
degrade automatic high beam control
performance.
93
Super Duty (TFE) Canada/United States of America, enUSA, Edition date: 201804, Fourth-Printing Lighting
Page 110 of 666
WARNING LAMPS AND
INDICATORS
The following warning lamps and
indicators alert you to a vehicle condition
that may become serious. Some lamps
illuminate when you start your vehicle to
make sure they work. If any lamps remain
on after starting your vehicle, refer to the
respective system warning lamp for further
information.
Note:
Some warning indicators appear in
the information display and operate the
same as a warning lamp but do not
illuminate when you start your vehicle.
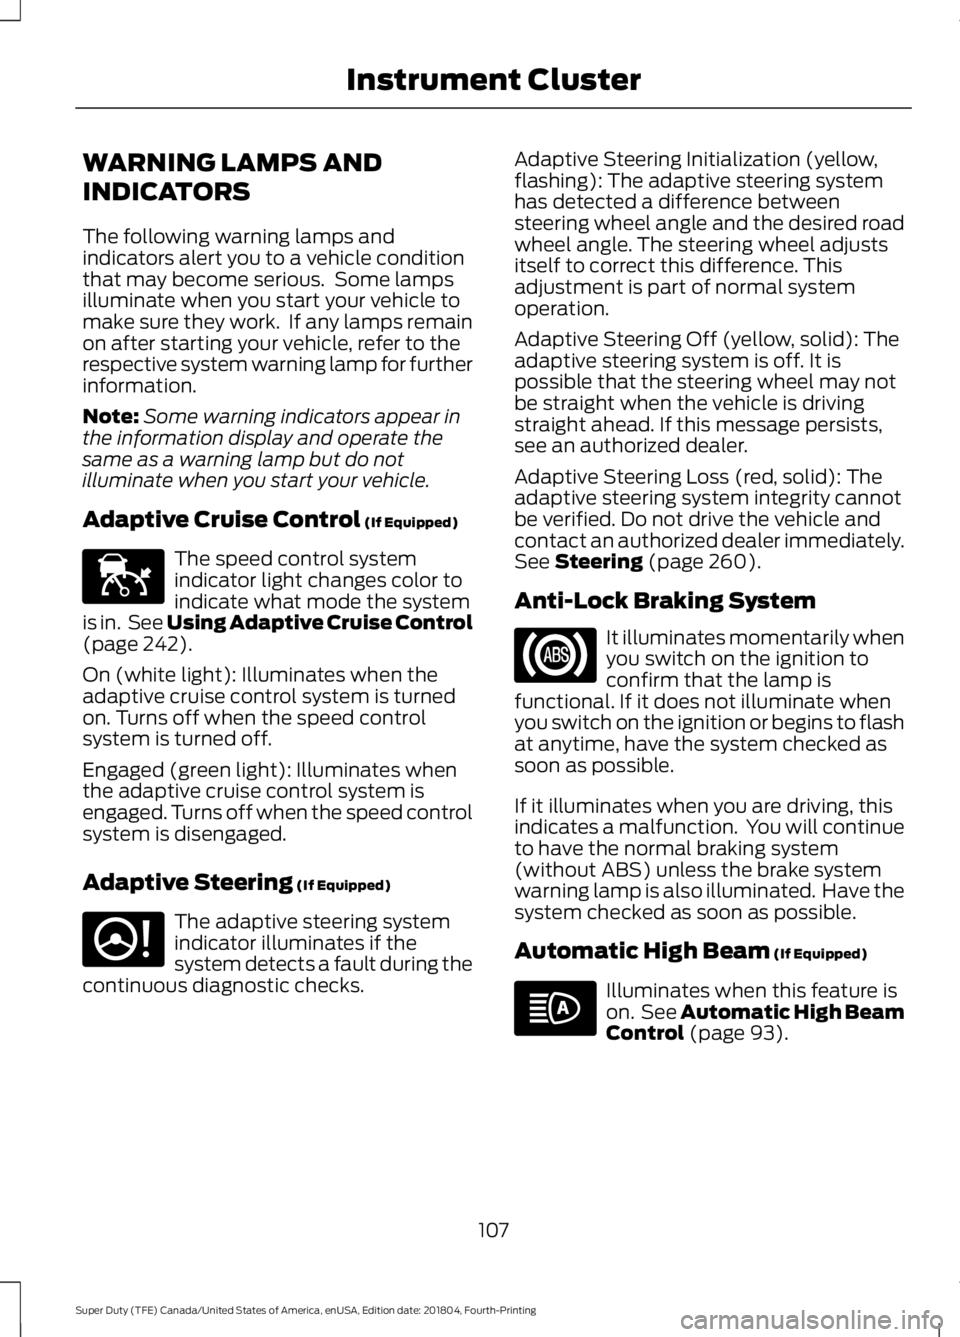
Adaptive Cruise Control (If Equipped) The speed control system
indicator light changes color to
indicate what mode the system
is in. See Using Adaptive Cruise Control
(page
242).
On (white light): Illuminates when the
adaptive cruise control system is turned
on. Turns off when the speed control
system is turned off.
Engaged (green light): Illuminates when
the adaptive cruise control system is
engaged. Turns off when the speed control
system is disengaged.
Adaptive Steering
(If Equipped) The adaptive steering system
indicator illuminates if the
system detects a fault during the
continuous diagnostic checks. Adaptive Steering Initialization (yellow,
flashing): The adaptive steering system
has detected a difference between
steering wheel angle and the desired road
wheel angle. The steering wheel adjusts
itself to correct this difference. This
adjustment is part of normal system
operation.
Adaptive Steering Off (yellow, solid): The
adaptive steering system is off. It is
possible that the steering wheel may not
be straight when the vehicle is driving
straight ahead. If this message persists,
see an authorized dealer.
Adaptive Steering Loss (red, solid): The
adaptive steering system integrity cannot
be verified. Do not drive the vehicle and
contact an authorized dealer immediately.
See
Steering (page 260).
Anti-Lock Braking System It illuminates momentarily when
you switch on the ignition to
confirm that the lamp is
functional. If it does not illuminate when
you switch on the ignition or begins to flash
at anytime, have the system checked as
soon as possible.
If it illuminates when you are driving, this
indicates a malfunction. You will continue
to have the normal braking system
(without ABS) unless the brake system
warning lamp is also illuminated. Have the
system checked as soon as possible.
Automatic High Beam
(If Equipped) Illuminates when this feature is
on. See
Automatic High Beam
Control (page 93).
107
Super Duty (TFE) Canada/United States of America, enUSA, Edition date: 201804, Fourth-Printing Instrument ClusterE144524 E223375
Page 111 of 666

Battery
If it illuminates while driving, it
indicates a malfunction. Switch
off all unnecessary electrical
equipment and have the system checked
by your authorized dealer immediately.
Brake System Warning Lamp WARNING: Driving your vehicle
with the warning lamp on is dangerous.
A significant decrease in braking
performance may occur. It may take you
longer to stop your vehicle. Have your
vehicle checked as soon as possible.
Driving extended distances with the
parking brake engaged can cause brake
failure and the risk of personal injury.
Note: Indicators vary depending on region.
This lamp is a dual function lamp and will
illuminate when:
• You apply the parking brake with the
ignition on.
• Your vehicle has a brake fault or low
brake fluid level, regardless of parking
brake position. If the lamp illuminates while you
are moving, you may have the
parking brake applied. Be sure
that the parking brake is off.
Have your vehicle checked as
soon as possible if the lamp
continues to illuminate.
Blind Spot Monitor
(If Equipped) It illuminates when you switch
this feature off or in conjunction
with a message. See Blind Spot
Information System
(page 253). Check Fuel Cap
(If Equipped) Illuminates when the fuel cap
may not be properly installed.
Continued driving with this light
on may cause the Service engine soon
warning indicator to come on.
Check 4X4
(If Equipped) Illuminates with the message
Check 4x4
when a four-wheel
drive fault is present. See Using
Four-Wheel Drive (page 212).
Cruise Control
(If Equipped) Illuminates when you switch this
feature on. See
Using Cruise
Control (page 241).
Diesel Engine Brake
(If Equipped) Illuminates when you switch the
manual engine brake on. See
General Information
(page
223). Illuminates when you switch the
automatic engine brake on. See
General Information
(page
223).
Diesel Exhaust Fluid
(If Equipped) With the key in the on position,
illuminates when the DEF is
contaminated, low or someone
has tampered with the DEF system. See
Selective Catalytic Reductant System
(page
196).
108
Super Duty (TFE) Canada/United States of America, enUSA, Edition date: 201804, Fourth-Printing Instrument Cluster E270480 E151262 E71340 E171217 E234452 E163176
Page 114 of 666

If the water in fuel indicator illuminates
when the engine is running, stop your
vehicle as soon as safely possible, shut off
the engine, then drain the fuel and water
separator. See Fuel Quality (page 185).
Allowing water to stay in the fuel system,
after the water in fuel indicator illuminates,
could result in extensive damage or failure
of the fuel injection system.
Note: Do not drain the fuel and water
separator while the engine is running. Air will
enter into the fuel system causing the engine
not to operate properly.
4X2
(If Equipped) Illuminates momentarily when
two-wheel drive high is selected.
If the light fails to display when
the ignition is turned on, or remains on,
have the system serviced immediately by
your authorized dealer.
4X4 HIGH
(If Equipped) Illuminates when four-wheel
drive high is engaged. If the light
fails to display when the ignition
is turned on, or remains on, have the
system serviced immediately by your
authorized dealer.
4X4 LOW
(If Equipped) Illuminates when four-wheel
drive low is engaged. If the light
fails to display when the ignition
is turned on, or remains on, have the
system serviced immediately by your
authorized dealer. AUDIBLE WARNINGS AND
INDICATORS
Headlamps On Warning Chime
Sounds when you remove the key from the
ignition and open the driver's door and you
have left the headlamps or parking lamps
on.
Key in Ignition Warning Chime
Sounds when you open the driver's door
and you have left the key in the ignition.
Parking Brake On Warning Chime
Sounds when you have left the parking
brake on and drive your vehicle. If the
warning chime remains on after you have
released the parking brake, have the
system checked by your authorized dealer
immediately.
111
Super Duty (TFE) Canada/United States of America, enUSA, Edition date: 201804, Fourth-Printing Instrument ClusterE181778 E181779 E181780
Page 121 of 666
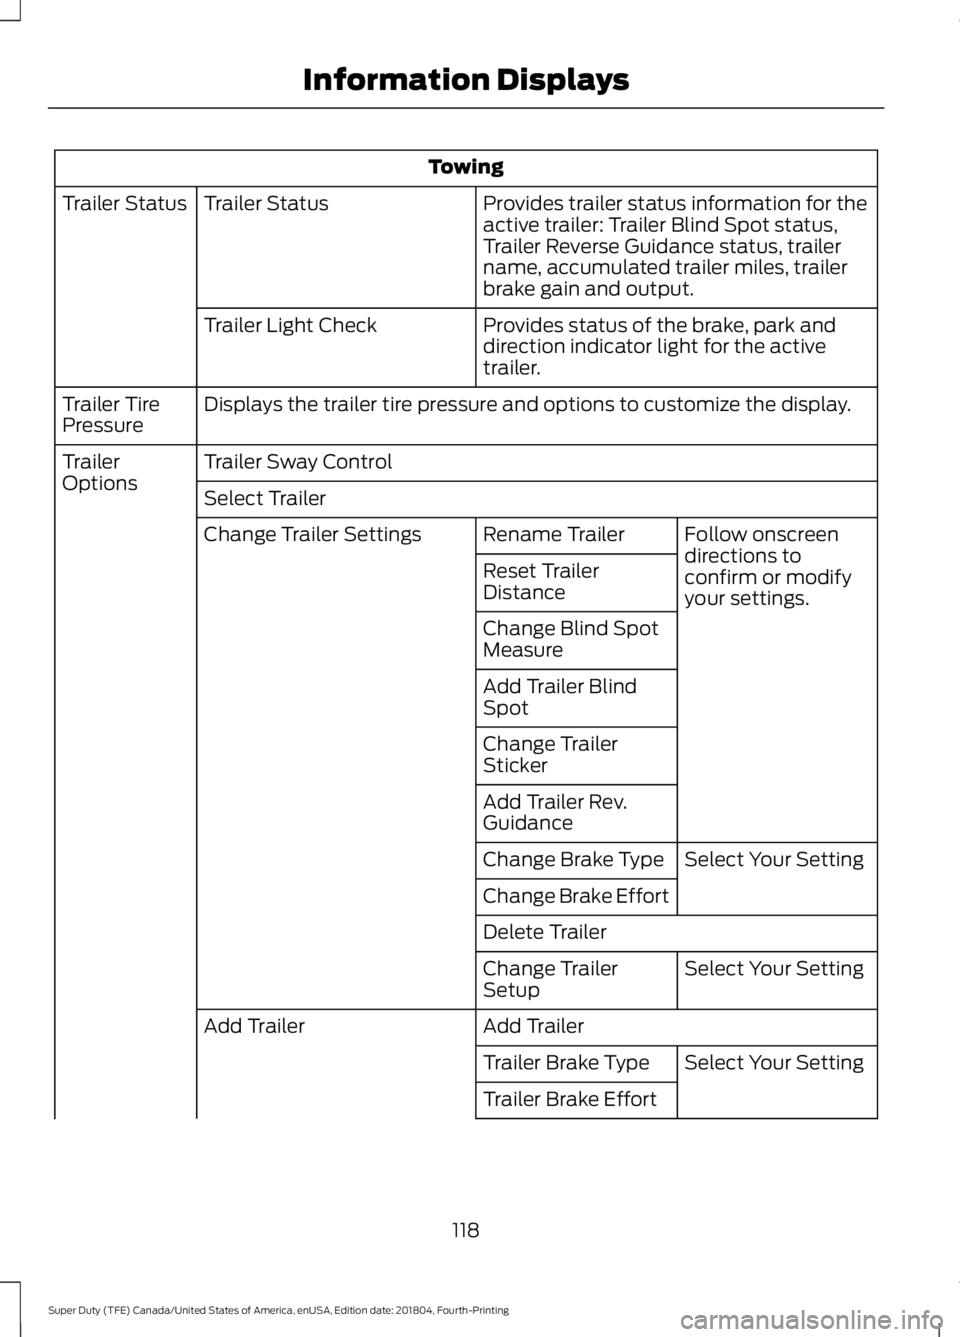
Towing
Provides trailer status information for the
active trailer: Trailer Blind Spot status,
Trailer Reverse Guidance status, trailer
name, accumulated trailer miles, trailer
brake gain and output.
Trailer Status
Trailer Status
Provides status of the brake, park and
direction indicator light for the active
trailer.
Trailer Light Check
Displays the trailer tire pressure and options to customize the display.
Trailer Tire
Pressure
Trailer Sway Control
Trailer
Options
Select Trailer
Follow onscreen
directions to
confirm or modify
your settings.
Rename Trailer
Change Trailer Settings
Reset Trailer
Distance
Change Blind Spot
Measure
Add Trailer Blind
Spot
Change Trailer
Sticker
Add Trailer Rev.
GuidanceSelect Your Setting
Change Brake Type
Change Brake Effort
Delete Trailer
Select Your Setting
Change Trailer
Setup
Add Trailer
Add Trailer
Select Your Setting
Trailer Brake Type
Trailer Brake Effort
118
Super Duty (TFE) Canada/United States of America, enUSA, Edition date: 201804, Fourth-Printing Information Displays