2019 FORD F-450 ignition
[x] Cancel search: ignitionPage 362 of 666

1.
Switch all of the lamps and the ignition
off.
2. Disconnect the electrical connector.
3. Turn the bulb holder counterclockwise
and remove it.
Note: You cannot separate the bulb from
the bulb holder.
Note: Handle a halogen headlamp bulb
carefully and keep out of children ’s reach.
Grasp the bulb only by its plastic base and
do not touch the glass. The oil from your
hand could cause the bulb to break the next
time the headlamps are operated.
LED Bulb (If Equipped)
LED lamps are not serviceable items. See
an authorized dealer if they fail. Fog Lamp Bulbs
(If Equipped) 1.
Switch all of the lamps and the ignition
off.
2. To access the bulb, reach behind the bumper.
3. Disconnect the electrical connector.
4. Turn the bulb holder counterclockwise
and remove it.
Note: You cannot separate the bulb from
the bulb holder.
Note: Handle a halogen bulb carefully and
keep out of children ’s reach. Grasp the bulb
only by its plastic base and do not touch the
glass. The oil from your hand could cause
the bulb to break the next time the fog
lamps are operated.
LED Lamps
(If Equipped)
LED lamps are not serviceable items. See
an authorized dealer if they fail.
The following lamps are LED:
• Headlamps.
• Front fog lamps.
• Rear lamps.
• High stop lamp and cargo lamp.
• License plate bulb.
359
Super Duty (TFE) Canada/United States of America, enUSA, Edition date: 201804, Fourth-Printing MaintenanceE224991 E163826
Page 363 of 666

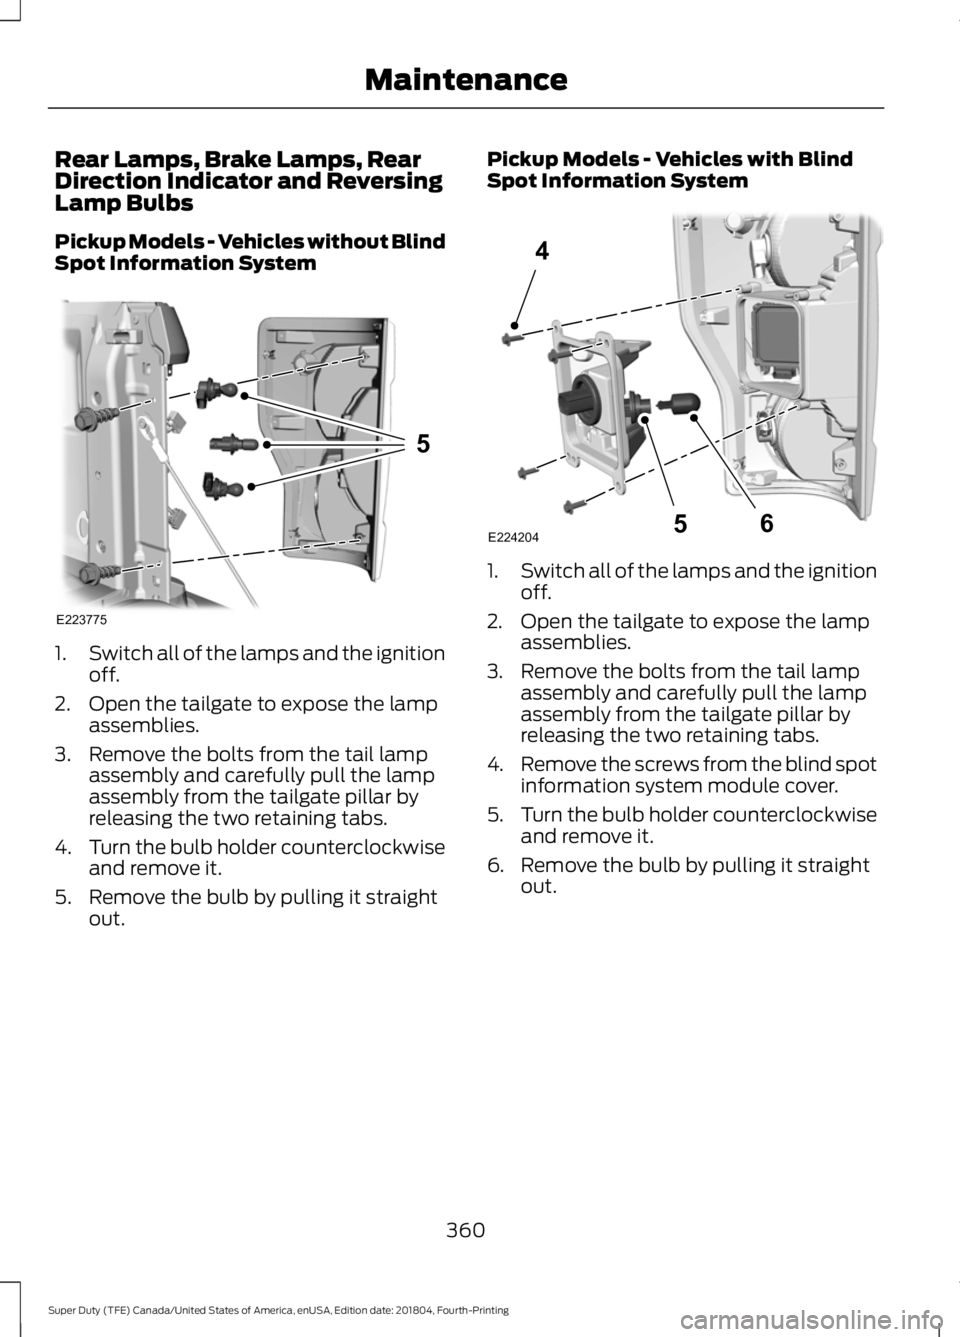
Rear Lamps, Brake Lamps, Rear
Direction Indicator and Reversing
Lamp Bulbs
Pickup Models - Vehicles without Blind
Spot Information System
1.
Switch all of the lamps and the ignition
off.
2. Open the tailgate to expose the lamp assemblies.
3. Remove the bolts from the tail lamp assembly and carefully pull the lamp
assembly from the tailgate pillar by
releasing the two retaining tabs.
4. Turn the bulb holder counterclockwise
and remove it.
5. Remove the bulb by pulling it straight out. Pickup Models - Vehicles with Blind
Spot Information System
1.
Switch all of the lamps and the ignition
off.
2. Open the tailgate to expose the lamp assemblies.
3. Remove the bolts from the tail lamp assembly and carefully pull the lamp
assembly from the tailgate pillar by
releasing the two retaining tabs.
4. Remove the screws from the blind spot
information system module cover.
5. Turn the bulb holder counterclockwise
and remove it.
6. Remove the bulb by pulling it straight out.
360
Super Duty (TFE) Canada/United States of America, enUSA, Edition date: 201804, Fourth-Printing MaintenanceE223775
5 E224204
4
65
Page 364 of 666

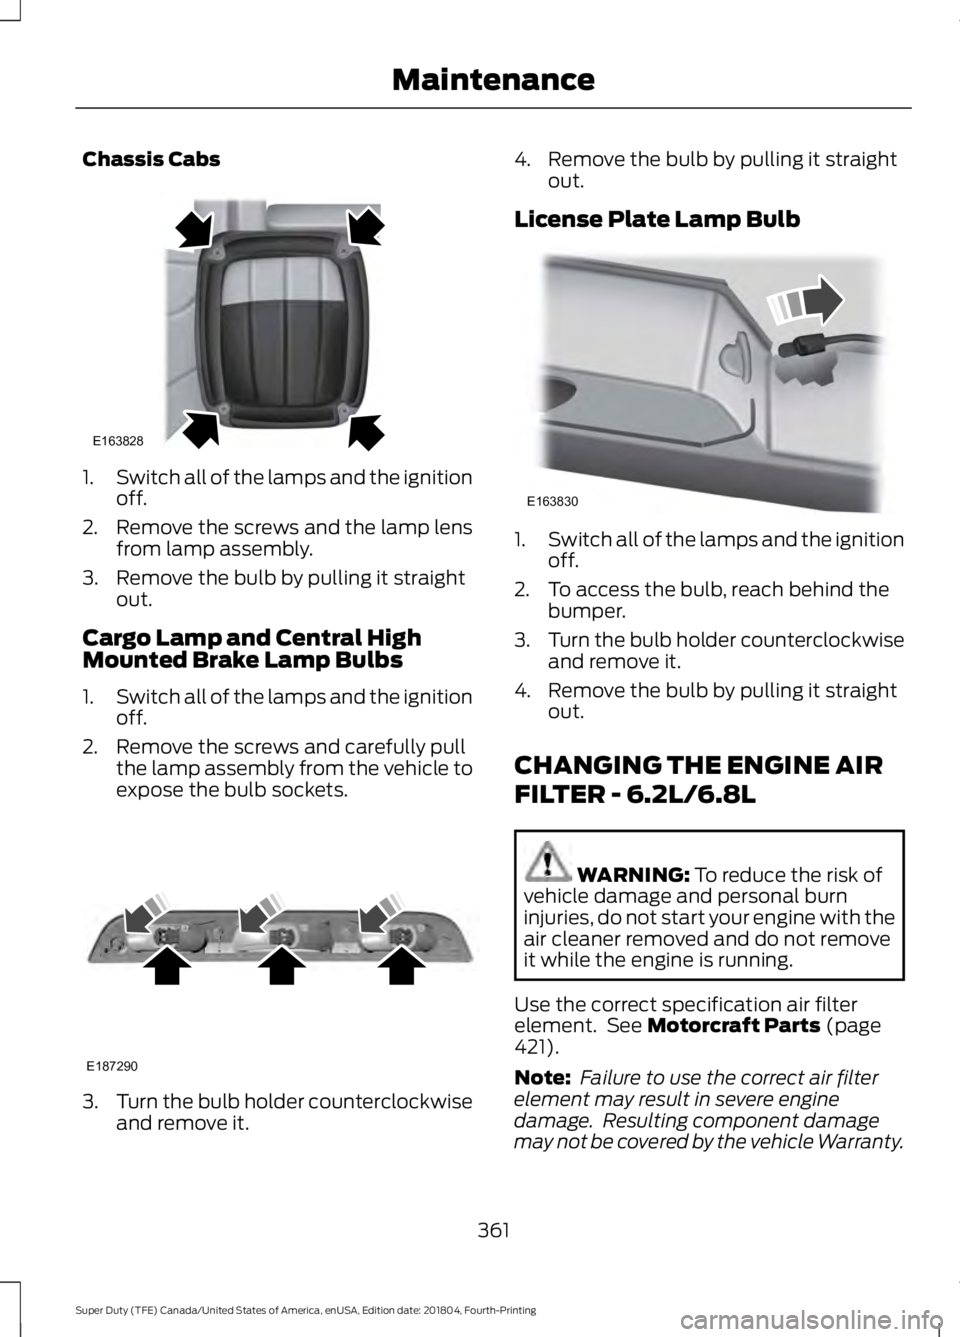
Chassis Cabs
1.
Switch all of the lamps and the ignition
off.
2. Remove the screws and the lamp lens from lamp assembly.
3. Remove the bulb by pulling it straight out.
Cargo Lamp and Central High
Mounted Brake Lamp Bulbs
1. Switch all of the lamps and the ignition
off.
2. Remove the screws and carefully pull the lamp assembly from the vehicle to
expose the bulb sockets. 3.
Turn the bulb holder counterclockwise
and remove it. 4. Remove the bulb by pulling it straight
out.
License Plate Lamp Bulb 1.
Switch all of the lamps and the ignition
off.
2. To access the bulb, reach behind the bumper.
3. Turn the bulb holder counterclockwise
and remove it.
4. Remove the bulb by pulling it straight out.
CHANGING THE ENGINE AIR
FILTER - 6.2L/6.8L WARNING: To reduce the risk of
vehicle damage and personal burn
injuries, do not start your engine with the
air cleaner removed and do not remove
it while the engine is running.
Use the correct specification air filter
element. See
Motorcraft Parts (page
421).
Note: Failure to use the correct air filter
element may result in severe engine
damage. Resulting component damage
may not be covered by the vehicle Warranty.
361
Super Duty (TFE) Canada/United States of America, enUSA, Edition date: 201804, Fourth-Printing MaintenanceE163828 E187290 E163830
Page 371 of 666

Note:
No special air purge is necessary after
filter servicing. The fuel system purges the
air in the filters.
Installation
1. Install the new filter into the filter bracket. Turn the filter clockwise to
lock it in place.
2. Reconnect the fuel lines.
3. Switch the ignition on for 30 seconds and then switch the ignition off.
Repeat this operation six times in a row
to purge any trapped air from the fuel
system.
368
Super Duty (TFE) Canada/United States of America, enUSA, Edition date: 201804, Fourth-Printing Maintenance
Page 374 of 666

WAXING
Regular waxing is necessary to protect your
car's paint from the elements. We
recommend that you wash and wax the
painted surface once or twice a year.
When washing and waxing, park your
vehicle in a shaded area out of direct
sunlight. Always wash your vehicle before
applying wax.
•
Use a quality wax that does not contain
abrasives.
• Follow the manufacturer ’s instructions
to apply and remove the wax.
• Apply a small amount of wax in a
back-and-forth motion, not in circles.
• Do not allow wax to come in contact
with any non-body (low-gloss black)
colored trim. The wax will discolor or
stain the parts over time.
•Roof racks.
• Bumpers.
• Grained door handles.
• Side moldings.
• Mirror housings.
• Windshield cowl area.
• Do not apply wax to glass areas.
• After waxing, your car's paint should
feel smooth, and be free of streaks and
smudges.
CLEANING THE ENGINE
Engines are more efficient when they are
clean because grease and dirt buildup keep
the engine warmer than normal. When washing:
•
Take care when using a power washer
to clean the engine. The high-pressure
fluid could penetrate the sealed parts
and cause damage.
• Do not spray a hot engine with cold
water to avoid cracking the engine
block or other engine components.
• Spray Motorcraft Engine Shampoo and
Degreaser on all parts that require
cleaning and pressure rinse clean. In
Canada, use Motorcraft Engine
Shampoo.
Note: If your vehicle has an engine cover
remove the cover before application of
Motorcraft Engine Shampoo and Degreaser.
Immediately rinse away any over spray.
• Never wash or rinse the engine while it
is hot or running; water in the running
engine may cause internal damage.
• Never wash or rinse any ignition coil,
spark plug wire or spark plug well, or
the area in and around these locations.
• Cover the battery, power distribution
box, and air filter assembly to prevent
water damage when cleaning the
engine.
CLEANING THE EXHAUST -
6.7L DIESEL WARNING: Failure to maintain the
functional holes, in the tailpipe section
of the exhaust, clean and free of debris
or foreign material may result in the
holes becoming blocked or plugged. Do
not modify or remove the tail-pipe
371
Super Duty (TFE) Canada/United States of America, enUSA, Edition date: 201804, Fourth-Printing Vehicle Care
Page 406 of 666

•
To reduce the chances of interference
from another vehicle, perform the
system reset procedure at least 3 ft
(1 m) away from another Ford Motor
Company vehicle undergoing the
system reset procedure at the same
time.
• Do not wait more than two minutes
between resetting each tire sensor or
the system can time-out and you have
to repeat the entire procedure on all
four wheels.
• A double horn sounds indicating the
need to repeat the procedure.
Performing the System Reset Procedure
- Single Rear Wheel
Read the entire procedure before
attempting.
1. Drive the vehicle above
20 mph
(32 km/h) for at least two minutes,
then park in a safe location where you
can easily get to all four tires and have
access to an air pump.
2. Place the ignition in the off position and
keep the key in the ignition.
3. Cycle the ignition to the on position with the engine off.
4. Turn the hazard flashers on then off three times. You must accomplish this
within 10 seconds. If you successfully
enter the reset mode, the horn sounds
once, the system indicator flashes and
a message shows in the information
display. If this does not occur, please
try again starting at step 2. If after
repeated attempts to enter the reset
mode, the horn does not sound, the
system indicator does not flash and no
message shows in the information
display, seek service from your
authorized dealer. 5. Train the tire pressure monitoring
system sensors in the tires using the
following system reset sequence
starting with the left front tire in the
following clockwise order: Left front -
driver side front tire, Right front -
passenger side front tire, Right rear -
passenger side rear tire, Left rear -
driver side rear tire.
6. Remove the valve cap from the valve stem on the left front tire. Decrease the
air pressure until the horn sounds.
Note: The single horn tone confirms that
the sensor identification code has been
learned by the module for this position. If a
double horn is heard, the reset procedure
was unsuccessful, and you must repeat it.
7. Remove the valve cap from the valve stem on the right front tire. Decrease
the air pressure until the horn sounds.
8. Remove the valve cap from the valve stem on the right rear tire. Decrease the
air pressure until the horn sounds.
9. Remove the valve cap from the valve stem on the left rear tire. Decrease the
air pressure until the horn sounds.
Training is complete after the horn
sounds for the last tire trained, driver
side rear tire, the system indicator
stops flashing, and a message shows
in the information display.
10. Turn the ignition off. If two short horn
beeps are heard, the reset procedure
was unsuccessful and you must
repeat it. If after repeating the
procedure and two short beeps are
heard when the ignition is turned to
off, seek assistance from your
authorized dealer.
403
Super Duty (TFE) Canada/United States of America, enUSA, Edition date: 201804, Fourth-Printing Wheels and Tires
Page 407 of 666

11.
Set all four tires to the recommended
air pressure as indicated on the
Safety Compliance Certification
Label, affixed to either the door hinge
pillar, door-latch post, or the door
edge that meets the door-latch post,
next to the driver seating position or
Tire Label located on the B-Pillar or
the edge of the driver door.
Performing the System Reset Procedure
- Dual Rear Wheel
For further information see
Understanding Your Tire Pressure
Monitoring System and refer to Dual
Rear Wheel, earlier in this section.
Read the entire procedure before
attempting.
1. Drive the vehicle above
20 mph
(32 km/h) for at least two minutes,
then park in a safe location where you
can easily get to all six tires and have
access to an air pump.
2. Place the ignition in the off position and
keep the key in the ignition.
3. Cycle the ignition to the on position with the engine off.
4. Turn the hazard flashers on then off three times. You must accomplish this
within 10 seconds. If you successfully
enter the reset mode, the horn sounds
once, the system indicator flashes and
a message shows in the information
display. If this does not occur, please
try again starting at step 2. If after
repeated attempts to enter the reset
mode, the horn does not sound, the
system indicator does not flash and no
message shows in the information
display, seek service from your
authorized dealer. 5. Train the tire pressure monitoring
system sensors in the tires using the
following system reset sequence
starting with the left front tire in the
following order: Left front - driver side
front tire, Right front - passenger side
front tire, Right outer rear -passenger
side rear outer tire, Right inner rear -
passenger side rear inner tire, Left outer
rear - driver side rear outer tire, Left
inner rear - driver side rear inner tire.
6. Remove the valve cap from the valve stem on the left front tire. Decrease the
air pressure until the horn sounds.
Note: The single horn chirp confirms that
the sensor identification code has been
learned by the module for this position. If a
double horn is heard, the reset procedure
was unsuccessful, and you must repeat it.
7. Remove the valve cap from the valve stem on the right front tire. Decrease
the air pressure until the horn sounds.
8. Remove the valve cap from the valve stem on the right outer rear tire.
Decrease the air pressure until the horn
sounds.
9. Remove the valve cap from the valve stem on the right inner rear tire.
Decrease the air pressure until the horn
sounds.
10. Remove the valve cap from the valve
stem on the left outer rear tire.
Decrease the air pressure until the
horn sounds.
11. Remove the valve cap from the valve
stem on the left inner rear tire.
Decrease the air pressure until the
horn sounds. Training is complete
after the horn sounds for the last tire
trained, the system indicator stops
flashing, and a message is shown in
the information display.
404
Super Duty (TFE) Canada/United States of America, enUSA, Edition date: 201804, Fourth-Printing Wheels and Tires
Page 408 of 666

12.
Turn the ignition off. If two short horn
beeps are heard, the reset procedure
was unsuccessful and you must
repeat it. If after repeating the
procedure and two short beeps are
heard when the ignition is turned to
off, seek assistance from your
authorized dealer.
13. Set all six tires to the recommended air pressure as indicated on the
Safety Compliance Certification
Label, affixed to either the door hinge
pillar, door-latch post, or the door
edge that meets the door-latch post,
next to the driver seating position or
Tire Label located on the B-Pillar or
the edge of the driver door.
Trailer Tire Pressure Monitoring
System (If Equipped)
Note: Additional equipment may be
required for your vehicle to support trailer
tire pressure monitoring. See your authorized
dealer for more information.
Note: The trailer tire pressure monitoring
system is not a substitute for proper tire
maintenance. It is your responsibility to
maintain correct tire pressures at all times.
Note: If a trailer tire is repaired, replaced or
broken down for service, the screw and valve
on the trailer tire pressure sensor should be
replaced. See your authorized dealer for
details. The trailer tire pressure monitoring system
is an added safety feature that allows you
to view your trailer tire pressures through
the information display.
See General
Information (page 112). Tire pressure
sensors are mounted into each tire on your
trailer. The sensors send a message to your
vehicle indicating the current trailer tire
pressure.
If the trailer tire pressure monitoring
system detects that a tire is low, a warning
message appears in the information
display. The trailer tire pressure status
screen in the information display highlights
the tire with a low pressure.
The main function of the trailer tire
pressure monitoring system is to warn you
when your trailer tires need air. It can also
warn you in the event the system is no
longer capable of functioning as intended.
See
Information Messages (page 128).
When a Temporary Spare or New Tire
is Installed
If you have replaced a trailer tire with a new
or spare tire, a warning message appears
and pressure readings are no longer
displayed for that tire.
To restore the full function of the trailer
tire pressure monitoring system:
• Have the damaged wheel and tire
assembly repaired and remounted to
your trailer.
• Install the trailer tire pressure
monitoring sensor into the new wheel
and tire assembly.
• Perform the trailer tire pressure
monitoring system reset procedure.
Trailer Tire Pressure Monitoring
System Reset Procedure
Note: You need to perform the tire pressure
monitoring system reset procedure after
each tire rotation, or when a new trailer tire
pressure sensor is installed into a trailer tire.
405
Super Duty (TFE) Canada/United States of America, enUSA, Edition date: 201804, Fourth-Printing Wheels and TiresE235807