2019 FORD F-350 ECU
[x] Cancel search: ECUPage 414 of 666

Rear
Note:
Jack at the specified locations to
avoid damage to the vehicle.
Jacking the Vehicle 1. Insert the hooked end of the jack
handle into the jack and turn the
handle clockwise until the wheel is
completely off the ground and high
enough to install the spare tire.
2. Remove the lug nuts with the lug wrench.
3. Replace the flat tire with the spare, making sure the valve stem of the
spare is facing outward when replacing
a front wheel. For the rear wheel
position on vehicles with single rear
wheel fitments, install the spare with
the valve stem facing outward. For
vehicles with dual rear wheels, the
valve stem of the spare must face
outward when replacing an inner
wheel, but must face inward when
replacing an outboard wheel.
4. Reinstall the lug nuts until the wheel is
snug against the hub. Do not fully
tighten the lug nuts until the vehicle
has been lowered.
5. Lower the wheel by turning the jack handle counterclockwise. 6. Remove the jack and fully tighten the
lug nuts in the order shown. See
Technical Specifications (page 417).
7. Safely stow the flat tire. See Stowing the flat or spare tire if the vehicle is
equipped with a spare tire carrier.
8. Stow the jack, jack handle and lug wrench. Make sure the jack is securely
fastened so it does not rattle when
driving.
9. Unblock the wheels. 8-lug nut torque sequence
10-lug nut torque sequence
411
Super Duty (TFE) Canada/United States of America, enUSA, Edition date: 201804, Fourth-Printing Wheels and TiresE162811 E161441
13
4
27
6
5
8 1
2
3
4
5
6
7 8
9
10
E169375
Page 417 of 666

Jacking the Vehicle
1. Insert the jack handle into the pump
linkage.
2. Use an up-and-down motion with the jack handle to raise the wheel
completely off the ground.
Note: Hydraulic jacks are equipped with a
pressure relief valve that prevents lifting
loads which exceed the jack's rated
capacity.
3. Remove the lug nuts with the lug wrench.
4. Replace the flat tire with the spare, making sure the valve stem of the
spare is facing outward when replacing
a front wheel. For the rear wheel
positions, the valve stem of the spare
must face outward when replacing an
inner wheel, but must face inward
when replacing an outboard wheel.
5. Reinstall the lug nuts until the wheel is
snug against the hub. Do not fully
tighten the lug nuts until the vehicle
has been lowered.
6. Lower the wheel by slowly turning the release valve counterclockwise.
Opening the release valve slowly
provides a more controlled rate of
descent. 7. Remove the jack and fully tighten the
lug nuts in the order shown. See
Technical Specifications (page 417).
8. Stow the flat tire. See Stowing the flat or spare tire if the vehicle is equipped
with a spare tire carrier.
9. Stow the jack, jack handle and lug wrench. Make sure the jack is securely
fastened so it does not rattle when
driving.
10. Unblock the wheels. 8-lug nut torque sequence
10-lug nut torque sequence
414
Super Duty (TFE) Canada/United States of America, enUSA, Edition date: 201804, Fourth-Printing Wheels and TiresE162819 E161441
13
4
27
6
5
8 1
2
3
4
5
6
7 8
9
10
E169375
Page 420 of 666

TECHNICAL SPECIFICATIONS
Wheel Lug Nut Torque Specifications
WARNING: When a wheel is installed, always remove any corrosion, dirt or foreign
materials present on the mounting surfaces of the wheel or the surface of the wheel
hub, brake drum or brake disc that contacts the wheel. Make sure that any fasteners
that attach the rotor to the hub are secured so they do not interfere with the mounting
surfaces of the wheel. Installing wheels without correct metal-to-metal contact at the
wheel mounting surfaces can cause the wheel nuts to loosen and the wheel to come
off while the vehicle is in motion, resulting in loss of control. lb.ft (Nm)
Bolt size
165 lb.ft (224 Nm)
M14 x 1.5
* Torque specifications are for nut and bolt threads free of dirt and rust. Use only Ford
recommended replacement fasteners.
On vehicles equipped with single rear wheels, retighten the lug nuts to the specified torque
at 100 miles (160 kilometers) after any wheel disturbance (such as tire rotation, changing
a flat tire, wheel removal).
On vehicles equipped with dual rear wheels, retighten the wheel lug nuts to the specified
torque at 100 miles (160 kilometers), and again at 500 miles (800 kilometers) of new
vehicle operation and after any wheel disturbance (such as tire rotation, changing a flat
tire, wheel removal).
It is important to follow the proper wheel mounting and lug nut torque procedures.
On all two-piece flat wheel nuts, apply one drop of motor oil between the flat washer
and the nut. Do not apply motor oil to the wheel nut threads or the wheel stud threads. 417
Super Duty (TFE) Canada/United States of America, enUSA, Edition date: 201804, Fourth-Printing Wheels and TiresE161443
Page 474 of 666
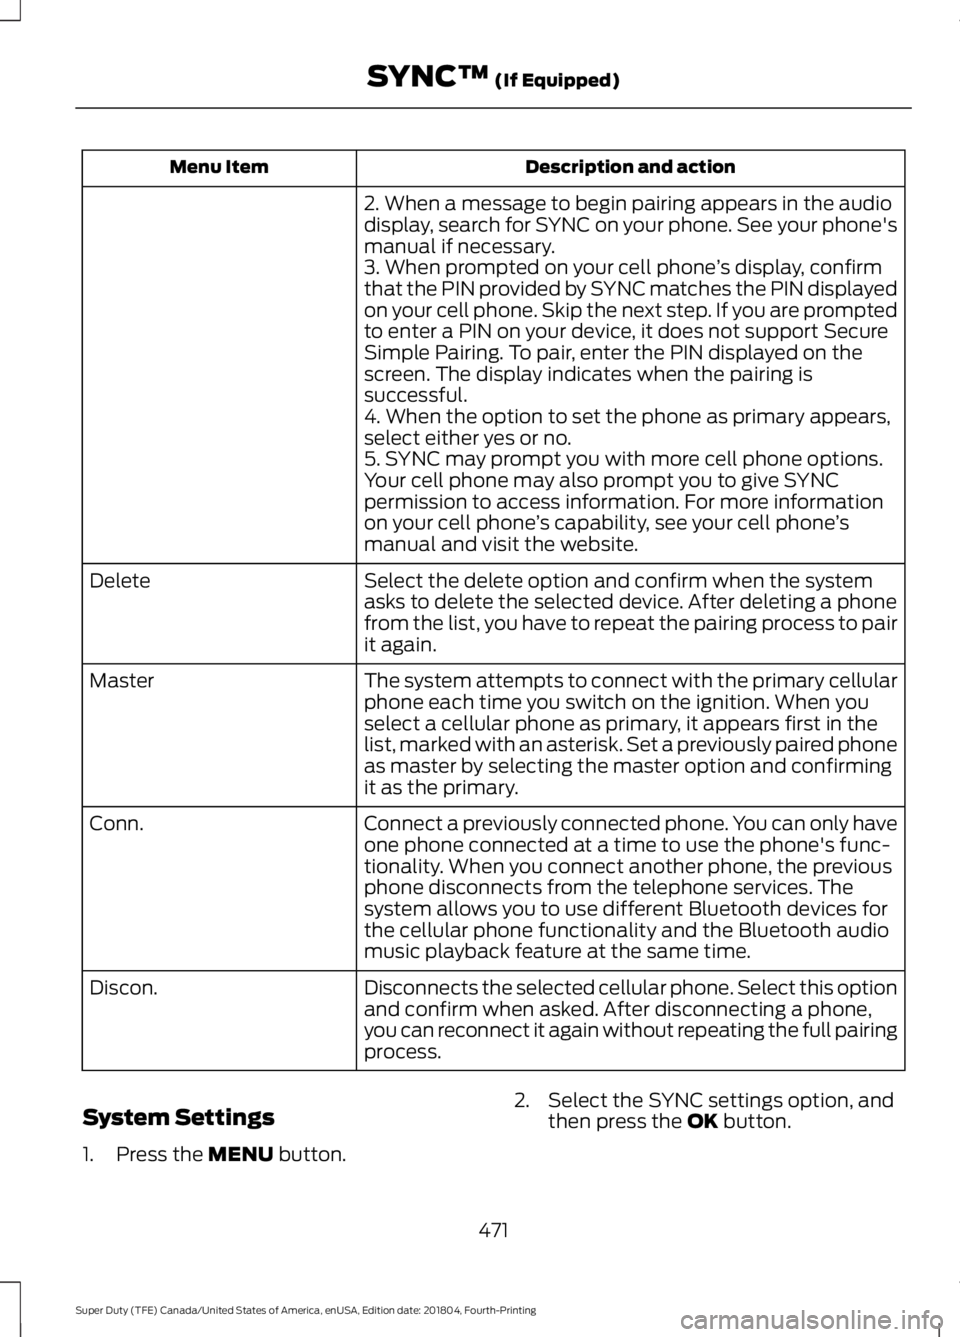
Description and action
Menu Item
2. When a message to begin pairing appears in the audio
display, search for SYNC on your phone. See your phone's
manual if necessary.
3. When prompted on your cell phone ’s display, confirm
that the PIN provided by SYNC matches the PIN displayed
on your cell phone. Skip the next step. If you are prompted
to enter a PIN on your device, it does not support Secure
Simple Pairing. To pair, enter the PIN displayed on the
screen. The display indicates when the pairing is
successful.
4. When the option to set the phone as primary appears,
select either yes or no.
5. SYNC may prompt you with more cell phone options.
Your cell phone may also prompt you to give SYNC
permission to access information. For more information
on your cell phone ’s capability, see your cell phone ’s
manual and visit the website.
Select the delete option and confirm when the system
asks to delete the selected device. After deleting a phone
from the list, you have to repeat the pairing process to pair
it again.
Delete
The system attempts to connect with the primary cellular
phone each time you switch on the ignition. When you
select a cellular phone as primary, it appears first in the
list, marked with an asterisk. Set a previously paired phone
as master by selecting the master option and confirming
it as the primary.
Master
Connect a previously connected phone. You can only have
one phone connected at a time to use the phone's func-
tionality. When you connect another phone, the previous
phone disconnects from the telephone services. The
system allows you to use different Bluetooth devices for
the cellular phone functionality and the Bluetooth audio
music playback feature at the same time.
Conn.
Disconnects the selected cellular phone. Select this option
and confirm when asked. After disconnecting a phone,
you can reconnect it again without repeating the full pairing
process.
Discon.
System Settings
1. Press the MENU button. 2. Select the SYNC settings option, and
then press the
OK button.
471
Super Duty (TFE) Canada/United States of America, enUSA, Edition date: 201804, Fourth-Printing SYNC™
(If Equipped)
Page 476 of 666
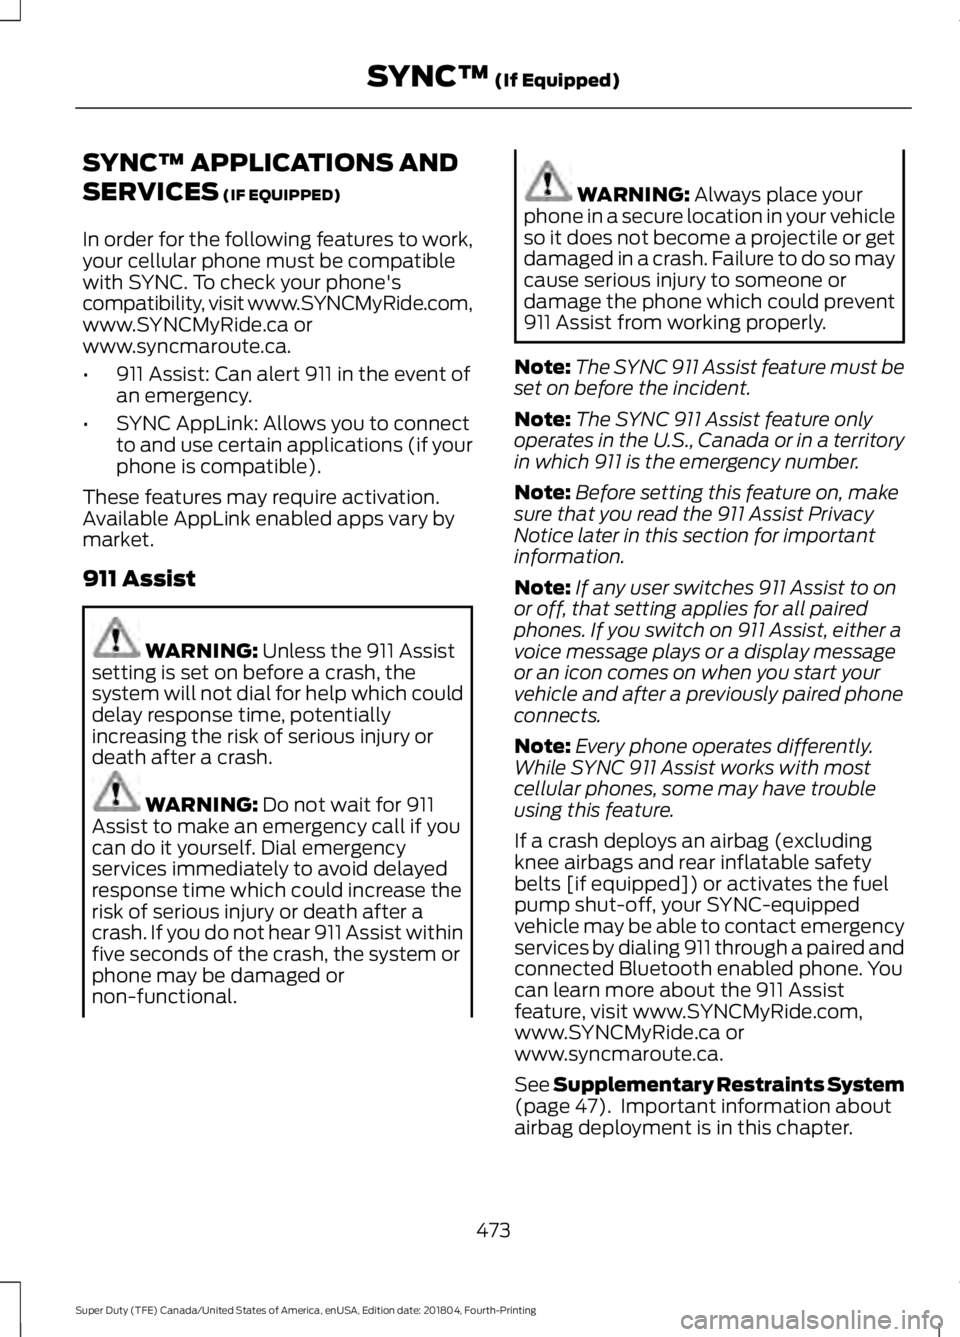
SYNC™ APPLICATIONS AND
SERVICES (IF EQUIPPED)
In order for the following features to work,
your cellular phone must be compatible
with SYNC. To check your phone's
compatibility, visit www.SYNCMyRide.com,
www.SYNCMyRide.ca or
www.syncmaroute.ca.
• 911 Assist: Can alert 911 in the event of
an emergency.
• SYNC AppLink: Allows you to connect
to and use certain applications (if your
phone is compatible).
These features may require activation.
Available AppLink enabled apps vary by
market.
911 Assist WARNING:
Unless the 911 Assist
setting is set on before a crash, the
system will not dial for help which could
delay response time, potentially
increasing the risk of serious injury or
death after a crash. WARNING:
Do not wait for 911
Assist to make an emergency call if you
can do it yourself. Dial emergency
services immediately to avoid delayed
response time which could increase the
risk of serious injury or death after a
crash. If you do not hear 911 Assist within
five seconds of the crash, the system or
phone may be damaged or
non-functional. WARNING:
Always place your
phone in a secure location in your vehicle
so it does not become a projectile or get
damaged in a crash. Failure to do so may
cause serious injury to someone or
damage the phone which could prevent
911 Assist from working properly.
Note: The SYNC 911 Assist feature must be
set on before the incident.
Note: The SYNC 911 Assist feature only
operates in the U.S., Canada or in a territory
in which 911 is the emergency number.
Note: Before setting this feature on, make
sure that you read the 911 Assist Privacy
Notice later in this section for important
information.
Note: If any user switches 911 Assist to on
or off, that setting applies for all paired
phones. If you switch on 911 Assist, either a
voice message plays or a display message
or an icon comes on when you start your
vehicle and after a previously paired phone
connects.
Note: Every phone operates differently.
While SYNC 911 Assist works with most
cellular phones, some may have trouble
using this feature.
If a crash deploys an airbag (excluding
knee airbags and rear inflatable safety
belts [if equipped]) or activates the fuel
pump shut-off, your SYNC-equipped
vehicle may be able to contact emergency
services by dialing 911 through a paired and
connected Bluetooth enabled phone. You
can learn more about the 911 Assist
feature, visit www.SYNCMyRide.com,
www.SYNCMyRide.ca or
www.syncmaroute.ca.
See
Supplementary Restraints System
(page 47). Important information about
airbag deployment is in this chapter.
473
Super Duty (TFE) Canada/United States of America, enUSA, Edition date: 201804, Fourth-Printing SYNC™
(If Equipped)
Page 491 of 666
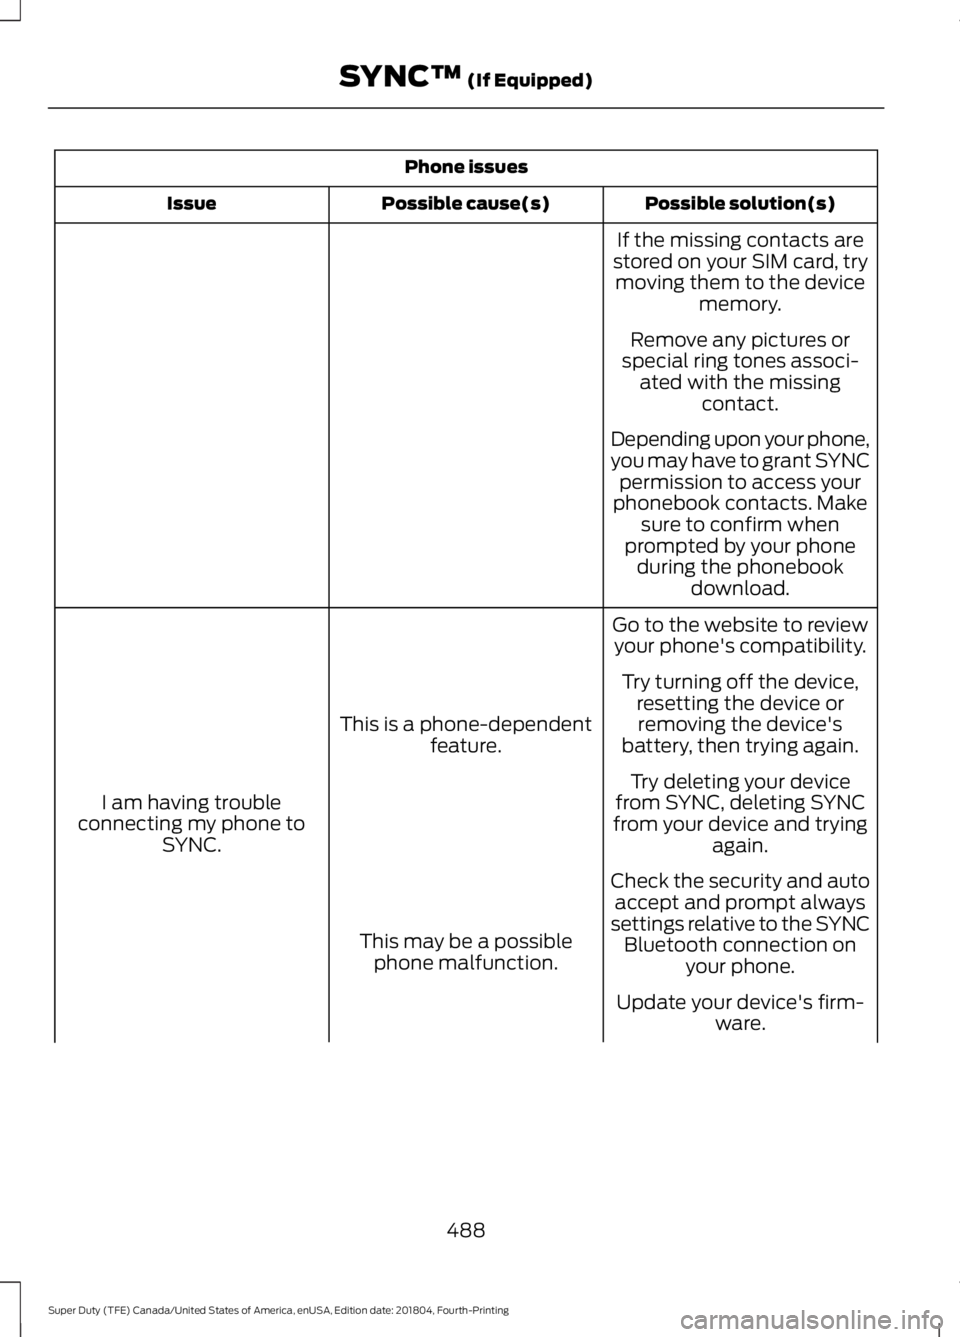
Phone issues
Possible solution(s)
Possible cause(s)
Issue
If the missing contacts are
stored on your SIM card, try moving them to the device memory.
Remove any pictures or
special ring tones associ- ated with the missing contact.
Depending upon your phone,
you may have to grant SYNC permission to access your
phonebook contacts. Make sure to confirm when
prompted by your phone during the phonebook download.
Go to the website to review your phone's compatibility.
This is a phone-dependent feature.
I am having trouble
connecting my phone to SYNC. Try turning off the device,
resetting the device orremoving the device's
battery, then trying again.
Try deleting your device
from SYNC, deleting SYNC
from your device and trying again.
Check the security and auto accept and prompt always
settings relative to the SYNC Bluetooth connection on your phone.
This may be a possible
phone malfunction.
Update your device's firm-ware.
488
Super Duty (TFE) Canada/United States of America, enUSA, Edition date: 201804, Fourth-Printing SYNC™ (If Equipped)
Page 492 of 666
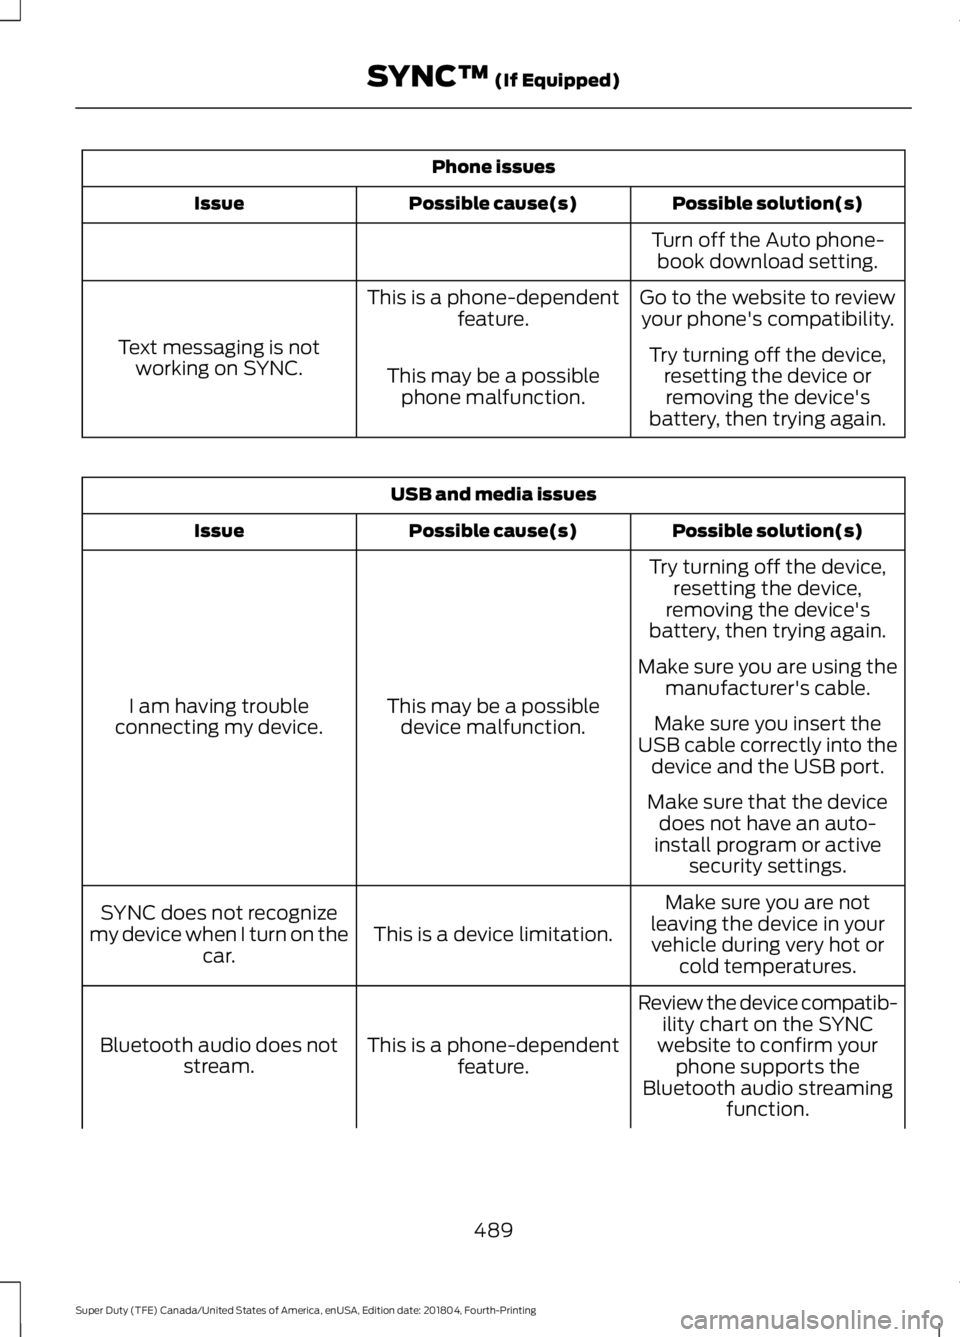
Phone issues
Possible solution(s)
Possible cause(s)
Issue
Turn off the Auto phone-book download setting.
Go to the website to review your phone's compatibility.
This is a phone-dependent
feature.
Text messaging is not working on SYNC. Try turning off the device,
resetting the device orremoving the device's
battery, then trying again.
This may be a possible
phone malfunction. USB and media issues
Possible solution(s)
Possible cause(s)
Issue
Try turning off the device,resetting the device,
removing the device's
battery, then trying again.
This may be a possible device malfunction.
I am having trouble
connecting my device. Make sure you are using the
manufacturer's cable.
Make sure you insert the
USB cable correctly into the device and the USB port.
Make sure that the device does not have an auto-
install program or active security settings.
Make sure you are not
leaving the device in your vehicle during very hot or cold temperatures.
This is a device limitation.
SYNC does not recognize
my device when I turn on the car.
Review the device compatib-ility chart on the SYNC
website to confirm your phone supports the
Bluetooth audio streaming function.
This is a phone-dependent
feature.
Bluetooth audio does not
stream.
489
Super Duty (TFE) Canada/United States of America, enUSA, Edition date: 201804, Fourth-Printing SYNC™ (If Equipped)
Page 504 of 666
PHONE ACCEPT: Press to answer a call
or switch between calls.
PHONE REJECT:
Press to end a call or
reject an incoming call.
Note: On some models, SEEK NEXT
may
be combined with PHONE REJECT and
SEEK PREVIOUS may be combined with
PHONE ACCEPT.
M:
Touch the control repeatedly to switch
between media sources (modes).
See
Steering Wheel (page 84).
Using the Controls on the Bezel
Depending on your vehicle and option
package, you may also have these controls
on your instrument panel:
• Power:
Switch the audio system on
and off.
• VOL:
Control the volume of playing
audio.
• Seek
and Tune: Use as you normally
would in audio modes.
• Eject:
Eject a CD from the audio
system.
• SOURCE
or MEDIA: Press repeatedly
to advance through available media
modes.
• SOUND:
Press to access the Sound
menu where you can adjust sound and
other audio settings.
• 1-6:
Press and hold to store or press to
select an AM, FM or SIRIUS memory
preset. See
Audio System (page 444).
• DISP:
Switch the display on or off. You
can also touch the screen to switch the
display back on.
• Temperature, fan and climate
control buttons:
Control the
temperature, fan speed or settings of
the climate control system. See
Climate Control
(page 145). 911 Assist
(If Equipped) WARNING:
Unless the 911 Assist
setting is set on before a crash, the
system will not dial for help which could
delay response time, potentially
increasing the risk of serious injury or
death after a crash. WARNING:
Do not wait for 911
Assist to make an emergency call if you
can do it yourself. Dial emergency
services immediately to avoid delayed
response time which could increase the
risk of serious injury or death after a
crash. If you do not hear 911 Assist within
five seconds of the crash, the system or
phone may be damaged or
non-functional. WARNING:
Always place your
phone in a secure location in your vehicle
so it does not become a projectile or get
damaged in a crash. Failure to do so may
cause serious injury to someone or
damage the phone which could prevent
911 Assist from working properly.
Note: The SYNC 911 Assist feature must be
set on before the incident.
Note: The SYNC 911 Assist feature only
operates in the U.S., Canada or in a territory
in which 911 is the emergency number.
Note: Before setting this feature on, make
sure that you read the 911 Assist Privacy
Notice later in this section for important
information.
Note: If any user sets 911 Assist to on or off,
that setting applies for all paired phones. If
911 Assist is switched off and the phone is
connected to SYNC, an icon displays on the
status bar.
501
Super Duty (TFE) Canada/United States of America, enUSA, Edition date: 201804, Fourth-Printing SYNC™ 3
(If Equipped)