2019 FORD EXPLORER heating
[x] Cancel search: heatingPage 83 of 571

Press and release to end a phone
call.
CRUISE CONTROL
Type One See Using Cruise Control (page 217).
Type Two See
Using Adaptive Cruise Control
(page 218). INFORMATION DISPLAY
CONTROL
See
Information Displays (page 104).
HEATED STEERING WHEEL
(IF
EQUIPPED)
Switch the heated steering wheel on and
off using the touchscreen. Touch the button to switch the
heated steering wheel on and
off.
Note: You can use the heated steering
wheel only when the engine is running.
Note: The system uses a sensor and is
designed to control the temperature of the
steering wheel and to prevent it from
overheating.
Note: In warm temperatures, the steering
wheel quickly reaches its maximum
temperature and the system reduces the
current to the heating element. This could
cause you to think that the system has
stopped working but it has not. This is
normal.
80
Explorer (TUB) Canada/United States of America, enUSA, Edition date: 201807, Second-Printing Steering WheelE265040 E200995 E200996 E203207
Page 102 of 571

Engine Coolant Temperature
Gauge
Shows the temperature of the engine
coolant. At normal operating temperature,
the needle remains in the center section.
If the needle enters the red section, the
engine is overheating. Stop the engine,
switch the ignition off and determine the
cause once the engine has cooled down.
Note:
Do not restart the engine until the
cause of the overheating has been resolved. WARNING: Do not remove the
coolant reservoir cap when the cooling
system is hot. Wait 10 minutes for the
cooling system to cool down. Cover the
coolant reservoir cap with a thick cloth
to prevent the possibility of scalding and
slowly remove the cap. Failure to follow
this instruction could result in personal
injury.
Fuel Gauge
The fuel gauge indicates about how much
fuel is in the fuel tank.
The arrow adjacent to the fuel pump
symbol indicates on which side of your
vehicle the fuel filler door is located.
Note: The fuel gauge may vary slightly
when your vehicle is moving or on a slope.
Low Fuel Reminder
A low fuel level reminder displays and
sounds when the distance to empty
reaches
75 mi (120 km) to empty for
MyKey, and at 50 mi (80 km), 25 mi
(40 km), 10 mi (20 km) and 0 mi (0 km)
for all vehicle keys.
Note: The low fuel reminder can appear at
different fuel gauge positions depending on
fuel economy conditions. This variation is
normal. WARNING LAMPS AND
INDICATORS
The following warning lamps and
indicators alert you to a vehicle condition
that may become serious. Some lamps
illuminate when you start your vehicle to
make sure they work. If any lamps remain
on after starting your vehicle, refer to the
respective system warning lamp for further
information.
Note:
Some warning indicators appear in
the information display and function the
same as a warning lamp, but do not display
when you start your vehicle.
Adaptive Cruise Control
(If Equipped) The speed control system
indicator light changes color to
indicate what mode the system
is in. See Using Adaptive Cruise Control
(page
218).
On (white light): Illuminates when you
switch on the adaptive cruise control
system. Turns off when the speed control
system is turned off.
Engaged (green light): Illuminates when
you engage the adaptive cruise control
system. Turns off when you disengage the
speed control system.
Anti-Lock Braking System If it illuminates when you are
driving, this indicates a
malfunction. You continue to
have the normal braking system (without
ABS) unless the brake system warning
lamp is also illuminated. Have the system
checked by an authorized dealer.
99
Explorer (TUB) Canada/United States of America, enUSA, Edition date: 201807, Second-Printing Instrument ClusterE144524
Page 119 of 571

4WD
Action
Message
The four wheel drive system has automatically disabled itselfdue to the system overheating.
4WD Temporarily
Disabled
The four wheel drive system has automatically disabled itself
due to the system overheating or you are using the spare tire.
4WD Off
The four wheel drive system resumes normal function andclears this message after driving a short distance with the road tire re-installed or after the system cools.
4WD Restored
The four wheel drive system is not operating properly and thepowertrain fault indicator illuminates. See Warning Lamps
and Indicators (page 99). If the warning stays illuminated
or continues to illuminate, contact an authorized dealer as soon as possible.
4WD Malfunction
Service Required
Displayed when the transfer case fluid requires service.
Change 4WD Power
Transfer Unit Lube
Displayed when the transfer case fluid has been changed and reset to new.
4WD Power Transfer
Unit Lube Set to New
Adaptive Cruise Control Action
Message
A radar malfunction is preventing the adaptive cruise from
engaging. See
Using Adaptive Cruise Control (page 218).
Adaptive Cruise
Malfunction
Conditions exist such that the adaptive cruise cannot functionproperly. See
Using Adaptive Cruise Control (page 218).
Adaptive Cruise Not
Available
The radar is blocked because of poor radar visibility due tobad weather or ice/mud/water in front of radar. Driver can
typically clean the sensor to resolve. See
Using Adaptive
Cruise Control (page 218).
Adaptive Cruise Not
Available Sensor
Blocked See Manual
AdvanceTrac ™ Action
Message
The system detects a malfunction due to a blocked sensor.
Service AdvanceTrac
The driver has disabled or enabled the traction control.
AdvanceTrac Off On
116
Explorer (TUB) Canada/United States of America, enUSA, Edition date: 201807, Second-Printing Information Displays
Page 130 of 571
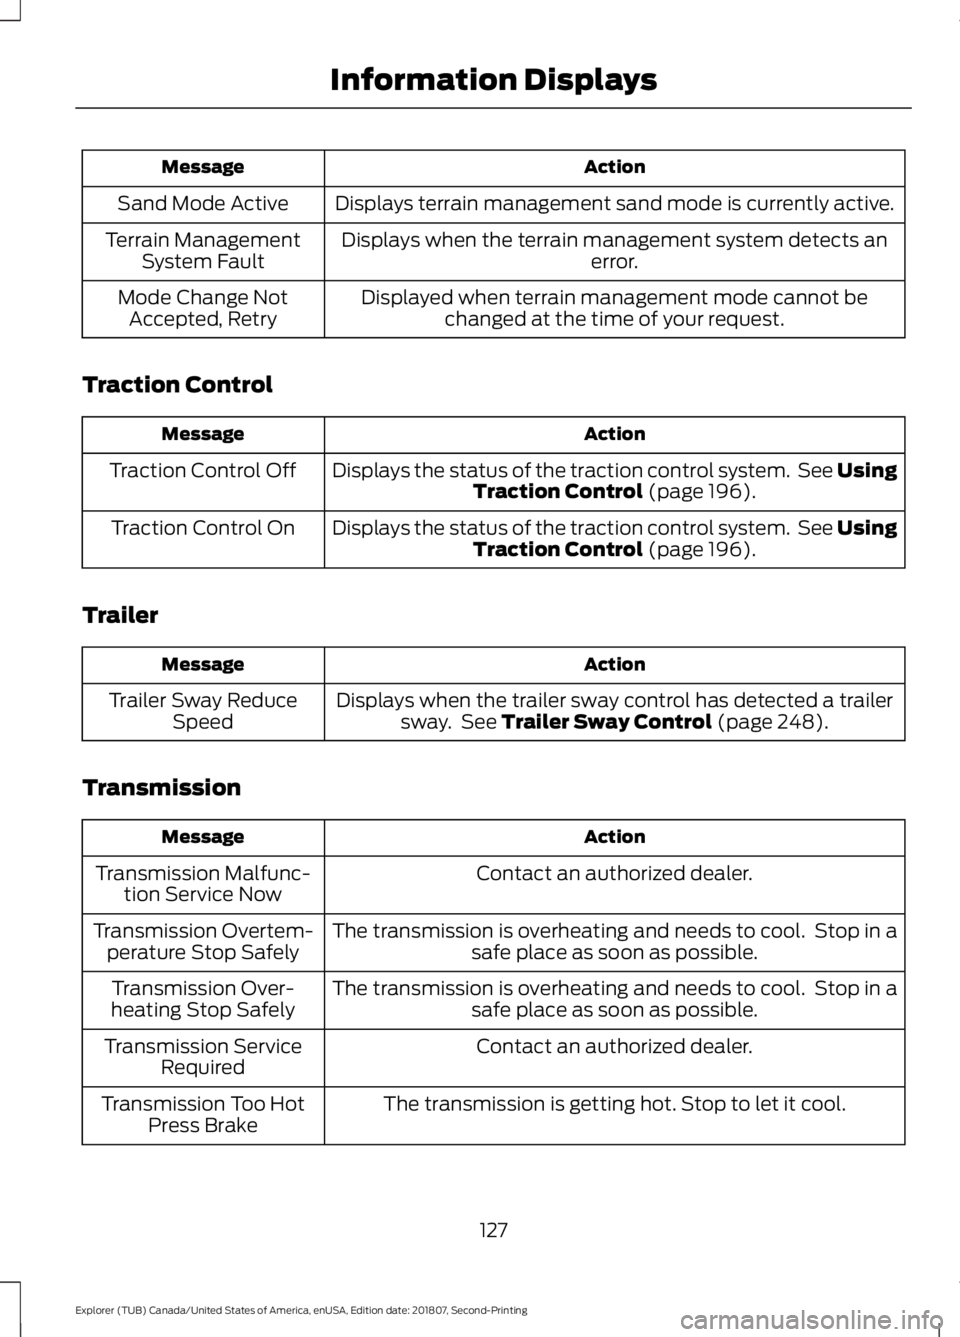
Action
Message
Displays terrain management sand mode is currently active.
Sand Mode Active
Displays when the terrain management system detects an error.
Terrain Management
System Fault
Displayed when terrain management mode cannot bechanged at the time of your request.
Mode Change Not
Accepted, Retry
Traction Control Action
Message
Displays the status of the traction control system. See UsingTraction Control (page 196).
Traction Control Off
Displays the status of the traction control system. See UsingTraction Control
(page 196).
Traction Control On
Trailer Action
Message
Displays when the trailer sway control has detected a trailersway. See
Trailer Sway Control (page 248).
Trailer Sway Reduce
Speed
Transmission Action
Message
Contact an authorized dealer.
Transmission Malfunc-
tion Service Now
The transmission is overheating and needs to cool. Stop in asafe place as soon as possible.
Transmission Overtem-
perature Stop Safely
The transmission is overheating and needs to cool. Stop in asafe place as soon as possible.
Transmission Over-
heating Stop Safely
Contact an authorized dealer.
Transmission Service
Required
The transmission is getting hot. Stop to let it cool.
Transmission Too Hot
Press Brake
127
Explorer (TUB) Canada/United States of America, enUSA, Edition date: 201807, Second-Printing Information Displays
Page 138 of 571
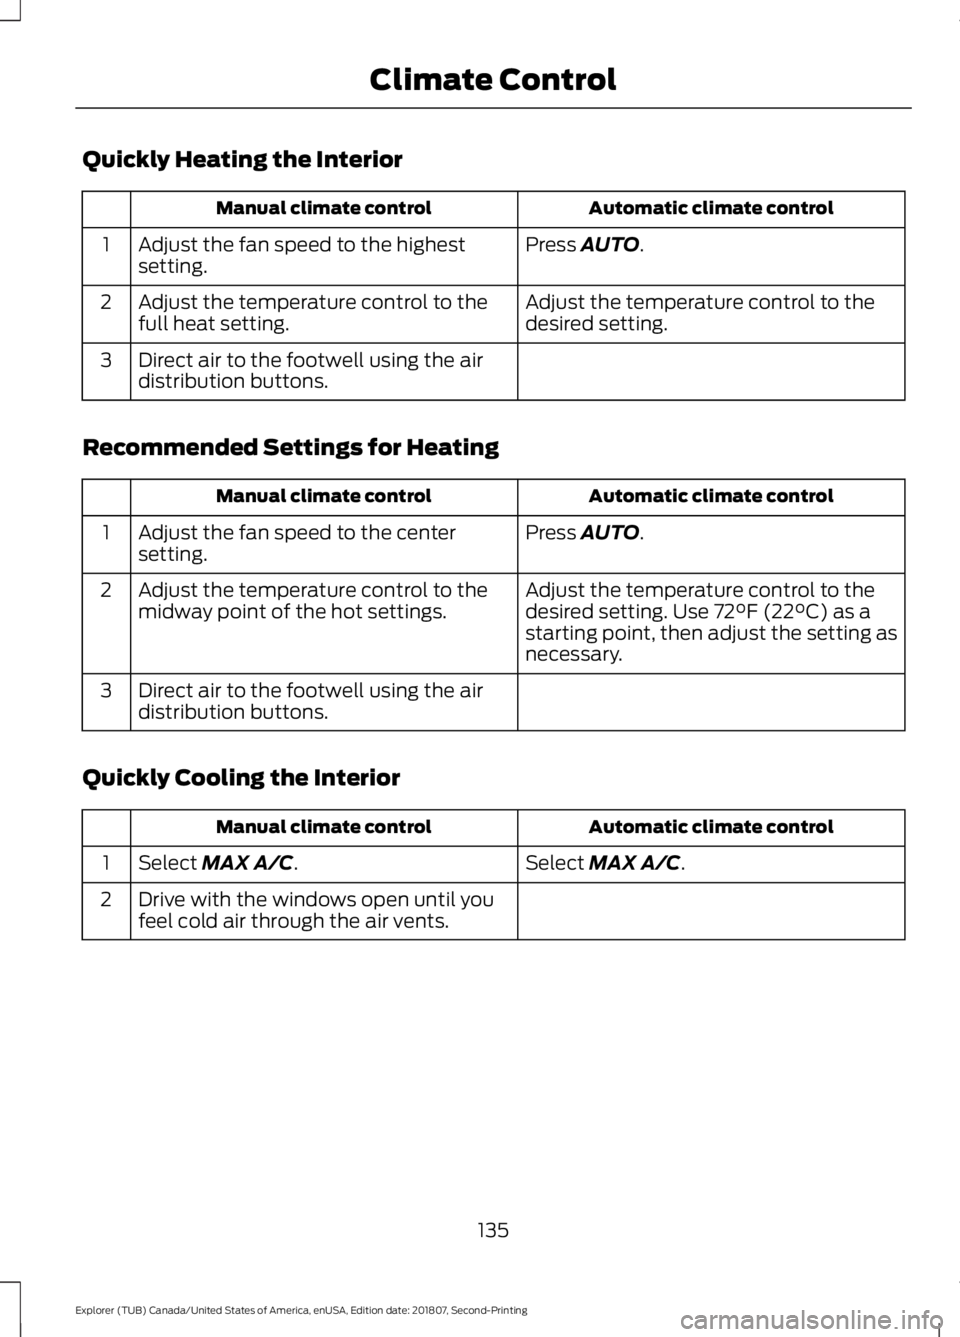
Quickly Heating the Interior
Automatic climate control
Manual climate control
Press AUTO.
Adjust the fan speed to the highest
setting.
1
Adjust the temperature control to the
desired setting.
Adjust the temperature control to the
full heat setting.
2
Direct air to the footwell using the air
distribution buttons.
3
Recommended Settings for Heating Automatic climate control
Manual climate control
Press
AUTO.
Adjust the fan speed to the center
setting.
1
Adjust the temperature control to the
desired setting. Use
72°F (22°C) as a
starting point, then adjust the setting as
necessary.
Adjust the temperature control to the
midway point of the hot settings.
2
Direct air to the footwell using the air
distribution buttons.
3
Quickly Cooling the Interior Automatic climate control
Manual climate control
Select
MAX A/C.
Select MAX A/C.
1
Drive with the windows open until you
feel cold air through the air vents.
2
135
Explorer (TUB) Canada/United States of America, enUSA, Edition date: 201807, Second-Printing Climate Control
Page 157 of 571
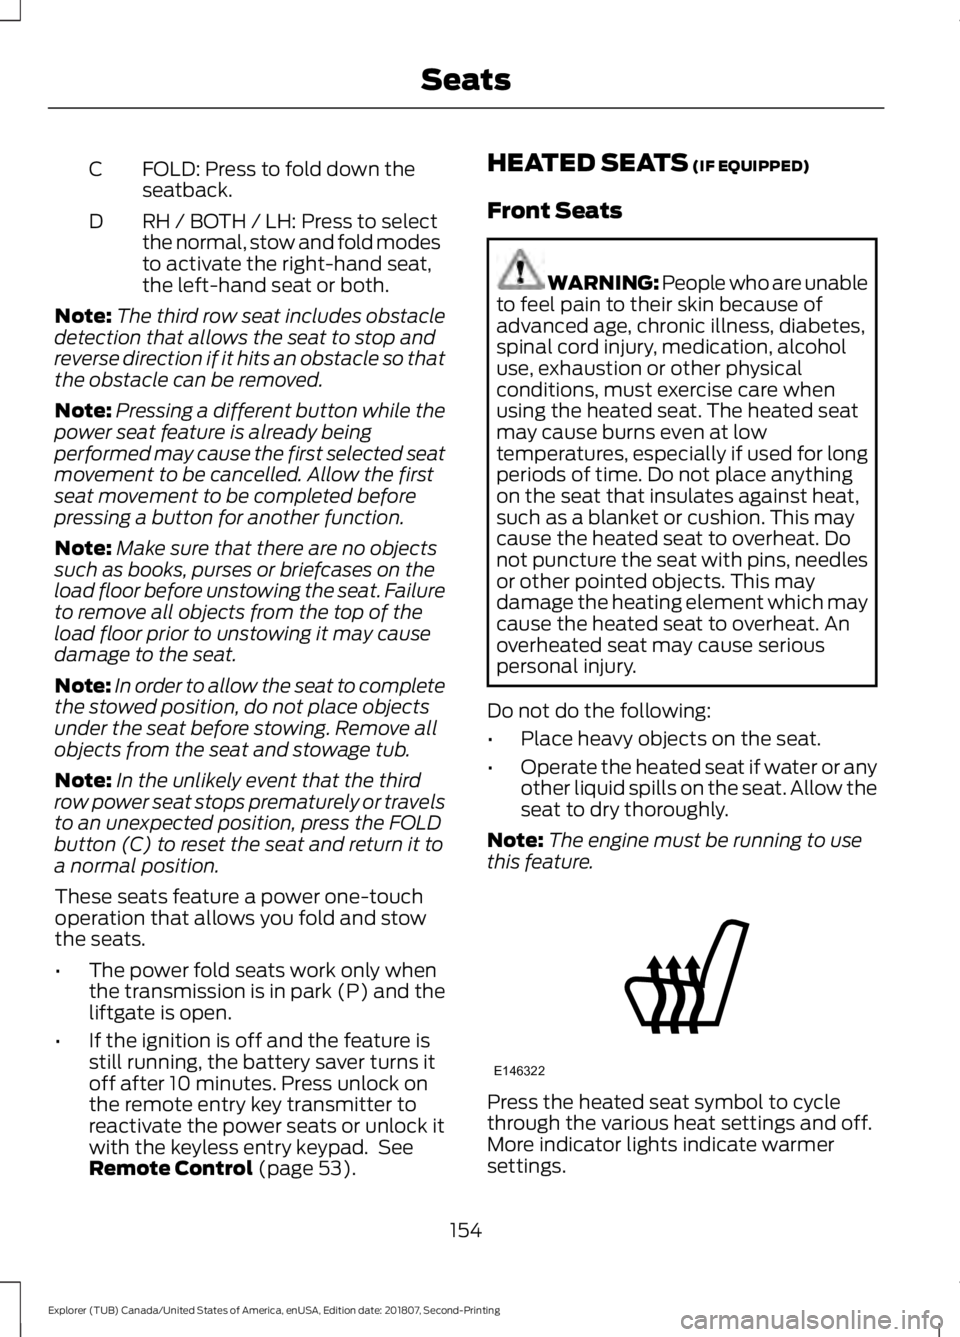
FOLD: Press to fold down the
seatback.
C
RH / BOTH / LH: Press to select
the normal, stow and fold modes
to activate the right-hand seat,
the left-hand seat or both.
D
Note: The third row seat includes obstacle
detection that allows the seat to stop and
reverse direction if it hits an obstacle so that
the obstacle can be removed.
Note: Pressing a different button while the
power seat feature is already being
performed may cause the first selected seat
movement to be cancelled. Allow the first
seat movement to be completed before
pressing a button for another function.
Note: Make sure that there are no objects
such as books, purses or briefcases on the
load floor before unstowing the seat. Failure
to remove all objects from the top of the
load floor prior to unstowing it may cause
damage to the seat.
Note: In order to allow the seat to complete
the stowed position, do not place objects
under the seat before stowing. Remove all
objects from the seat and stowage tub.
Note: In the unlikely event that the third
row power seat stops prematurely or travels
to an unexpected position, press the FOLD
button (C) to reset the seat and return it to
a normal position.
These seats feature a power one-touch
operation that allows you fold and stow
the seats.
• The power fold seats work only when
the transmission is in park (P) and the
liftgate is open.
• If the ignition is off and the feature is
still running, the battery saver turns it
off after 10 minutes. Press unlock on
the remote entry key transmitter to
reactivate the power seats or unlock it
with the keyless entry keypad. See
Remote Control (page 53). HEATED SEATS
(IF EQUIPPED)
Front Seats WARNING: People who are unable
to feel pain to their skin because of
advanced age, chronic illness, diabetes,
spinal cord injury, medication, alcohol
use, exhaustion or other physical
conditions, must exercise care when
using the heated seat. The heated seat
may cause burns even at low
temperatures, especially if used for long
periods of time. Do not place anything
on the seat that insulates against heat,
such as a blanket or cushion. This may
cause the heated seat to overheat. Do
not puncture the seat with pins, needles
or other pointed objects. This may
damage the heating element which may
cause the heated seat to overheat. An
overheated seat may cause serious
personal injury.
Do not do the following:
• Place heavy objects on the seat.
• Operate the heated seat if water or any
other liquid spills on the seat. Allow the
seat to dry thoroughly.
Note: The engine must be running to use
this feature. Press the heated seat symbol to cycle
through the various heat settings and off.
More indicator lights indicate warmer
settings.
154
Explorer (TUB) Canada/United States of America, enUSA, Edition date: 201807, Second-Printing SeatsE146322
Page 158 of 571
Note:
The heated seats may remain on
after you remote start your vehicle, based
on your remote start settings. The heated
seats may also turn on when you start your
vehicle if they were on when you switched
your vehicle off.
Second Row Heated Seats (If Equipped) WARNING: People who are unable
to feel pain to their skin because of
advanced age, chronic illness, diabetes,
spinal cord injury, medication, alcohol
use, exhaustion or other physical
conditions, must exercise care when
using the heated seat. The heated seat
may cause burns even at low
temperatures, especially if used for long
periods of time. Do not place anything
on the seat that insulates against heat,
such as a blanket or cushion. This may
cause the heated seat to overheat. Do
not puncture the seat with pins, needles
or other pointed objects. This may
damage the heating element which may
cause the heated seat to overheat. An
overheated seat may cause serious
personal injury.
Do not do the following:
• Place heavy objects on the seat.
• Operate the seat heater if water or any
other liquid spills on the seat. Allow the
seat to dry thoroughly.
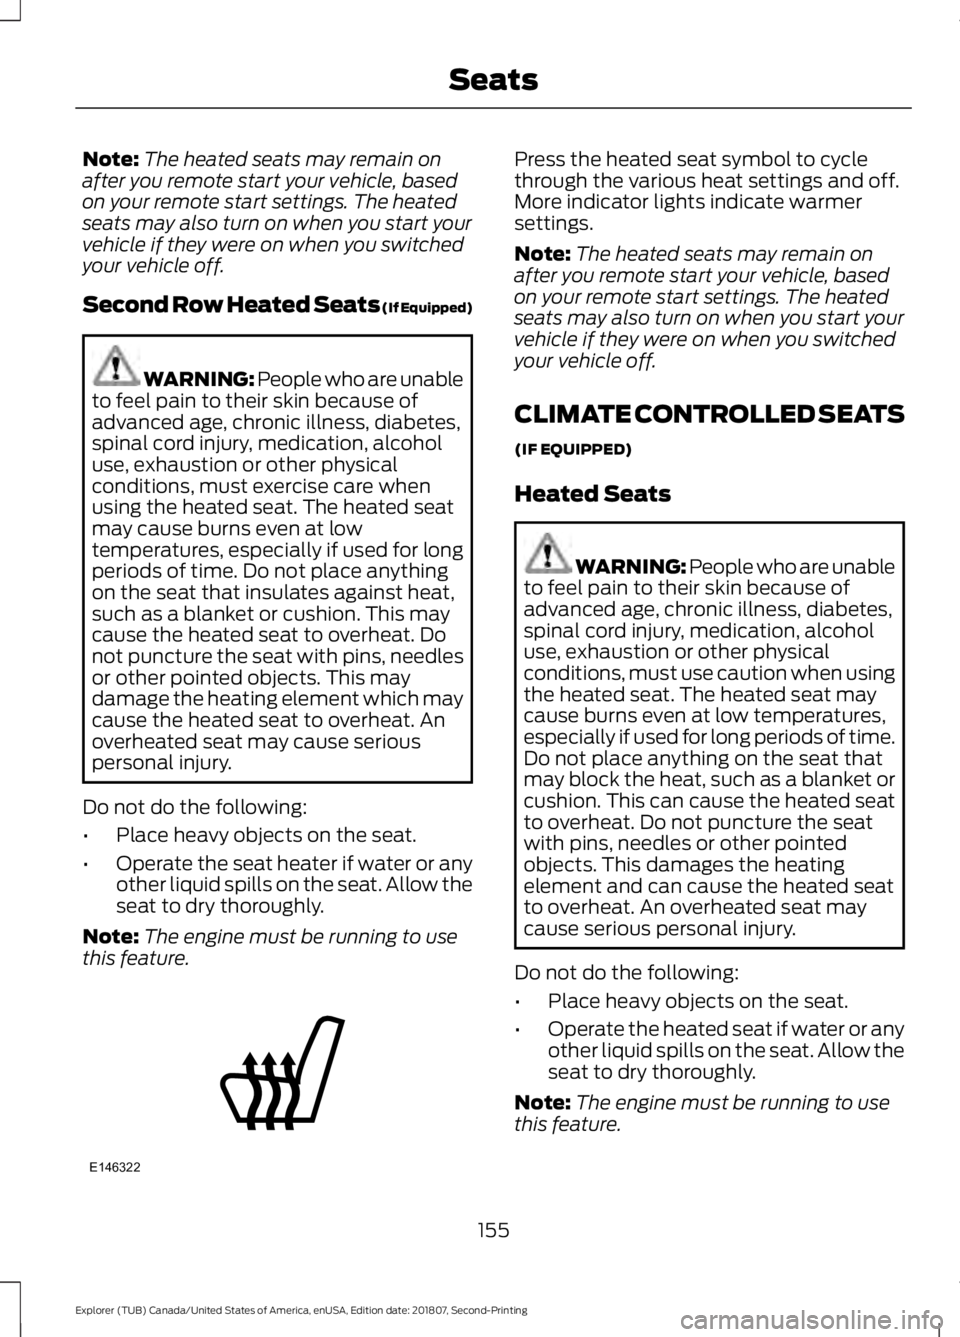
Note: The engine must be running to use
this feature. Press the heated seat symbol to cycle
through the various heat settings and off.
More indicator lights indicate warmer
settings.
Note:
The heated seats may remain on
after you remote start your vehicle, based
on your remote start settings. The heated
seats may also turn on when you start your
vehicle if they were on when you switched
your vehicle off.
CLIMATE CONTROLLED SEATS
(IF EQUIPPED)
Heated Seats WARNING: People who are unable
to feel pain to their skin because of
advanced age, chronic illness, diabetes,
spinal cord injury, medication, alcohol
use, exhaustion or other physical
conditions, must use caution when using
the heated seat. The heated seat may
cause burns even at low temperatures,
especially if used for long periods of time.
Do not place anything on the seat that
may block the heat, such as a blanket or
cushion. This can cause the heated seat
to overheat. Do not puncture the seat
with pins, needles or other pointed
objects. This damages the heating
element and can cause the heated seat
to overheat. An overheated seat may
cause serious personal injury.
Do not do the following:
• Place heavy objects on the seat.
• Operate the heated seat if water or any
other liquid spills on the seat. Allow the
seat to dry thoroughly.
Note: The engine must be running to use
this feature.
155
Explorer (TUB) Canada/United States of America, enUSA, Edition date: 201807, Second-Printing SeatsE146322
Page 162 of 571
Gate Operator / Canadian
Programming
Canadian radio-frequency laws require
transmitter signals to
“time-out” (or quit)
after several seconds of transmission –
which may not be long enough for
HomeLink to pick up the signal during
programming. Similar to this Canadian law,
some U.S. gate operators are designed to
“time-out” in the same manner.
Note: If programming a garage door opener
or gate operator, it is advised to unplug the
device during the “cycling” process to
prevent possible overheating.
1. Press and hold the HomeLink button while you press and release, every two
seconds, your hand-held transmitter
until the HomeLink indicator light
changes from a slow to a rapidly
blinking light.
2. Release both the HomeLink and hand-held transmitter buttons.
3. Continue programing HomeLink. See In-Vehicle Programming
.
Erasing the Function Button Codes
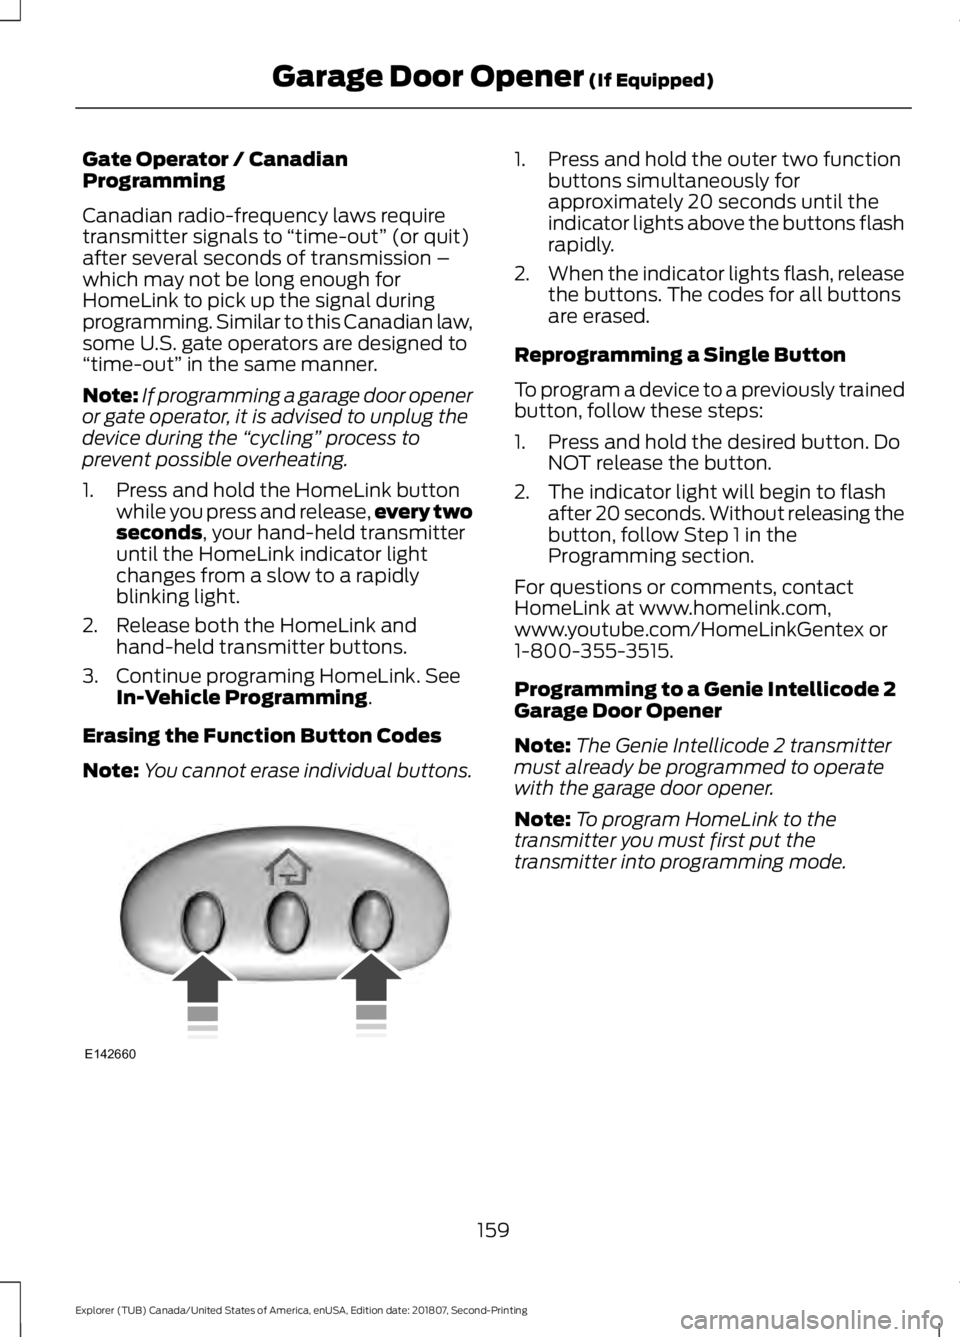
Note: You cannot erase individual buttons. 1. Press and hold the outer two function
buttons simultaneously for
approximately 20 seconds until the
indicator lights above the buttons flash
rapidly.
2. When the indicator lights flash, release
the buttons. The codes for all buttons
are erased.
Reprogramming a Single Button
To program a device to a previously trained
button, follow these steps:
1. Press and hold the desired button. Do NOT release the button.
2. The indicator light will begin to flash after 20 seconds. Without releasing the
button, follow Step 1 in the
Programming section.
For questions or comments, contact
HomeLink at www.homelink.com,
www.youtube.com/HomeLinkGentex or
1-800-355-3515.
Programming to a Genie Intellicode 2
Garage Door Opener
Note: The Genie Intellicode 2 transmitter
must already be programmed to operate
with the garage door opener.
Note: To program HomeLink to the
transmitter you must first put the
transmitter into programming mode.
159
Explorer (TUB) Canada/United States of America, enUSA, Edition date: 201807, Second-Printing Garage Door Opener
(If Equipped)E142660