2019 FORD EXPLORER heating
[x] Cancel search: heatingPage 194 of 571
Once through water, always try the brakes.
Wet brakes do not stop the vehicle as
effectively as dry brakes. Drying can be
improved by moving your vehicle slowly
while applying light pressure on the brake
pedal.
Be cautious of sudden changes in vehicle
speed or direction when you are driving in
mud. Even 4WD vehicles can lose traction
in slick mud. As when you are driving over
sand, apply the accelerator slowly and
avoid spinning your wheels. If the vehicle
does slide, steer in the direction of the slide
until you regain control of the vehicle.
After driving through mud, clean off residue
stuck to rotating driveshafts and tires.
Excess mud stuck on tires and rotating
driveshafts causes an imbalance that
could damage drive components.
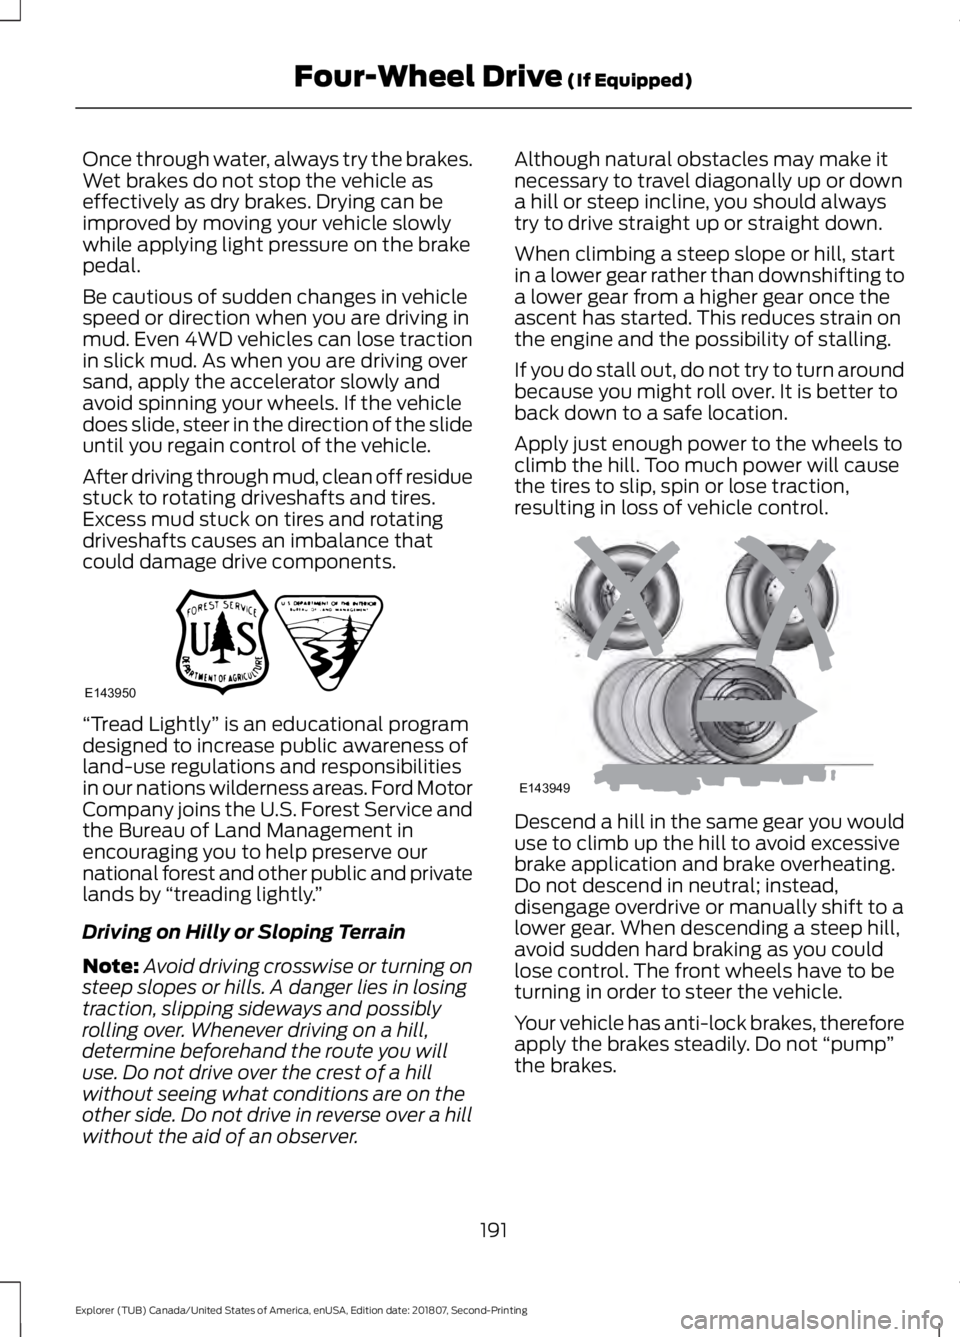
“Tread Lightly
” is an educational program
designed to increase public awareness of
land-use regulations and responsibilities
in our nations wilderness areas. Ford Motor
Company joins the U.S. Forest Service and
the Bureau of Land Management in
encouraging you to help preserve our
national forest and other public and private
lands by “treading lightly. ”
Driving on Hilly or Sloping Terrain
Note: Avoid driving crosswise or turning on
steep slopes or hills. A danger lies in losing
traction, slipping sideways and possibly
rolling over. Whenever driving on a hill,
determine beforehand the route you will
use. Do not drive over the crest of a hill
without seeing what conditions are on the
other side. Do not drive in reverse over a hill
without the aid of an observer. Although natural obstacles may make it
necessary to travel diagonally up or down
a hill or steep incline, you should always
try to drive straight up or straight down.
When climbing a steep slope or hill, start
in a lower gear rather than downshifting to
a lower gear from a higher gear once the
ascent has started. This reduces strain on
the engine and the possibility of stalling.
If you do stall out, do not try to turn around
because you might roll over. It is better to
back down to a safe location.
Apply just enough power to the wheels to
climb the hill. Too much power will cause
the tires to slip, spin or lose traction,
resulting in loss of vehicle control.
Descend a hill in the same gear you would
use to climb up the hill to avoid excessive
brake application and brake overheating.
Do not descend in neutral; instead,
disengage overdrive or manually shift to a
lower gear. When descending a steep hill,
avoid sudden hard braking as you could
lose control. The front wheels have to be
turning in order to steer the vehicle.
Your vehicle has anti-lock brakes, therefore
apply the brakes steadily. Do not
“pump”
the brakes.
191
Explorer (TUB) Canada/United States of America, enUSA, Edition date: 201807, Second-Printing Four-Wheel Drive (If Equipped)E143950 E143949
Page 224 of 571
When you press the accelerator pedal, you
override the set speed and gap distance.
Use the accelerator pedal
normally to intentionally exceed
the set speed limit.
When you override the system, the green
indicator light illuminates and the vehicle
image does not appear in the information
display.
The system resumes operation when you
release the accelerator pedal. The vehicle
speed decreases to the set speed, or a
lower speed if following a slower vehicle.
Changing the Set Speed Press and release to increase the
set speed in small increments.
Press and release to decrease
the set speed in small
increments.
Press and hold either button to change the
set speed in large increments. Release the
button when you reach the speed you
prefer.
Press the accelerator or brake pedal until
you reach the speed you prefer. Press
either button.
The system may apply the brakes to slow
the vehicle to the new set speed. The set
speed displays continuously in the
information display when the system is
active.
Canceling the Set Speed Press and release the button or
tap the brake pedal.
The set speed does not erase. Resuming the Set Speed Press and release the button.
Your vehicle speed returns to the
previously set speed and gap setting. The
set speed displays continuously in the
information display when the system is
active.
Note: Only use resume if you are aware of
the set speed and intend to return to it.
Automatic Cancellation
The system is not functional at vehicle
speeds below 12 mph (20 km/h). The
information display indicates low engine
speed, an audible alarm sounds and the
automatic braking releases if the vehicle
drops below this speed.
Automatic cancellation can also occur
when:
• The tires lose traction.
• You apply the parking brake.
Note: If the engine speed drops too low, an
audible warning sounds and a message
appears in the information display.
Automatic braking releases.
Hilly Condition Usage
Note: An audible alarm sounds and the
system shuts down if it applies brakes for
an extended period of time. This allows the
brakes to cool. The system functions
normally again when the brakes have
cooled.
Select a lower gear during prolonged
downhill driving on steep slopes, such as
mountainous areas, when the system is
active. In such situations, the system needs
additional engine braking to reduce the
load on the vehicle ’s regular brake system
to prevent the brakes from overheating.
221
Explorer (TUB) Canada/United States of America, enUSA, Edition date: 201807, Second-Printing Cruise ControlE144529
Page 239 of 571
Extreme continuous steering may increase
the effort required for you to steer your
vehicle. This increased effort prevents
overheating and permanent damage to
the steering system. You do not lose the
ability to steer your vehicle manually.
Typical steering and driving maneuvers
allow the system to cool and return to
normal operation.
Steering Tips
If the steering wanders or pulls, check for:
•
Correct tire pressures.
• Uneven tire wear.
• Loose or worn suspension
components.
• Loose or worn steering components.
• Improper vehicle alignment.
Note: A high crown in the road or high
crosswinds may also make the steering
seem to wander or pull.
Adaptive Learning
The electronic power steering system
adaptive learning helps correct road
irregularities and improves overall handling
and steering feel. It communicates with
the brake system to help operate
advanced stability control and accident
avoidance systems. Additionally, whenever
the battery is disconnected or a new
battery installed, you must drive your
vehicle a short distance before the system
relearns the strategy and reactivates all
systems. PRE-COLLISION ASSIST (IF
EQUIPPED) WARNING:
You are responsible
for controlling your vehicle at all times.
The system is designed to be an aid and
does not relieve you of your responsibility
to drive with due care and attention.
Failure to follow this instruction could
result in the loss of control of your
vehicle, personal injury or death. WARNING:
The system does not
detect vehicles that are driving in a
different direction, pedestrians at night,
cyclists or animals. Failure to take care
may result in the loss of control of your
vehicle, serious personal injury or death. WARNING:
The system does not
operate during hard acceleration or
steering. Failure to take care may lead
to a crash or personal injury. WARNING:
The system may fail
or operate with reduced function during
cold and severe weather conditions.
Snow, ice, rain, spray and fog can
adversely affect the system. Keep the
front camera and radar free of snow and
ice. Failure to take care may result in the
loss of control of your vehicle, serious
personal injury or death. WARNING: In situations where the
vehicle camera has limited detection
capability, this may reduce system
performance. These situations include
but are not limited to direct or low
sunlight, vehicles at night without tail
lights, unconventional vehicle types,
pedestrians with complex backgrounds,
236
Explorer (TUB) Canada/United States of America, enUSA, Edition date: 201807, Second-Printing Driving Aids
Page 292 of 571
ENGINE COOLANT CHECK
WARNING: Do not remove the
coolant reservoir cap when the engine is
on or the cooling system is hot. Wait 10
minutes for the cooling system to cool
down. Cover the coolant reservoir cap
with a thick cloth to prevent the
possibility of scalding and slowly remove
the cap. Failure to follow this instruction
could result in personal injury. WARNING:
Do not put coolant in
the windshield washer reservoir. If
sprayed on the windshield, coolant could
make it difficult to see through the
windshield. WARNING:
To reduce the risk of
personal injury, make sure the engine is
cool before unscrewing the coolant
pressure relief cap. The cooling system
is under pressure. Steam and hot liquid
can come out forcefully when you loosen
the cap slightly. WARNING:
Do not add coolant
further than the MAX mark.
When the engine is cold, check the
concentration and level of the coolant at
the intervals listed in the scheduled
maintenance information. See Scheduled
Maintenance
(page 495).
Note: Make sure that the coolant level is
between the
MIN and MAX marks on the
coolant reservoir.
Note: Coolant expands when it is hot. The
level may extend beyond the
MAX mark. Maintain coolant concentration within
48% to 50%, which equates to a freeze
point between
-29°F (-34°C) and -35°F
(-37°C). Coolant concentration should be
checked using a refractometer. We do not
recommend the use of hydrometers or
coolant test strips for measuring coolant
concentration.
Adding Coolant WARNING:
Do not add engine
coolant when the engine is hot. Failure
to follow this instruction could result in
personal injury. WARNING:
Do not remove the
coolant reservoir cap when the engine is
on or the cooling system is hot. Wait 10
minutes for the cooling system to cool
down. Cover the coolant reservoir cap
with a thick cloth to prevent the
possibility of scalding and slowly remove
the cap. Failure to follow this instruction
could result in personal injury. WARNING:
Do not put coolant in
the windshield washer reservoir. If
sprayed on the windshield, coolant could
make it difficult to see through the
windshield.
Note: Do not use stop leak pellets, cooling
system sealants, or non-specified additives
as they can cause damage to the engine
cooling or heating systems. Resulting
component damage may not be covered by
the vehicle Warranty.
Note: Automotive fluids are not
interchangeable.
289
Explorer (TUB) Canada/United States of America, enUSA, Edition date: 201807, Second-Printing Maintenance
Page 293 of 571
It is very important to use prediluted
coolant approved to the correct
specification in order to avoid plugging the
small passageways in the engine cooling
system. See Capacities and
Specifications (page 340). Do not mix
different colors or types of coolant in your
vehicle. Mixing of engine coolants or using
an incorrect coolant may harm the engine
or cooling system components and may
not be covered by the vehicle Warranty.
Note: If prediluted coolant is not available,
use the approved concentrated coolant
diluting it to 50/50 with distilled water. See
Capacities and Specifications
(page 340).
Using water that has not been deionised
may contribute to deposit formation,
corrosion and plugging of the small cooling
system passageways.
Note: Coolants marketed for all makes and
models may not be approved to our
specifications and may cause damage to
the cooling system. Resulting component
damage may not be covered by the vehicle
Warranty.
If the coolant level is at or below the
minimum mark, add prediluted coolant
immediately.
To top up the coolant level do the
following:
1. Unscrew the cap slowly. Any pressure escapes as you unscrew the cap.
2. Add prediluted coolant approved to the correct specification. See
Capacities and Specifications (page
340
).
3. Add enough prediluted coolant to reach the correct level.
4. Replace the coolant reservoir cap, turn
it clockwise until you feel a strong
resistance. 5. Check the coolant level in the coolant
reservoir the next few times you drive
your vehicle. If necessary, add enough
prediluted engine coolant to bring the
coolant level to the correct level.
If you have to add more than
1.1 qt (1 L) of
engine coolant per month, have your
vehicle checked as soon as possible.
Operating an engine with a low level of
coolant can result in engine overheating
and possible engine damage.
Note: During normal vehicle operation, the
coolant may change color from orange to
pink or light red. As long as the coolant is
clear and uncontaminated, this color change
does not indicate the coolant has degraded
nor does it require the coolant to be drained,
the system to be flushed, or the coolant to
be replaced.
In case of emergency, you can add a large
amount of water without engine coolant
in order to reach a vehicle service location.
In this instance, qualified personnel:
1. Must drain the cooling system.
2. Chemically clean the coolant system.
3. Refill with engine coolant as soon as possible.
Water alone, without engine coolant, can
cause engine damage from corrosion,
overheating or freezing.
Do not use the following as a coolant
substitute:
• Alcohol.
• Methanol.
• Brine.
• Any coolant mixed with alcohol or
methanol antifreeze.
Alcohol and other liquids can cause engine
damage from overheating or freezing.
290
Explorer (TUB) Canada/United States of America, enUSA, Edition date: 201807, Second-Printing Maintenance
Page 296 of 571
The air conditioning may automatically
turn on and off during severe operating
conditions to protect the engine from
overheating. When the coolant
temperature decreases to the normal
operating temperature, the air conditioning
turns on.
If the coolant temperature gauge moves
fully into the red zone, or if the coolant
temperature warning or service engine
soon messages appear in your information
display, do the following:
1. Stop your vehicle as soon as it is safe
to do so. Fully apply the parking brake,
shift into park (P) or neutral (N).
2. Leave the engine running until the coolant temperature gauge needle
returns to the normal position. If the
temperature does not drop after
several minutes, follow the remaining
steps.
3. Switch the engine off and wait for it to
cool. Check the coolant level.
4. If the coolant level is at or below the minimum mark, add prediluted coolant
immediately.
5. If the coolant level is normal, restart the engine and continue.
AUTOMATIC TRANSMISSION
FLUID CHECK - 2.3L
ECOBOOST™ (IF EQUIPPED)
Note: Transmission fluid should be checked
by an authorized dealer. If required, fluid
should be added by an authorized dealer. Have an authorized dealer check and
change the transmission fluid at the
correct service interval. See Maintenance
(page
282). Your transmission does not
consume fluid. However, the fluid level
should be checked if the transmission is
not working properly, (i.e., if the
transmission slips or shifts slowly) or if you
notice some sign of fluid leakage.
Do not use supplemental transmission
fluid additives, treatments or cleaning
agents. The use of these materials may
affect transmission operation and result
in damage to internal transmission
components.
AUTOMATIC TRANSMISSION
FLUID CHECK - 3.5L DURATEC/
3.5L ECOBOOST™
(IF EQUIPPED)
Do not use supplemental transmission
fluid additives because they are
unnecessary and could lead to
transmission damage that may not be
covered by the vehicle Warranty.
The transmission does not consume fluid.
However, if the transmission slips or shifts
slowly you should check the fluid level. If
you notice a sign of leaking fluid, contact
an authorized dealer.
Checking the Transmission Fluid
Level WARNING:
The dipstick and
surrounding components are hot. Use
gloves when moving components and
checking the transmission fluid level.
Failure to follow this warning could result
in serious personal injury.
293
Explorer (TUB) Canada/United States of America, enUSA, Edition date: 201807, Second-Printing Maintenance
Page 297 of 571
Only check the transmission fluid level
when the engine is at normal operating
temperature 179°F (82°C)-199°F (93°C).
Normal operating temperature is reached
after driving approximately 20 mi (30 km).
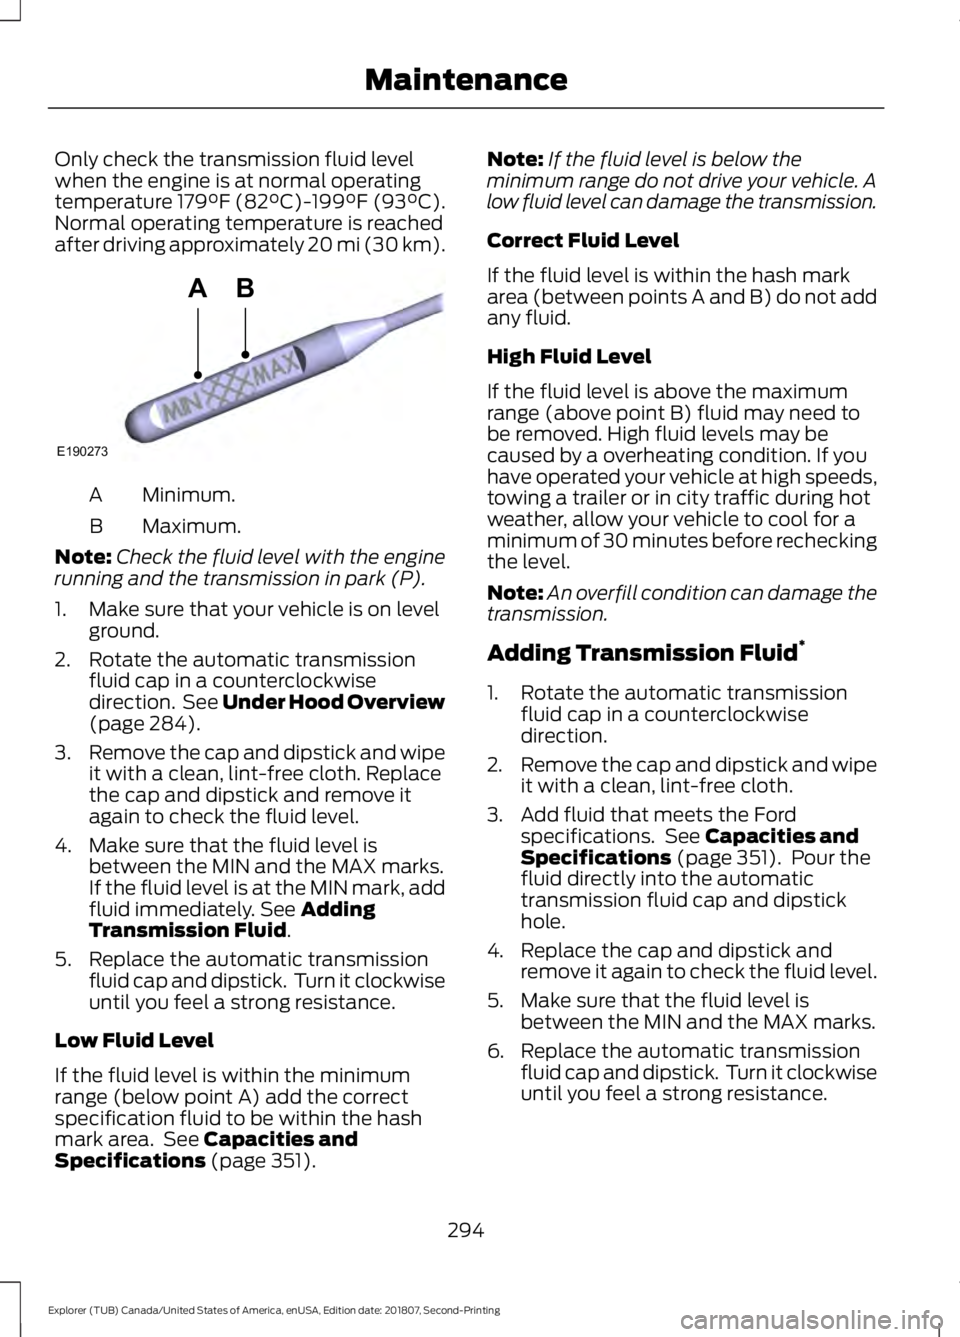
Minimum.
A
Maximum.
B
Note: Check the fluid level with the engine
running and the transmission in park (P).
1. Make sure that your vehicle is on level ground.
2. Rotate the automatic transmission fluid cap in a counterclockwise
direction. See Under Hood Overview
(page 284).
3. Remove the cap and dipstick and wipe
it with a clean, lint-free cloth. Replace
the cap and dipstick and remove it
again to check the fluid level.
4. Make sure that the fluid level is between the MIN and the MAX marks.
If the fluid level is at the MIN mark, add
fluid immediately. See
Adding
Transmission Fluid.
5. Replace the automatic transmission fluid cap and dipstick. Turn it clockwise
until you feel a strong resistance.
Low Fluid Level
If the fluid level is within the minimum
range (below point A) add the correct
specification fluid to be within the hash
mark area. See
Capacities and
Specifications (page 351). Note:
If the fluid level is below the
minimum range do not drive your vehicle. A
low fluid level can damage the transmission.
Correct Fluid Level
If the fluid level is within the hash mark
area (between points A and B) do not add
any fluid.
High Fluid Level
If the fluid level is above the maximum
range (above point B) fluid may need to
be removed. High fluid levels may be
caused by a overheating condition. If you
have operated your vehicle at high speeds,
towing a trailer or in city traffic during hot
weather, allow your vehicle to cool for a
minimum of 30 minutes before rechecking
the level.
Note: An overfill condition can damage the
transmission.
Adding Transmission Fluid *
1. Rotate the automatic transmission fluid cap in a counterclockwise
direction.
2. Remove the cap and dipstick and wipe
it with a clean, lint-free cloth.
3. Add fluid that meets the Ford specifications. See
Capacities and
Specifications (page 351). Pour the
fluid directly into the automatic
transmission fluid cap and dipstick
hole.
4. Replace the cap and dipstick and remove it again to check the fluid level.
5. Make sure that the fluid level is between the MIN and the MAX marks.
6. Replace the automatic transmission fluid cap and dipstick. Turn it clockwise
until you feel a strong resistance.
294
Explorer (TUB) Canada/United States of America, enUSA, Edition date: 201807, Second-Printing MaintenanceE190273
AB
Page 332 of 571
USING SUMMER TIRES
Summer tires provide superior
performance on wet and dry roads.
Summer tires do not have the Mud and
Snow (M+S or M/S) tire traction rating on
the tire side wall. Since summer tires do
not have the same traction performance
as All-season or Snow tires, we do not
recommend using summer tires when
temperatures drop to approximately 45°F
(7°C) or below (depending on tire wear
and environmental conditions) or in snow
and ice conditions. Like any tire, summer
tire performance is affected by tire wear
and environmental conditions. If you must
drive in those conditions, we recommend
using Mud and Snow (M+S, M/S),
All-season or Snow tires.
Always store your summer tires indoors at
temperatures above
19°F (-7°C). The
rubber compounds used in these tires lose
flexibility and may develop surface cracks
in the tread area at temperatures below
19°F (-7°C)
. If the tires have been
subjected to 19°F (-7°C) or less, warm
them in a heated space to at least 41°F
(5°C) for at least 24 hours before installing
them on a vehicle, or moving the vehicle
with the tires installed, or checking tire inflation. Do not place tires near heaters
or heating devices used to warm the room
where the tires are stored. Do not apply
heat or blow heated air directly on the tires.
Always inspect the tires after storage
periods and before use.
USING SNOW CHAINS
WARNING:
Snow tires must be
the same size, load index, and speed
rating as those originally provided by
Ford. Use of any tire or wheel not
recommended by Ford can affect the
safety and performance of your vehicle,
which could result in an increased risk of
loss of vehicle control, vehicle rollover,
personal injury, and death. Additionally,
the use of non-recommended tires and
wheels could cause steering, suspension,
axle, transfer case, or power transfer unit
failure. It is also strongly advised to
follow the Ford recommended tire
inflation pressure found on the Safety
Compliance Certification Label (affixed
to either the door hinge pillar, door-latch
post, or the door edge that meets the
door-latch post, next to the driver ’s
seating position), or Tire Label which is
located on the B-Pillar or the edge of the
driver door. Failure to follow the tire
pressure recommendations can cause
uneven treadwear patterns and
adversely affect the way your vehicle
handles.
The tires on your vehicle (excluding the
265/45ZR20 Sport Tire) may have
all-weather treads to provide traction in
rain and snow. However, in some climates
you may need to use snow chains.
329
Explorer (TUB) Canada/United States of America, enUSA, Edition date: 201807, Second-Printing Wheels and TiresE142547