2019 FORD EXPLORER clock setting
[x] Cancel search: clock settingPage 291 of 571
Only use oils certified for gasoline engines
by the American Petroleum Institute (API).
An oil with this trademark symbol
conforms to the current engine and
emission system protection standards and
fuel economy requirements of the
International Lubricants Specification
Advisory Committee (ILSAC).
To top up the engine oil level do the
following:
1. Clean the area surrounding the engine
oil filler cap before you remove it.
2. Remove the engine oil filler cap. See Under Hood Overview (page 283).
Turn it counterclockwise and remove
it.
3. Add engine oil that meets our specifications. See
Capacities and
Specifications (page 351). You may
have to use a funnel to pour the engine
oil into the opening.
4. Recheck the oil level.
5. If the oil level is correct, replace the dipstick and make sure it is fully seated.
6. Replace the engine oil filler cap. Turn it clockwise until you feel a strong
resistance.
Note: Do not add oil further than the
maximum mark. Oil levels above the
maximum mark may cause engine damage.
Note: Make sure you install the oil filler cap
correctly.
Note: Soak up any spillage with an
absorbent cloth immediately.
OIL CHANGE INDICATOR
RESET
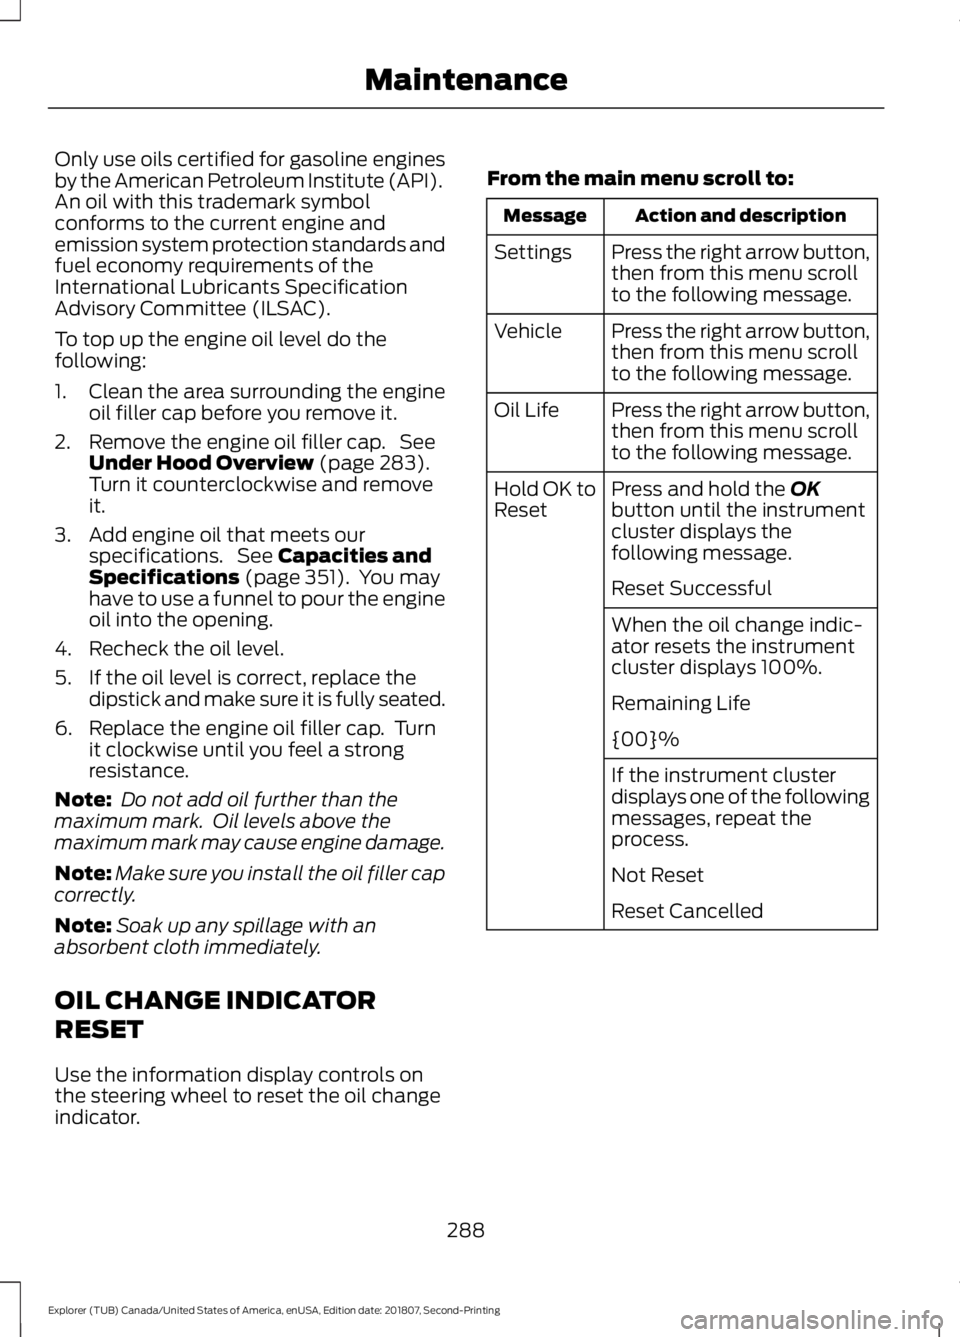
Use the information display controls on
the steering wheel to reset the oil change
indicator. From the main menu scroll to: Action and description
Message
Press the right arrow button,
then from this menu scroll
to the following message.
Settings
Press the right arrow button,
then from this menu scroll
to the following message.
Vehicle
Press the right arrow button,
then from this menu scroll
to the following message.
Oil Life
Press and hold the
OK
button until the instrument
cluster displays the
following message.
Hold OK to
Reset
Reset Successful
When the oil change indic-
ator resets the instrument
cluster displays 100%.
Remaining Life
{00}%
If the instrument cluster
displays one of the following
messages, repeat the
process.
Not Reset
Reset Cancelled
288
Explorer (TUB) Canada/United States of America, enUSA, Edition date: 201807, Second-Printing Maintenance
Page 300 of 571
Note:
If your vehicle's battery has a cover
or shield, make sure it is reinstalled after the
battery has been cleaned or replaced.
Note: See an authorized dealer for low
voltage battery access, testing, or
replacement.
When a low voltage battery replacement
is necessary, see an authorized dealer to
replace the low voltage battery with a Ford
recommended replacement low voltage
battery that matches the electrical
requirements of the vehicle.
To ensure proper operation of the battery
management system (BMS), do not allow
a technician to connect any electrical
device ground connection directly to the
low voltage battery negative post. A
connection at the low voltage battery
negative post can cause inaccurate
measurements of the battery condition
and potential incorrect system operation.
Note: If a person adds electrical or
electronic accessories or components to the
vehicle, the accessories or components may
adversely affect the low voltage battery
performance and durability and may also
affect the performance of other electrical
systems in the vehicle.
For longer, trouble-free operation, keep the
top of the battery clean and dry. Also,
make certain the battery cables are always
tightly fastened to the battery terminals.
If you see any corrosion on the battery or
terminals, remove the cables from the
terminals and clean with a wire brush. You
can neutralize the acid with a solution of
baking soda and water.
When a battery replacement is required,
the battery should only be replaced with
a Ford recommended replacement battery
that matches the electrical requirements
of the vehicle. Because your vehicle
’s engine is
electronically-controlled by a computer,
some engine control settings are
maintained by power from the low voltage
battery. Some engine computer settings,
like the idle trim and fuel trim strategy,
optimize the driveability and performance
of the engine. Some other computer
settings, like the clock and radio station
presets, are also maintained in memory by
power from the low voltage battery. When
a technician disconnects and connects the
low voltage battery, these settings are
erased. Complete the following procedure
in order to restore the settings:
1. With the vehicle at a complete stop, set the parking brake.
2. Shift the transmission into park (P).
3. Switch off all accessories.
4. Fully press the brake pedal and start the vehicle.
5. Run the engine until it reaches normal operating temperature. While the
engine is warming up, complete the
following: Reset the clock. See Audio
System (page 362). Reset the power
windows bounce-back feature. See
Windows and Mirrors
(page 90).
Reset the radio station presets. See
Audio System
(page 362).
6. Allow the engine to idle for at least one
minute. If the engine turns off, press
the accelerator pedal to start the
engine.
7. While the engine is running, press the brake pedal and shift into neutral (N).
8. Allow the engine to run for at least one
minute by pressing on the accelerator
pedal.
9. Drive the vehicle at least 12 mi (20 km)
to completely relearn the idle and fuel
trim strategy.
297
Explorer (TUB) Canada/United States of America, enUSA, Edition date: 201807, Second-Printing Maintenance
Page 369 of 571
AUDIO UNIT - VEHICLES WITH:
AM/FM/CD/SYNC
WARNING: Driving while
distracted can result in loss of vehicle
control, crash and injury. We strongly
recommend that you use extreme
caution when using any device that may
take your focus off the road. Your
primary responsibility is the safe
operation of your vehicle. We
recommend against the use of any
hand-held device while driving and
encourage the use of voice-operated
systems when possible. Make sure you
are aware of all applicable local laws
that may affect the use of electronic
devices while driving.
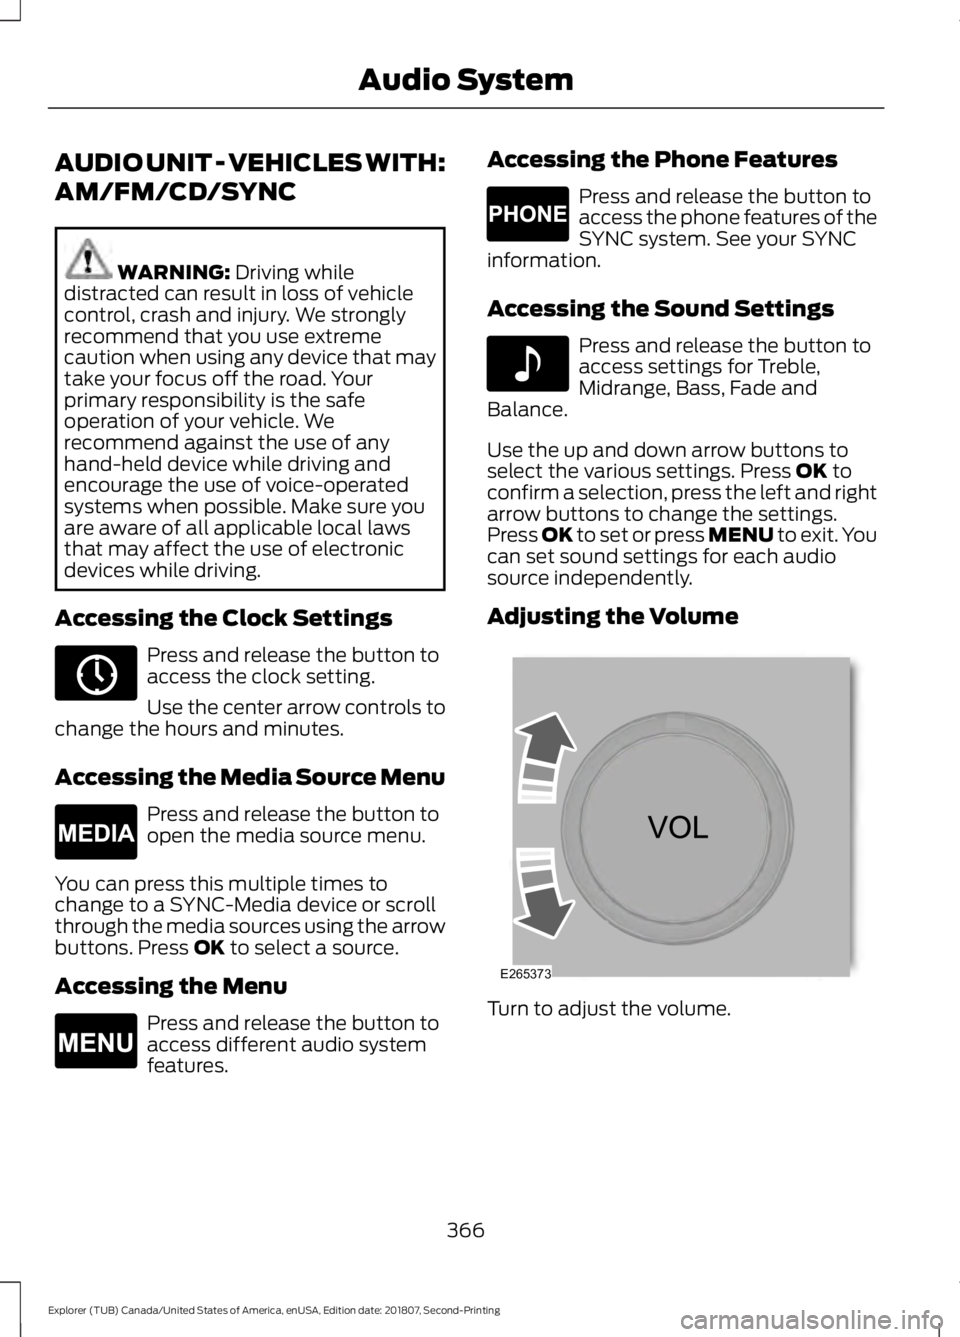
Accessing the Clock Settings Press and release the button to
access the clock setting.
Use the center arrow controls to
change the hours and minutes.
Accessing the Media Source Menu Press and release the button to
open the media source menu.
You can press this multiple times to
change to a SYNC-Media device or scroll
through the media sources using the arrow
buttons. Press
OK to select a source.
Accessing the Menu Press and release the button to
access different audio system
features. Accessing the Phone Features Press and release the button to
access the phone features of the
SYNC system. See your SYNC
information.
Accessing the Sound Settings Press and release the button to
access settings for Treble,
Midrange, Bass, Fade and
Balance.
Use the up and down arrow buttons to
select the various settings. Press
OK to
confirm a selection, press the left and right
arrow buttons to change the settings.
Press OK to set or press MENU to exit. You
can set sound settings for each audio
source independently.
Adjusting the Volume Turn to adjust the volume.
366
Explorer (TUB) Canada/United States of America, enUSA, Edition date: 201807, Second-Printing Audio SystemE265036 E265035 E265038 E265037 E142611 E265373
Page 373 of 571
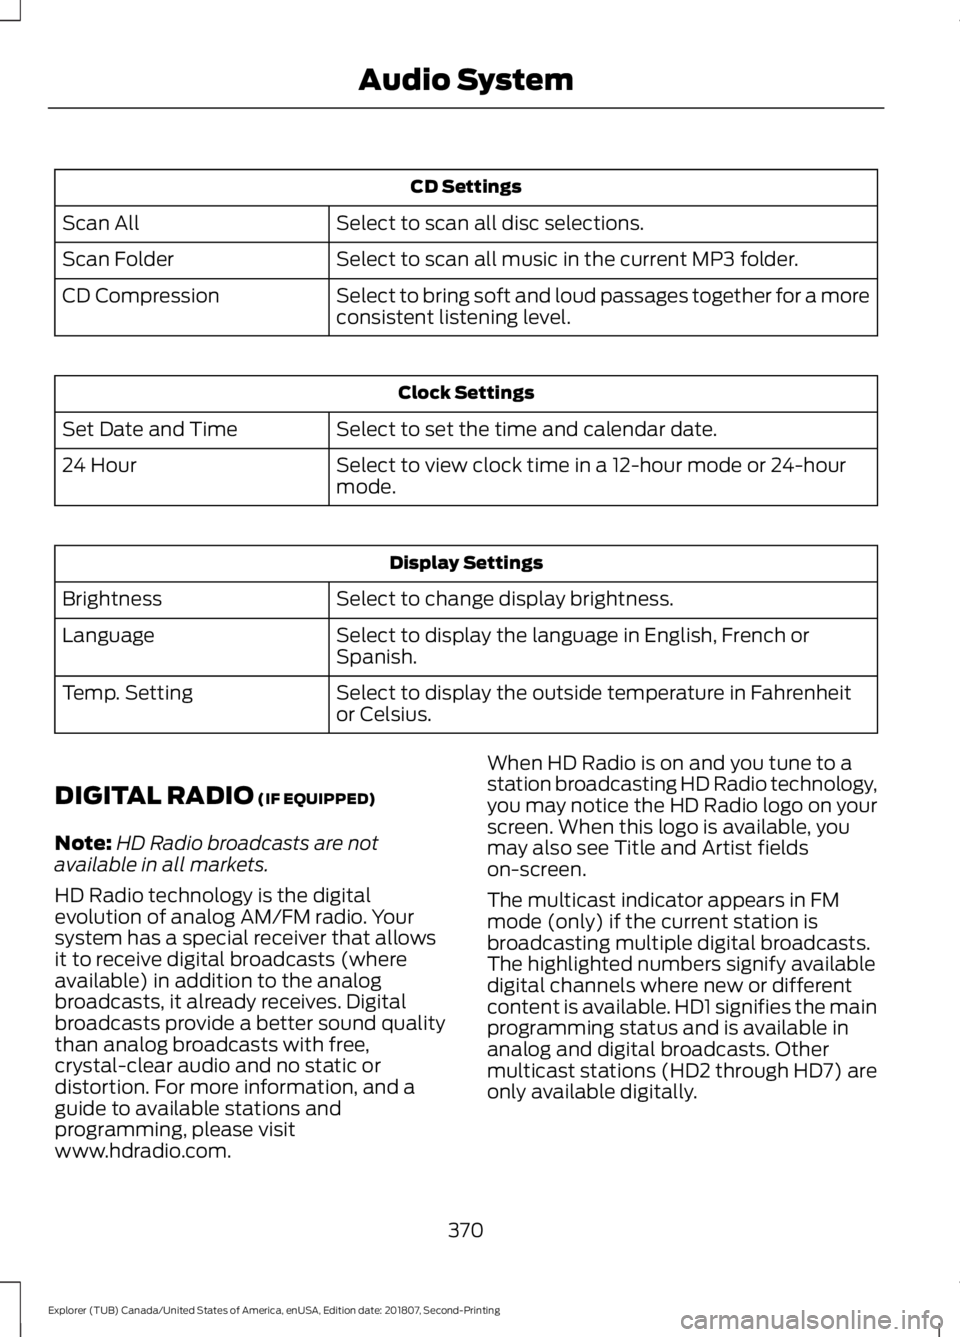
CD Settings
Select to scan all disc selections.
Scan All
Select to scan all music in the current MP3 folder.
Scan Folder
Select to bring soft and loud passages together for a more
consistent listening level.
CD Compression Clock Settings
Select to set the time and calendar date.
Set Date and Time
Select to view clock time in a 12-hour mode or 24-hour
mode.
24 Hour Display Settings
Select to change display brightness.
Brightness
Select to display the language in English, French or
Spanish.
Language
Select to display the outside temperature in Fahrenheit
or Celsius.
Temp. Setting
DIGITAL RADIO (IF EQUIPPED)
Note: HD Radio broadcasts are not
available in all markets.
HD Radio technology is the digital
evolution of analog AM/FM radio. Your
system has a special receiver that allows
it to receive digital broadcasts (where
available) in addition to the analog
broadcasts, it already receives. Digital
broadcasts provide a better sound quality
than analog broadcasts with free,
crystal-clear audio and no static or
distortion. For more information, and a
guide to available stations and
programming, please visit
www.hdradio.com. When HD Radio is on and you tune to a
station broadcasting HD Radio technology,
you may notice the HD Radio logo on your
screen. When this logo is available, you
may also see Title and Artist fields
on-screen.
The multicast indicator appears in FM
mode (only) if the current station is
broadcasting multiple digital broadcasts.
The highlighted numbers signify available
digital channels where new or different
content is available. HD1 signifies the main
programming status and is available in
analog and digital broadcasts. Other
multicast stations (HD2 through HD7) are
only available digitally.
370
Explorer (TUB) Canada/United States of America, enUSA, Edition date: 201807, Second-Printing Audio System
Page 418 of 571
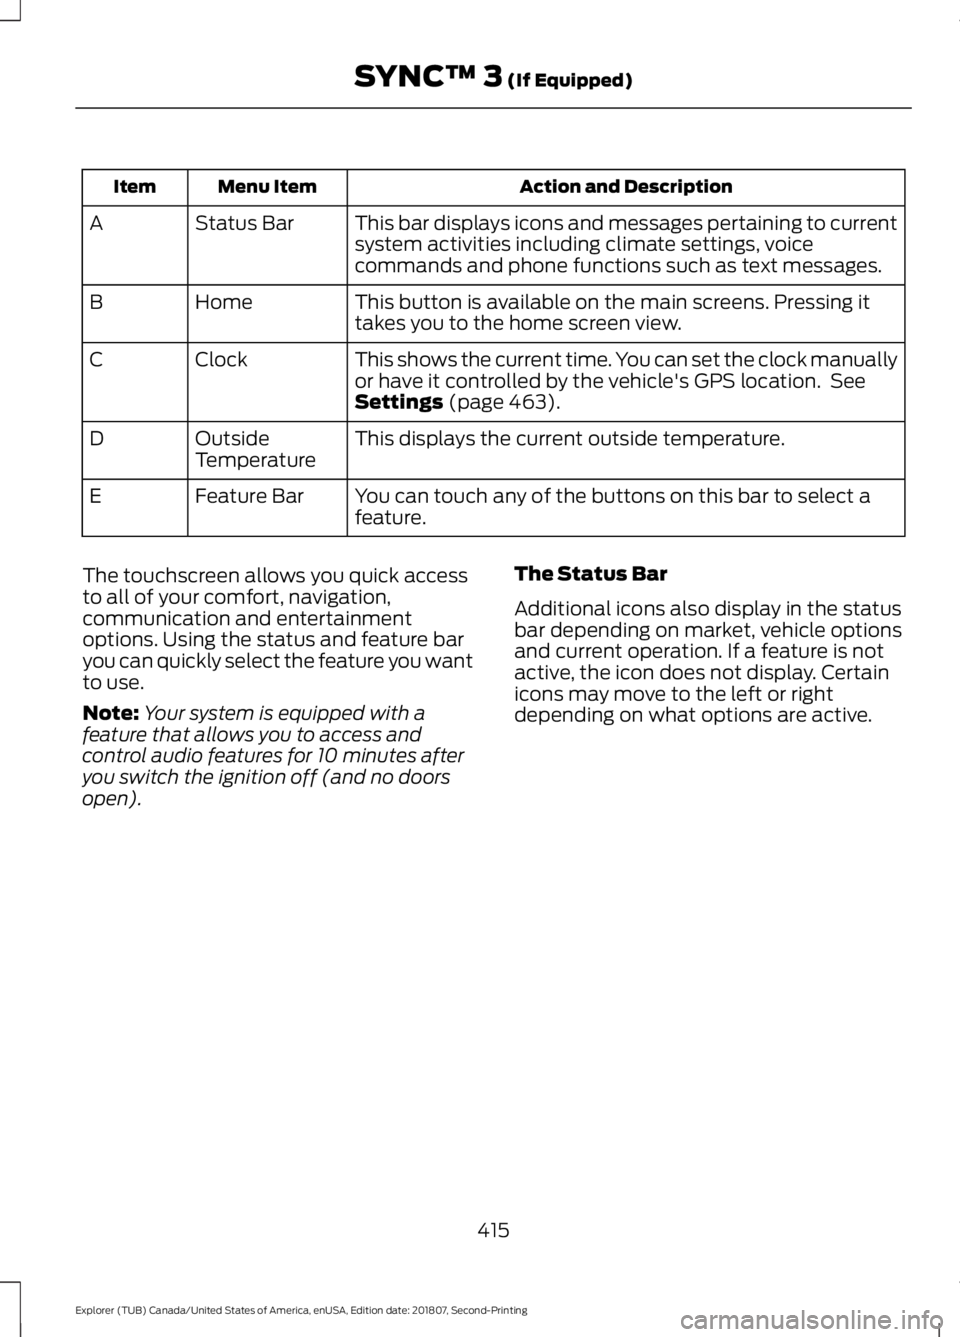
Action and Description
Menu Item
Item
This bar displays icons and messages pertaining to current
system activities including climate settings, voice
commands and phone functions such as text messages.
Status Bar
A
This button is available on the main screens. Pressing it
takes you to the home screen view.
Home
B
This shows the current time. You can set the clock manually
or have it controlled by the vehicle's GPS location. See
Settings (page 463).
Clock
C
This displays the current outside temperature.
Outside
Temperature
D
You can touch any of the buttons on this bar to select a
feature.
Feature Bar
E
The touchscreen allows you quick access
to all of your comfort, navigation,
communication and entertainment
options. Using the status and feature bar
you can quickly select the feature you want
to use.
Note: Your system is equipped with a
feature that allows you to access and
control audio features for 10 minutes after
you switch the ignition off (and no doors
open). The Status Bar
Additional icons also display in the status
bar depending on market, vehicle options
and current operation. If a feature is not
active, the icon does not display. Certain
icons may move to the left or right
depending on what options are active.
415
Explorer (TUB) Canada/United States of America, enUSA, Edition date: 201807, Second-Printing SYNC™ 3
(If Equipped)
Page 468 of 571

Action and Description
Menu Item
This allows you to view the version level of the Gracenote Database.
Gracenote® Data-
base Info
This allows you to view the manufacturer and model number of your
media device.
Device Informa-
tion
Erase the stored in media information in order to re-index.
Update Media
Index
Clock
To adjust the time, select the up and down
arrows on either side of the screen. The
arrows on the left adjust the hour and
arrows on the right adjust the minute. You
can then select AM or PM. You can adjust the following features: Action and Description
Menu Item
Select how time displays.
Clock Format
When active, the clock adjusts to time zone changes.
Auto Time Zone
Update This feature is only available in vehicles with navigation.
When selected, the vehicle clock resets to GPS satellite time.
Reset Clock to
GPS Time
The system automatically saves any
updates you make to the settings. Bluetooth
Pressing this button allows you to access
the following: Action
Menu Item
Turning Bluetooth off disconnects all devices and does not permit
new connections.
Bluetooth
You must activate Bluetooth to pair a
Bluetooth-enabled device.
The processes of pairing a Bluetooth
device is the same as pairing a phone. See
Pairing a Device in Phone settings for how
to pair a device and the available options. Phone
Pair your Bluetooth-enabled phone with
the system before using the functions in
hands-free mode.
Switch on Bluetooth on your device to
begin pairing. See your phone
’s manual if
necessary.
465
Explorer (TUB) Canada/United States of America, enUSA, Edition date: 201807, Second-Printing SYNC™ 3 (If Equipped)
Page 558 of 571
1
180 Degree Camera.....................................215
Camera Views...................................................... 216
Using the System................................................ 216
4
4WD See: Four-Wheel Drive..................................... 188
A
A/C See: Climate Control......................................... 129
About This Manual...........................................7
ABS See: Brakes........................................................... 193
ABS driving hints See: Hints on Driving With Anti-Lock
Brakes................................................................ 193
Accessories.....................................................491 Exterior Style........................................................ 491
Interior Style......................................................... 491
Lifestyle.................................................................. 491
Peace of Mind...................................................... 491
Accessories See: Replacement Parts
Recommendation............................................ 12
ACC See: Using Adaptive Cruise Control.............218
Active Park Assist........................................206 Using Active Park Assist.................................. 207
Adjusting the Headlamps
........................299
Vertical Aim Adjustment................................ 299
Adjusting the Pedals......................................81
Adjusting the Steering Wheel - Vehicles With: Manual Adjustable Steering
Column .............................................................
77
Adjusting the Steering Wheel - Vehicles With: Power Adjustable Steering
Column .............................................................
77
End of Travel Position......................................... 78
Memory Feature.................................................... 78
Airbag Disposal
...............................................52
Air Conditioning See: Climate Control......................................... 129Air Filter
See: Changing the Engine Air Filter............304
Alarm See: Anti-Theft Alarm........................................ 76
Ambient Lighting...........................................89 Adjusting the Brightness................................... 89
Changing the Color............................................. 89
Switching Ambient Lighting Off..................... 89
Switching Ambient Lighting On..................... 89
Anti-Theft Alarm
............................................76
Arming the Alarm................................................. 76
Disarming the Alarm........................................... 76
Appendices.....................................................514
Apps.................................................................460 ........................................................................\
......... 460
SiriusXM Traffic and Travel Link................... 462
At a Glance........................................................16
Audible Warnings and Indicators...........102 Automatic Transmission Warning
Chime................................................................. 103
Engine On Warning Chime.............................. 102
Headlamps On Warning Chime.................... 102
Key in Ignition Warning Chime....................... 102
Keyless Warning Alert ...................................... 102
Parking Brake On Warning Chime................102
Audio Control
...................................................79
Seek and Media.................................................... 79
Audio System................................................362 General Information......................................... 362
Audio Unit - Vehicles With: AM/FM/CD/ SYNC.............................................................366
Accessing the Clock Settings....................... 366
Accessing the Media Source Menu............366
Accessing the Menu......................................... 366
Accessing the Phone Features..................... 366
Accessing the Sound Settings..................... 366
Adjusting the Volume...................................... 366
Changing Radio Stations................................ 367
Ejecting the CD................................................... 367
Inserting a CD...................................................... 367
Listening to a CD................................................ 367
Listening to Satellite Radio............................ 367
Listening to the Radio...................................... 367
Menu Structure.................................................. 368
Muting the Audio................................................ 367
Playing or Pausing Media................................ 367
Switching the Audio Unit On and Off.........367
Using a Cell Phone............................................ 367
555
Explorer (TUB) Canada/United States of America, enUSA, Edition date: 201807, Second-Printing Index
Page 567 of 571

Rear Under Floor Storage.........................239
Adjustable Load Floor...................................... 239
Cargo Management System......................... 239
Rear View Camera........................................212 Camera Guidelines............................................. 213
Manual Zoom....................................................... 215
Obstacle Distance Indicator........................... 214
Rear Camera Delay............................................ 215
Using the Rear View Camera System.........213
Rear View Camera See: Rear View Camera.................................... 212
Rear Window Wiper and Washers...........83 Rear Camera Washer.......................................... 83
Rear Window Washer......................................... 83
Rear Window Wiper Blade............................... 83
Recommended Towing Weights...........248
Refueling..........................................................176 Refueling System Overview............................ 176
Refueling System Warning.............................. 178
Refueling Your Vehicle....................................... 177
Remote Control..............................................53 Car Finder................................................................ 58
Integrated Keyhead Transmitter..................... 53
Intelligent Access Key......................................... 54
Memory Feature.................................................... 57
Remote Start......................................................... 58
Replacing the Battery......................................... 55
Sounding the Panic Alarm................................ 58
Remote Start
.................................................138
Automatic Settings............................................ 138
Heated and Cooled Features......................... 138
Last Settings........................................................ 138
Repairing Minor Paint Damage.................311
Replacement Parts Recommendation........................................12
Collision Repairs.................................................... 12
Scheduled Maintenance and Mechanical Repairs.................................................................. 12
Warranty on Replacement Parts..................... 12
Replacing a Lost Key or Remote Control............................................................59
Reporting Safety Defects (Canada Only)..............................................................269
Reporting Safety Defects (U.S. Only)..............................................................269
Roadside Assistance..................................258 Vehicles Sold in Canada: Getting Roadside
Assistance....................................................... 259Vehicles Sold in the United States: Getting
Roadside Assistance................................... 258
Vehicles Sold in the United States: Using Roadside Assistance................................... 258
Roadside Emergencies
..............................258
Roof Racks and Load Carriers................240
Adjusting the Crossbar..................................... 241
Thumbwheel Kit.................................................. 241
Running-In See: Breaking-In................................................. 255
Running Out of Fuel.....................................174 Adding Fuel From a Portable Fuel
Container........................................................... 175
Filling a Portable Fuel Container................... 175
S
Safety Canopy ™
............................................49
Safety Precautions.......................................172
Satellite Radio
...............................................372
Satellite Radio Electronic Serial Number
(ESN)................................................................. 373
Satellite Radio Reception Factors...............373
SiriusXM Satellite Radio Service.................. 373
Troubleshooting................................................. 374
Scheduled Maintenance Record...........503
Scheduled Maintenance
..........................495
Seatbelt Extension........................................42
Seatbelt Height Adjustment......................39
Seatbelt Reminder
........................................40
Belt-Minder™....................................................... 40
Seatbelts...........................................................35 Principle of Operation......................................... 35
Seatbelt Warning Lamp and Indicator Chime..............................................................40
Conditions of operation.................................... 40
Seats.................................................................139
Security...............................................................75
Settings...........................................................463 911 Assist.............................................................. 468
Ambient Lighting................................................ 475
Bluetooth.............................................................. 465
Clock...................................................................... 465
Display.................................................................... 476
General................................................................... 473
Media Player....................................................... 464
Mobile Apps.......................................................... 471
Navigation............................................................ 469
564
Explorer (TUB) Canada/United States of America, enUSA, Edition date: 201807, Second-Printing Index