2019 FORD EXPLORER ignition
[x] Cancel search: ignitionPage 255 of 571
2. Set your vehicle parking brake.
3. Place the automatic transmission in
park (P).
4. Place wheel chocks in front and back of the trailer wheels. (Chocks not
included with vehicle.)
Launching or Retrieving a Boat or
Personal Watercraft (PWC)
Note: Disconnect the wiring to the trailer
before backing the trailer into the water.
Note: Reconnect the wiring to the trailer
after
removing the trailer from the water.
When backing down a ramp during boat
launching or retrieval:
• Do not allow the static water level to
rise above the bottom edge of the rear
bumper.
• Do not allow waves to break higher
than
6 in (15 cm) above the bottom
edge of the rear bumper.
Exceeding these limits may allow water to
enter vehicle components:
• Causing internal damage to the
components.
• Affecting driveability, emissions, and
reliability.
Replace the rear axle lubricant anytime
the rear axle has been submerged in water.
Water may have contaminated the rear
axle lubricant, which is not normally
checked or changed unless a leak is
suspected or other axle repair is required. TOWING THE VEHICLE ON
FOUR WHEELS - 2.3L
ECOBOOST™
Emergency Towing WARNING:
If your vehicle has a
steering wheel lock make sure the
ignition is in the accessory or on position
when being towed.
If your vehicle becomes inoperable
(without access to wheel dollies,
car-hauling trailer, or flatbed transport
vehicle), it can be flat-towed (all wheels
on the ground, regardless of the powertrain
and transmission configuration) under the
following conditions:
• Your vehicle is facing forward for
towing in a forward direction.
• Place the transmission in neutral (N).
If you cannot shift the transmission into
neutral (N), you may need to override
the gear shifter.
See Automatic
Transmission (page 184).
• Maximum speed is 35 mph (56 km/h).
• Maximum distance is
50 mi (80 km).
TOWING THE VEHICLE ON
FOUR WHEELS - 3.5L
DURATEC/3.5L ECOBOOST™ WARNING:
If your vehicle has a
steering wheel lock make sure the
ignition is in the accessory or on position
when being towed.
252
Explorer (TUB) Canada/United States of America, enUSA, Edition date: 201807, Second-Printing Towing
Page 256 of 571
Emergency Towing
If your vehicle becomes inoperable
(without access to wheel dollies or vehicle
transport trailer), it can be flat-towed (all
wheels on the ground, regardless of the
powertrain and transmission
configuration) under the following
conditions:
•
Your vehicle is facing forward for
towing in a forward direction.
• Shift into neutral (N). If you cannot
shift into neutral (N), you may need to
override it. See Transmission (page
184).
• Maximum speed is 35 mph (56 km/h).
• Maximum distance is
50 mi (80 km).
Recreational Towing
Note: Put your climate control system in
recirculated air mode to prevent exhaust
fumes from entering the vehicle. See
Climate Control
(page 129).
Follow these guidelines if you have a need
for recreational (RV) towing. An example
of recreational towing would be towing
your vehicle behind a motorhome. We
designed these guidelines to prevent
damage to your transmission.
You can tow your vehicle with all four
wheels on the ground.
If you tow your vehicle with all four wheels
on the ground:
• Tow only in the forward direction.
• Release the parking brake.
Vehicles with Keyless Start
1. Start the vehicle by pressing the brake pedal, and then pressing the keyless
start button until the vehicle starts.
2. Press the brake pedal and shift the gearshift into neutral (N). 3. Switch the vehicle off by pressing the
keyless start button once.
4. Disconnect the negative (black) cable from the battery. You need the door
key to lock and unlock doors when the
battery cable is disconnected. See
Changing the 12V Battery (page 296
).
Note: The anti-theft system does not work
until you reconnect the battery cable.
Start the engine within 15 minutes of
reconnecting the battery cable.
Vehicles with an Ignition Key
1. Start the vehicle by pressing the brake pedal, and then turning the ignition key
until the vehicle starts.
2. Press the brake pedal and shift the transmission into neutral (N).
3. Switch off your vehicle by turning the ignition key past the accessory position.
The key position is between the
accessory and off positions. See
Ignition Switch
(page 166).
4. Disconnect the negative (black) cable from the battery. See
Changing the
12V Battery (page 296).
Note: The anti-theft system does not work
until you reconnect the battery cable.
Start the engine within 15 minutes of
reconnecting the battery cable.
253
Explorer (TUB) Canada/United States of America, enUSA, Edition date: 201807, Second-Printing Towing
Page 262 of 571
Vehicles Sold in Canada: Getting
Roadside Assistance
To fully assist you should you have a
vehicle concern, Ford Motor Company of
Canada, Limited offers a complimentary
roadside assistance program. This program
is eligible within Canada or the continental
United States.
The service is available 24 hours a day,
seven days a week.
This program is separate from the New
Vehicle Limited Warranty, but the coverage
is concurrent with the powertrain coverage
period of your vehicle. Canadian roadside
coverage and benefits may differ from the
U.S. coverage.
If you require more information, please call
us in Canada at 1-800-665-2006, or visit
our website at www.ford.ca.
HAZARD FLASHERS
Note:
The hazard flashers operate when
the ignition is in any position, or if the key is
not in the ignition. If used when the vehicle
is not running, the battery loses charge. As
a result, there may be insufficient power to
restart your vehicle. The flasher control is on the
instrument panel. Use your
hazard flashers when your
vehicle is creating a safety hazard for other
motorists.
• Press the flasher control and all front
and rear direction indicators flash.
• Press the button again to switch them
off. FUEL SHUTOFF WARNING: If your vehicle has
been involved in a crash, have the fuel
system checked. Failure to follow this
instruction could result in fire, personal
injury or death.
Note: When you try to restart your vehicle
after a fuel shutoff, the vehicle makes sure
that various systems are safe to restart.
Once the vehicle determines the systems
are safe, then the vehicle allows you to
restart.
Note: In the event that your vehicle does
not restart after your third attempt, contact
a qualified technician.
The fuel pump shutoff stops the flow of
fuel to the engine in the event of a
moderate to severe crash. Not every
impact causes a shutoff.
Should your vehicle shut off after a crash,
you may restart your vehicle.
If your vehicle has a key system:
1. Switch off the ignition.
2. Switch to start position.
3. Switch off the ignition.
4. Switch on the ignition to re-enable the
fuel pump.
5. If the vehicle does not start, repeat steps 1 through 4.
If your vehicle has a push button start
system:
1. Press
START/STOP to switch off your
vehicle.
2. Press the brake pedal and START/STOP
to switch on your
vehicle.
3. Remove your foot from the brake pedal
and press
START/STOP to switch off
your vehicle.
259
Explorer (TUB) Canada/United States of America, enUSA, Edition date: 201807, Second-Printing Roadside Emergencies
Page 275 of 571

Protected Component
Fuse Rating
Fuse or Relay
Number
Powertrain control module power.
20A 1
1
Engine emissions (MIL).
20A 1
2
A/C clutch control relay coil.
20A 1
3
Variable Air Conditioning Compressor.
Active grille shutters.
Ignition coils.
20A 1
4
Not used.
—
5
Not used.
—
6
Not used.
—
7
Not used.
—
8
Not used.
—
9
Heated mirrors.
15A 1
10
Not used.
—
11
Heated rear window.
40A 2
12
Not used.
—
13
Powertrain control module relay.
—
14
Horn relay power.
20A 1
15
A/C clutch relay power.
10A 1
16
Rear heated window and heated mirrors
relay.
—
17
Rear blower motor relay.
—
18
Not used.
—
19
Left hand side cooling fan relay.
—
20
Cooling fans series/parallel relay.
—
21
Electronic fan relay 2.
25A 2
22
272
Explorer (TUB) Canada/United States of America, enUSA, Edition date: 201807, Second-Printing Fuses
Page 276 of 571

Protected Component
Fuse Rating
Fuse or Relay
Number
Not used.
—
23
Right hand side electronic cooling fan 3
relay.
—
24
Not used.
—
25
Anti-lock brake system valves.
30A 2
26
Trailer tow battery charge relay power.
30A 2
27
Not used.
—
28
Starter relay.
—
29
Not used.
—
30
Electric power-assisted steering.
10A 1
31
Anti-lock brake system module.
10A 1
32
Powertrain control module (Ignition Switch
Position - Run).
10A 1
33
Blind spot information system.
10A 1
34
Adaptive cruise control.
Front view camera.
Rear camera.
Not used.
—
35
Blower motor relay.
—
36
Trailer tow battery charge relay.
—
37
A/C compressor clutch relay.
—
38
Horn relay.
—
39
Not used.
—
40
Rear blower motor.
40A 2
41
Not used.
—
42
Front blower motor.
40A 2
43
273
Explorer (TUB) Canada/United States of America, enUSA, Edition date: 201807, Second-Printing Fuses
Page 281 of 571

Protected Components
Fuse Rating
Fuse or Relay
Number
Front climate control module.
7.5A 2
12
Instrument cluster.
7.5A 2
13
Smart data link.
Steering column control module.
Extended power module.
10A 2
14
Smart datalink connector power.
10A 2
15
Heads up display.
Not used.
—
16
Electronic finish panel.
5A 2
17
Push button start switch.
5A 2
18
Ignition switch.
Key inhibit.
Transmission control switch.
7.5A 2
19
Not used.
—
20
Terrain management switch.
5A 2
21
Heads up display.
Humidity sensor.
Occupant classification sensor.
5A 2
22
Delayed accessory power.
10A 1
23
Power windows.
Moonroof.
Folding mirror relay.
DC inverter.
Window/moonroof switch illumination.
Central lock relay.
20A 1
24
Left-hand front smart window motor.
30A 1
25
Door zone module.
Right-hand front smart window motor.
30A 1
26
Door zone module.
Moonroof.
30A 1
27
278
Explorer (TUB) Canada/United States of America, enUSA, Edition date: 201807, Second-Printing Fuses
Page 303 of 571
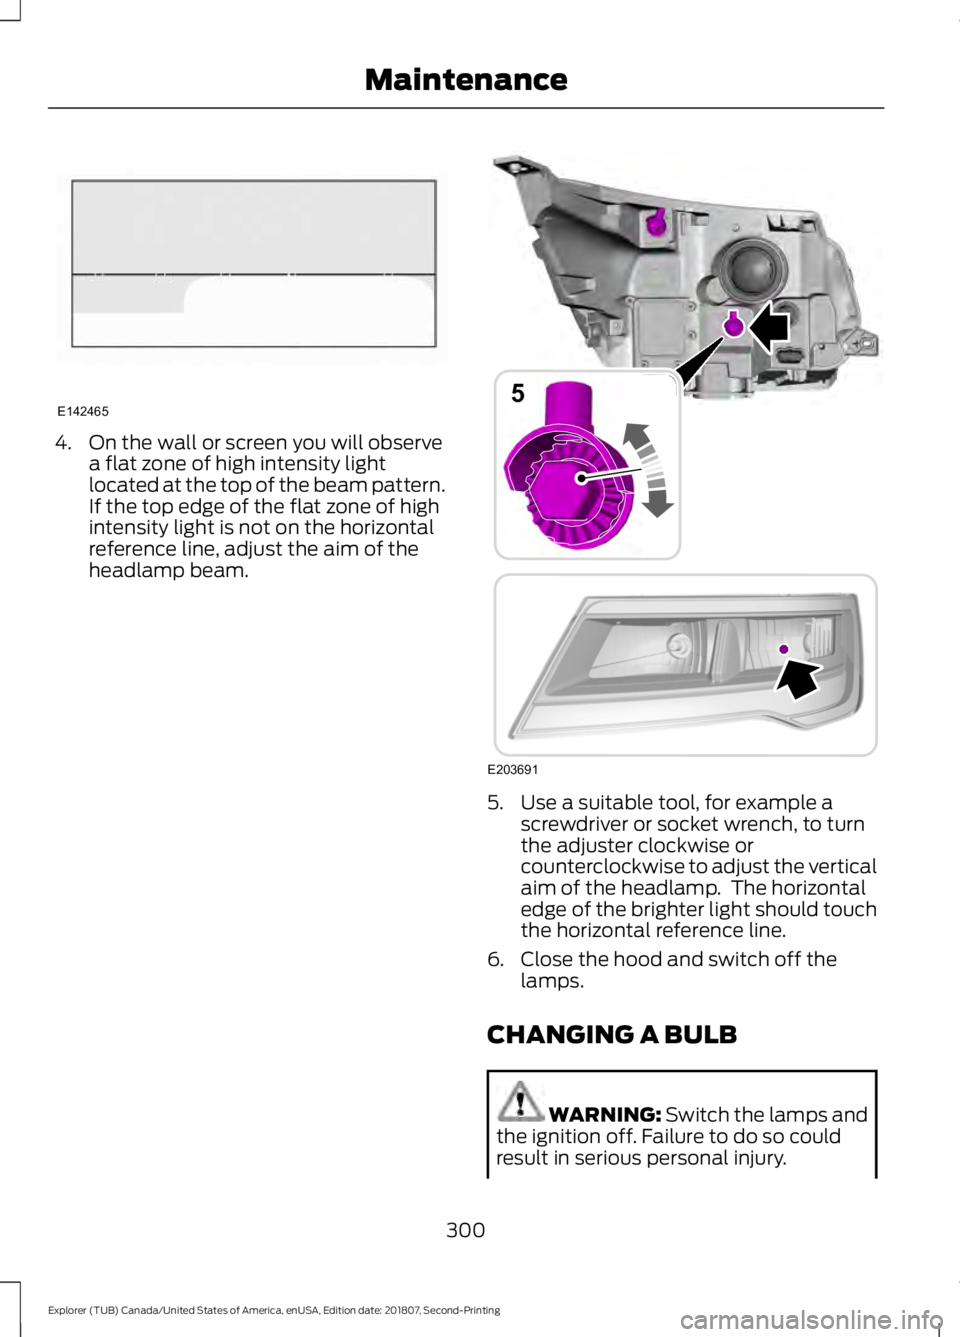
4. On the wall or screen you will observe
a flat zone of high intensity light
located at the top of the beam pattern.
If the top edge of the flat zone of high
intensity light is not on the horizontal
reference line, adjust the aim of the
headlamp beam. 5. Use a suitable tool, for example a
screwdriver or socket wrench, to turn
the adjuster clockwise or
counterclockwise to adjust the vertical
aim of the headlamp. The horizontal
edge of the brighter light should touch
the horizontal reference line.
6. Close the hood and switch off the lamps.
CHANGING A BULB WARNING: Switch the lamps and
the ignition off. Failure to do so could
result in serious personal injury.
300
Explorer (TUB) Canada/United States of America, enUSA, Edition date: 201807, Second-Printing MaintenanceE142465 E203691
5
Page 304 of 571
WARNING: Bulbs can become hot.
Let the bulb cool down before removing
it. Failure to do so could result in
personal injury.
Use the correct specification bulb. See
Bulb Specification Chart (page 360).
Install in the reverse order unless otherwise
stated.
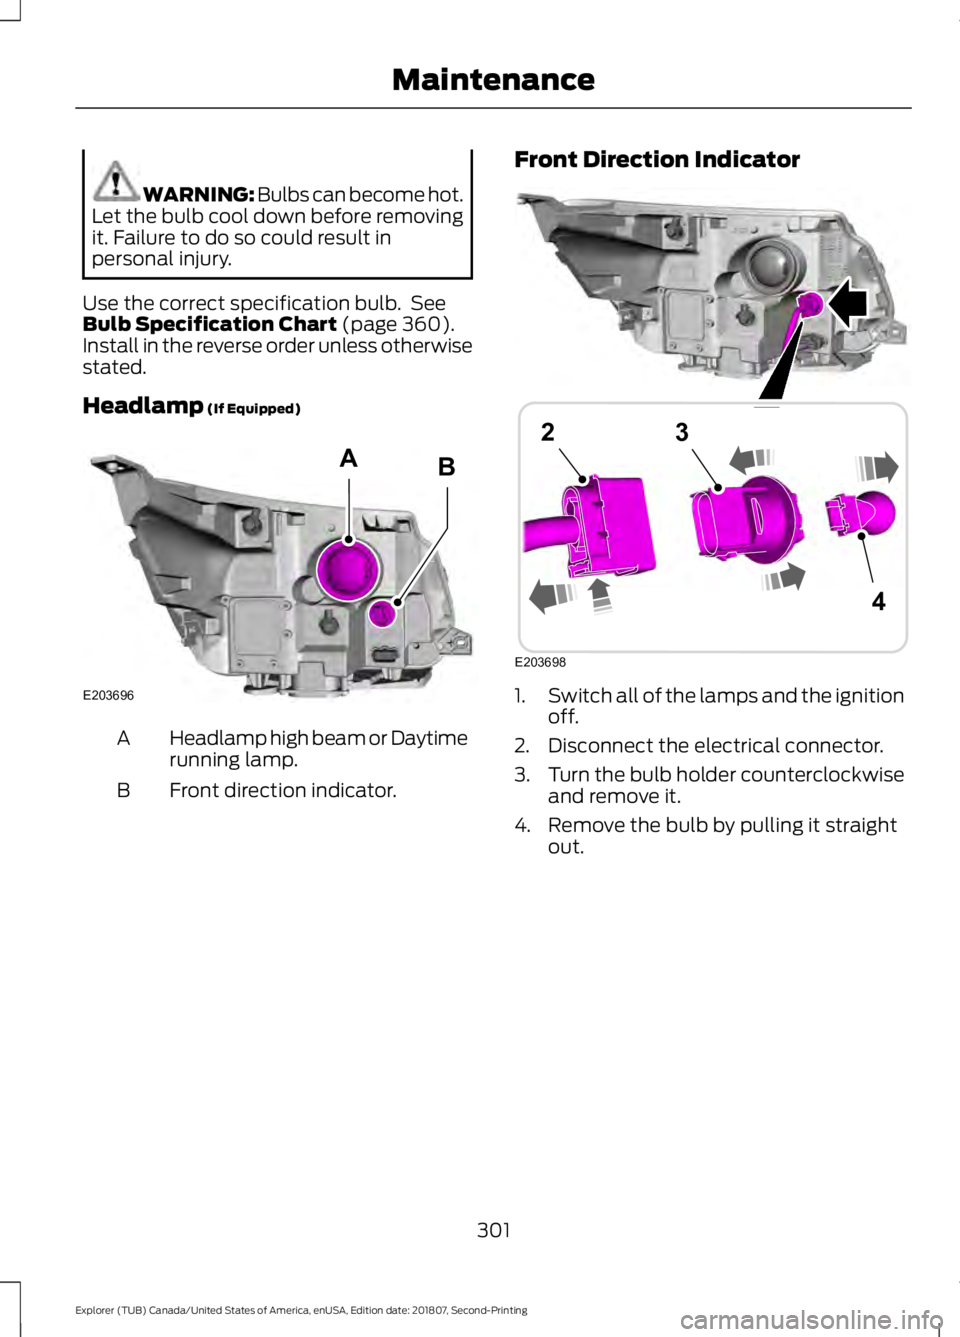
Headlamp
(If Equipped) Headlamp high beam or Daytime
running lamp.
A
Front direction indicator.
B Front Direction Indicator
1.
Switch all of the lamps and the ignition
off.
2. Disconnect the electrical connector.
3. Turn the bulb holder counterclockwise
and remove it.
4. Remove the bulb by pulling it straight out.
301
Explorer (TUB) Canada/United States of America, enUSA, Edition date: 201807, Second-Printing MaintenanceE203696
AB E203698
4
23