Page 123 of 571

Electronic Stability Control
Action
Message
The system detects a malfunction due to a blocked sensor.
ESC Service required
Displays the traction control system status.
ESC Off
Displays the traction control system status.
ESC On
Engine Action
Message
Displays when the engine temperature is too high. Stop yourvehicle in a safe place and allow the engine to cool. If the
problem persists, contact an authorized dealer. See Engine Coolant Check (page 289).
High Engine Temper-
ature Stop Safely
Engine service is required. Contact an authorized dealer.
Engine Fault Service
Now
Check the engine oil level. See Engine Oil Check (page 287).
Engine Oil Level Low
Check Level
Fuel Action
Message
An early reminder of a low fuel condition.
Fuel Level LOW
The fuel fill inlet may not be properly closed.
Check Fuel Fill Inlet
Hill Descent Control Action
Message
Displays when you deactivate hill descent control mode.
Hill Descent Control OFF
Displays when hill descent speed exceeds 20 mph (32 km/h).
For Hill Descent Reduce
Speed
Displays when hill descent control mode requires you to shift the transmission into gear.
For Hill Descent Select
Gear
Displays when the hill control mode requires you to resume control.
Hill Descent Driver
Resume Control
120
Explorer (TUB) Canada/United States of America, enUSA, Edition date: 201807, Second-Printing Information Displays
Page 127 of 571
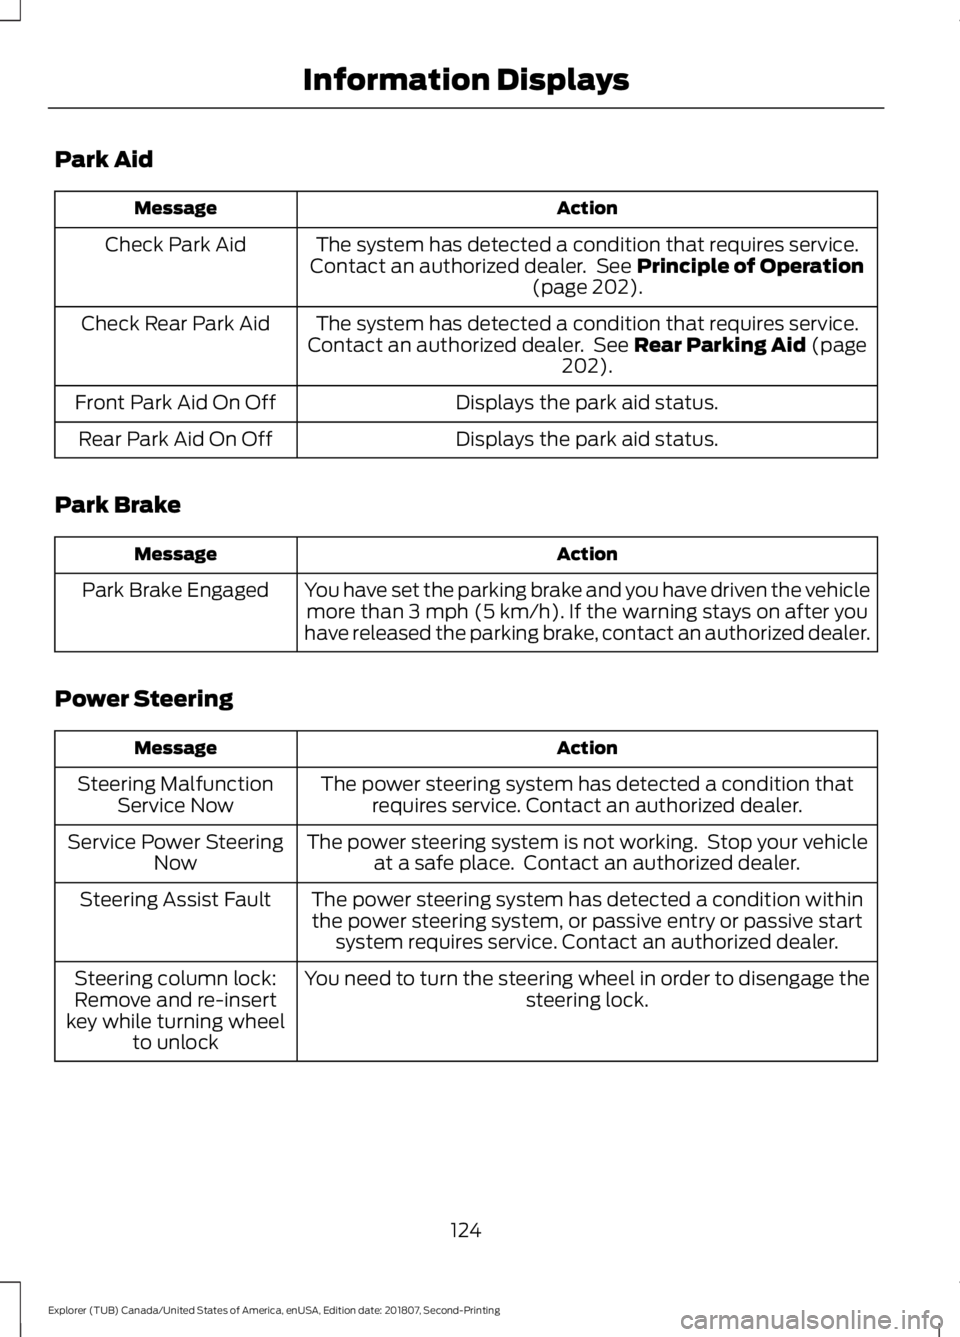
Park Aid
Action
Message
The system has detected a condition that requires service.
Contact an authorized dealer. See Principle of Operation
(page 202).
Check Park Aid
The system has detected a condition that requires service.
Contact an authorized dealer. See
Rear Parking Aid (page
202).
Check Rear Park Aid
Displays the park aid status.
Front Park Aid On Off
Displays the park aid status.
Rear Park Aid On Off
Park Brake Action
Message
You have set the parking brake and you have driven the vehiclemore than 3 mph (5 km/h). If the warning stays on after you
have released the parking brake, contact an authorized dealer.
Park Brake Engaged
Power Steering Action
Message
The power steering system has detected a condition thatrequires service. Contact an authorized dealer.
Steering Malfunction
Service Now
The power steering system is not working. Stop your vehicleat a safe place. Contact an authorized dealer.
Service Power Steering
Now
The power steering system has detected a condition withinthe power steering system, or passive entry or passive start system requires service. Contact an authorized dealer.
Steering Assist Fault
You need to turn the steering wheel in order to disengage thesteering lock.
Steering column lock:
Remove and re-insert
key while turning wheel to unlock
124
Explorer (TUB) Canada/United States of America, enUSA, Edition date: 201807, Second-Printing Information Displays
Page 128 of 571

Pre-Collision Assist
Action
Message
A fault with the system has occurred. Contact an authorized dealer.
Pre-Collision Warning
Malfunction
You have a blocked sensor due to bad weather, ice, mud or
water in front of the radar sensor. You can typically clean the sensor to resolve. See Pre-Collision Assist (page 236).
Pre-Collision Warning
Not Available SensorBlocked See Manual
A fault with the system has occurred. Contact an authorized dealer.
Pre-Collision Warning
Not Available
Remote Start Action
Message
A reminder to apply the brake and push the gearshift buttonto drive your vehicle after a remote start.
To Drive: Press Brake
and Gear Shift Button
Seats Action
Message
Objects are by the passenger seat. After you move the objectsaway from the seat, if the warning stays on or continues to
come on, contact an authorized dealer as soon as possible.
Occupant Sensor
BLOCKED Remove
Objects Near Passenger Seat
A reminder that memory seats are not available while driving.
Memory Recall Not
Permitted While Driving
Shows where you have saved your memory setting.
Memory X Saved
125
Explorer (TUB) Canada/United States of America, enUSA, Edition date: 201807, Second-Printing Information Displays
Page 131 of 571
Action
Message
The transmission has overheated and has limited functionality.
Transmission Limited
Function See Manual
The transmission is too cold. Wait for it to warm up beforeyou drive.
Transmission Warming
Up Please Wait
A reminder to shift into park.
Transmission Not in Park
A request for you to apply the brake as needed by the trans-mission.
Press Brake Pedal
The transmission has adjusted the shift strategy.
Transmission Adjusted
The transmission is adjusting the shift strategy.
Transmission Adapt-
Mode
The transmission is locked and unable to select gears.
Transmission Indicat-
Mode Lockup On
The transmission is unlocked and free to select gears.
Transmission Indicat-
Mode Lockup Off
128
Explorer (TUB) Canada/United States of America, enUSA, Edition date: 201807, Second-Printing Information Displays
Page 133 of 571
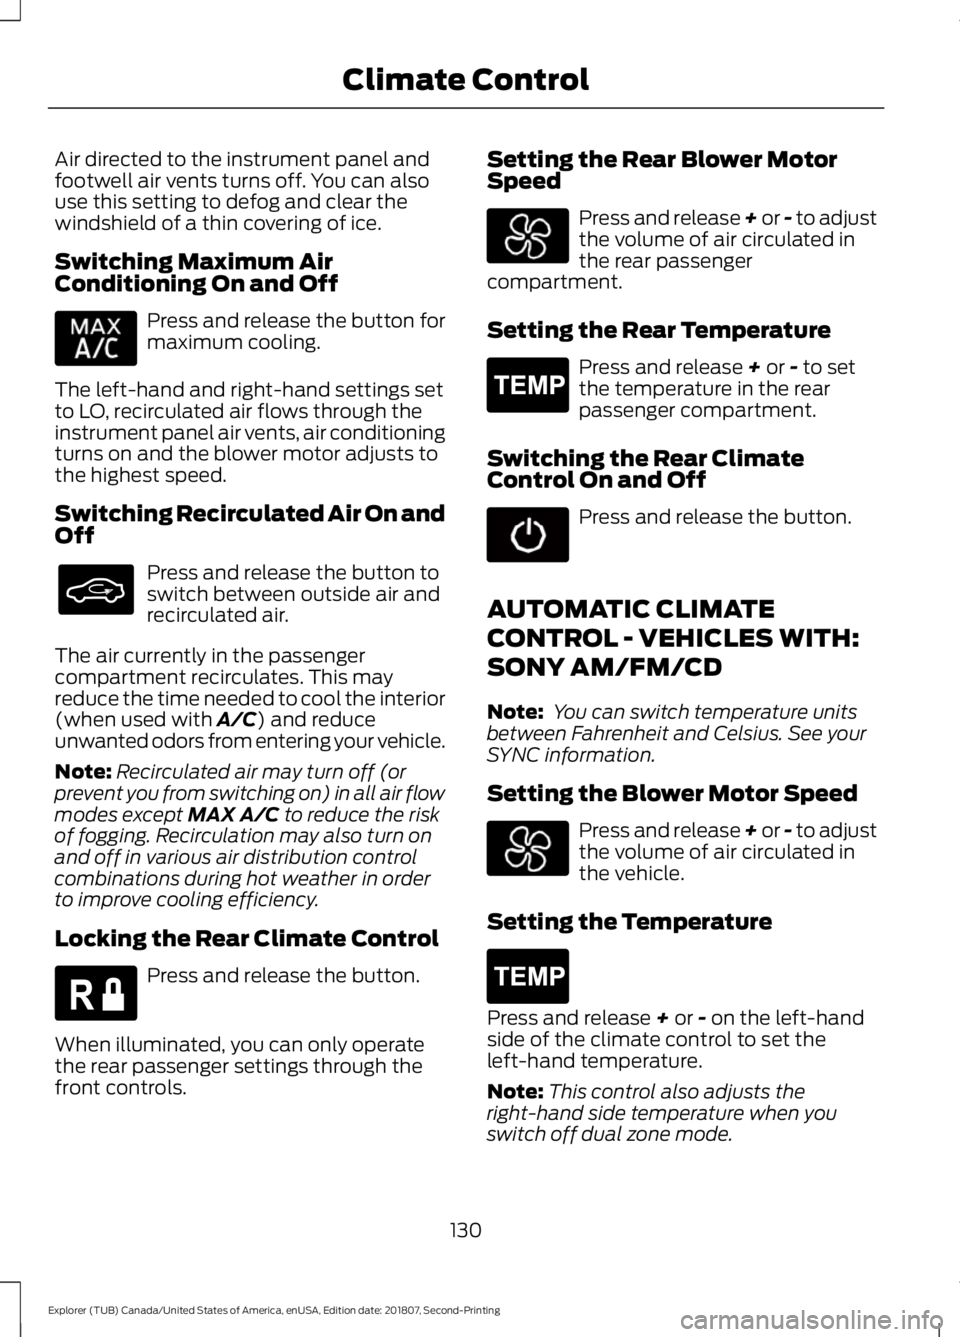
Air directed to the instrument panel and
footwell air vents turns off. You can also
use this setting to defog and clear the
windshield of a thin covering of ice.
Switching Maximum Air
Conditioning On and Off
Press and release the button for
maximum cooling.
The left-hand and right-hand settings set
to LO, recirculated air flows through the
instrument panel air vents, air conditioning
turns on and the blower motor adjusts to
the highest speed.
Switching Recirculated Air On and
Off Press and release the button to
switch between outside air and
recirculated air.
The air currently in the passenger
compartment recirculates. This may
reduce the time needed to cool the interior
(when used with A/C) and reduce
unwanted odors from entering your vehicle.
Note: Recirculated air may turn off (or
prevent you from switching on) in all air flow
modes except
MAX A/C to reduce the risk
of fogging. Recirculation may also turn on
and off in various air distribution control
combinations during hot weather in order
to improve cooling efficiency.
Locking the Rear Climate Control Press and release the button.
When illuminated, you can only operate
the rear passenger settings through the
front controls. Setting the Rear Blower Motor
Speed Press and release + or - to adjust
the volume of air circulated in
the rear passenger
compartment.
Setting the Rear Temperature Press and release
+ or - to set
the temperature in the rear
passenger compartment.
Switching the Rear Climate
Control On and Off Press and release the button.
AUTOMATIC CLIMATE
CONTROL - VEHICLES WITH:
SONY AM/FM/CD
Note: You can switch temperature units
between Fahrenheit and Celsius. See your
SYNC information.
Setting the Blower Motor Speed Press and release + or - to adjust
the volume of air circulated in
the vehicle.
Setting the Temperature Press and release
+ or - on the left-hand
side of the climate control to set the
left-hand temperature.
Note: This control also adjusts the
right-hand side temperature when you
switch off dual zone mode.
130
Explorer (TUB) Canada/United States of America, enUSA, Edition date: 201807, Second-Printing Climate Control E266664 E265400 E265400
Page 139 of 571
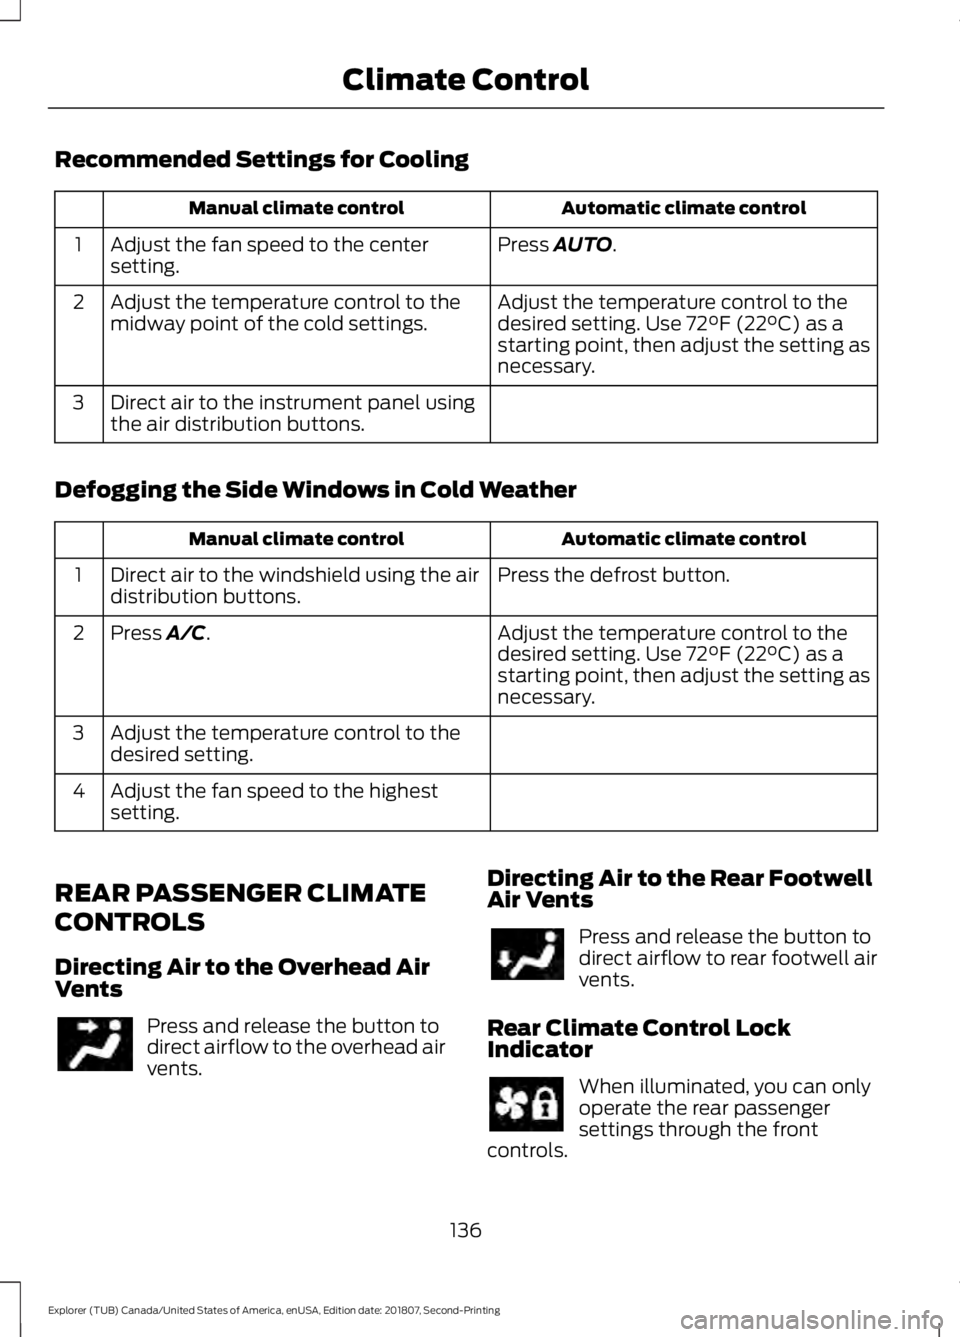
Recommended Settings for Cooling
Automatic climate control
Manual climate control
Press AUTO.
Adjust the fan speed to the center
setting.
1
Adjust the temperature control to the
desired setting. Use
72°F (22°C) as a
starting point, then adjust the setting as
necessary.
Adjust the temperature control to the
midway point of the cold settings.
2
Direct air to the instrument panel using
the air distribution buttons.
3
Defogging the Side Windows in Cold Weather Automatic climate control
Manual climate control
Press the defrost button.
Direct air to the windshield using the air
distribution buttons.
1
Adjust the temperature control to the
desired setting. Use
72°F (22°C) as a
starting point, then adjust the setting as
necessary.
Press A/C.
2
Adjust the temperature control to the
desired setting.
3
Adjust the fan speed to the highest
setting.
4
REAR PASSENGER CLIMATE
CONTROLS
Directing Air to the Overhead Air
Vents Press and release the button to
direct airflow to the overhead air
vents.
Directing Air to the Rear Footwell
Air Vents Press and release the button to
direct airflow to rear footwell air
vents.
Rear Climate Control Lock
Indicator When illuminated, you can only
operate the rear passenger
settings through the front
controls.
136
Explorer (TUB) Canada/United States of America, enUSA, Edition date: 201807, Second-Printing Climate Control
Page 143 of 571
WARNING: The head restraint is
a safety device. Whenever possible it
should be installed and properly
adjusted when the seat is occupied.
Failure to adjust the head restraint
properly could reduce its effectiveness
during certain impacts.
Note: Adjust the seatback to an upright
driving position before adjusting the head
restraint. Adjust the head restraint so that
the top of it is level with the top of your head
and as far forward as possible. Make sure
that you remain comfortable. If you are
extremely tall, adjust the head restraint to
its highest position.
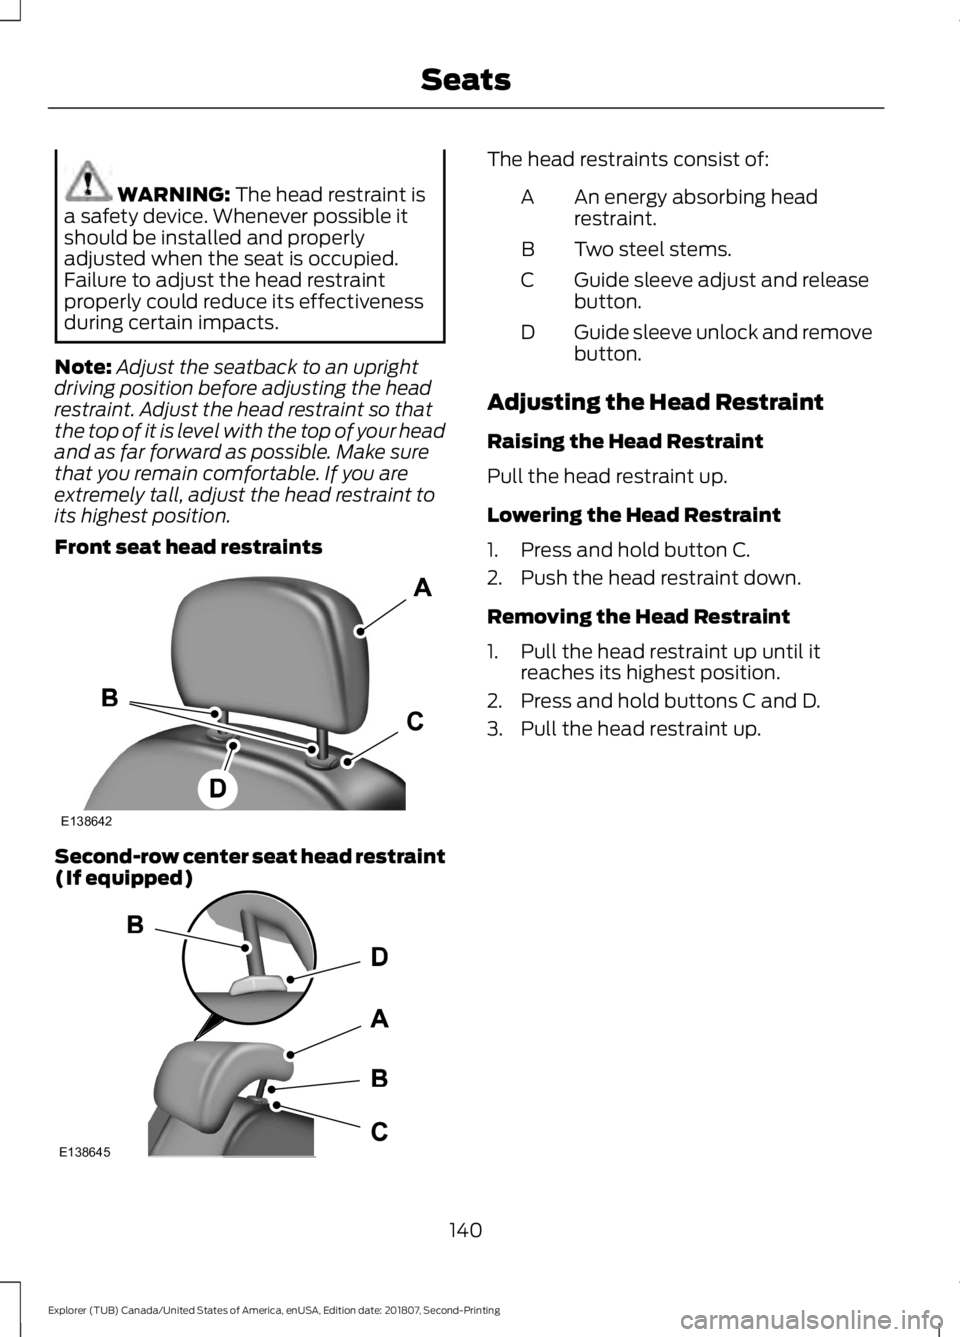
Front seat head restraints Second-row center seat head restraint
(If equipped) The head restraints consist of:
An energy absorbing head
restraint.
A
Two steel stems.
B
Guide sleeve adjust and release
button.
C
Guide sleeve unlock and remove
button.
D
Adjusting the Head Restraint
Raising the Head Restraint
Pull the head restraint up.
Lowering the Head Restraint
1. Press and hold button C.
2. Push the head restraint down.
Removing the Head Restraint
1. Pull the head restraint up until it reaches its highest position.
2. Press and hold buttons C and D.
3. Pull the head restraint up.
140
Explorer (TUB) Canada/United States of America, enUSA, Edition date: 201807, Second-Printing SeatsE138642 E138645
Page 144 of 571
Installing the Head Restraint
Align the steel stems into the guide sleeves
and push the head restraint down until it
locks.
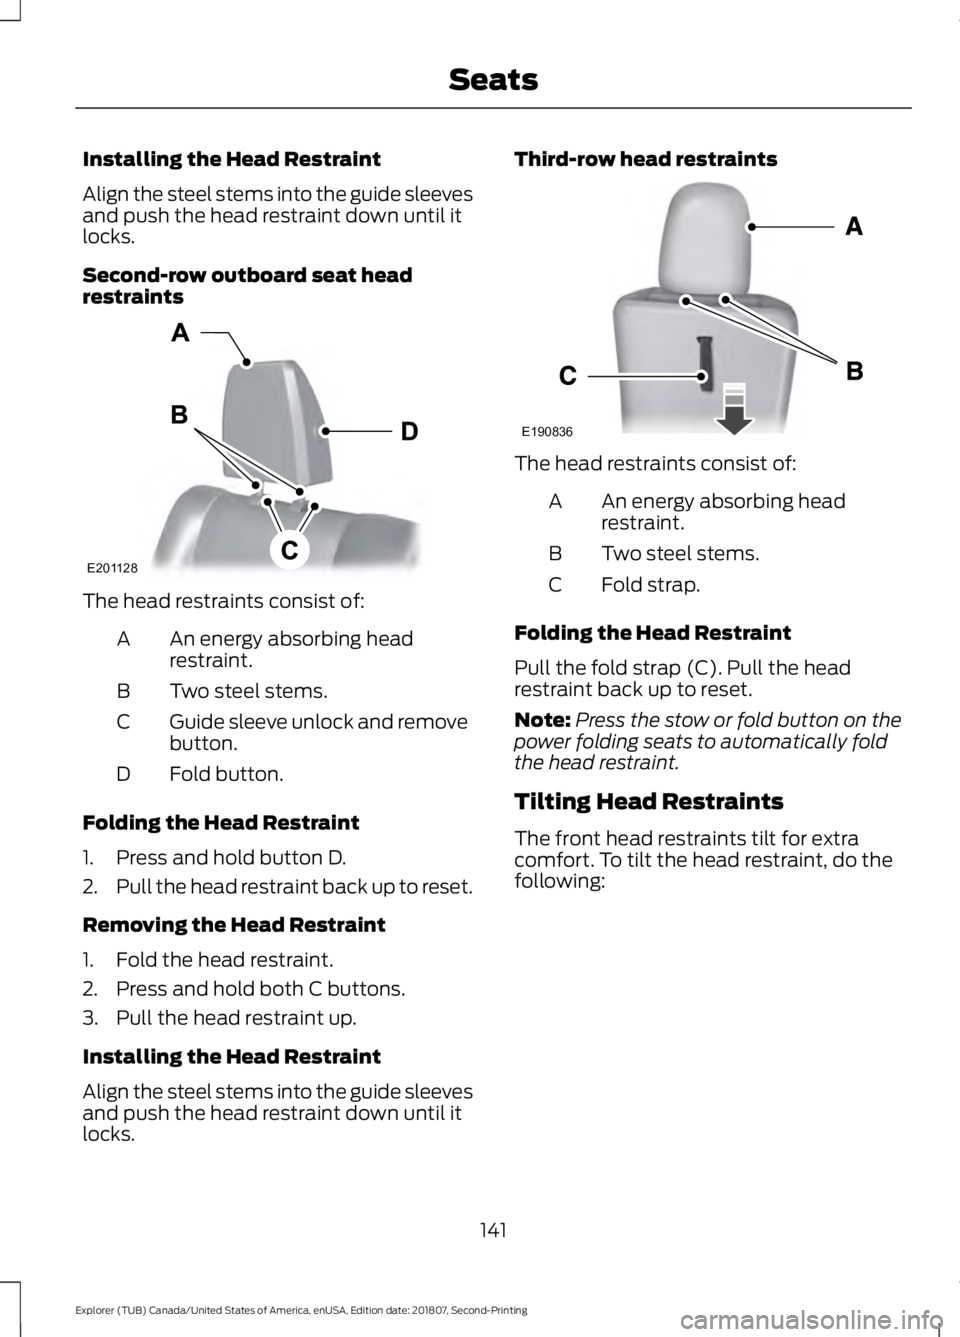
Second-row outboard seat head
restraints
The head restraints consist of:
An energy absorbing head
restraint.
A
Two steel stems.
B
Guide sleeve unlock and remove
button.
C
Fold button.
D
Folding the Head Restraint
1. Press and hold button D.
2. Pull the head restraint back up to reset.
Removing the Head Restraint
1. Fold the head restraint.
2. Press and hold both C buttons.
3. Pull the head restraint up.
Installing the Head Restraint
Align the steel stems into the guide sleeves
and push the head restraint down until it
locks. Third-row head restraints
The head restraints consist of:
An energy absorbing head
restraint.
A
Two steel stems.
B
Fold strap.
C
Folding the Head Restraint
Pull the fold strap (C). Pull the head
restraint back up to reset.
Note: Press the stow or fold button on the
power folding seats to automatically fold
the head restraint.
Tilting Head Restraints
The front head restraints tilt for extra
comfort. To tilt the head restraint, do the
following:
141
Explorer (TUB) Canada/United States of America, enUSA, Edition date: 201807, Second-Printing SeatsE201128 E190836