2019 FORD EXPLORER ECU
[x] Cancel search: ECUPage 286 of 571
1.
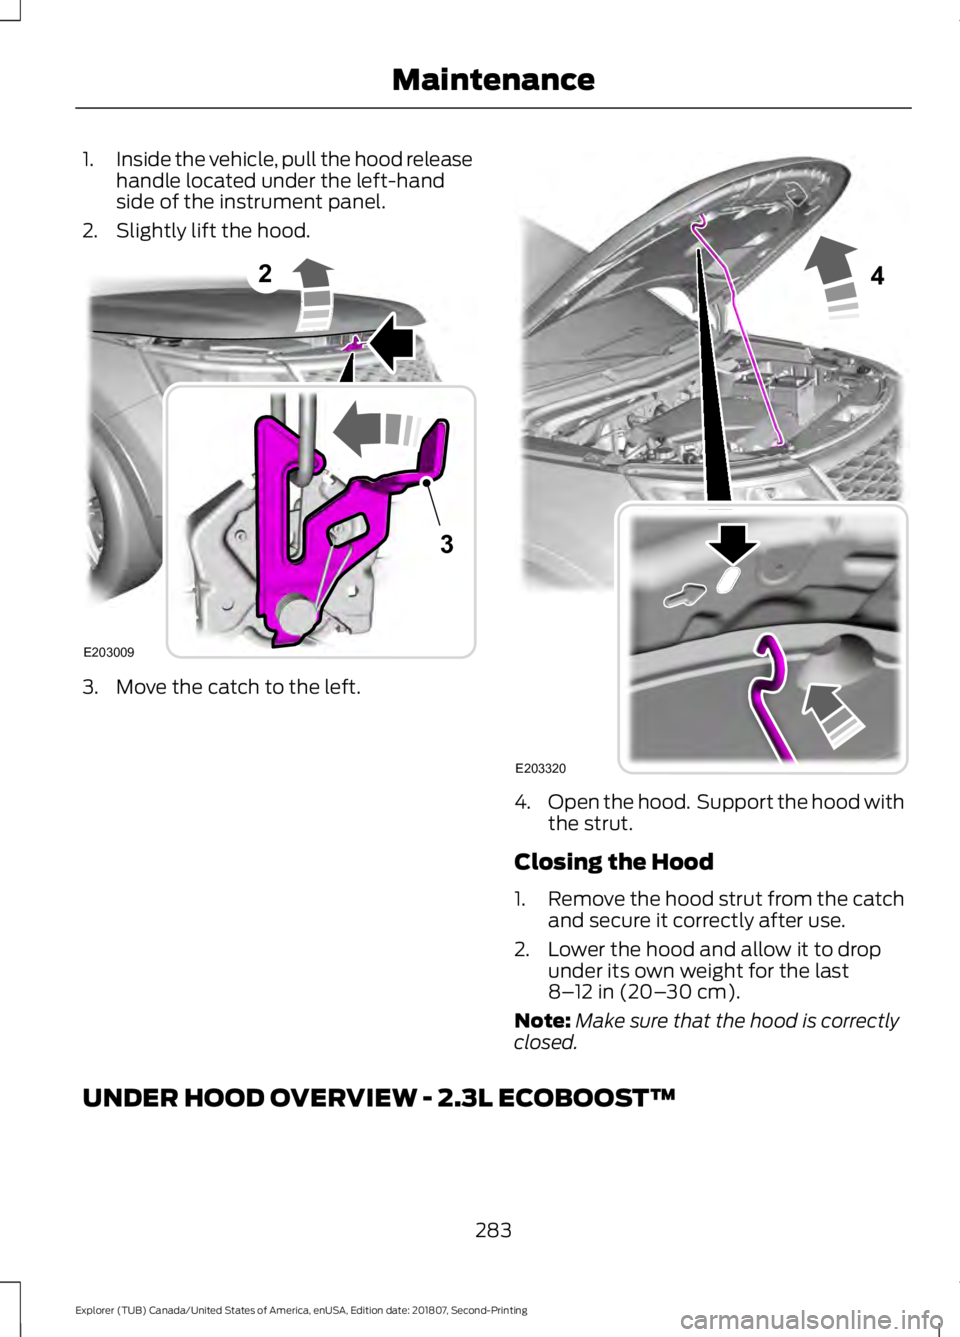
Inside the vehicle, pull the hood release
handle located under the left-hand
side of the instrument panel.
2. Slightly lift the hood. 3. Move the catch to the left.
4.
Open the hood. Support the hood with
the strut.
Closing the Hood
1. Remove the hood strut from the catch
and secure it correctly after use.
2. Lower the hood and allow it to drop under its own weight for the last
8–12 in (20– 30 cm).
Note: Make sure that the hood is correctly
closed.
UNDER HOOD OVERVIEW - 2.3L ECOBOOST™
283
Explorer (TUB) Canada/United States of America, enUSA, Edition date: 201807, Second-Printing Maintenance2
E203009
3 4
E203320
Page 298 of 571
*
Vehicles With Turbocharged Engines WARNING: Do not start the engine
with the air filter removed. This can
cause damage not covered by the
vehicle Warranty and can result in
serious injury.
1. Loosen the clamp holding the air filter assembly to the rubber hose.
2. Remove the air filter assembly securing
bolts.
3. Lift the air filter assembly to disengage
the locating pins.
4. Rotate the air filter assembly slightly in a counterclockwise direction.
5. Check the transmission fluid level.
6. Install the air filter assembly in reverse
order. Tighten the air filter assembly
securing bolts until you feel a strong
resistance.
BRAKE FLUID CHECK WARNING: Do not use any fluid
other than the recommended brake fluid
as this will reduce brake efficiency. Use
of incorrect fluid could result in the loss
of vehicle control, serious personal injury
or death. WARNING:
Only use brake fluid
from a sealed container. Contamination
with dirt, water, petroleum products or
other materials may result in brake
system damage or failure. Failure to
adhere to this warning could result in the
loss of vehicle control, serious personal
injury or death. WARNING:
Do not allow the fluid
to touch your skin or eyes. If this
happens, rinse the affected areas
immediately with plenty of water and
contact your physician. WARNING:
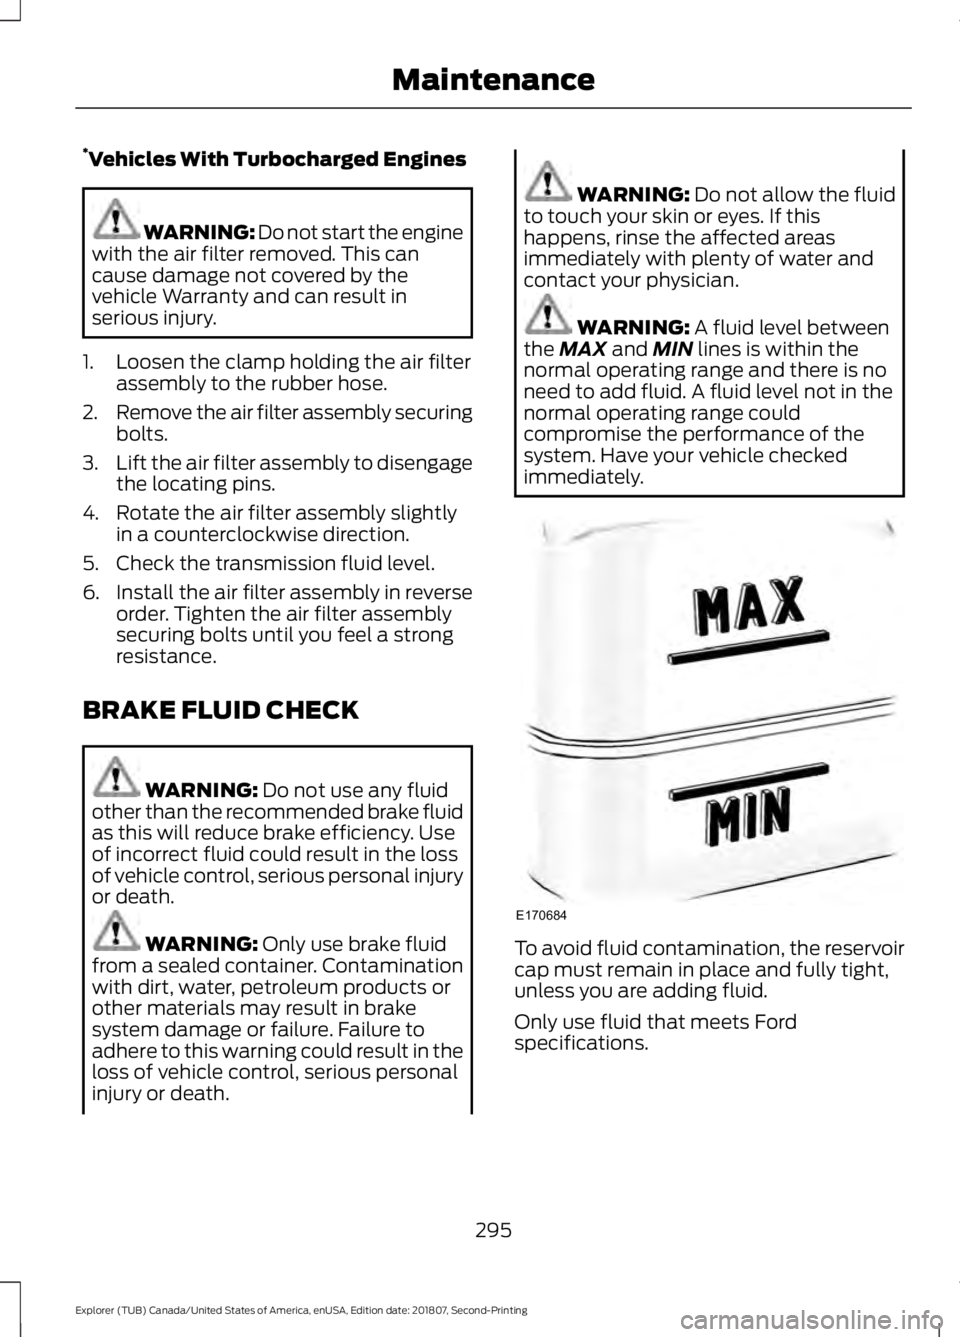
A fluid level between
the MAX and MIN lines is within the
normal operating range and there is no
need to add fluid. A fluid level not in the
normal operating range could
compromise the performance of the
system. Have your vehicle checked
immediately. To avoid fluid contamination, the reservoir
cap must remain in place and fully tight,
unless you are adding fluid.
Only use fluid that meets Ford
specifications.
295
Explorer (TUB) Canada/United States of America, enUSA, Edition date: 201807, Second-Printing MaintenanceE170684
Page 306 of 571
Rear Direction Indicator and
Reversing Lamp
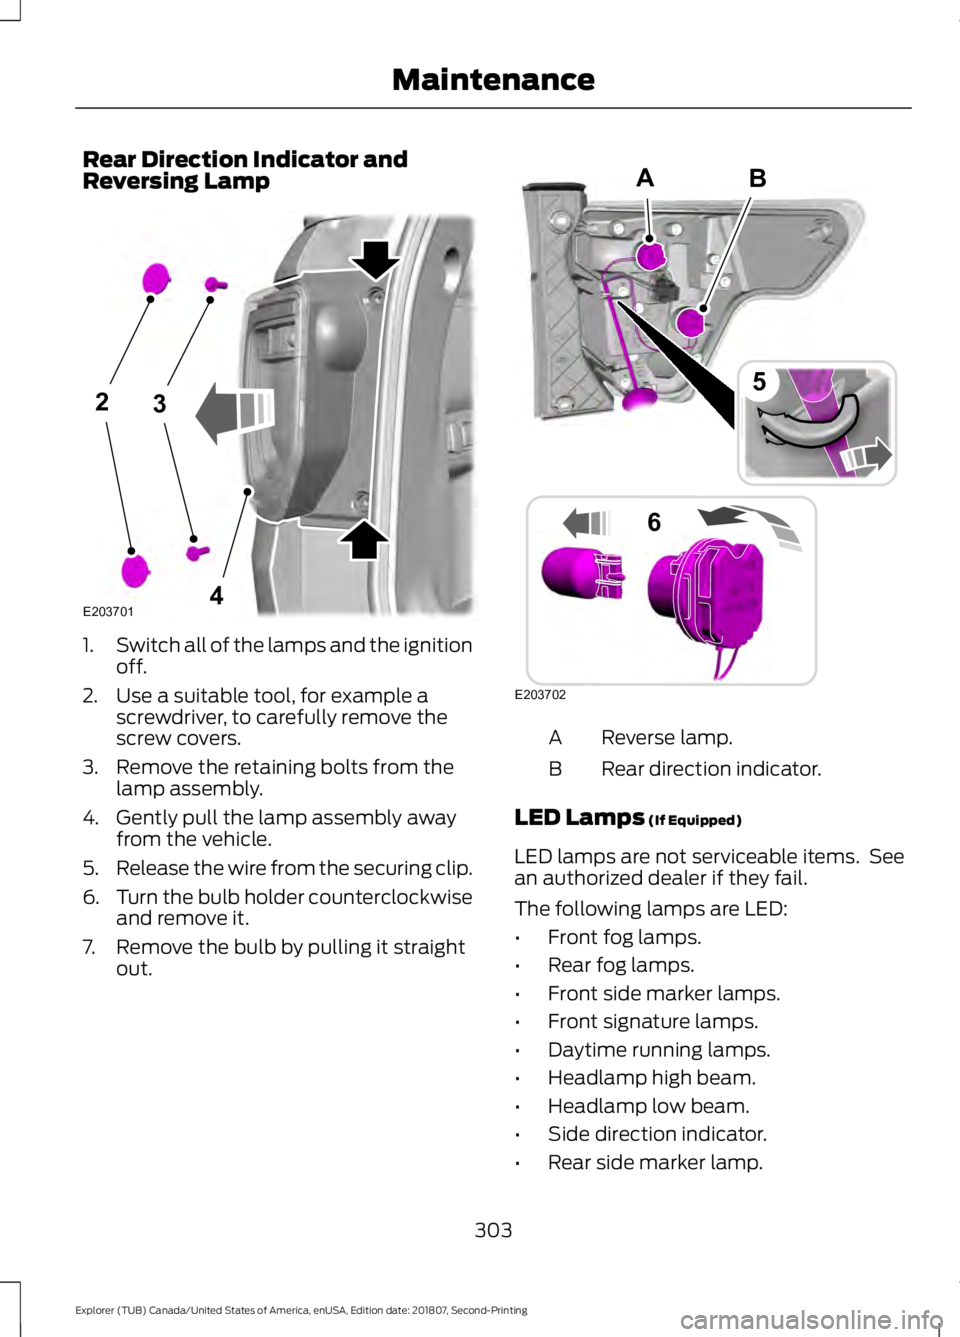
1.
Switch all of the lamps and the ignition
off.
2. Use a suitable tool, for example a screwdriver, to carefully remove the
screw covers.
3. Remove the retaining bolts from the lamp assembly.
4. Gently pull the lamp assembly away from the vehicle.
5. Release the wire from the securing clip.
6. Turn the bulb holder counterclockwise
and remove it.
7. Remove the bulb by pulling it straight out. Reverse lamp.
A
Rear direction indicator.
B
LED Lamps (If Equipped)
LED lamps are not serviceable items. See
an authorized dealer if they fail.
The following lamps are LED:
• Front fog lamps.
• Rear fog lamps.
• Front side marker lamps.
• Front signature lamps.
• Daytime running lamps.
• Headlamp high beam.
• Headlamp low beam.
• Side direction indicator.
• Rear side marker lamp.
303
Explorer (TUB) Canada/United States of America, enUSA, Edition date: 201807, Second-Printing Maintenance23
4E203701 B
E203702
5
6
A
Page 307 of 571
•
Brake and rear lamp.
• Central high mounted brake lamp.
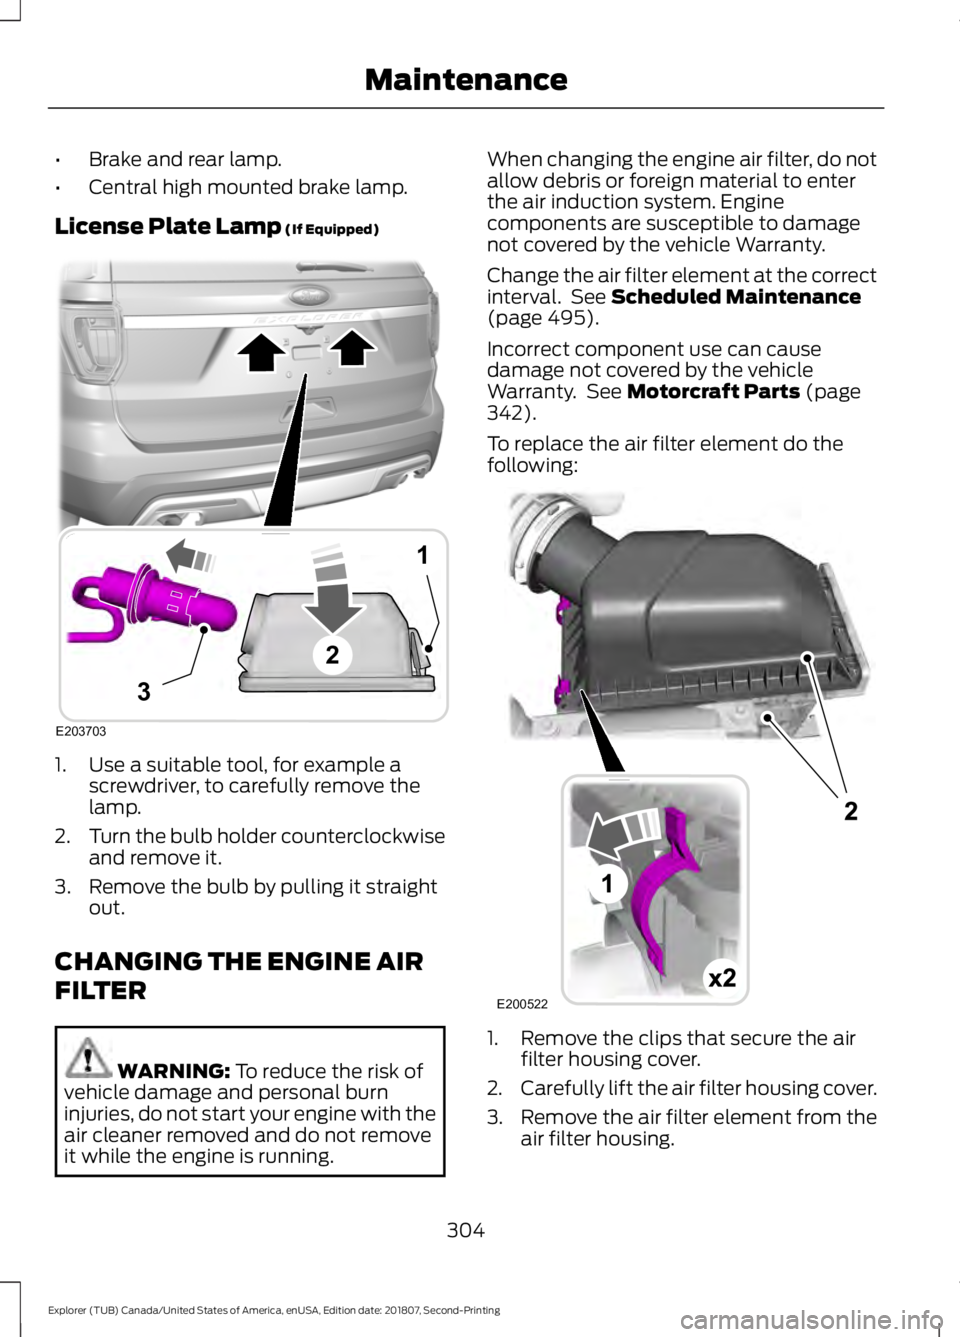
License Plate Lamp (If Equipped) 1. Use a suitable tool, for example a
screwdriver, to carefully remove the
lamp.
2. Turn the bulb holder counterclockwise
and remove it.
3. Remove the bulb by pulling it straight out.
CHANGING THE ENGINE AIR
FILTER WARNING:
To reduce the risk of
vehicle damage and personal burn
injuries, do not start your engine with the
air cleaner removed and do not remove
it while the engine is running. When changing the engine air filter, do not
allow debris or foreign material to enter
the air induction system. Engine
components are susceptible to damage
not covered by the vehicle Warranty.
Change the air filter element at the correct
interval. See
Scheduled Maintenance
(page 495).
Incorrect component use can cause
damage not covered by the vehicle
Warranty. See
Motorcraft Parts (page
342).
To replace the air filter element do the
following: 1. Remove the clips that secure the air
filter housing cover.
2. Carefully lift the air filter housing cover.
3. Remove the air filter element from the
air filter housing.
304
Explorer (TUB) Canada/United States of America, enUSA, Edition date: 201807, Second-Printing MaintenanceE203703
1
3
2 E200522
Page 308 of 571
4.
Wipe any dirt or debris from the air filter
housing and cover to make sure no dirt
gets in the engine and that you have a
good seal.
5. Install a new air filter element. Be careful not to crimp the filter element
edges between the air filter housing
and cover. This could cause filter
damage and allow unfiltered air to
enter the engine if it is not properly
seated.
6. Install the air filter housing cover.
7. Engage the clips to secure the air filter housing cover to the air filter housing.
305
Explorer (TUB) Canada/United States of America, enUSA, Edition date: 201807, Second-Printing Maintenance
Page 338 of 571
2.
Full-size dissimilar spare with label
on wheel: This spare tire has a label on
the wheel that states: THIS WHEEL AND
TIRE ASSEMBLY FOR TEMPORARY USE
ONLY.
When driving with one of the dissimilar
spare tires listed above, do not:
• Exceed
50 mph (80 km/h).
• Load the vehicle beyond maximum
vehicle load rating listed on the Safety
Compliance Label.
• Tow a trailer.
• Use snow chains on the end of the
vehicle with the dissimilar spare tire.
• Use more than one dissimilar spare tire
at a time.
• Use commercial car washing
equipment.
• Try to repair the dissimilar spare tire.
Use of one of the dissimilar spare tires
listed above at any one wheel location can
lead to impairment of the following:
• Handling, stability and braking
performance.
• Comfort and noise.
• Ground clearance and parking at curbs.
• Winter weather driving capability.
• Wet weather driving capability.
• All-wheel driving capability.
3. Full-size dissimilar spare without
label on wheel
When driving with the full-size dissimilar
spare wheel and tire assembly, do not:
• Exceed
70 mph (113 km/h).
• Use more than one dissimilar spare
wheel and tire assembly at a time.
• Use commercial car washing
equipment.
• Use snow chains on the end of the
vehicle with the dissimilar spare wheel
and tire assembly. The usage of a full-size dissimilar spare
wheel and tire assembly can lead to
impairment of the following:
•
Handling, stability and braking
performance.
• Comfort and noise.
• Ground clearance and parking at curbs.
• Winter weather driving capability.
• Wet weather driving capability.
• All-wheel driving capability.
When driving with the full-size dissimilar
spare wheel and tire assembly additional
caution should be given to:
• Towing a trailer.
• Driving vehicles equipped with a
camper body.
• Driving vehicles with a load on the
cargo rack.
Drive cautiously when using a full-size
dissimilar spare wheel and tire assembly
and seek service as soon as possible.
Tire Change Procedure WARNING:
When one of the front
wheels is off the ground, the
transmission alone will not prevent the
vehicle from moving or slipping off the
jack, even if the transmission is in park
(P). WARNING:
To help prevent your
vehicle from moving when changing a
wheel, shift the transmission into park
(P), set the parking brake and use an
appropriate block or wheel chock to
secure the wheel diagonally opposite to
the wheel being changed. For example,
when changing the front left wheel,
place an appropriate block or wheel
chock on the right rear wheel.
335
Explorer (TUB) Canada/United States of America, enUSA, Edition date: 201807, Second-Printing Wheels and Tires
Page 339 of 571
WARNING: Do not work on your
vehicle when the jack is the only support.
If the vehicle slips off the jack, you or
someone else could be seriously injured. WARNING:
Do not attempt to
change a tire on the side of the vehicle
close to moving traffic. Pull far enough
off the road to avoid the danger of being
hit when operating the jack or changing
the wheel. WARNING:
Always use the jack
provided as original equipment with your
vehicle. If using a jack other than the one
provided, make sure the jack capacity is
adequate for the vehicle weight,
including any vehicle cargo or
modifications. If you are unsure if the jack
capacity is adequate, contact the
authorized dealer.
Note: Passengers should not remain in your
vehicle when the vehicle is being jacked.
Note: Jack at the specified locations to
avoid damage to the vehicle.
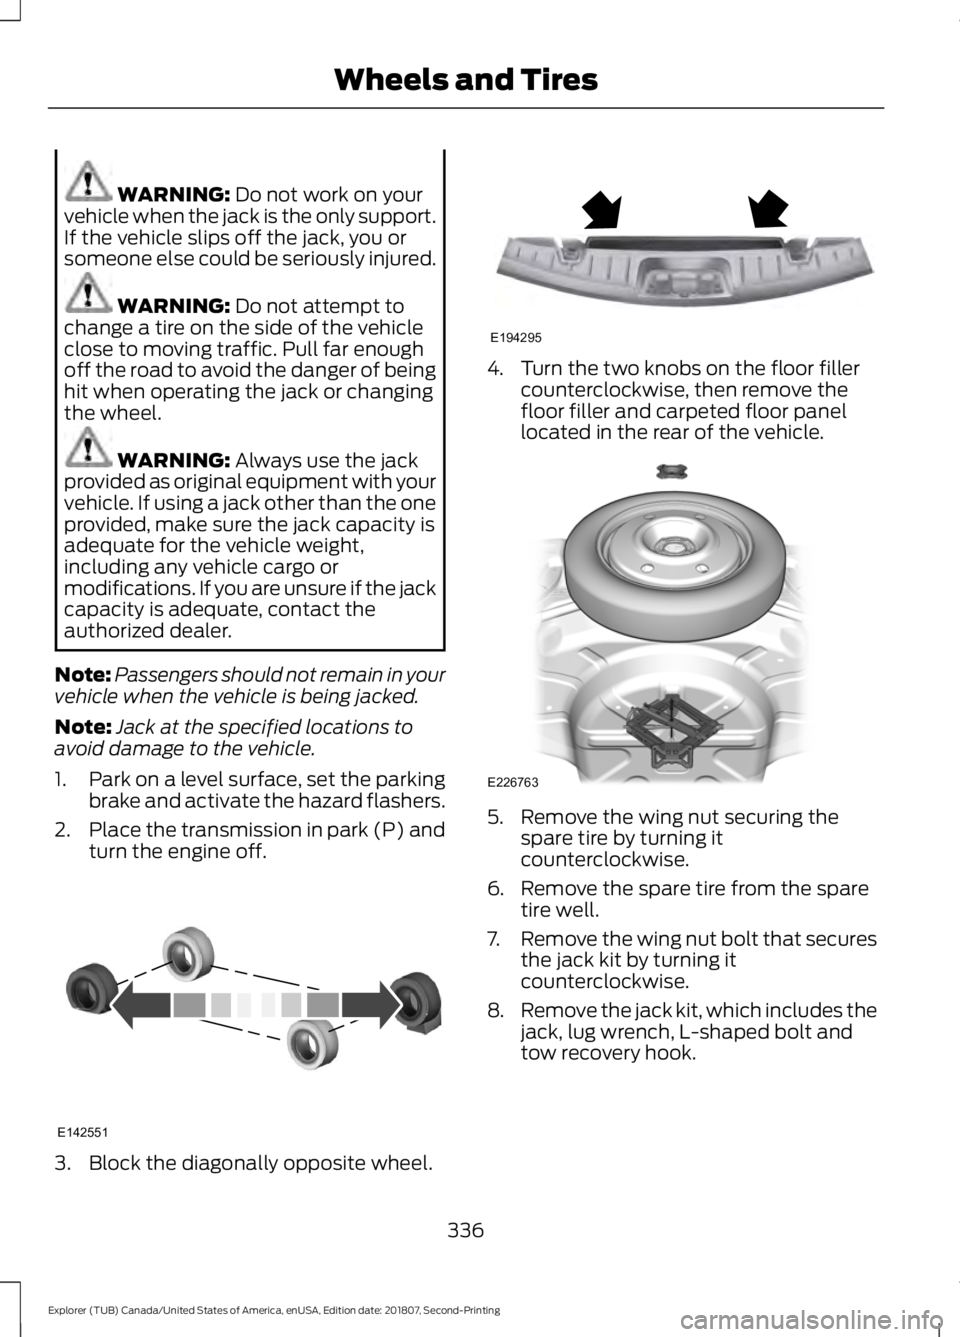
1. Park on a level surface, set the parking
brake and activate the hazard flashers.
2. Place the transmission in park (P) and
turn the engine off. 3. Block the diagonally opposite wheel. 4. Turn the two knobs on the floor filler
counterclockwise, then remove the
floor filler and carpeted floor panel
located in the rear of the vehicle. 5. Remove the wing nut securing the
spare tire by turning it
counterclockwise.
6. Remove the spare tire from the spare tire well.
7. Remove the wing nut bolt that secures
the jack kit by turning it
counterclockwise.
8. Remove the jack kit, which includes the
jack, lug wrench, L-shaped bolt and
tow recovery hook.
336
Explorer (TUB) Canada/United States of America, enUSA, Edition date: 201807, Second-Printing Wheels and TiresE142551 E194295 E226763
Page 341 of 571

2. Fasten the flat tire to the luggage
compartment back panel by inserting
the L-shaped bolt through one of the
lug bolt holes in the wheel.
3. Turn the L-shaped bolt clockwise into the threaded hole in the luggage
compartment back panel until the tire
is secured.
4. Unblock the diagonally opposite wheel. Stowing the jack With the road wheel in the vertical position
in the spare tire tub, the jack assembly
does not fit in its standard position. Secure
the jack in the alternate position by
inserting the wing bolt through the jack as
shown.
TECHNICAL SPECIFICATIONS
Wheel Lug Nut Torque Specifications WARNING: When you install a wheel, always remove any corrosion, dirt or foreign
materials present on the mounting surfaces of the wheel or the surface of the wheel
hub, brake drum or brake disc that contacts the wheel. Make sure to secure any fasteners
that attach the rotor to the hub so they do not interfere with the mounting surfaces of
the wheel. Installing wheels without correct metal-to-metal contact at the wheel
mounting surfaces can cause the wheel nuts to loosen and the wheel to come off while
your vehicle is in motion, resulting in loss of vehicle control, personal injury or death. Ib-ft (Nm)
*
Bolt size
100 (135)
1/2-20 x 1.5
* Torque specifications are for nut and bolt threads free of dirt and rust. Use only Ford
recommended replacement fasteners.
Retighten the lug nuts to the specified torque within 100 miles (160 kilometers) after any
wheel disturbance (such as tire rotation, changing a flat tire, wheel removal).
338
Explorer (TUB) Canada/United States of America, enUSA, Edition date: 201807, Second-Printing Wheels and TiresE194296 E194297