2019 FORD EXPLORER towing
[x] Cancel search: towingPage 257 of 571
All Vehicles
•
Do not exceed 65 mph (105 km/h).
• Start the engine and allow it to run for
a few minutes at the beginning of each
day and every six hours thereafter. With
the engine running and your foot on the
brake, shift into drive (D) and then into
reverse (R) before shifting back into
neutral (N).
Front-wheel Drive Vehicles
Alternatively, you can tow your front-wheel
drive vehicle with the front wheels off the
ground by using a tow dolly, or with all four
wheels off the ground using a vehicle
transport trailer. If you are using a tow
dolly, follow the instructions specified by
the equipment provider.
Four-wheel Drive Vehicles
Alternatively, you can tow your four-wheel
drive vehicle with all four wheels off the
ground using a vehicle transport trailer. Do
not tow your four-wheel drive vehicle with
the front wheels off the ground (by using
a tow dolly) and the rear wheels on the
ground. This causes damage to your
four-wheel drive system. If you are using a
vehicle transport trailer, follow the
instruction specified by the equipment
provider.
254
Explorer (TUB) Canada/United States of America, enUSA, Edition date: 201807, Second-Printing Towing
Page 258 of 571
BREAKING-IN
You need to break in new tires for
approximately 300 mi (480 km). During
this time, your vehicle may exhibit some
unusual driving characteristics.
Avoid driving too fast during the first
1,000 mi (1,600 km)
. Vary your speed
frequently and change up through the
gears early. Do not labor the engine.
Do not tow during the first
1,000 mi
(1,600 km).
ECONOMICAL DRIVING
Your fuel economy is affected by several
things, such as how you drive, the
conditions you drive under, and how you
maintain your vehicle.
You may improve your fuel economy by
keeping these things in mind:
• Accelerate and slow down in a smooth,
moderate fashion.
• Drive at steady speeds without
stopping.
• Anticipate stops; slowing down may
eliminate the need to stop.
• Combine errands and minimize
stop-and-go driving.
• Close the windows for high-speed
driving.
• Drive at reasonable speeds (traveling
at 55 mph [88 km/h] uses 15% less
fuel than traveling at 65 mph [105
km/h]).
• Keep the tires properly inflated and use
only the recommended size.
• Use the recommended engine oil.
• Perform all regularly scheduled
maintenance. Avoid these actions; they reduce your fuel
economy:
•
Sudden accelerations or hard
accelerations.
• Revving the engine before turning it off.
• Idle for periods longer than one minute.
• Warm up your vehicle on cold
mornings.
• Use the air conditioner or front
defroster.
• Use the speed control in hilly terrain.
• Rest your foot on the brake pedal while
driving.
• Drive a heavily loaded vehicle or tow a
trailer.
• Carry unnecessary weight
(approximately 1 mpg [0.4 km/L] is
lost for every 400 lb [180 kilogram] of
weight carried).
• Driving with the wheels out of
alignment.
Conditions
• Heavily loading a vehicle or towing a
trailer may reduce fuel economy at any
speed.
• Adding certain accessories to your
vehicle (for example bug deflectors,
rollbars, light bars, running boards, ski
racks or luggage racks) may reduce
fuel economy.
• To maximize the fuel economy, drive
with the tonneau cover installed (if
equipped).
• Using fuel blended with alcohol may
lower fuel economy.
• Fuel economy may decrease with lower
temperatures during the first
5–10 mi
(12 –16 km) of driving.
• Driving on flat terrain offers improved
fuel economy as compared to driving
on hilly terrain.
255
Explorer (TUB) Canada/United States of America, enUSA, Edition date: 201807, Second-Printing Driving Hints
Page 261 of 571
ROADSIDE ASSISTANCE
Vehicles Sold in the United States:
Getting Roadside Assistance
To fully assist you should you have a
vehicle concern, Ford Motor Company
offers a complimentary roadside
assistance program. This program is
separate from the New Vehicle Limited
Warranty.
The service is available:
•
24 hours a day, seven days a week.
• For the coverage period listed on the
Roadside Assistance Card included in
your Owner's Manual portfolio.
Roadside Assistance covers:
• A flat tire change with a good spare
(except vehicles supplied with a tire
inflation kit).
• Battery jump start.
• Lock-out assistance (key replacement
cost is the customer's responsibility).
• Fuel delivery — independent service
contractors, if not prohibited by state,
local or municipal law, shall deliver up
to 2 gal (8 L) of gasoline or 5 gal (20 L)
of diesel fuel to a disabled vehicle.
Roadside Assistance limits fuel delivery
service to two no-charge occurrences
within a 12-month period.
• Winch out — available within 100 ft
(30 m) of a paved or county
maintained road, no recoveries. •
Towing — independent service
contractors, if not prohibited by state,
local or municipal law, shall tow Ford
eligible vehicles to an authorized dealer
within
35 mi (56 km) of the
disablement location or to the nearest
authorized dealer. If a member
requests a tow to an authorized dealer
that is more than
35 mi (56 km) from
the disablement location, the member
shall be responsible for any mileage
costs in excess of
35 mi (56 km).
• Roadside Assistance includes up to
$200 for a towed trailer if the disabled
eligible vehicle requires service at the
nearest authorized dealer. If the towing
vehicle is operational but the trailer is
not, then the trailer does not qualify for
any roadside services.
Vehicles Sold in the United States:
Using Roadside Assistance
Complete the roadside assistance
identification card and place it in your
wallet for quick reference. This card is in
the owner's information portfolio in the
glove compartment.
United States vehicle customers who
require Roadside Assistance, call
1-800-241-3673.
If you need to arrange roadside assistance
for yourself, Ford Motor Company
reimburses a reasonable amount for
towing to the nearest dealership within
35 mi (56 km)
. To obtain reimbursement
information, United States vehicle
customers call 1-800-241-3673.
Customers need to submit their original
receipts.
258
Explorer (TUB) Canada/United States of America, enUSA, Edition date: 201807, Second-Printing Roadside Emergencies
Page 265 of 571
2. Remove the jumper cable on the
negative (-) terminal of the booster
vehicle battery.
3. Remove the jumper cable from the positive (+) terminal of the booster
vehicle battery.
4. Remove the jumper cable from the positive (+) terminal of the disabled
vehicle battery.
5. Allow the engine to idle for at least one
minute.
POST-CRASH ALERT SYSTEM
The system flashes the direction indicators
and sounds the horn (intermittently) in the
event of a serious impact that deploys an
airbag (front, side, side curtain or Safety
Canopy) or the seatbelt pretensioners.
The horn and indicators turn off when:
• You press the hazard control button.
• You press the panic button on the
remote entry transmitter (if equipped).
• Your vehicle runs out of power.
• Sounding of the horn is only enabled
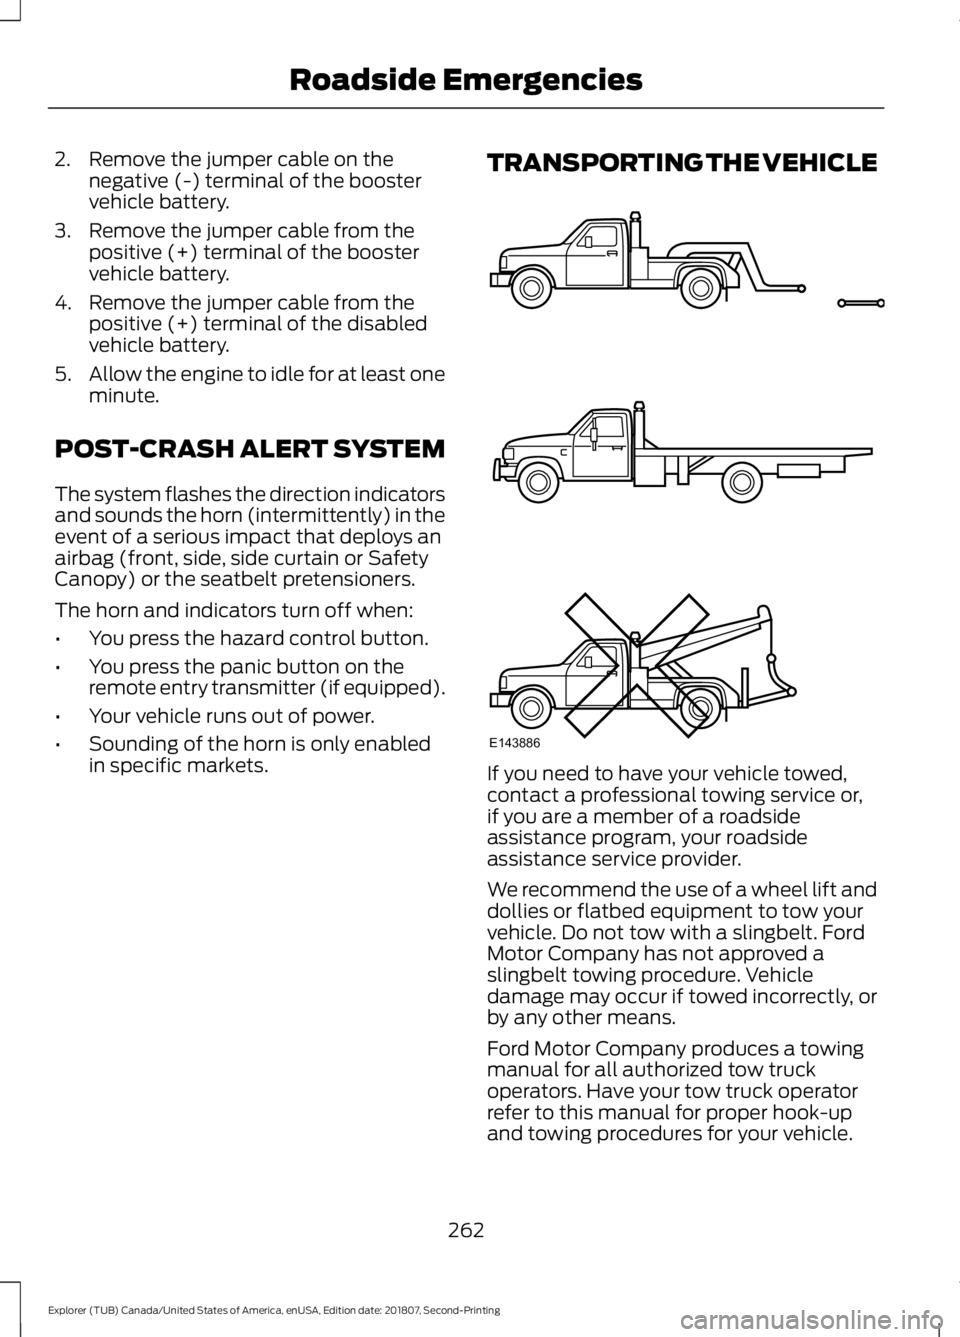
in specific markets. TRANSPORTING THE VEHICLE
If you need to have your vehicle towed,
contact a professional towing service or,
if you are a member of a roadside
assistance program, your roadside
assistance service provider.
We recommend the use of a wheel lift and
dollies or flatbed equipment to tow your
vehicle. Do not tow with a slingbelt. Ford
Motor Company has not approved a
slingbelt towing procedure. Vehicle
damage may occur if towed incorrectly, or
by any other means.
Ford Motor Company produces a towing
manual for all authorized tow truck
operators. Have your tow truck operator
refer to this manual for proper hook-up
and towing procedures for your vehicle.
262
Explorer (TUB) Canada/United States of America, enUSA, Edition date: 201807, Second-Printing Roadside EmergenciesE143886
Page 266 of 571
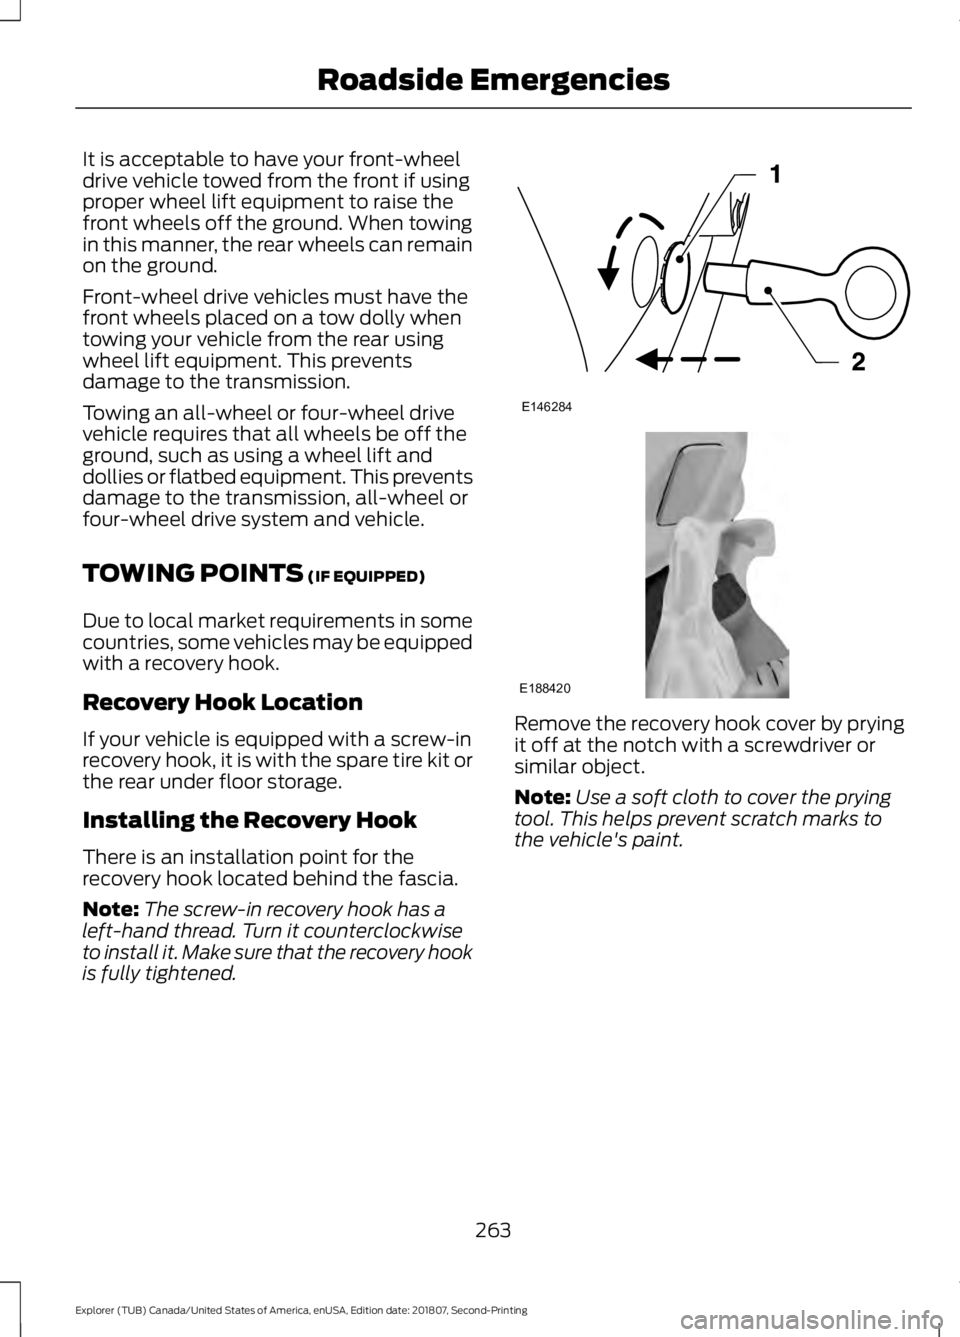
It is acceptable to have your front-wheel
drive vehicle towed from the front if using
proper wheel lift equipment to raise the
front wheels off the ground. When towing
in this manner, the rear wheels can remain
on the ground.
Front-wheel drive vehicles must have the
front wheels placed on a tow dolly when
towing your vehicle from the rear using
wheel lift equipment. This prevents
damage to the transmission.
Towing an all-wheel or four-wheel drive
vehicle requires that all wheels be off the
ground, such as using a wheel lift and
dollies or flatbed equipment. This prevents
damage to the transmission, all-wheel or
four-wheel drive system and vehicle.
TOWING POINTS (IF EQUIPPED)
Due to local market requirements in some
countries, some vehicles may be equipped
with a recovery hook.
Recovery Hook Location
If your vehicle is equipped with a screw-in
recovery hook, it is with the spare tire kit or
the rear under floor storage.
Installing the Recovery Hook
There is an installation point for the
recovery hook located behind the fascia.
Note: The screw-in recovery hook has a
left-hand thread. Turn it counterclockwise
to install it. Make sure that the recovery hook
is fully tightened. Remove the recovery hook cover by prying
it off at the notch with a screwdriver or
similar object.
Note:
Use a soft cloth to cover the prying
tool. This helps prevent scratch marks to
the vehicle's paint.
263
Explorer (TUB) Canada/United States of America, enUSA, Edition date: 201807, Second-Printing Roadside EmergenciesE146284 E188420
Page 297 of 571
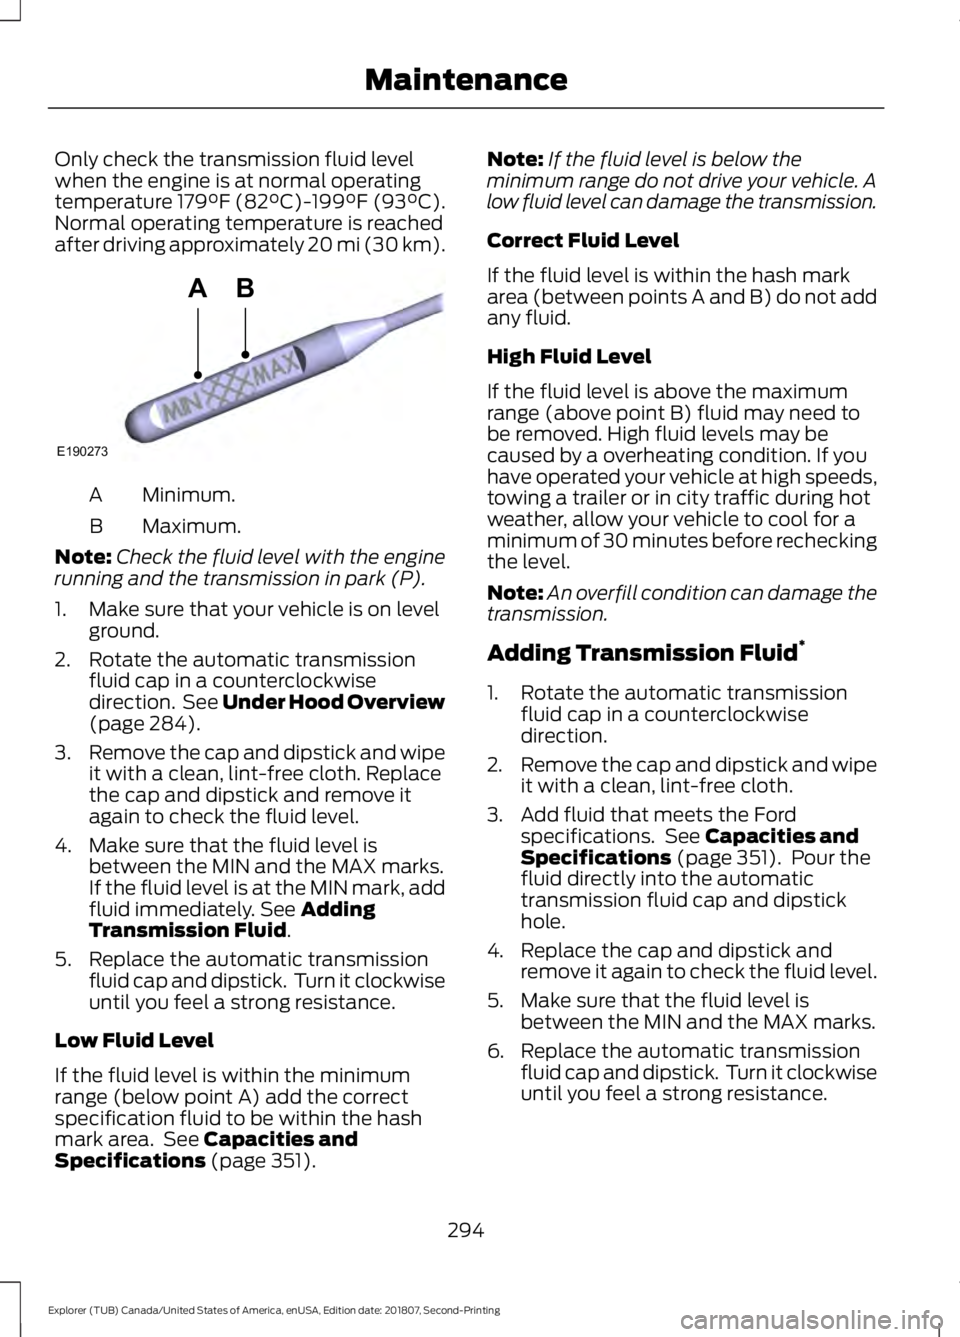
Only check the transmission fluid level
when the engine is at normal operating
temperature 179°F (82°C)-199°F (93°C).
Normal operating temperature is reached
after driving approximately 20 mi (30 km).
Minimum.
A
Maximum.
B
Note: Check the fluid level with the engine
running and the transmission in park (P).
1. Make sure that your vehicle is on level ground.
2. Rotate the automatic transmission fluid cap in a counterclockwise
direction. See Under Hood Overview
(page 284).
3. Remove the cap and dipstick and wipe
it with a clean, lint-free cloth. Replace
the cap and dipstick and remove it
again to check the fluid level.
4. Make sure that the fluid level is between the MIN and the MAX marks.
If the fluid level is at the MIN mark, add
fluid immediately. See
Adding
Transmission Fluid.
5. Replace the automatic transmission fluid cap and dipstick. Turn it clockwise
until you feel a strong resistance.
Low Fluid Level
If the fluid level is within the minimum
range (below point A) add the correct
specification fluid to be within the hash
mark area. See
Capacities and
Specifications (page 351). Note:
If the fluid level is below the
minimum range do not drive your vehicle. A
low fluid level can damage the transmission.
Correct Fluid Level
If the fluid level is within the hash mark
area (between points A and B) do not add
any fluid.
High Fluid Level
If the fluid level is above the maximum
range (above point B) fluid may need to
be removed. High fluid levels may be
caused by a overheating condition. If you
have operated your vehicle at high speeds,
towing a trailer or in city traffic during hot
weather, allow your vehicle to cool for a
minimum of 30 minutes before rechecking
the level.
Note: An overfill condition can damage the
transmission.
Adding Transmission Fluid *
1. Rotate the automatic transmission fluid cap in a counterclockwise
direction.
2. Remove the cap and dipstick and wipe
it with a clean, lint-free cloth.
3. Add fluid that meets the Ford specifications. See
Capacities and
Specifications (page 351). Pour the
fluid directly into the automatic
transmission fluid cap and dipstick
hole.
4. Replace the cap and dipstick and remove it again to check the fluid level.
5. Make sure that the fluid level is between the MIN and the MAX marks.
6. Replace the automatic transmission fluid cap and dipstick. Turn it clockwise
until you feel a strong resistance.
294
Explorer (TUB) Canada/United States of America, enUSA, Edition date: 201807, Second-Printing MaintenanceE190273
AB
Page 338 of 571
2.
Full-size dissimilar spare with label
on wheel: This spare tire has a label on
the wheel that states: THIS WHEEL AND
TIRE ASSEMBLY FOR TEMPORARY USE
ONLY.
When driving with one of the dissimilar
spare tires listed above, do not:
• Exceed
50 mph (80 km/h).
• Load the vehicle beyond maximum
vehicle load rating listed on the Safety
Compliance Label.
• Tow a trailer.
• Use snow chains on the end of the
vehicle with the dissimilar spare tire.
• Use more than one dissimilar spare tire
at a time.
• Use commercial car washing
equipment.
• Try to repair the dissimilar spare tire.
Use of one of the dissimilar spare tires
listed above at any one wheel location can
lead to impairment of the following:
• Handling, stability and braking
performance.
• Comfort and noise.
• Ground clearance and parking at curbs.
• Winter weather driving capability.
• Wet weather driving capability.
• All-wheel driving capability.
3. Full-size dissimilar spare without
label on wheel
When driving with the full-size dissimilar
spare wheel and tire assembly, do not:
• Exceed
70 mph (113 km/h).
• Use more than one dissimilar spare
wheel and tire assembly at a time.
• Use commercial car washing
equipment.
• Use snow chains on the end of the
vehicle with the dissimilar spare wheel
and tire assembly. The usage of a full-size dissimilar spare
wheel and tire assembly can lead to
impairment of the following:
•
Handling, stability and braking
performance.
• Comfort and noise.
• Ground clearance and parking at curbs.
• Winter weather driving capability.
• Wet weather driving capability.
• All-wheel driving capability.
When driving with the full-size dissimilar
spare wheel and tire assembly additional
caution should be given to:
• Towing a trailer.
• Driving vehicles equipped with a
camper body.
• Driving vehicles with a load on the
cargo rack.
Drive cautiously when using a full-size
dissimilar spare wheel and tire assembly
and seek service as soon as possible.
Tire Change Procedure WARNING:
When one of the front
wheels is off the ground, the
transmission alone will not prevent the
vehicle from moving or slipping off the
jack, even if the transmission is in park
(P). WARNING:
To help prevent your
vehicle from moving when changing a
wheel, shift the transmission into park
(P), set the parking brake and use an
appropriate block or wheel chock to
secure the wheel diagonally opposite to
the wheel being changed. For example,
when changing the front left wheel,
place an appropriate block or wheel
chock on the right rear wheel.
335
Explorer (TUB) Canada/United States of America, enUSA, Edition date: 201807, Second-Printing Wheels and Tires
Page 340 of 571

9. Turn the lead screw, where the lug
wrench attaches, of the jack by hand
to release the lug wrench from the jack.
Press the button on the wrench to
extend the handle. Fold down the
wrench socket.
10. Loosen each wheel lug nut one-half turn counterclockwise, but do not
remove them until the wheel is off
the ground. 11.
The vehicle jacking points are shown
here, and are depicted on the warning
label on the jack.
12. Small arrow-shaped marks on the sills show the location of the jacking
points. 13. Raise the wheel by turning the jack
handle clockwise.
14. Remove the lug nuts with the lug wrench. 15. Replace the flat tire with the spare
tire, marking sure the valve stem is
facing outward. Reinstall the lug nuts
until the wheel is snug against the
hub. Do not fully tighten the lug nuts
until the wheel has been lowered.
16. Lower the wheel by turning the jack handle counterclockwise. 17.
Remove the jack and fully tighten the
lug nuts in the order shown. See
Technical Specifications (page
338).
Stowing the flat tire
1. Stand the flat tire vertically in the mini-spare tub with the tire's valve
stem facing rearward toward the
luggage compartment.
337
Explorer (TUB) Canada/United States of America, enUSA, Edition date: 201807, Second-Printing Wheels and TiresE145908 E201156 12
3
4
5
E75442