2019 FORD EXPLORER service indicator
[x] Cancel search: service indicatorPage 186 of 571
Your vehicle may not pass the I/M test if
the service engine soon indicator is on or
not working properly (bulb is burned out),
or if the OBD-II system has determined
that some of the emission control systems
have not been properly checked. In this
case, the vehicle is not ready for I/M
testing.
If the vehicle
’s engine or transmission has
just been serviced, or the battery has
recently run down or been replaced, the
OBD-II system may indicate that the
vehicle is not ready for I/M testing. To
determine if the vehicle is ready for I/M
testing, turn the ignition key to the on
position for 15 seconds without cranking
the engine. If the service engine soon
indicator blinks eight times, it means that
the vehicle is not ready for I/M testing; if
the service engine soon indicator stays on
solid, it means that your vehicle is ready
for I/M testing.
The OBD-II system checks the emission
control system during normal driving. A
complete check may take several days.
If the vehicle is not ready for I/M testing,
you can perform the following driving cycle
consisting of mixed city and highway
driving:
1. 15 minutes of steady driving on an expressway or highway followed by 20
minutes of stop-and-go driving with at
least four 30-second idle periods.
2. Allow your vehicle to sit for at least eight hours with the ignition off. Then,
start the vehicle and complete the
above driving cycle. The vehicle must
warm up to its normal operating
temperature. Once started, do not turn
off the vehicle until the above driving
cycle is complete.
If the vehicle is still not ready for I/M
testing, you need to repeat the above
driving cycle.
183
Explorer (TUB) Canada/United States of America, enUSA, Edition date: 201807, Second-Printing Engine Emission Control
Page 191 of 571
PRINCIPLE OF OPERATION
This system is a proactive system. It has
the ability to anticipate wheel slip and
transfer torque to the rear wheels before
slip occurs. Even when wheel slip is not
present, the system is continuously making
adjustments to the torque distribution, in
an attempt to improve straight line and
cornering behavior, both on and off road.
The system automatically turns on every
time you switch the ignition on.
If any component requires maintenance,
a message appears in the information
display.
USING FOUR-WHEEL DRIVE
WARNING: Vehicles with a higher
center of gravity such as utility and
four-wheel drive vehicles handle
differently than vehicles with a lower
center of gravity. Utility and four-wheel
drive vehicles are not designed for
cornering at speeds as high as passenger
cars any more than low-slung sports cars
are designed to perform satisfactorily
under off-road conditions. Avoid sharp
turns, excessive speed and abrupt
maneuvers in these vehicles. Failure to
drive cautiously could result in an
increased risk of loss of vehicle control,
vehicle rollover, personal injury and
death.
The intelligent 4WD system continuously
monitors vehicle conditions and
automatically adjusts the power
distribution between the front and rear
wheels. It combines transparent
all-surface operation with highly capable
four-wheel drive. The 4WD system is always active and
requires no driver input. It is capable of
handling all road conditions, including
street and highway driving as well as
off-road and winter driving. The driver can
optimize more 4WD control by moving the
terrain management switch for the correct
terrain. See Using Terrain Control (page
199).
Note: A warning message will be displayed
in the information display when an 4WD
system fault is present
See Information
Messages (page 115). An 4WD system fault
will cause the 4WD system to default to
front-wheel drive only mode. When this
warning message is displayed, have your
vehicle serviced at an authorized dealer
Note: A warning message will be displayed
in the information display if the 4WD system
has overheated
See Information
Messages (page 115). This condition may
occur if the vehicle was operated in extreme
conditions with excessive wheel slip, such
as deep sand. To resume normal 4WD
function as soon as possible, stop the
vehicle in a safe location and stop the
engine for at least 10 minutes. After the
engine has been restarted and the 4WD
system has adequately cooled, the warning
message will turn off and normal 4WD
function will return.
Do not use a spare tire of a different size
other than the tire provided. If the
mini-spare tire is installed, the 4WD system
may disable automatically and enter
front-wheel drive only mode to protect
driveline components. This condition will
be indicated by a warning in the
information display
See Information
Messages (page 115). If there is a warning
message in the information display from
using the spare tire, this indicator should
turn off after reinstalling the repaired or
replaced normal road tire and cycling the
ignition off and on. It is recommended to
188
Explorer (TUB) Canada/United States of America, enUSA, Edition date: 201807, Second-Printing Four-Wheel Drive
(If Equipped)
Page 199 of 571
PRINCIPLE OF OPERATION
The traction control system helps avoid
drive wheel spin and loss of traction.
If your vehicle begins to slide, the system
applies the brakes to individual wheels
and, when needed, reduces engine power
at the same time. If the wheels spin when
accelerating on slippery or loose surfaces,
the system reduces engine power in order
to increase traction.
USING TRACTION CONTROL
WARNING: The stability and
traction control light illuminates steadily
if the system detects a failure. Make sure
you did not manually disable the traction
control system using the information
display controls or the switch. If the
stability control and traction control light
is still illuminating steadily, have the
system serviced by an authorized dealer
immediately. Operating your vehicle with
the traction control disabled could lead
to an increased risk of loss of vehicle
control, vehicle rollover, personal injury
and death.
The system automatically turns on each
time you switch the ignition on.
If your vehicle is stuck in mud or snow,
switching traction control off may be
beneficial as this allows the wheels to spin.
Note: When you switch traction control off,
stability control remains fully active.
Switching the System Off
When you switch the system off or on, a
message appears in the information
display showing system status. You can switch the system off by either
using the information display controls or
the switch.
Using the Information Display
Controls
You can switch this feature off or on in the
information display.
See General
Information (page 104).
Using a Switch
(If Equipped)
Use the traction control switch on the
instrument panel to switch the system off
or on.
System Indicator Lights and
Messages The stability and traction control
light:
• Temporarily illuminates on engine
start-up.
• Flashes when a driving condition
activates either of the systems.
• Illuminates if a problem occurs in either
of the systems. The stability and traction control
off light temporarily illuminates
on engine start-up and stays on
when you switch the traction control
system off.
196
Explorer (TUB) Canada/United States of America, enUSA, Edition date: 201807, Second-Printing Traction ControlE138639 E130458
Page 202 of 571
USING TERRAIN CONTROL
The terrain management system optimizes
drivability and comfort as well as
maximizing traction while operating on
different types of terrain.
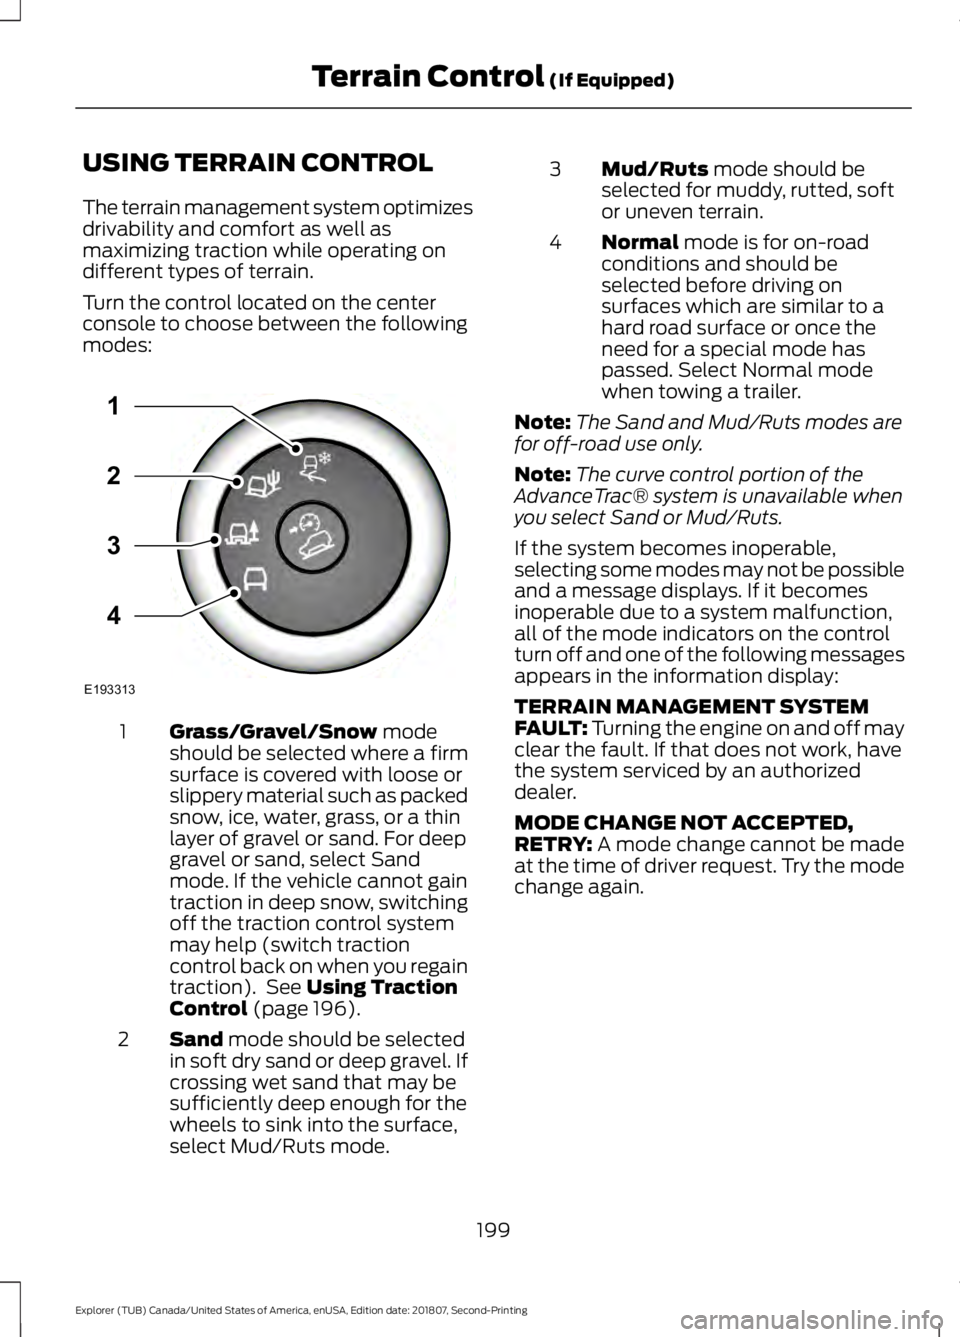
Turn the control located on the center
console to choose between the following
modes:
Grass/Gravel/Snow mode
should be selected where a firm
surface is covered with loose or
slippery material such as packed
snow, ice, water, grass, or a thin
layer of gravel or sand. For deep
1
gravel or sand, select Sand
mode. If the vehicle cannot gain
traction in deep snow, switching
off the traction control system
may help (switch traction
control back on when you regain
traction). See
Using Traction
Control (page 196).
Sand
mode should be selected
in soft dry sand or deep gravel. If
crossing wet sand that may be
sufficiently deep enough for the
wheels to sink into the surface,
select Mud/Ruts mode.
2 Mud/Ruts
mode should be
selected for muddy, rutted, soft
or uneven terrain.
3
Normal
mode is for on-road
conditions and should be
selected before driving on
surfaces which are similar to a
hard road surface or once the
need for a special mode has
passed. Select Normal mode
when towing a trailer.
4
Note: The Sand and Mud/Ruts modes are
for off-road use only.
Note: The curve control portion of the
AdvanceTrac® system is unavailable when
you select Sand or Mud/Ruts.
If the system becomes inoperable,
selecting some modes may not be possible
and a message displays. If it becomes
inoperable due to a system malfunction,
all of the mode indicators on the control
turn off and one of the following messages
appears in the information display:
TERRAIN MANAGEMENT SYSTEM
FAULT:
Turning the engine on and off may
clear the fault. If that does not work, have
the system serviced by an authorized
dealer.
MODE CHANGE NOT ACCEPTED,
RETRY:
A mode change cannot be made
at the time of driver request. Try the mode
change again.
199
Explorer (TUB) Canada/United States of America, enUSA, Edition date: 201807, Second-Printing Terrain Control
(If Equipped)E193313
3
2
1
4
Page 262 of 571
Vehicles Sold in Canada: Getting
Roadside Assistance
To fully assist you should you have a
vehicle concern, Ford Motor Company of
Canada, Limited offers a complimentary
roadside assistance program. This program
is eligible within Canada or the continental
United States.
The service is available 24 hours a day,
seven days a week.
This program is separate from the New
Vehicle Limited Warranty, but the coverage
is concurrent with the powertrain coverage
period of your vehicle. Canadian roadside
coverage and benefits may differ from the
U.S. coverage.
If you require more information, please call
us in Canada at 1-800-665-2006, or visit
our website at www.ford.ca.
HAZARD FLASHERS
Note:
The hazard flashers operate when
the ignition is in any position, or if the key is
not in the ignition. If used when the vehicle
is not running, the battery loses charge. As
a result, there may be insufficient power to
restart your vehicle. The flasher control is on the
instrument panel. Use your
hazard flashers when your
vehicle is creating a safety hazard for other
motorists.
• Press the flasher control and all front
and rear direction indicators flash.
• Press the button again to switch them
off. FUEL SHUTOFF WARNING: If your vehicle has
been involved in a crash, have the fuel
system checked. Failure to follow this
instruction could result in fire, personal
injury or death.
Note: When you try to restart your vehicle
after a fuel shutoff, the vehicle makes sure
that various systems are safe to restart.
Once the vehicle determines the systems
are safe, then the vehicle allows you to
restart.
Note: In the event that your vehicle does
not restart after your third attempt, contact
a qualified technician.
The fuel pump shutoff stops the flow of
fuel to the engine in the event of a
moderate to severe crash. Not every
impact causes a shutoff.
Should your vehicle shut off after a crash,
you may restart your vehicle.
If your vehicle has a key system:
1. Switch off the ignition.
2. Switch to start position.
3. Switch off the ignition.
4. Switch on the ignition to re-enable the
fuel pump.
5. If the vehicle does not start, repeat steps 1 through 4.
If your vehicle has a push button start
system:
1. Press
START/STOP to switch off your
vehicle.
2. Press the brake pedal and START/STOP
to switch on your
vehicle.
3. Remove your foot from the brake pedal
and press
START/STOP to switch off
your vehicle.
259
Explorer (TUB) Canada/United States of America, enUSA, Edition date: 201807, Second-Printing Roadside Emergencies
Page 265 of 571
2. Remove the jumper cable on the
negative (-) terminal of the booster
vehicle battery.
3. Remove the jumper cable from the positive (+) terminal of the booster
vehicle battery.
4. Remove the jumper cable from the positive (+) terminal of the disabled
vehicle battery.
5. Allow the engine to idle for at least one
minute.
POST-CRASH ALERT SYSTEM
The system flashes the direction indicators
and sounds the horn (intermittently) in the
event of a serious impact that deploys an
airbag (front, side, side curtain or Safety
Canopy) or the seatbelt pretensioners.
The horn and indicators turn off when:
• You press the hazard control button.
• You press the panic button on the
remote entry transmitter (if equipped).
• Your vehicle runs out of power.
• Sounding of the horn is only enabled
in specific markets. TRANSPORTING THE VEHICLE
If you need to have your vehicle towed,
contact a professional towing service or,
if you are a member of a roadside
assistance program, your roadside
assistance service provider.
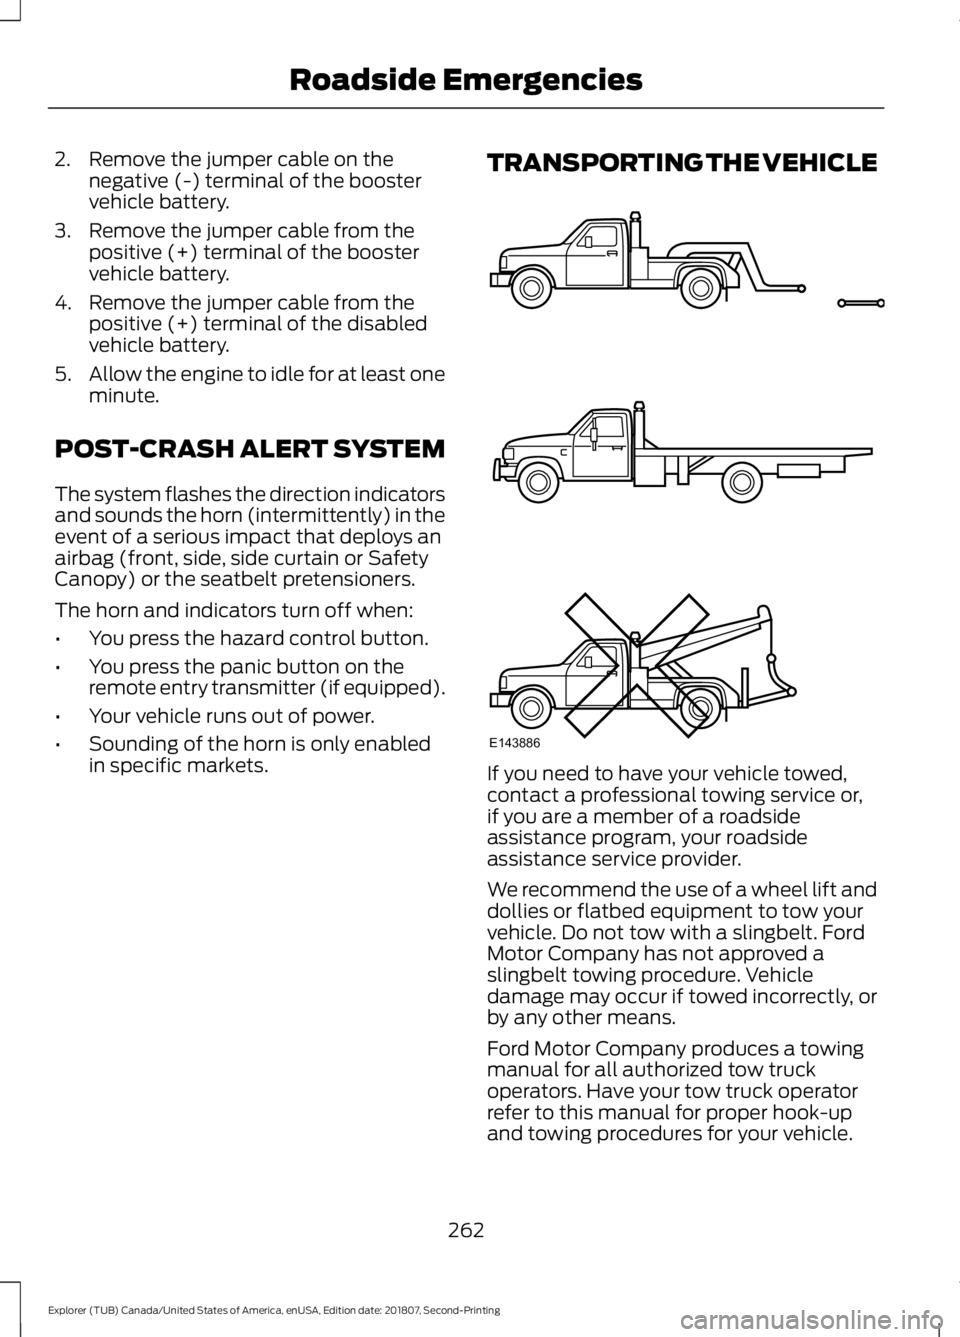
We recommend the use of a wheel lift and
dollies or flatbed equipment to tow your
vehicle. Do not tow with a slingbelt. Ford
Motor Company has not approved a
slingbelt towing procedure. Vehicle
damage may occur if towed incorrectly, or
by any other means.
Ford Motor Company produces a towing
manual for all authorized tow truck
operators. Have your tow truck operator
refer to this manual for proper hook-up
and towing procedures for your vehicle.
262
Explorer (TUB) Canada/United States of America, enUSA, Edition date: 201807, Second-Printing Roadside EmergenciesE143886
Page 306 of 571
Rear Direction Indicator and
Reversing Lamp
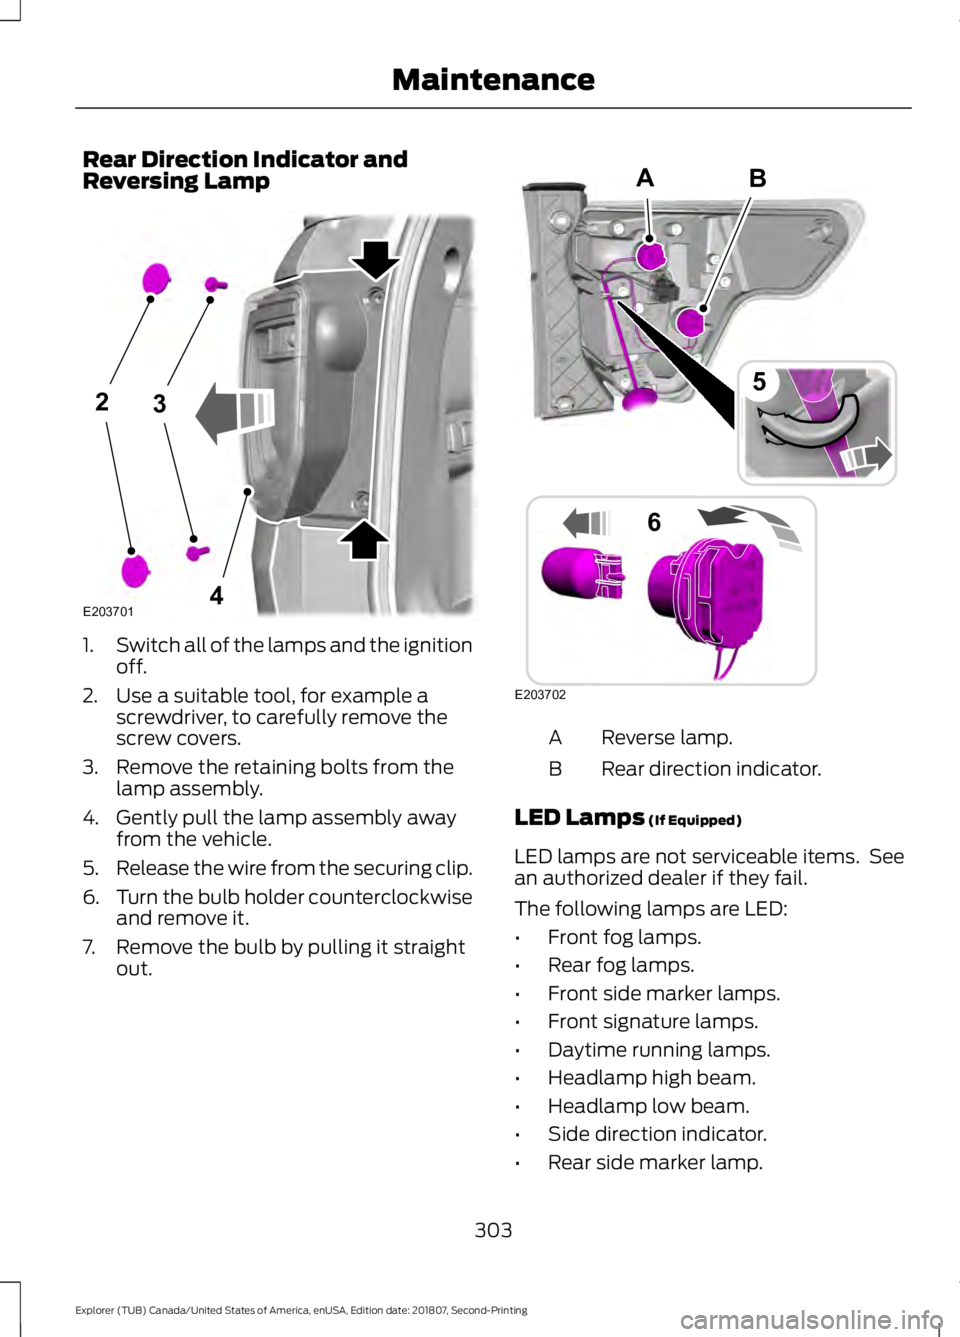
1.
Switch all of the lamps and the ignition
off.
2. Use a suitable tool, for example a screwdriver, to carefully remove the
screw covers.
3. Remove the retaining bolts from the lamp assembly.
4. Gently pull the lamp assembly away from the vehicle.
5. Release the wire from the securing clip.
6. Turn the bulb holder counterclockwise
and remove it.
7. Remove the bulb by pulling it straight out. Reverse lamp.
A
Rear direction indicator.
B
LED Lamps (If Equipped)
LED lamps are not serviceable items. See
an authorized dealer if they fail.
The following lamps are LED:
• Front fog lamps.
• Rear fog lamps.
• Front side marker lamps.
• Front signature lamps.
• Daytime running lamps.
• Headlamp high beam.
• Headlamp low beam.
• Side direction indicator.
• Rear side marker lamp.
303
Explorer (TUB) Canada/United States of America, enUSA, Edition date: 201807, Second-Printing Maintenance23
4E203701 B
E203702
5
6
A
Page 334 of 571

them to the proper pressure. Driving on a
significantly under-inflated tire causes the
tire to overheat and can lead to tire failure.
Under-inflation also reduces fuel efficiency
and tire tread life, and may affect the
vehicle
’s handling and stopping ability.
Please note that the TPMS is not a
substitute for proper tire maintenance, and
it is the driver ’s responsibility to maintain
correct tire pressure, even if under-inflation
has not reached the level to trigger
illumination of the TPMS low tire pressure
telltale.
Your vehicle has also been equipped with
a TPMS malfunction indicator to indicate
when the system is not operating properly.
The TPMS malfunction indicator is
combined with the low tire pressure
telltale. When the system detects a
malfunction, the telltale will flash for
approximately one minute and then remain
continuously illuminated. This sequence
will continue upon subsequent vehicle
start-ups as long as the malfunction exists.
When the malfunction indicator is
illuminated, the system may not be able
to detect or signal low tire pressure as
intended. TPMS malfunctions may occur
for a variety of reasons, including the
installation of replacement or alternate
tires or wheels on the vehicle that prevent
the TPMS from functioning properly.
Always check the TPMS malfunction
telltale after replacing one or more tires or
wheels on your vehicle to ensure that the
replacement or alternate tires and wheels
allow the TPMS to continue to function
properly.
This device complies with Part 15 of the
FCC Rules and with License exempt RSS
Standards of Industry Canada. Operation
is subject to the following two conditions:
1. This device may not cause harmful interference, and 2. This device must accept any
interference received, including
interference that may cause undesired
operation.
Note: Changes or modifications not
expressively approved by the party
responsible for compliance could void the
user's authority to operate the equipment.
The term "IC:" before the radio certification
number only signifies that Industry Canada
technical specifications were met.
Changing Tires With a Tire
Pressure Monitoring System Note:
Each road tire is equipped with a tire
pressure sensor located inside the wheel
and tire assembly cavity. The pressure
sensor is attached to the valve stem. The
pressure sensor is covered by the tire and is
not visible unless the tire is removed. Take
care when changing the tire to avoid
damaging the sensor.
You should always have your tires serviced
by an authorized dealer.
Check the tire pressure periodically (at
least monthly) using an accurate tire
gauge. See When Inflating Your Tires in
this chapter.
331
Explorer (TUB) Canada/United States of America, enUSA, Edition date: 201807, Second-Printing Wheels and TiresE142549