2019 FORD EXPLORER engine
[x] Cancel search: enginePage 64 of 571

Note:
Not every feature applies to every
vehicle in every market. When they are
available for your vehicle, then they appear
in your information display, providing
choices to switch them on or off, or to select
a more specific setting.
• Various vehicle speed limits so the
MyKey driver cannot exceed certain
speeds. The information display shows
warnings followed by an audible tone
when the MyKey driver reaches the set
speed. You cannot override the set
speed by fully depressing the
accelerator pedal. WARNING: Do not set MyKey
maximum speed limit to a limit that will
prevent the driver from maintaining a
safe speed considering posted speed
limits and prevailing road conditions. The
driver is always responsible to drive in
accordance with local laws and
prevailing conditions. Failure to do so
could result in accident or injury. •
Various vehicle speed reminders so
MyKey drivers know when their vehicle
speed approaches the limits. Warnings
appear in your information display and
a tone sounds when the MyKey drivers
exceed the set vehicle speed.
• The audio system's maximum volume
limits to 45% so MyKey drivers can
concentrate on the road. A message
appears in the information display
when MyKey drivers attempt to exceed
the limited volume. MyKey also
disables the automatic volume control.
Note:
If your vehicle includes an
AM/FM radio or a very basic audio
system, then the radio may not limit.
• Always on setting. This setting forces
certain features to remain on and
active for MyKey drivers. For example,
E911 or emergency assistance and the
do not disturb features stay on even if
a MyKey driver uses the feature's
control to switch it off. When you
select, you will not be able to turn off
Advance Trac or traction control (if
your vehicle has this feature).
CREATING A MYKEY
Use the information display to create a
MyKey:
1. Insert the key you want to program into
the ignition. See Starting a Gasoline
Engine
(page 167). If your vehicle is
equipped with a push-button start,
place the remote control into the
backup slot. See Passive Anti-Theft
System
(page 75).
2. Switch the ignition on.
61
Explorer (TUB) Canada/United States of America, enUSA, Edition date: 201807, Second-Printing MyKey
™
Page 71 of 571

The lamps do not turn off if:
•
You switch them on with the lighting
control.
• Any door is open.
Illuminated Exit
The interior lamps and some exterior
lamps illuminate when all doors are closed
and you switch the ignition off.
The lamps turn off if all the doors remain
closed and:
• 25 seconds have elapsed.
• You lock your vehicle from the outside.
Battery Saver
If you leave the courtesy lamps, interior
lamps or headlamps on, the battery saver
shuts them off 10 minutes after you switch
the ignition off.
Battery Saver for Intelligent Access
Keys (If Equipped)
If you leave the ignition switched on and
the engine is not running, the battery saver
will turn the ignition off when it detects a
certain amount of battery drain, or after
45 minutes have elapsed.
KEYLESS ENTRY (IF EQUIPPED)
SECURICODE™ Keyless Entry
Keypad
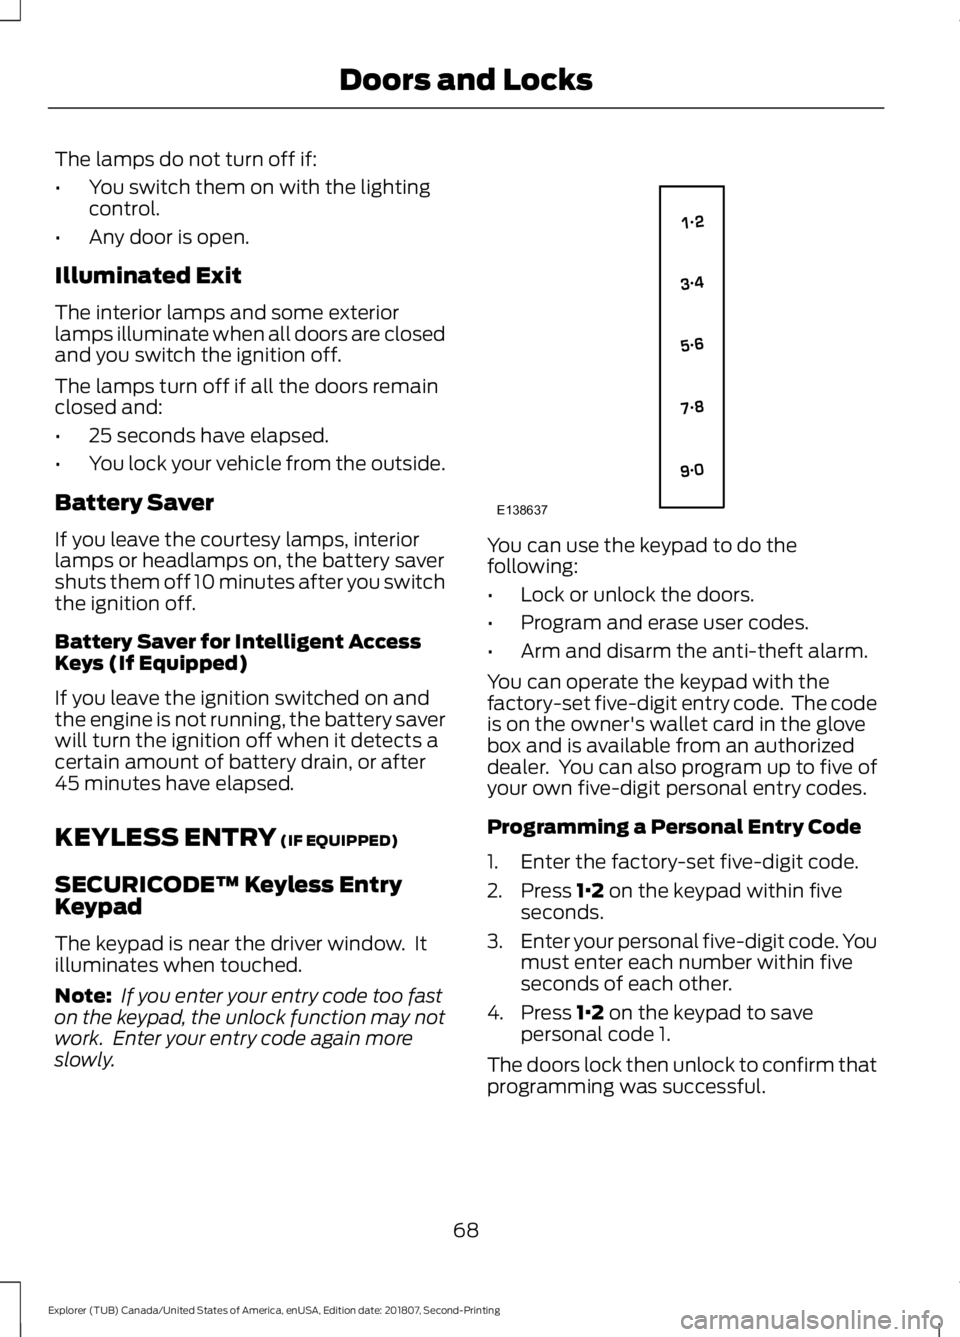
The keypad is near the driver window. It
illuminates when touched.
Note: If you enter your entry code too fast
on the keypad, the unlock function may not
work. Enter your entry code again more
slowly. You can use the keypad to do the
following:
•
Lock or unlock the doors.
• Program and erase user codes.
• Arm and disarm the anti-theft alarm.
You can operate the keypad with the
factory-set five-digit entry code. The code
is on the owner's wallet card in the glove
box and is available from an authorized
dealer. You can also program up to five of
your own five-digit personal entry codes.
Programming a Personal Entry Code
1. Enter the factory-set five-digit code.
2. Press
1·2 on the keypad within five
seconds.
3. Enter your personal five-digit code. You
must enter each number within five
seconds of each other.
4. Press
1·2 on the keypad to save
personal code 1.
The doors lock then unlock to confirm that
programming was successful.
68
Explorer (TUB) Canada/United States of America, enUSA, Edition date: 201807, Second-Printing Doors and LocksE138637
Page 78 of 571

PASSIVE ANTI-THEFT
SYSTEM
Note:
The system is not compatible with
non-Ford aftermarket remote start systems.
Use of these systems may result in vehicle
starting problems and a loss of security
protection.
Note: Metallic objects, electronic devices
or a second coded key on the same key
chain may cause vehicle starting problems
if they are too close to the key when starting
the engine. Prevent these objects from
touching the coded key while starting the
engine. Switch the ignition off, move all
objects on the key chain away from the
coded key and restart the engine if a
problem occurs.
Note: Do not leave a duplicate coded key
in the vehicle. Always take your keys and
lock all doors when leaving the vehicle.
SecuriLock®
The system is an engine immobilization
system. It is designed to help prevent the
engine from being started unless a coded
key programmed to your vehicle is used.
Using the wrong key may prevent the
engine from starting. A message may
appear in the information display.
If you are unable to start the engine with a
correctly coded key, a malfunction has
happened and a message may appear in
the information display.
Automatic Arming
The vehicle arms immediately after you
switch the ignition off.
Automatic Disarming
Switching the ignition on with a coded key
disarms the vehicle. Replacement Keys
Note:
Your vehicle comes equipped with
two integrated keyhead transmitters or two
intelligent access keys.
The integrated keyhead transmitter
functions as a programmed ignition key
that operates all the locks and starts the
vehicle, as well as a remote control.
The intelligent access key functions as a
programmed key that operates the driver
door lock and activates the intelligent
access with push button start system, as
well as a remote control.
If your programmed transmitters or
standard SecuriLock coded keys
(integrated keyhead transmitters only) are
lost or stolen and you do not have an extra
coded key, you will need to have your
vehicle towed to an authorized dealer. You
need to erase the key codes from your
vehicle and program new coded keys.
Store an extra programmed key away from
the vehicle in a safe place to help prevent
any inconveniences. See your authorized
dealer to purchase additional spare or
replacement keys.
Programming a Spare Integrated
Keyhead Transmitter
Note: You can program a maximum of eight
coded keys to your vehicle. All eight can be
integrated keyhead transmitters.
You can program your own integrated
keyhead transmitter or standard
SecuriLock coded keys to your vehicle. This
procedure will program both the engine
immobilizer keycode and the remote entry
portion of the remote control to your
vehicle
Only use integrated keyhead transmitters
or standard SecuriLock keys.
75
Explorer (TUB) Canada/United States of America, enUSA, Edition date: 201807, Second-Printing Security
Page 79 of 571

You must have two previously
programmed coded keys and the new
unprogrammed key readily accessible. See
your authorized dealer to have the spare
key programmed if two previously
programmed coded keys are not available.
Read and understand the entire procedure
before you begin.
1.
Insert the first previously programmed
coded key into the ignition.
2. Switch the ignition from off to on. Keep
the ignition on for at least three
seconds, but no more than 10 seconds.
3. Switch the ignition off and remove the
first coded key from the ignition.
4. After three seconds but within 10 seconds of switching the ignition off,
insert the second previously coded key
into the ignition.
5. Switch the ignition from off to on. Keep
the ignition on for at least three
seconds, but no more than 10 seconds.
6. Switch the ignition off and remove the
second previously programmed coded
key from the ignition.
7. After three seconds but within 10 seconds of switching the ignition off
and removing the previously
programmed coded key, insert the new
unprogrammed key into the ignition.
8. Switch the ignition from off to on. Keep
the ignition on for at least six seconds.
9. Remove the newly programmed coded
key from the ignition.
If the key has been successfully
programmed it will start the engine and
operate the remote entry system (if the
new key is an integrated keyhead
transmitter).
If programming was not successful, wait
10 seconds and repeat Steps 1 through 8.
If you are still unsuccessful, take your
vehicle to your authorized dealer. Programming a Spare Intelligent
Access Key
See your authorized dealer to have
additional keys programmed to your
vehicle.
ANTI-THEFT ALARM (IF EQUIPPED)
The system will warn you of an
unauthorized entry to your vehicle. It will
be triggered if any door, the luggage
compartment or the hood is opened
without using the key, remote control or
keyless entry keypad.
The direction indicators will flash and the
horn will sound if unauthorized entry is
attempted while the alarm is armed.
Take all remote controls to an authorized
dealer if there is any potential alarm
problem with your vehicle.
Arming the Alarm
The alarm is ready to arm when there is
not a key in your vehicle. Electronically lock
your vehicle to arm the alarm.
Disarming the Alarm
Disarm the alarm by any of the following
actions:
• Unlock the doors or luggage
compartment with the remote control
or keyless entry keypad.
• Switch your vehicle on or start your
vehicle.
• Use a key in the driver door to unlock
your vehicle, then switch your vehicle
on within 12 seconds.
Note: Pressing the panic button on the
remote control will stop the horn and signal
indicators, but will not disarm the system.
76
Explorer (TUB) Canada/United States of America, enUSA, Edition date: 201807, Second-Printing Security
Page 83 of 571

Press and release to end a phone
call.
CRUISE CONTROL
Type One See Using Cruise Control (page 217).
Type Two See
Using Adaptive Cruise Control
(page 218). INFORMATION DISPLAY
CONTROL
See
Information Displays (page 104).
HEATED STEERING WHEEL
(IF
EQUIPPED)
Switch the heated steering wheel on and
off using the touchscreen. Touch the button to switch the
heated steering wheel on and
off.
Note: You can use the heated steering
wheel only when the engine is running.
Note: The system uses a sensor and is
designed to control the temperature of the
steering wheel and to prevent it from
overheating.
Note: In warm temperatures, the steering
wheel quickly reaches its maximum
temperature and the system reduces the
current to the heating element. This could
cause you to think that the system has
stopped working but it has not. This is
normal.
80
Explorer (TUB) Canada/United States of America, enUSA, Edition date: 201807, Second-Printing Steering WheelE265040 E200995 E200996 E203207
Page 93 of 571

POWER WINDOWS
WARNING: Do not leave children
unattended in your vehicle and do not
let them play with the power windows.
Failure to follow this instruction could
result in personal injury. WARNING:
When closing the
power windows, verify they are free of
obstruction and make sure that children
and pets are not in the proximity of the
window openings. Note:
You may hear a pulsing noise when
just one of the windows is open. Lower the
opposite window slightly to reduce this
noise.
Press the switch to open the window.
Lift the switch to close the window.
One-Touch Down
Press the switch fully and release it. Press
again or lift it to stop the window.
One-Touch Up
Lift the switch fully and release it. Press or
lift it again to stop the window. Resetting One-Touch Up
Start the engine.
1. Lift and hold the window switch until
the you fully close the door window.
Continue to hold the switch for a few
seconds after you close the window.
2. Release the window switch.
3. Press and hold the window switch until
you fully open the door window.
4. Release the window switch.
5. Lift and hold the window switch until you fully close the window.
6. Test for correct window operation by carrying out the one-touch down and
one-touch up features.
Bounce-Back
The window will stop automatically while
closing. It reverses some distance if there
is an obstacle in the way.
Overriding the Bounce-Back Feature WARNING: When you override the
bounce-back feature the window will
not reverse if it detects an obstacle. Take
care when closing the windows to avoid
personal injury or damage to your
vehicle.
Pull up the window switch and hold within
a few seconds of the window reaching the
bounce-back position. The window travels
up with no bounce-back protection. The
window stops if you release the switch
before the window fully closes.
90
Explorer (TUB) Canada/United States of America, enUSA, Edition date: 201807, Second-Printing Windows and MirrorsE146043
Page 95 of 571

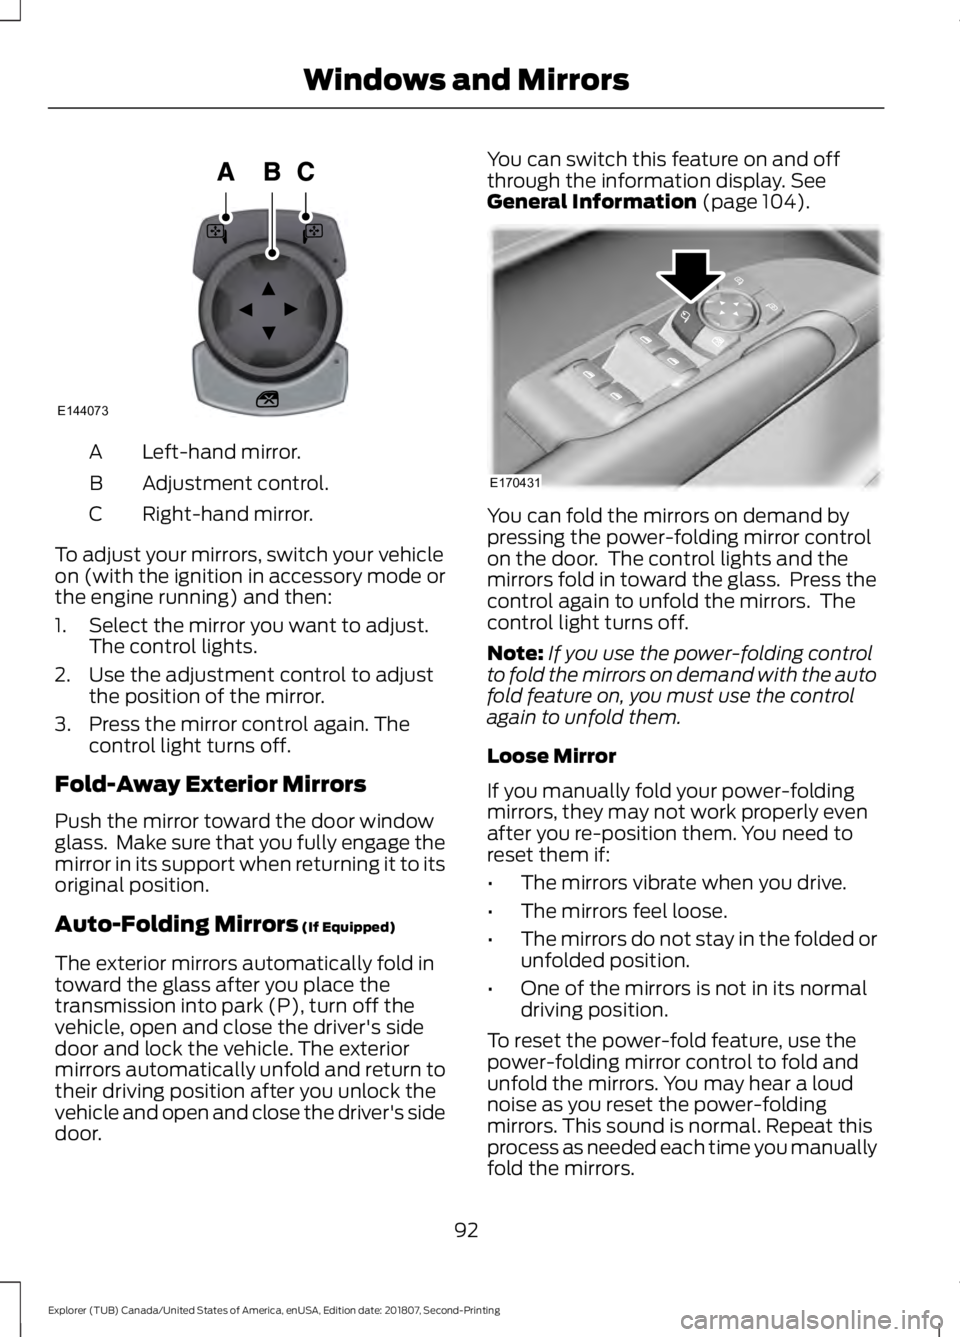
Left-hand mirror.
A
Adjustment control.
B
Right-hand mirror.
C
To adjust your mirrors, switch your vehicle
on (with the ignition in accessory mode or
the engine running) and then:
1. Select the mirror you want to adjust. The control lights.
2. Use the adjustment control to adjust the position of the mirror.
3. Press the mirror control again. The control light turns off.
Fold-Away Exterior Mirrors
Push the mirror toward the door window
glass. Make sure that you fully engage the
mirror in its support when returning it to its
original position.
Auto-Folding Mirrors (If Equipped)
The exterior mirrors automatically fold in
toward the glass after you place the
transmission into park (P), turn off the
vehicle, open and close the driver's side
door and lock the vehicle. The exterior
mirrors automatically unfold and return to
their driving position after you unlock the
vehicle and open and close the driver's side
door. You can switch this feature on and off
through the information display.
See
General Information (page 104). You can fold the mirrors on demand by
pressing the power-folding mirror control
on the door. The control lights and the
mirrors fold in toward the glass. Press the
control again to unfold the mirrors. The
control light turns off.
Note:
If you use the power-folding control
to fold the mirrors on demand with the auto
fold feature on, you must use the control
again to unfold them.
Loose Mirror
If you manually fold your power-folding
mirrors, they may not work properly even
after you re-position them. You need to
reset them if:
• The mirrors vibrate when you drive.
• The mirrors feel loose.
• The mirrors do not stay in the folded or
unfolded position.
• One of the mirrors is not in its normal
driving position.
To reset the power-fold feature, use the
power-folding mirror control to fold and
unfold the mirrors. You may hear a loud
noise as you reset the power-folding
mirrors. This sound is normal. Repeat this
process as needed each time you manually
fold the mirrors.
92
Explorer (TUB) Canada/United States of America, enUSA, Edition date: 201807, Second-Printing Windows and MirrorsE144073 E170431
Page 99 of 571

GAUGES
Type 1
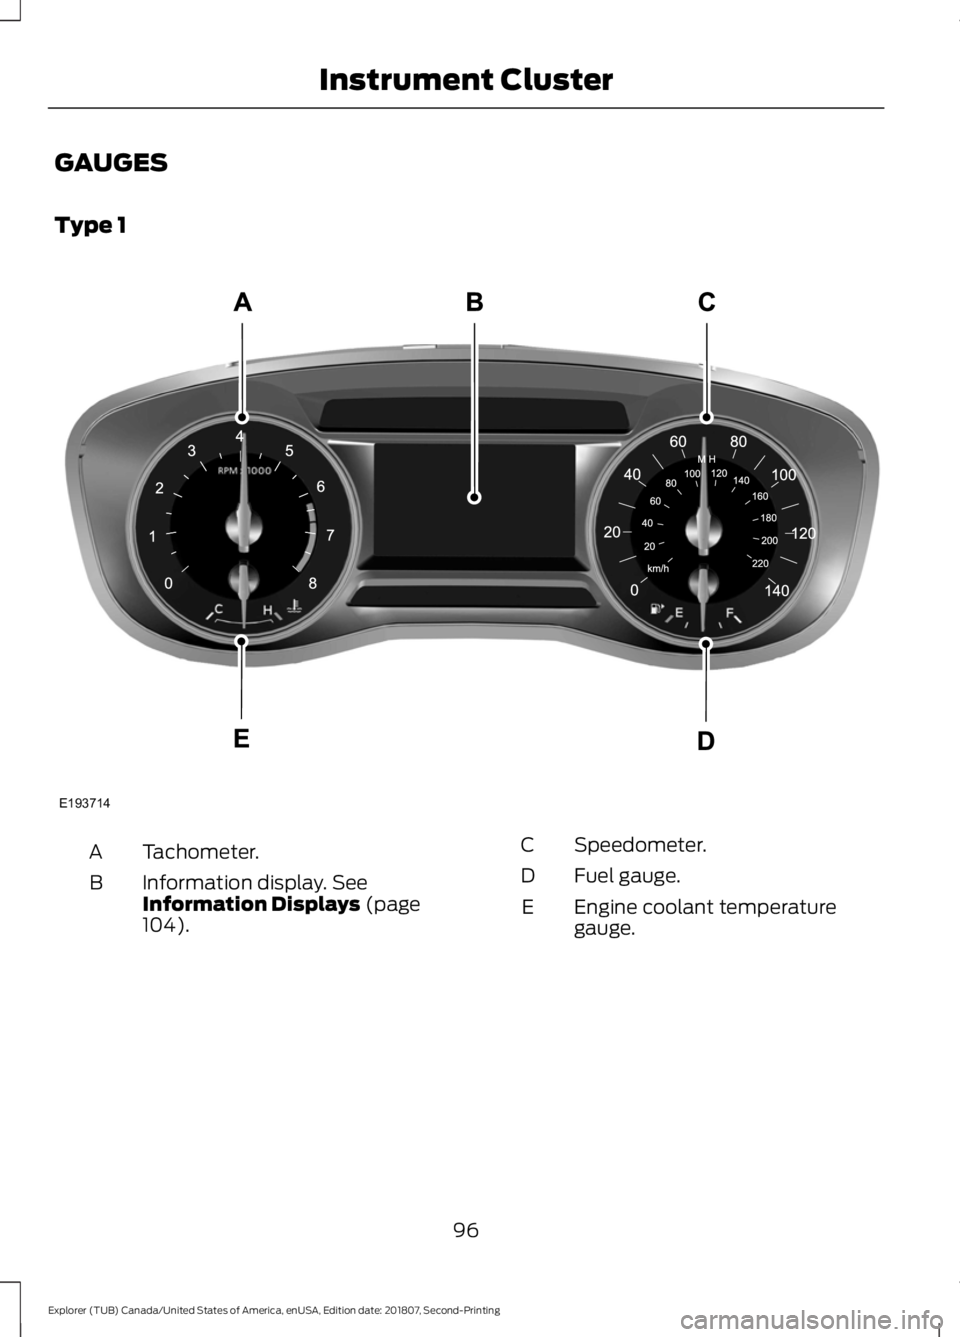
Tachometer.
A
Information display. See
Information Displays (page
104).
B
Speedometer.
C
Fuel gauge.
D
Engine coolant temperature
gauge.
E
96
Explorer (TUB) Canada/United States of America, enUSA, Edition date: 201807, Second-Printing Instrument ClusterE193714