2019 FORD EXPEDITION buttons
[x] Cancel search: buttonsPage 31 of 583
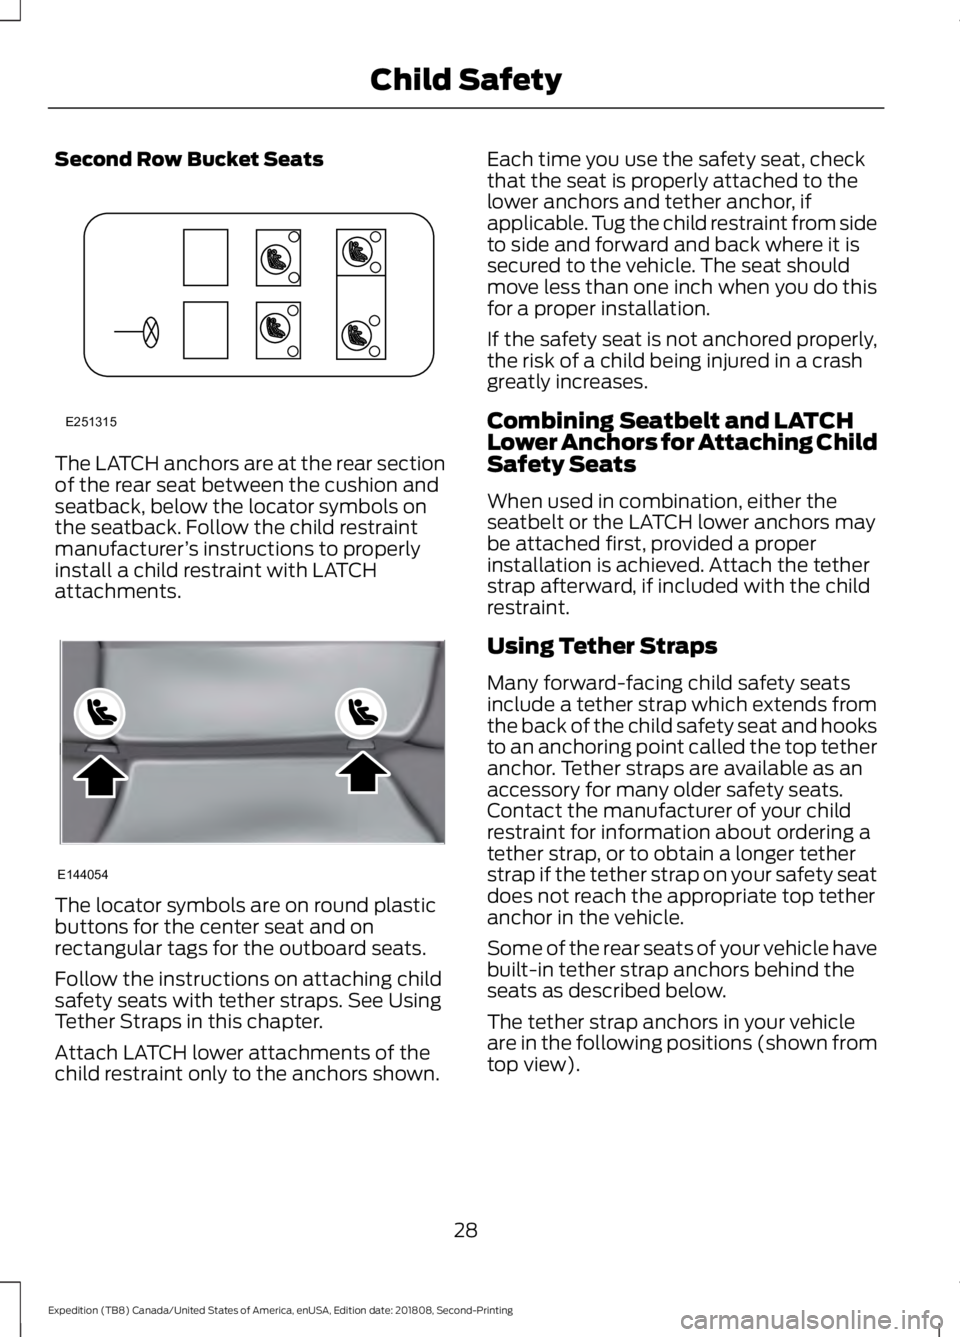
Second Row Bucket Seats
The LATCH anchors are at the rear section
of the rear seat between the cushion and
seatback, below the locator symbols on
the seatback. Follow the child restraint
manufacturer
’s instructions to properly
install a child restraint with LATCH
attachments. The locator symbols are on round plastic
buttons for the center seat and on
rectangular tags for the outboard seats.
Follow the instructions on attaching child
safety seats with tether straps. See Using
Tether Straps in this chapter.
Attach LATCH lower attachments of the
child restraint only to the anchors shown. Each time you use the safety seat, check
that the seat is properly attached to the
lower anchors and tether anchor, if
applicable. Tug the child restraint from side
to side and forward and back where it is
secured to the vehicle. The seat should
move less than one inch when you do this
for a proper installation.
If the safety seat is not anchored properly,
the risk of a child being injured in a crash
greatly increases.
Combining Seatbelt and LATCH
Lower Anchors for Attaching Child
Safety Seats
When used in combination, either the
seatbelt or the LATCH lower anchors may
be attached first, provided a proper
installation is achieved. Attach the tether
strap afterward, if included with the child
restraint.
Using Tether Straps
Many forward-facing child safety seats
include a tether strap which extends from
the back of the child safety seat and hooks
to an anchoring point called the top tether
anchor. Tether straps are available as an
accessory for many older safety seats.
Contact the manufacturer of your child
restraint for information about ordering a
tether strap, or to obtain a longer tether
strap if the tether strap on your safety seat
does not reach the appropriate top tether
anchor in the vehicle.
Some of the rear seats of your vehicle have
built-in tether strap anchors behind the
seats as described below.
The tether strap anchors in your vehicle
are in the following positions (shown from
top view).
28
Expedition (TB8) Canada/United States of America, enUSA, Edition date: 201808, Second-Printing Child SafetyE251315 E144054
Page 72 of 583

LOCKING AND UNLOCKING
You can use the power door lock control
or the remote control to lock and unlock
your vehicle.
Power Door Locks
The power door lock control is on the driver
and front passenger door panels.
Unlock.
A
Lock.
B
Door Lock Switch Inhibitor
When you electronically lock your vehicle,
the power door lock switch and interior
trunk release switch will not operate after
20 seconds. You must unlock your vehicle
with the remote control or keyless keypad,
or switch the ignition on, to restore function
to these switches. You can switch this
feature on or off in the information display.
Note: Switch the ignition on and off after
changing the setting in the information
display.
Rear Door Unlocking and Opening
Pull the interior door handle twice to
unlock and open a rear door. The first pull
unlocks the door and the second pull
opens the door. Remote Control
You can use the remote control at any
time. The liftgate release button only
operates when the speed is less than
3 mph (5 km/h).
Unlocking the Doors (Two-Stage
Unlock) Press the button to unlock the
driver door.
Press the button again within three
seconds to unlock all doors. The direction
indicators will flash.
Note: If the system does not function, use
the key blade to lock and unlock your
vehicle.
Reprogramming the Unlocking Function
Note: When you press the unlock button,
either all the doors unlock, or only the driver
door unlocks. Pressing the unlock button
again unlocks all the doors.
Press and hold the unlock and lock buttons
on the remote control simultaneously for
at least four seconds with the ignition off.
The direction indicators flash twice to
confirm the change. The unlocking mode
applies to the remote control, keyless entry
keypad and intelligent access. You can
also change between the unlocking modes
using the information display. See
General Information
(page 113).
To return to the original unlocking function,
repeat the process.
Locking the Doors Press the button to lock all
doors. The direction indicators
will flash.
69
Expedition (TB8) Canada/United States of America, enUSA, Edition date: 201808, Second-Printing Doors and LocksE138628 E138629 E138623
Page 78 of 583
2.
With the buttons facing the rear of your
vehicle and the key ring facing upward,
place the first intelligent access key
into the backup slot inside the center
console.
3. Press the push button ignition switch once and wait for a few seconds.
4. Press the push button ignition switch again and remove the intelligent access
key from the center console.
5. Insert the second programmed key into
the backup slot in the center console,
then press the push button ignition
switch.
The factory-set code appears in the
information display for a few seconds.
Note: The code may not display until after
any other warning messages first display.
75
Expedition (TB8) Canada/United States of America, enUSA, Edition date: 201808, Second-Printing Doors and Locks
Page 116 of 583
GENERAL INFORMATION
WARNING: Driving while
distracted can result in loss of vehicle
control, crash and injury. We strongly
recommend that you use extreme
caution when using any device that may
take your focus off the road. Your
primary responsibility is the safe
operation of your vehicle. We
recommend against the use of any
hand-held device while driving and
encourage the use of voice-operated
systems when possible. Make sure you
are aware of all applicable local laws
that may affect the use of electronic
devices while driving.
Various systems on your vehicle can be
controlled using the information display
controls on the steering wheel.
Corresponding information is displayed in
the information display.
Note: Some options may appear slightly
different or not at all if the items are
optional. Note:
Trailer options are not available if
your vehicle speed is greater than
3 mph
(5 km/h).
Note: Some MyKey menu options only
appear if MyKey is enabled and at least one
MyKey is programmed. This icon gives you the ability to
switch a feature on or off. A
check in the box indicates the
feature is on, and unchecked indicates the
feature is off.
Information Display Controls
(Type 1 and 2)
• Press the up and down arrow buttons
to scroll through and highlight the
options within a menu.
• Press the right arrow button to enter a
sub-menu.
• Press the left arrow button to exit a
menu.
• Press the
OK button to choose and
confirm a setting or messages.
Type 1 Main Menu
Trip 1
Trip 2
Fuel Economy Driver Assist Settings
113
Expedition (TB8) Canada/United States of America, enUSA, Edition date: 201808, Second-Printing Information DisplaysE204495
Page 123 of 583
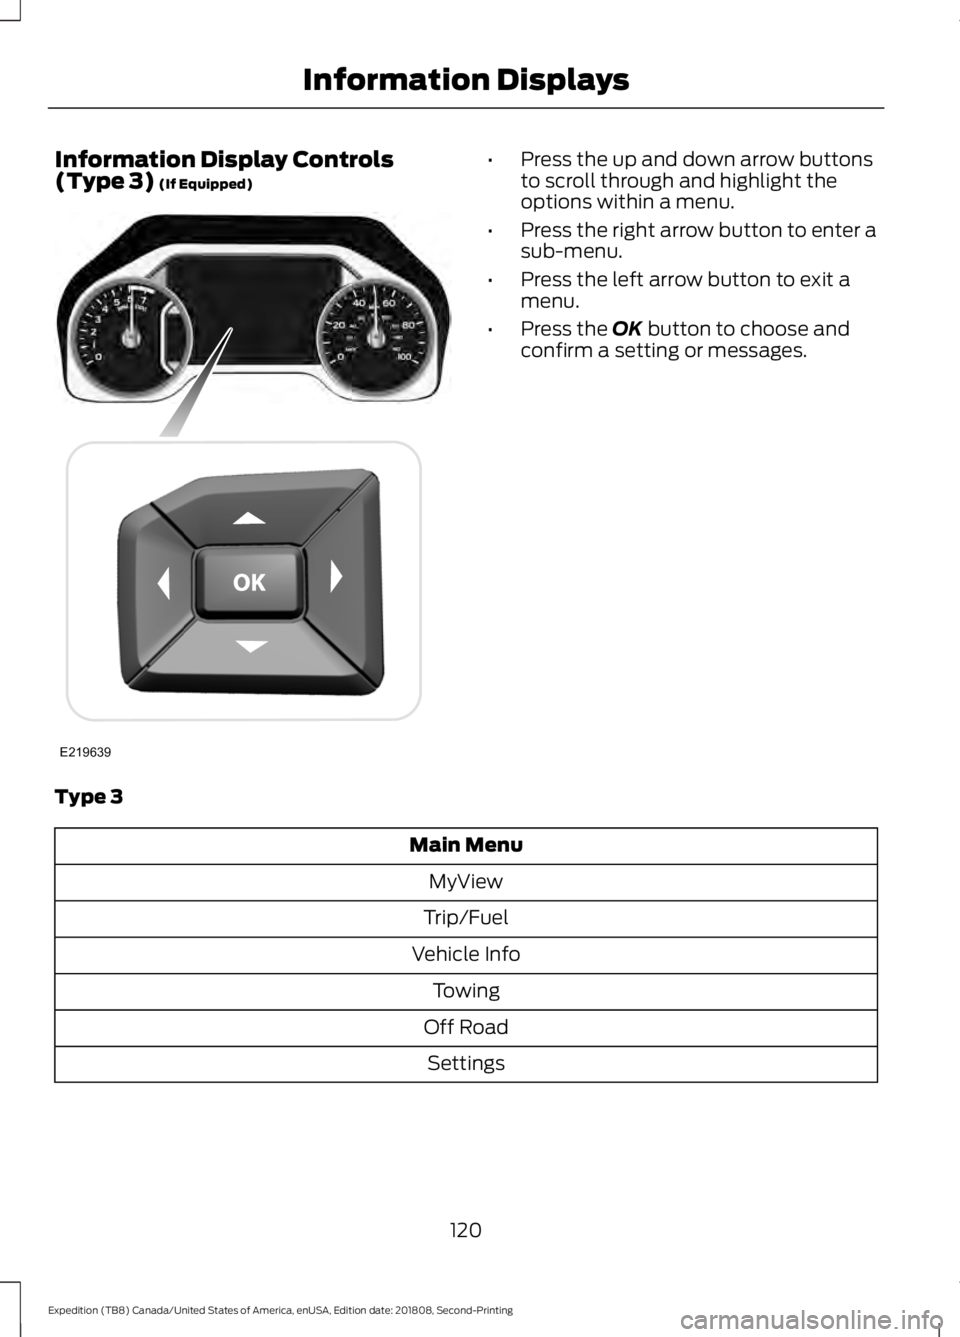
Information Display Controls
(Type 3) (If Equipped) •
Press the up and down arrow buttons
to scroll through and highlight the
options within a menu.
• Press the right arrow button to enter a
sub-menu.
• Press the left arrow button to exit a
menu.
• Press the
OK button to choose and
confirm a setting or messages.
Type 3 Main Menu
MyView
Trip/Fuel
Vehicle Info Towing
Off Road Settings
120
Expedition (TB8) Canada/United States of America, enUSA, Edition date: 201808, Second-Printing Information DisplaysE219639
Page 150 of 583
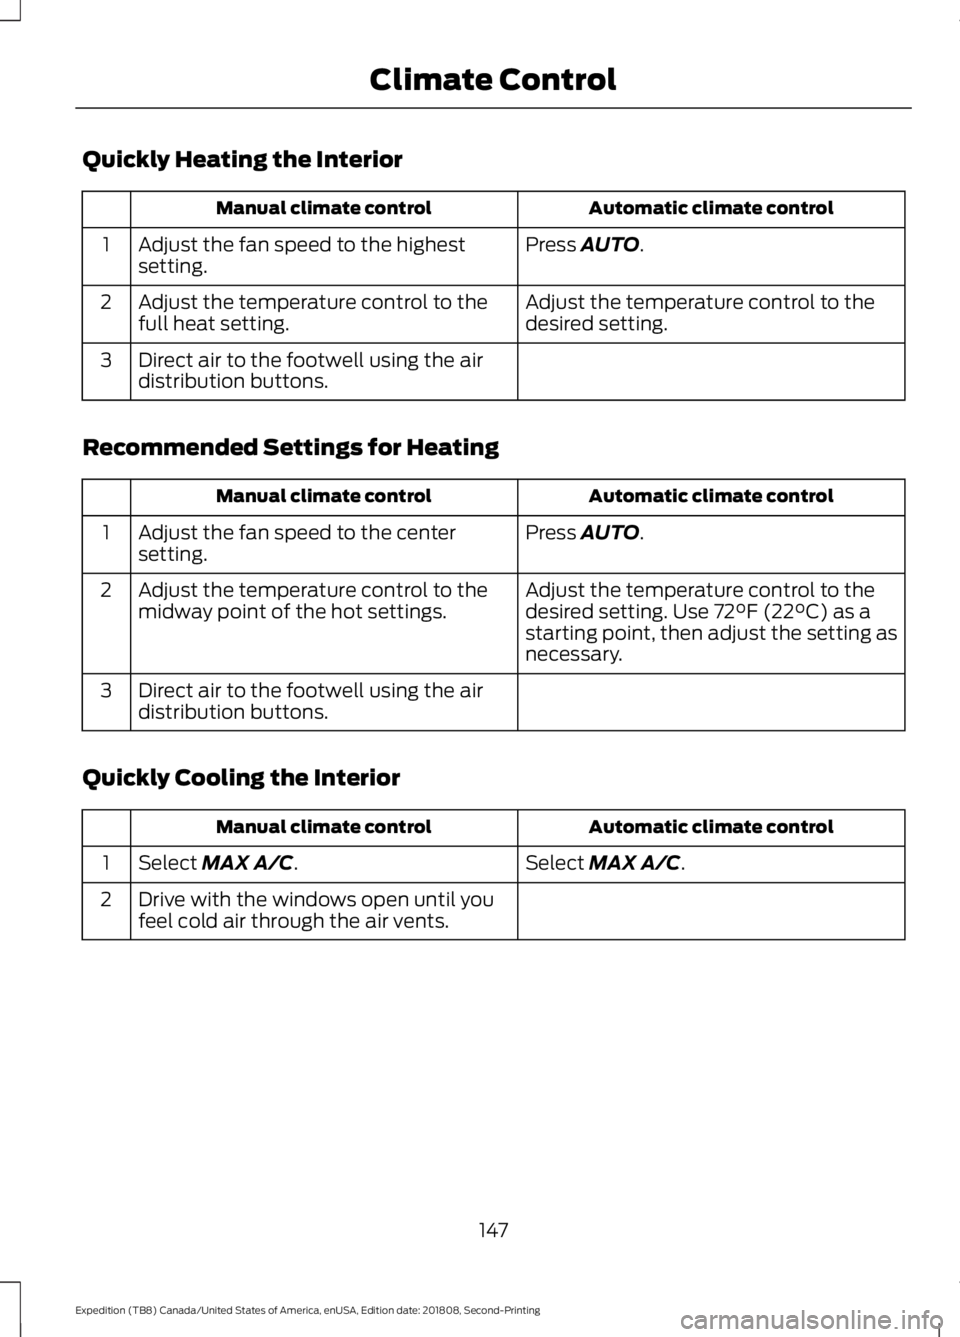
Quickly Heating the Interior
Automatic climate control
Manual climate control
Press AUTO.
Adjust the fan speed to the highest
setting.
1
Adjust the temperature control to the
desired setting.
Adjust the temperature control to the
full heat setting.
2
Direct air to the footwell using the air
distribution buttons.
3
Recommended Settings for Heating Automatic climate control
Manual climate control
Press
AUTO.
Adjust the fan speed to the center
setting.
1
Adjust the temperature control to the
desired setting. Use
72°F (22°C) as a
starting point, then adjust the setting as
necessary.
Adjust the temperature control to the
midway point of the hot settings.
2
Direct air to the footwell using the air
distribution buttons.
3
Quickly Cooling the Interior Automatic climate control
Manual climate control
Select
MAX A/C.
Select MAX A/C.
1
Drive with the windows open until you
feel cold air through the air vents.
2
147
Expedition (TB8) Canada/United States of America, enUSA, Edition date: 201808, Second-Printing Climate Control
Page 151 of 583
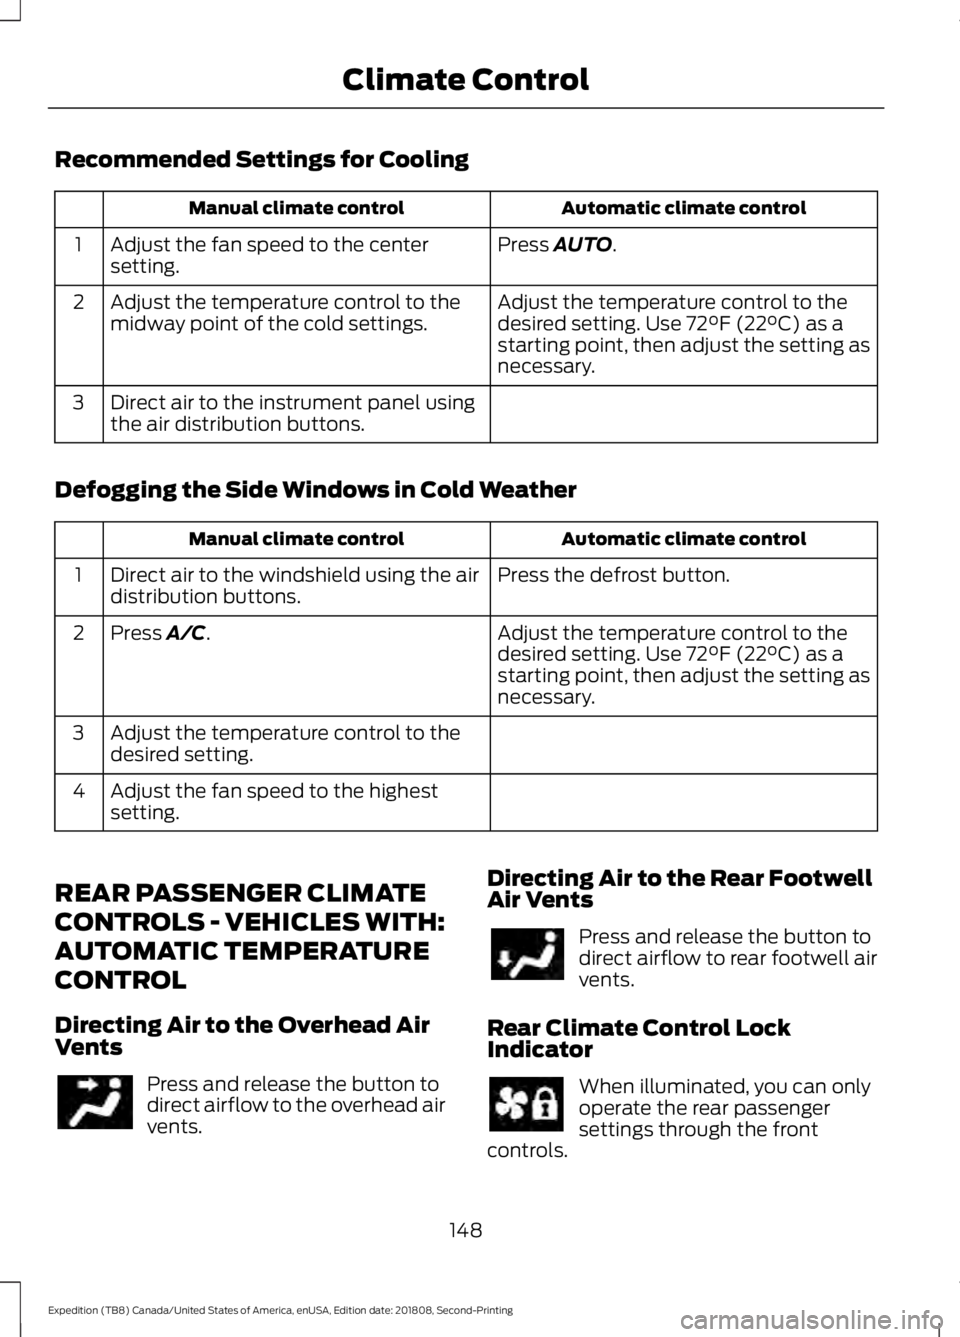
Recommended Settings for Cooling
Automatic climate control
Manual climate control
Press AUTO.
Adjust the fan speed to the center
setting.
1
Adjust the temperature control to the
desired setting. Use
72°F (22°C) as a
starting point, then adjust the setting as
necessary.
Adjust the temperature control to the
midway point of the cold settings.
2
Direct air to the instrument panel using
the air distribution buttons.
3
Defogging the Side Windows in Cold Weather Automatic climate control
Manual climate control
Press the defrost button.
Direct air to the windshield using the air
distribution buttons.
1
Adjust the temperature control to the
desired setting. Use
72°F (22°C) as a
starting point, then adjust the setting as
necessary.
Press A/C.
2
Adjust the temperature control to the
desired setting.
3
Adjust the fan speed to the highest
setting.
4
REAR PASSENGER CLIMATE
CONTROLS - VEHICLES WITH:
AUTOMATIC TEMPERATURE
CONTROL
Directing Air to the Overhead Air
Vents Press and release the button to
direct airflow to the overhead air
vents. Directing Air to the Rear Footwell
Air Vents Press and release the button to
direct airflow to rear footwell air
vents.
Rear Climate Control Lock
Indicator When illuminated, you can only
operate the rear passenger
settings through the front
controls.
148
Expedition (TB8) Canada/United States of America, enUSA, Edition date: 201808, Second-Printing Climate Control
Page 157 of 583
WARNING: The head restraint is
a safety device. Whenever possible it
should be installed and properly
adjusted when the seat is occupied.
Failure to adjust the head restraint
properly could reduce its effectiveness
during certain impacts.
Note: Adjust the seat backrest to an upright
driving position before adjusting the head
restraint. Adjust the head restraint so that
the top of it is level with the top of your head
and as far forward as possible. Make sure
that you remain comfortable. If you are
extremely tall, adjust the head restraint to
its highest position.
Front Seat Manual Head
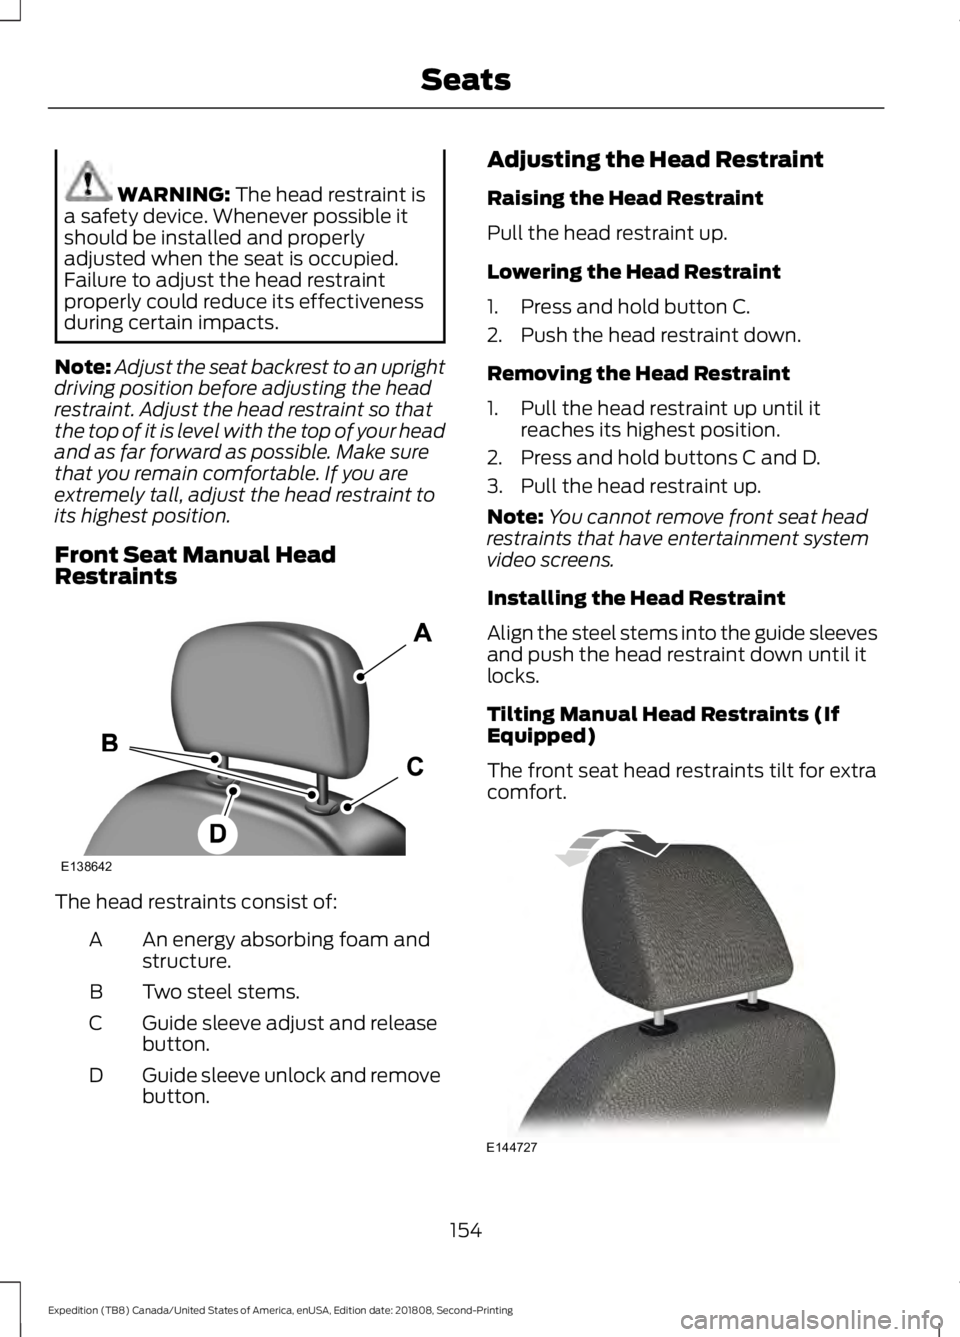
Restraints The head restraints consist of:
An energy absorbing foam and
structure.
A
Two steel stems.
B
Guide sleeve adjust and release
button.
C
Guide sleeve unlock and remove
button.
D Adjusting the Head Restraint
Raising the Head Restraint
Pull the head restraint up.
Lowering the Head Restraint
1. Press and hold button C.
2. Push the head restraint down.
Removing the Head Restraint
1. Pull the head restraint up until it
reaches its highest position.
2. Press and hold buttons C and D.
3. Pull the head restraint up.
Note: You cannot remove front seat head
restraints that have entertainment system
video screens.
Installing the Head Restraint
Align the steel stems into the guide sleeves
and push the head restraint down until it
locks.
Tilting Manual Head Restraints (If
Equipped)
The front seat head restraints tilt for extra
comfort. 154
Expedition (TB8) Canada/United States of America, enUSA, Edition date: 201808, Second-Printing SeatsE138642 E144727