2019 FORD EXPEDITION weight
[x] Cancel search: weightPage 54 of 583
Note:
When you first switch the ignition on,
the passenger airbag status indicator off
and on lamps illuminate for a short period
to confirm it is functional.
The front passenger sensing system is
designed to disable (will not inflate) the
front passenger frontal airbag under
certain conditions:
• The front passenger seat is
unoccupied.
• The system determines an infant is
present in a child restraint.
• A passenger takes their weight off of
the seat for a period of time.
• If there is a problem with the airbag
system or the passenger sensing
system.
Even with this technology, parents are
strongly encouraged to always properly
restrain children in the rear seat.
• When the front passenger sensing
system disables (will not inflate) the
front passenger frontal airbag, the
passenger airbag status indicator
illuminates the off lamp and stays lit
to remind you that the front passenger
frontal airbag is disabled.
• If you have installed the child restraint
and the passenger airbag status
indicator illuminates the on lamp, then
switch your vehicle off, remove the
child restraint from your vehicle and
reinstall the restraint following the
child restraint manufacturer's
instructions.
The front passenger sensing system works
with sensors that are part of the front
passenger seat and seatbelt. The sensors
are designed to detect the presence of a
properly seated occupant and determine
if the front passenger frontal airbag should
be enabled. •
When the front passenger sensing
system enables the front passenger
frontal airbag (may inflate), the
passenger airbag status indicator
illuminates the on lamp and remains
illuminated.
If a person of adult size is sitting in the front
passenger seat, but the passenger airbag
status indicator off lamp is lit, it is possible
that the person is not sitting properly in the
seat. If this happens:
• Switch your vehicle off and ask the
person to place the seatback in an
upright position.
• Have the person sit upright in the seat,
centered on the seat cushion, with the
person's legs comfortably extended.
• Restart your vehicle and have the
person remain in this position for about
two minutes. This allows the system
to detect that person and enable the
passenger frontal airbag.
• If the indicator off lamp remains lit
even after this, you should advise the
person to ride in the rear seat.
Note: When the passenger airbag status
indicator off lamp illuminates, the passenger
side airbag (seat mounted) may be disabled
to avoid the risk of airbag deployment
issues.
After all occupants have adjusted their
seats and put on seatbelts, it is very
important that they continue to sit
properly. A properly seated occupant sits
upright, leaning against the seatback, and
centered on the seat cushion, with their
feet comfortably extended on the floor.
Sitting improperly can increase the chance
of injury in a crash event. For example, if
an occupant slouches, lies down, turns
sideways, sits forward, leans forward or
sideways, or puts one or both feet up, the
chance of injury during a crash greatly
increases.
51
Expedition (TB8) Canada/United States of America, enUSA, Edition date: 201808, Second-Printing Supplementary Restraints System
Page 55 of 583
If you think that the state of the passenger
airbag status indicator lamp is incorrect,
check for the following:
•
Objects lodged underneath the seat.
• Objects between the seat cushion and
the center console.
• Objects hanging off the seat backrest.
• Objects stowed in the seat backrest
map pocket.
• Objects placed on the occupant's lap.
• Cargo interference with the seat
• Other passengers pushing or pulling on
the seat.
• Rear passenger feet and knees resting
or pushing on the seat.
The conditions listed above may cause the
weight of a properly seated occupant to
be incorrectly interpreted by the front
passenger sensing system. The person in
the front passenger seat may appear
heavier or lighter due to the conditions
described in the previous list. Make sure the front passenger
sensing system is operating
properly. See Crash Sensors
and Airbag Indicator (page 54).
If the airbag readiness light is lit, do the
following:
The driver and adult passengers should
check for objects lodged underneath the
front passenger seat or cargo interfering
with the seat.
If objects are lodged or cargo is interfering
with the seat, please take the following
steps to remove the obstruction:
• Pull your vehicle over.
• Switch your vehicle off.
• Driver or adult passengers should
check for any objects lodged
underneath the front passenger seat
or cargo interfering with the seat. •
Remove the obstruction(s) (if found).
• Restart your vehicle.
• Wait at least two minutes and verify
that the airbag readiness light in the
instrument cluster is no longer
illuminated.
• If the airbag readiness light in the
instrument cluster remains illuminated,
this may or may not be a problem due
to the front passenger sensing system.
Do not attempt to repair or service the
system. Take your vehicle immediately to
an authorized dealer.
If it is necessary to modify an advanced
front airbag system to accommodate a
person with disabilities, contact your
Customer Relationship Center.
SIDE AIRBAGS WARNING:
Do not place objects
or mount equipment on or near the
airbag cover, on the side of the front or
rear seatbacks, or in areas that may
come into contact with a deploying
airbag. Failure to follow these
instructions may increase the risk of
personal injury in the event of a crash. WARNING:
Do not use accessory
seat covers. The use of accessory seat
covers may prevent the deployment of
the side airbags and increase the risk of
injury in an accident. WARNING:
Do not lean your head
on the door. The side airbag could injure
you as it deploys from the side of the
seatback.
52
Expedition (TB8) Canada/United States of America, enUSA, Edition date: 201808, Second-Printing Supplementary Restraints SystemE67017
Page 81 of 583

If the liftgate starts to close after it has
fully opened, this indicates there may be
excessive weight on the liftgate or a
possible strut failure. A repetitive tone
sounds and the liftgate closes under
control. Remove any excessive weight
from the liftgate. If the liftgate continues
to close after opening, have the system
checked as soon as possible.
Opening and Closing the Liftgate
WARNING: Make sure all persons
are clear of the power liftgate area
before using the power liftgate control.
Note: Make sure the area behind your
vehicle is free from obstruction and that
there is enough room for you to operate the
liftgate. Objects too close to your vehicle,
for example a wall, garage door or another
vehicle may come into contact with the
moving liftgate. This could damage the
liftgate and its components.
Note: Be careful when opening or closing
the liftgate in a garage or other enclosed
area to avoid damaging the liftgate.
Note: Do not leave the liftgate open when
you are driving. This could damage the
liftgate and its components.
From the Instrument Panel With the transmission in park
(P), press the button on the
instrument panel.
Remote Control Press the button twice within a
few seconds. Outside Control
Opening the Liftgate
1. Unlock the liftgate with the remote
control or power door unlock control.
If an intelligent access key is within
3 ft
(1 m) of the liftgate, the liftgate unlocks
when you press the liftgate release
button. 2. Press the button inside the liftgate
handle.
Note: Allow the power system to open the
liftgate. Manually pushing or pulling the
liftgate may activate the system ’s obstacle
detection and stop the power operation or
reverse its direction, replicate a strut failure,
or damage mechanical components.
Closing the Liftgate WARNING:
Keep clear of the
liftgate when using the rear switch.
78
Expedition (TB8) Canada/United States of America, enUSA, Edition date: 201808, Second-Printing Liftgate E138630 E252962
Page 156 of 583
SITTING IN THE CORRECT
POSITION
WARNING: Sitting improperly, out
of position or with the seatback reclined
too far can take weight off the seat
cushion and affect the decision of the
passenger sensing system, resulting in
serious injury or death in the event of a
crash. Always sit upright against your
seat back, with your feet on the floor. WARNING:
Do not recline the
seatback too far as this can cause the
occupant to slide under the seatbelt,
resulting in serious injury in the event of
a collision. WARNING:
Do not place objects
higher than the top of the seat backrest.
Failure to follow this instruction could
result in personal injury or death in the
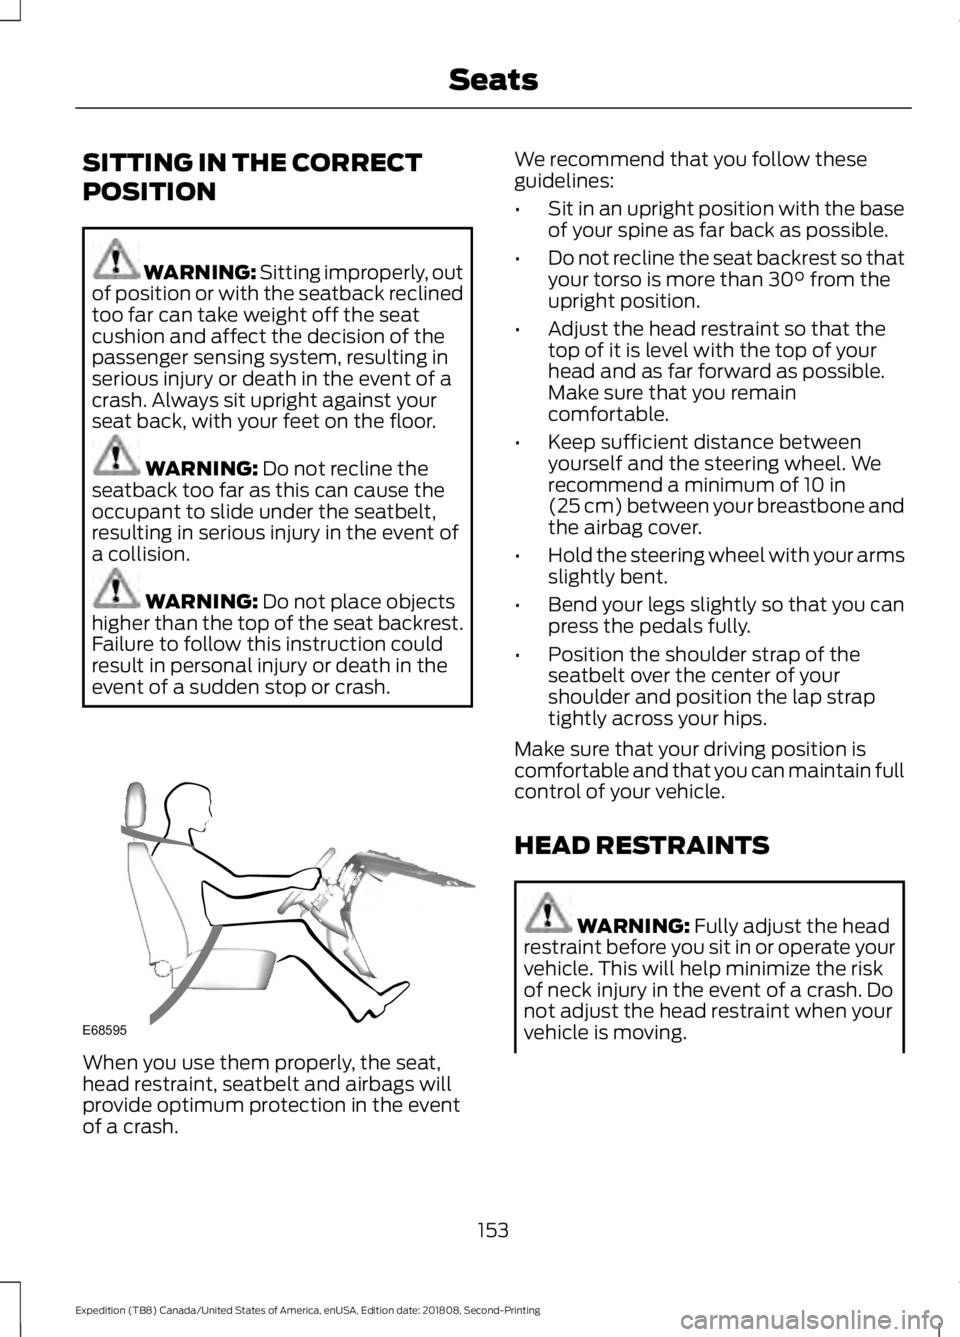
event of a sudden stop or crash. When you use them properly, the seat,
head restraint, seatbelt and airbags will
provide optimum protection in the event
of a crash. We recommend that you follow these
guidelines:
•
Sit in an upright position with the base
of your spine as far back as possible.
• Do not recline the seat backrest so that
your torso is more than
30° from the
upright position.
• Adjust the head restraint so that the
top of it is level with the top of your
head and as far forward as possible.
Make sure that you remain
comfortable.
• Keep sufficient distance between
yourself and the steering wheel. We
recommend a minimum of
10 in
(25 cm) between your breastbone and
the airbag cover.
• Hold the steering wheel with your arms
slightly bent.
• Bend your legs slightly so that you can
press the pedals fully.
• Position the shoulder strap of the
seatbelt over the center of your
shoulder and position the lap strap
tightly across your hips.
Make sure that your driving position is
comfortable and that you can maintain full
control of your vehicle.
HEAD RESTRAINTS WARNING:
Fully adjust the head
restraint before you sit in or operate your
vehicle. This will help minimize the risk
of neck injury in the event of a crash. Do
not adjust the head restraint when your
vehicle is moving.
153
Expedition (TB8) Canada/United States of America, enUSA, Edition date: 201808, Second-Printing SeatsE68595
Page 186 of 583
Guarding Against Exhaust Fumes
WARNING: Exhaust leaks may
result in entry of harmful and potentially
lethal fumes into the passenger
compartment. If you smell exhaust
fumes inside your vehicle, have your
vehicle inspected immediately. Do not
drive if you smell exhaust fumes.
Important Ventilating Information
If you stop your vehicle and then leave the
engine idling for long periods, we
recommend that you do one of the
following:
• Open the windows at least 1 in (3 cm).
• Set your climate control to outside air.
ENGINE BLOCK HEATER
(IF
EQUIPPED) WARNING:
Failure to follow
engine block heater instructions could
result in property damage or serious
personal injury. WARNING:
Do not use your heater
with ungrounded electrical systems or
two-pronged adapters. There is a risk of
electrical shock. WARNING:
Do not fully close the
hood, or allow it to drop under its own
weight when using the engine block
heater. This could damage the power
cable and may cause an electrical short
resulting in fire, injury and property
damage. Note:
The heater is most effective when
outdoor temperatures are below
0°F
(-18°C).
The heater acts as a starting aid by
warming the engine coolant. This allows
the climate control system to respond
quickly. The equipment includes a heater
element (installed in the engine block) and
a wire harness. You can connect the
system to a grounded 120-volt AC
electrical source.
We recommend that you do the following
for a safe and correct operation:
• Use a 16-gauge outdoor extension cord
that is product certified by
Underwriter ’s Laboratory (UL) or
Canadian Standards Association
(CSA). This extension cord must be
suitable for use outdoors, in cold
temperatures, and be clearly marked
Suitable for Use with Outdoor
Appliances. Do not use an indoor
extension cord outdoors. This could
result in an electric shock or become a
fire hazard.
• Use as short an extension cord as
possible.
• Do not use multiple extension cords.
• Make sure that when in operation, the
extension cord plug and heater cord
plug connections are free and clear of
water. This could cause an electric
shock or fire.
• Make sure your vehicle is parked in a
clean area, clear of combustibles.
• Make sure the heater, heater cord and
extension cord are firmly connected.
• Check for heat anywhere in the
electrical hookup once the system has
been operating for approximately 30
minutes.
183
Expedition (TB8) Canada/United States of America, enUSA, Edition date: 201808, Second-Printing Starting and Stopping the Engine
Page 197 of 583
Filling the Fuel Tank
For consistent results when refueling:
•
Turn the ignition off before fueling; an
inaccurate reading results if the engine
is left running.
• Use the same fill rate
(low-medium-high) each time the tank
is filled.
• Allow no more than one automatic
shut-off when refueling.
Results are most accurate when the filling
method is consistent.
Calculating Fuel Economy
Your vehicle calculates fuel economy
figures through the trip computer average
fuel function. See Information Displays
(page 113).
The first
1,000 mi (1,500 km) of driving is
the break-in period of the engine. A more
accurate measurement is obtained after
2,000 mi (3,000 km)
.
1. Completely fill the fuel tank and record
the initial odometer reading.
See
Refueling (page 191).
2. Each time you fill the fuel tank, record the amount of fuel added.
3. After at least three fill ups, fill the fuel tank and record the current odometer
reading.
4. Subtract your initial odometer reading from the current odometer reading.
To calculate L/100 km (liters per 100
kilometers) fuel consumption, multiply the
liters used by 100, then divide by kilometers
traveled. To calculate MPG (miles per
gallon) fuel consumption, divide miles
traveled by gallons used. Keep a record for at least one month and
record the type of driving, for example city
or highway. This provides an accurate
estimate of your vehicle
’s fuel economy
under current driving conditions. Keeping
records during summer and winter shows
how temperature impacts fuel economy.
Conditions
• Heavily loading your vehicle reduces
fuel economy.
• Carrying unnecessary weight in your
vehicle may reduce fuel economy.
• Avoid adding accessories that increase
aerodynamic drag to your vehicle such
as bug deflectors, car top carriers and
ski or bike racks.
• Using fuel blended with alcohol may
lower fuel economy.
• Fuel economy may decrease with lower
temperatures.
• Fuel economy may decrease when
driving short distances.
• You will get better fuel economy when
driving on flat terrain than when driving
on hilly terrain.
194
Expedition (TB8) Canada/United States of America, enUSA, Edition date: 201808, Second-Printing Fuel and Refueling
Page 199 of 583
•
Incorrect fuel for climatic conditions.
• Incorrect engine oil viscosity for
climactic conditions.
Note: Some vehicles have a lifetime fuel
filter that is integrated with the fuel tank.
Regular maintenance or replacement is not
needed.
Note: If these checks do not help you
correct the concern, have your vehicle
checked as soon as possible.
Noise Emissions Warranty,
Prohibited Tampering Acts and
Maintenance
On January 1, 1978, Federal regulation
became effective governing the noise
emission on trucks over 10,000 lb
(4,536 kg) Gross Vehicle Weight Rating
(GVWR). The preceding statements
concerning prohibited tampering acts and
maintenance, and the noise warranty
found in the Warranty Guide, are
applicable to complete chassis cabs over
10,000 lb (4,536 kg)
GVWR.
CATALYTIC CONVERTER WARNING:
Do not park, idle or
drive your vehicle on dry grass or other
dry ground cover. The emission system
heats up the engine compartment and
exhaust system, creating the risk of fire. WARNING:
The normal operating
temperature of the exhaust system is
very high. Never work around or attempt
to repair any part of the exhaust system
until it has cooled. Use special care when
working around the catalytic converter.
The catalytic converter heats up to a very
high temperature after only a short
period of engine operation and stays hot
after the engine is switched off. WARNING:
Exhaust leaks may
result in entry of harmful and potentially
lethal fumes into the passenger
compartment. If you smell exhaust
fumes inside your vehicle, have your
vehicle inspected immediately. Do not
drive if you smell exhaust fumes.
Your vehicle has various emission control
components and a catalytic converter that
enables it to comply with applicable
exhaust emission standards.
To make sure that the catalytic converter
and other emission control components
continue to work properly:
• Do not crank the engine for more than
10 seconds at a time.
• Do not run the engine with a spark plug
lead disconnected.
• Do not push-start or tow-start your
vehicle. Use booster cables. See Jump
Starting the Vehicle
(page 308).
• Use only the specified fuel listed.
• Do not switch the ignition off when your
vehicle is moving.
• Avoid running out of fuel.
• Have the items listed in scheduled
maintenance information performed
according to the specified schedule.
Note: Resulting component damage may
not be covered by the vehicle Warranty.
The scheduled maintenance items listed
in scheduled maintenance information are
essential to the life and performance of
your vehicle and to its emissions system.
If you use anything other than Ford,
Motorcraft or Ford-authorized parts for
maintenance replacements or for service
of components affecting emission control,
such non-Ford parts should be equivalent
to genuine Ford Motor Company parts in
performance and durability.
196
Expedition (TB8) Canada/United States of America, enUSA, Edition date: 201808, Second-Printing Engine Emission Control
Page 274 of 583
For the short wheel base system, it is
necessary for the second panel located
toward the front of the vehicle to be raised
up when the seats are folded down.
For the long wheel base system, it is
necessary for the second panel located
toward the front of the vehicle to be raised
up.
Note:
Before moving the board into the
shelf position, you may need to flip down
the hooks.
Note: Do not put more than 50 lb (22 kg)
on shelf.
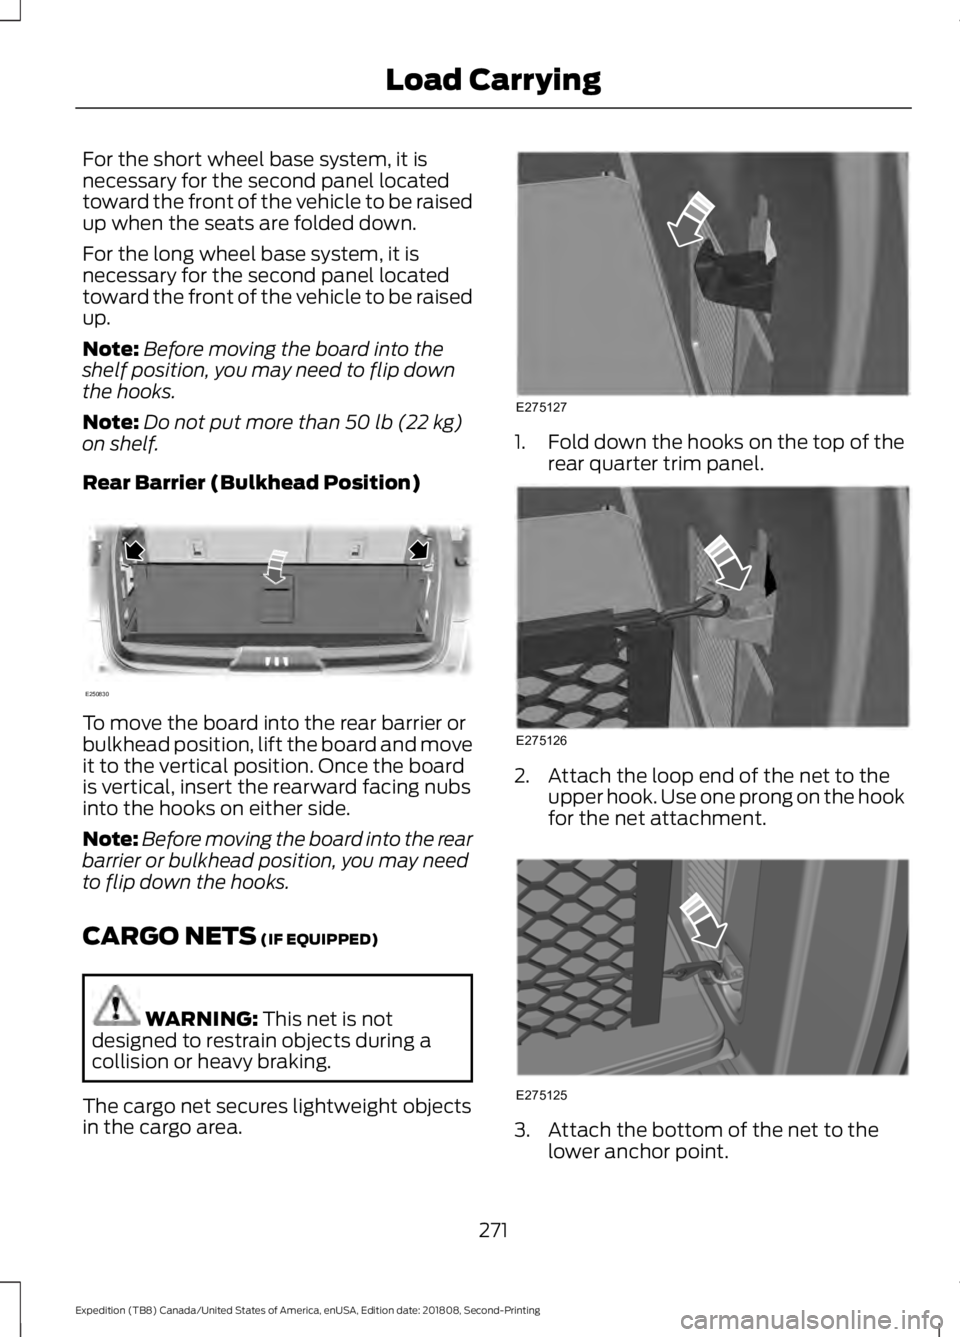
Rear Barrier (Bulkhead Position) To move the board into the rear barrier or
bulkhead position, lift the board and move
it to the vertical position. Once the board
is vertical, insert the rearward facing nubs
into the hooks on either side.
Note:
Before moving the board into the rear
barrier or bulkhead position, you may need
to flip down the hooks.
CARGO NETS
(IF EQUIPPED) WARNING:
This net is not
designed to restrain objects during a
collision or heavy braking.
The cargo net secures lightweight objects
in the cargo area. 1.
Fold down the hooks on the top of the
rear quarter trim panel. 2. Attach the loop end of the net to the
upper hook. Use one prong on the hook
for the net attachment. 3. Attach the bottom of the net to the
lower anchor point.
271
Expedition (TB8) Canada/United States of America, enUSA, Edition date: 201808, Second-Printing Load CarryingE250830 E275127 E275126 E275125