2019 FORD EXPEDITION ESP
[x] Cancel search: ESPPage 68 of 583

Note:
Not every feature applies to every
vehicle in every market. When they are
available for your vehicle, then they appear
in your information display, providing
choices to switch them on or off, or to select
a more specific setting.
• Various vehicle speed limits so the
MyKey driver cannot exceed certain
speeds. The information display shows
warnings followed by an audible tone
when the MyKey driver reaches the set
speed. You cannot override the set
speed by fully depressing the
accelerator pedal. WARNING: Do not set MyKey
maximum speed limit to a limit that will
prevent the driver from maintaining a
safe speed considering posted speed
limits and prevailing road conditions. The
driver is always responsible to drive in
accordance with local laws and
prevailing conditions. Failure to do so
could result in accident or injury. •
Various vehicle speed reminders so
MyKey drivers know when their vehicle
speed approaches the limits. Warnings
appear in your information display and
a tone sounds when the MyKey drivers
exceed the set vehicle speed.
• The audio system's maximum volume
limits to 45% so MyKey drivers can
concentrate on the road. A message
appears in the information display
when MyKey drivers attempt to exceed
the limited volume. MyKey also
disables the automatic volume control.
Note:
If your vehicle includes an
AM/FM radio or a very basic audio
system, then the radio may not limit.
• Always on setting. This setting forces
certain features to remain on and
active for MyKey drivers. For example,
E911 or emergency assistance and the
do not disturb features stay on even if
a MyKey driver uses the feature's
control to switch it off. When selected,
you will not be able to turn off Advance
Trac or traction control (if your vehicle
has this feature).
CREATING A MYKEY
Use the information display to create a
MyKey:
1. Insert the key you want to program into
the ignition. If your vehicle is equipped
with a push-button start, place the
remote control into the backup slot.
See
Passive Anti-Theft System
(page 81).
2. Switch the ignition on.
3. Access the main menu in the information display and then scroll
through the menus to change the
settings of your MyKey. From the
MyKey menu select the option Create
MyKey. See
Information Displays
(page 113).
65
Expedition (TB8) Canada/United States of America, enUSA, Edition date: 201808, Second-Printing MyKey
™
Page 80 of 583

Closing the Liftgate
A handle is inside the liftgate to help with
closing.
POWER LIFTGATE (IF EQUIPPED)
WARNING:
It is extremely
dangerous to ride in a cargo area, inside
or outside of a vehicle. In a crash, people
riding in these areas are more likely to be
seriously injured or killed. Do not allow
people to ride in any area of your vehicle
that is not equipped with seats and
seatbelts. Make sure everyone in your
vehicle is in a seat and properly using a
seatbelt. Failure to follow this warning
could result in serious personal injury or
death. WARNING:
Make sure that you
fully close the liftgate to prevent exhaust
fumes from entering your vehicle. If you
are unable to fully close the tailgate,
open the air vents or the windows to
allow fresh air to enter your vehicle.
Failure to follow this instruction could
result in personal injury or death. WARNING:
Make sure that you
fully close the liftgate to prevent
passengers and cargo from falling out.
Failure to follow this instruction could
result in personal injury or death. WARNING:
Keep keys out of reach
of children. Do not allow children to
operate or play near an open or moving
power liftgate. You should supervise the
operation of the power liftgate at all
times.
Note: Make sure that you close the liftgate
before operating or moving your vehicle,
especially in an enclosure, like a garage or
a parking structure. This could damage the
liftgate and its components.
Note: Do not hang anything, for example
a bike rack, from the glass or liftgate. This
could damage the liftgate and its
components.
The liftgate only operates with the
transmission in park (P).
Three warning tones sound as the liftgate
begins to power close. If there is a problem
with the open or close request, one of the
following may occur:
• One tone sounds if the ignition is on
and the transmission is not in park (P).
• Three tones sound if the battery
voltage is below the minimum
operating voltage.
• One tone sounds if the vehicle speed
is at or above
3 mph (5 km/h).
77
Expedition (TB8) Canada/United States of America, enUSA, Edition date: 201808, Second-Printing LiftgateE252964
Page 98 of 583

Flashing the Headlamp High Beam
Slightly pull the lever toward you and
release it to flash the headlamps.
AUTOLAMPS (IF EQUIPPED)
WARNING:
The system does not
relieve you of your responsibility to drive
with due care and attention. You may
need to override the system if it does not
turn the headlamps on in low visibility
conditions, for example daytime fog. When the lighting control is in the
autolamps position, the headlamps turn
on in low light situations, or when the
wipers turn on. The headlamps remain on for a period of
time after you switch the ignition off. Use
the information display controls to adjust
the period of time that the headlamps
remain on.
Note:
If you switch the autolamps on, you
cannot switch the high beams on until the
system turns the low beams on.
Windshield Wiper Activated
Headlamps
When you switch the autolamps on, the
headlamps turn on within 10 seconds of
switching the wipers on. They turn off
approximately 60 seconds after you switch
the windshield wipers off.
The headlamps do not turn on with the
wipers:
• During a single wipe.
• When using the windshield washers.
• If the wipers are in intermittent mode.
Note: If you switch the autolamps and the
autowipers on, the headlamps turn on when
the windshield wipers continuously operate.
INSTRUMENT LIGHTING
DIMMER 95
Expedition (TB8) Canada/United States of America, enUSA, Edition date: 201808, Second-Printing LightingE163268 E142451 E231828
Page 99 of 583

Press repeatedly or press and hold until
you reach the desired level.
HEADLAMP EXIT DELAY
After you switch the ignition off, you can
switch the headlamps on by pulling the
direction indicator lever toward you. You
will hear a short tone. The headlamps will
switch off automatically after three
minutes with any door open or 30 seconds
after the last door has been closed. You
can cancel this feature by pulling the
direction indicator toward you again or
switching the ignition on.
DAYTIME RUNNING LAMPS (IF
EQUIPPED) WARNING:
The daytime running
lamps system does not activate the rear
lamps and may not provide adequate
lighting during low visibility driving
conditions. Make sure you switch the
headlamps on, as appropriate, during all
low visibility conditions. Failure to do so
may result in a crash.
Type One - Conventional (Non-
Configurable)
The daytime running lamps turn on when:
1. Switching the ignition on.
2. The transmission is not in park (P) for vehicles with automatic transmissions,
or releasing the parking brake for
vehicles with manual transmissions.
3. The lighting control is in the off, parking
lamp or autolamps positions.
4. The headlamps are off. Type Two - Configurable
Switch the daytime running lamps on or
off using the information display. See
Information Displays
(page 113).
The daytime running lamps turn on when:
1. The lamps are on in the information display.
2. Switching the ignition on.
3. The transmission is not in park (P) for vehicles with automatic transmissions,
or releasing the parking brake for
vehicles with manual transmissions.
4. The lighting control is in the autolamps
position.
5. The headlamps are off.
The other lighting control switch positions
do not turn on the daytime running lamps.
If the daytime running lamps are off in the
information display, the lamps stay off in
all switch positions.
AUTOMATIC HIGH BEAM
CONTROL
(IF EQUIPPED) WARNING:
The system does not
relieve you of your responsibility to drive
with due care and attention. You may
need to override the system if it does not
turn the high beams on or off.
The system turns on high beams if it is dark
enough and no other traffic is present. If it
detects an approaching vehicle ’s
headlamps or tail lamps, or street lighting
ahead, the system turns off high beams
before they can distract other road users.
Low beams remain on.
Note: The system may not operate properly
if the sensor is blocked. Keep the windshield
free from obstruction or damage.
96
Expedition (TB8) Canada/United States of America, enUSA, Edition date: 201808, Second-Printing Lighting
Page 112 of 583

WARNING LAMPS AND
INDICATORS
The following warning lamps and
indicators alert you to a vehicle condition
that may become serious. Some lamps
illuminate when you start your vehicle to
make sure they work. If any lamps remain
on after starting your vehicle, refer to the
respective system warning lamp for further
information.
Note:
Some warning indicators appear in
the information display and operate the
same as a warning lamp but do not
illuminate when you start your vehicle.
Adaptive Cruise Control Indicator
(If Equipped) It illuminates when you switch
the system on.
It illuminates white when the
system is in standby mode. It illuminates
green when you set the adaptive cruise
speed.
See Using Adaptive Cruise Control
(page 242).
Airbag Warning Lamp If it does not illuminate when you
switch the ignition on, continues
to flash or remains on when the
engine is running, this indicates a
malfunction. Have your vehicle checked
as soon as possible.
Anti-Lock Brake System Warning
Lamp If it illuminates when you are
driving, this indicates a
malfunction. Your vehicle
continues to have normal braking without
the anti-lock brake system function. Have
your vehicle checked as soon as possible. Automatic Headlamp High Beam
Indicator
(If Equipped) It illuminates when the system
automatically turns the
headlamp high beam on.
Auto-Start-Stop Indicator (If Equipped) It illuminates when the engine
has automatically stopped. It
flashes to inform you when the
engine needs to restart. The
indicator is shown with a
strikethrough if the system is not
available.
See
Auto-Start-Stop (page 185).
Battery If it illuminates while driving, it
indicates a malfunction. Switch
off all unnecessary electrical
equipment and have the system checked
by your authorized dealer immediately.
Blind Spot Information System
Indicator
(If Equipped) It illuminates when you switch
the system off.
See
Blind Spot Information
System (page 254).
Brake System Warning Lamp WARNING:
Driving your vehicle
with the warning lamp on is dangerous.
A significant decrease in braking
performance may occur. It may take you
longer to stop your vehicle. Have your
vehicle checked as soon as possible.
Driving extended distances with the
parking brake engaged can cause brake
failure and the risk of personal injury.
109
Expedition (TB8) Canada/United States of America, enUSA, Edition date: 201808, Second-Printing Instrument ClusterE144524 E67017 E146361 E151262
Page 116 of 583

GENERAL INFORMATION
WARNING: Driving while
distracted can result in loss of vehicle
control, crash and injury. We strongly
recommend that you use extreme
caution when using any device that may
take your focus off the road. Your
primary responsibility is the safe
operation of your vehicle. We
recommend against the use of any
hand-held device while driving and
encourage the use of voice-operated
systems when possible. Make sure you
are aware of all applicable local laws
that may affect the use of electronic
devices while driving.
Various systems on your vehicle can be
controlled using the information display
controls on the steering wheel.
Corresponding information is displayed in
the information display.
Note: Some options may appear slightly
different or not at all if the items are
optional. Note:
Trailer options are not available if
your vehicle speed is greater than
3 mph
(5 km/h).
Note: Some MyKey menu options only
appear if MyKey is enabled and at least one
MyKey is programmed. This icon gives you the ability to
switch a feature on or off. A
check in the box indicates the
feature is on, and unchecked indicates the
feature is off.
Information Display Controls
(Type 1 and 2)
• Press the up and down arrow buttons
to scroll through and highlight the
options within a menu.
• Press the right arrow button to enter a
sub-menu.
• Press the left arrow button to exit a
menu.
• Press the
OK button to choose and
confirm a setting or messages.
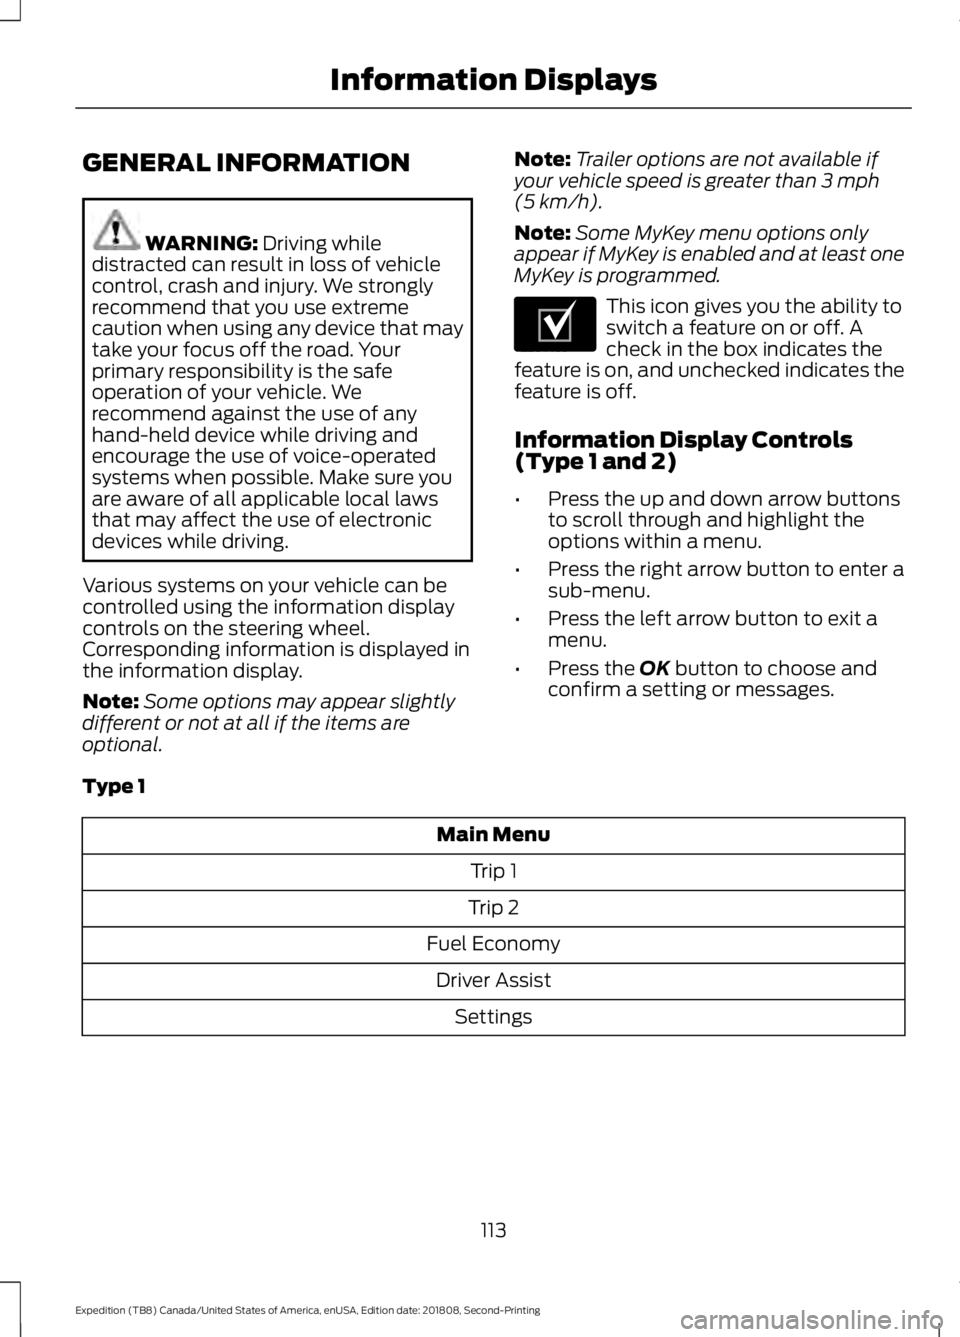
Type 1 Main Menu
Trip 1
Trip 2
Fuel Economy Driver Assist Settings
113
Expedition (TB8) Canada/United States of America, enUSA, Edition date: 201808, Second-Printing Information DisplaysE204495
Page 138 of 583

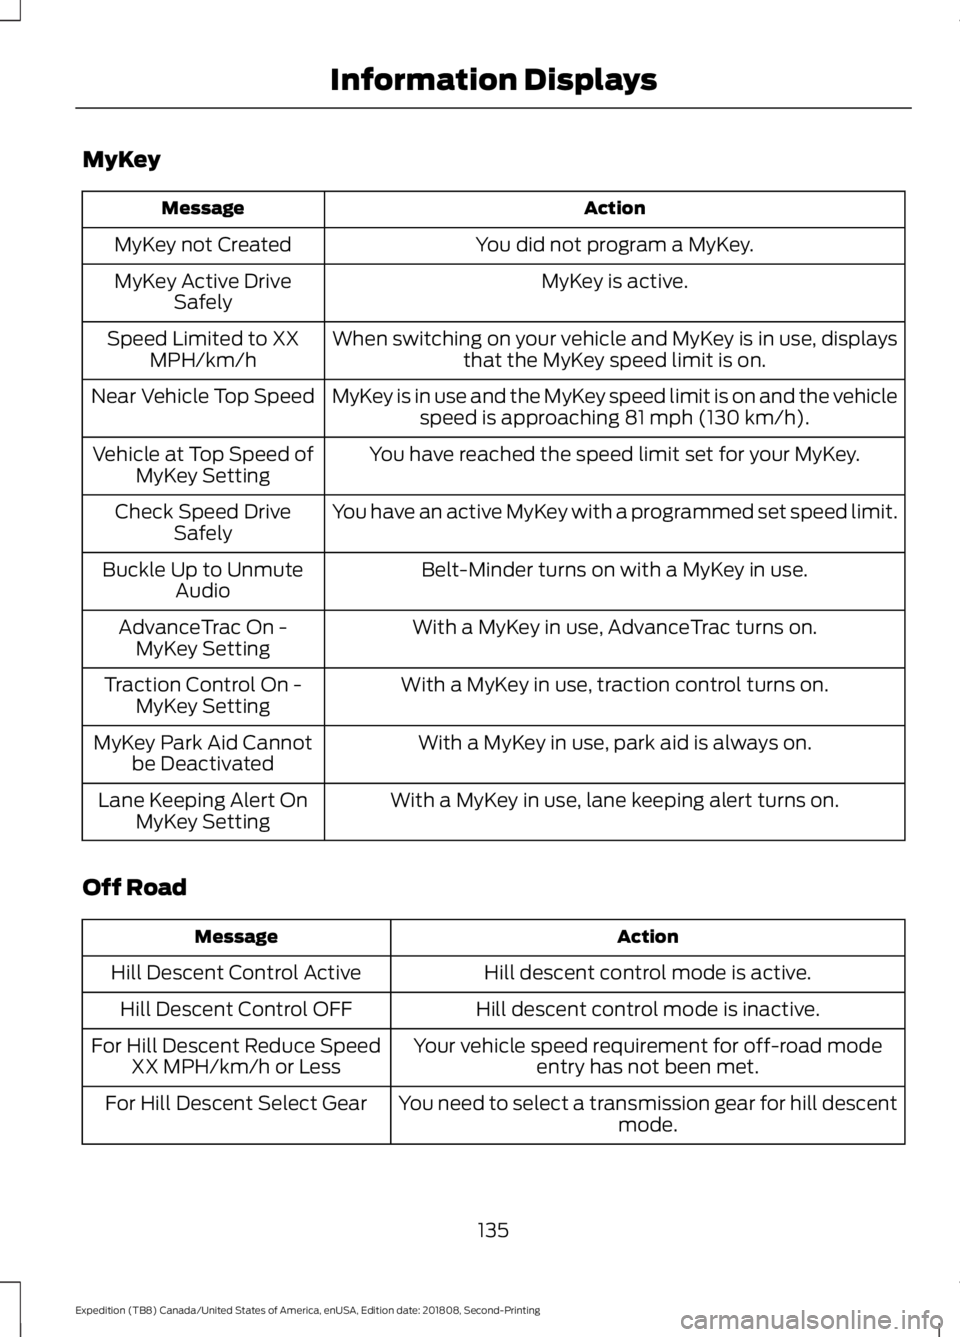
MyKey
Action
Message
You did not program a MyKey.
MyKey not Created
MyKey is active.
MyKey Active Drive
Safely
When switching on your vehicle and MyKey is in use, displaysthat the MyKey speed limit is on.
Speed Limited to XX
MPH/km/h
MyKey is in use and the MyKey speed limit is on and the vehiclespeed is approaching 81 mph (130 km/h).
Near Vehicle Top Speed
You have reached the speed limit set for your MyKey.
Vehicle at Top Speed of
MyKey Setting
You have an active MyKey with a programmed set speed limit.
Check Speed Drive
Safely
Belt-Minder turns on with a MyKey in use.
Buckle Up to Unmute
Audio
With a MyKey in use, AdvanceTrac turns on.
AdvanceTrac On -
MyKey Setting
With a MyKey in use, traction control turns on.
Traction Control On -
MyKey Setting
With a MyKey in use, park aid is always on.
MyKey Park Aid Cannot
be Deactivated
With a MyKey in use, lane keeping alert turns on.
Lane Keeping Alert On
MyKey Setting
Off Road Action
Message
Hill descent control mode is active.
Hill Descent Control Active
Hill descent control mode is inactive.
Hill Descent Control OFF
Your vehicle speed requirement for off-road modeentry has not been met.
For Hill Descent Reduce Speed
XX MPH/km/h or Less
You need to select a transmission gear for hill descentmode.
For Hill Descent Select Gear
135
Expedition (TB8) Canada/United States of America, enUSA, Edition date: 201808, Second-Printing Information Displays
Page 168 of 583

Folding the Power Rear Seats (If
Equipped)
Note: The power fold seats operate for 10
minutes after you switch the ignition off.
The transmission must be in park (P) and
the liftgate, or liftgate glass must be open.
Similar to the battery saver feature, the
power rear seat disable 10 minutes after you
switch the ignition off.
Note: Be sure the third-row center head
restraint is in the lowered position before
you power the rear seats down. The
third-row outermost head restraints fold
automatically when you press the fold
button.
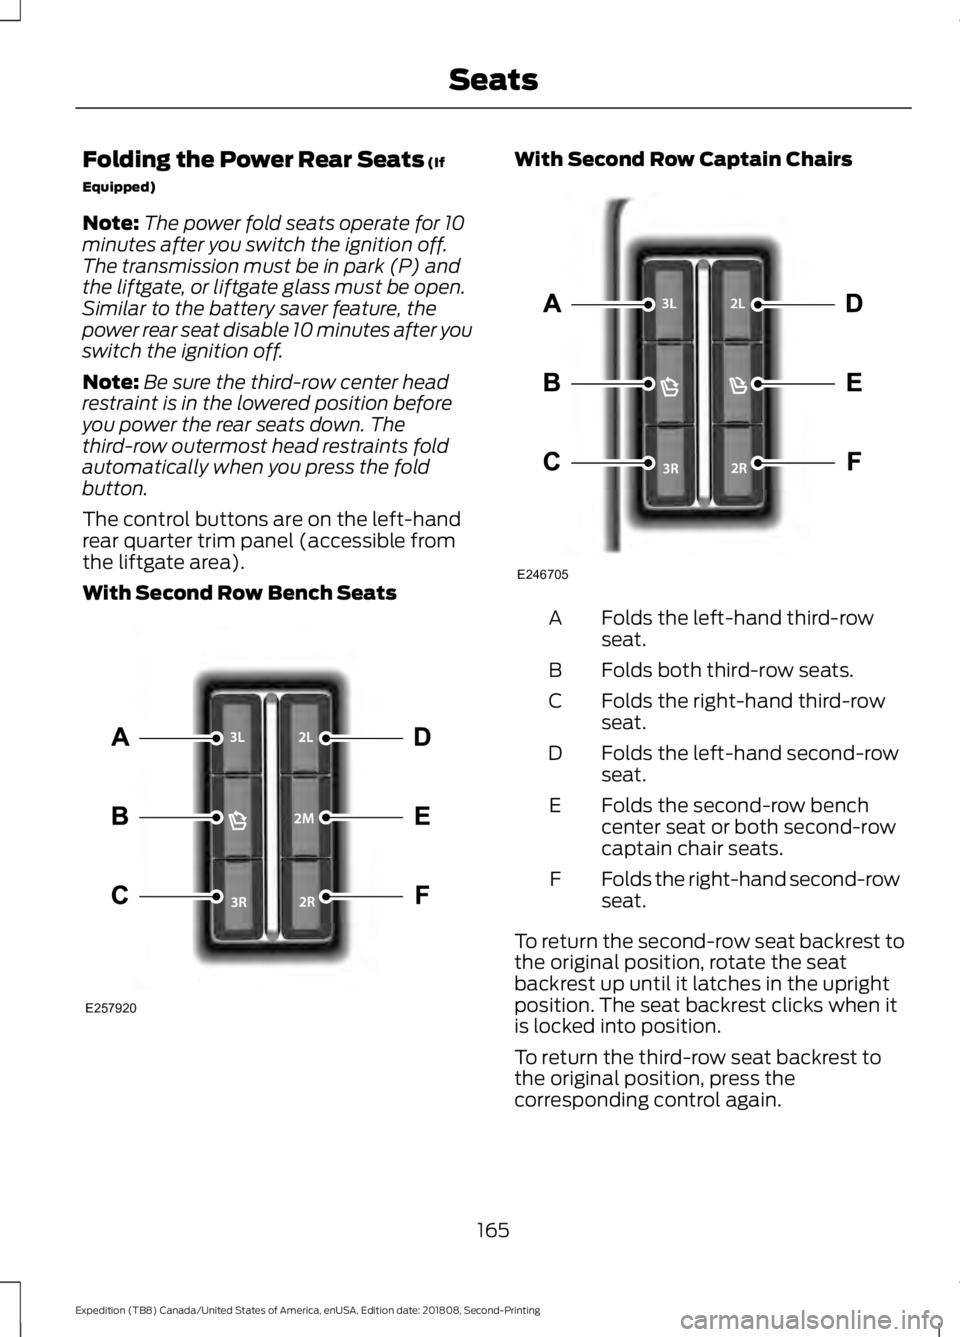
The control buttons are on the left-hand
rear quarter trim panel (accessible from
the liftgate area).
With Second Row Bench Seats With Second Row Captain Chairs
Folds the left-hand third-row
seat.
A
Folds both third-row seats.
B
Folds the right-hand third-row
seat.
C
Folds the left-hand second-row
seat.
D
Folds the second-row bench
center seat or both second-row
captain chair seats.
E
Folds the right-hand second-row
seat.
F
To return the second-row seat backrest to
the original position, rotate the seat
backrest up until it latches in the upright
position. The seat backrest clicks when it
is locked into position.
To return the third-row seat backrest to
the original position, press the
corresponding control again.
165
Expedition (TB8) Canada/United States of America, enUSA, Edition date: 201808, Second-Printing SeatsE257920 E246705