2019 FORD E-350 ECU
[x] Cancel search: ECUPage 144 of 329

GENERAL INFORMATION
Have your vehicle serviced regularly to help
maintain its roadworthiness and resale
value. There is a large network of
authorized dealers that are there to help
you with their professional servicing
expertise. We believe that their specially
trained technicians are best qualified to
service your vehicle properly and expertly.
They are supported by a wide range of
highly specialized tools developed
specifically for servicing your vehicle.
If your vehicle requires professional service,
an authorized dealer can provide the
necessary parts and service. Check your
warranty information to find out which
parts and services are covered.
Use only recommended fuels, lubricants,
fluids and service parts conforming to
specifications. Motorcraft® parts are
designed and built to provide the best
performance in your vehicle.
Precautions
•
Do not work on a hot engine.
• Make sure that nothing gets caught in
moving parts.
• Do not work on a vehicle with the
engine running in an enclosed space,
unless you are sure you have enough
ventilation.
• Keep all open flames and other burning
material (such as cigarettes) away
from the battery and all fuel related
parts.
Working with the Engine Off
1. Set the parking brake and shift the transmission to park (P). 2. Switch off the engine.
3. Block the wheels.
Working with the Engine On WARNING: To reduce the risk of
vehicle damage and personal burn
injuries, do not start your engine with the
air cleaner removed and do not remove
it while the engine is running.
1. Set the parking brake and shift the transmission to park (P).
2. Block the wheels.
OPENING AND CLOSING THE
HOOD 1.
Inside the vehicle, pull the hood release
handle located under the bottom left
corner of the instrument panel.
2. Go to the front of the vehicle and push
the auxiliary latch, located in the center
of the top grille, to the left in order to
release the hood.
3. Lift the hood and secure it with the prop rod.
141
E-Series (TE4) Canada/United States of America, enUSA, Edition date: 201804, Second-Printing MaintenanceE196351
Page 162 of 329
2. Remove the four screws and the lamp
lens from the lamp assembly.
3. Carefully pull the bulb straight out of the socket and push in the new bulb.
CHANGING THE ENGINE AIR
FILTER WARNING: To reduce the risk of
vehicle damage or personal injury, do not
start the engine with the air filter
removed and do not remove it while the
engine is running.
Note: Failure to use the correct air filter
element may result in severe engine
damage. The customer warranty may be
void for any damage to the engine if the
correct air filter element is not used.
When changing the air filter element, use
only the air filter element listed. See
Motorcraft Parts
(page 199). The air filter
element should be replaced at the
appropriate intervals. See
Normal
Scheduled Maintenance (page 279).
Note: Failure to use the correct air filter
element may result in severe engine
damage. Resulting component damage may
not be covered by the vehicle Warranty. 1.
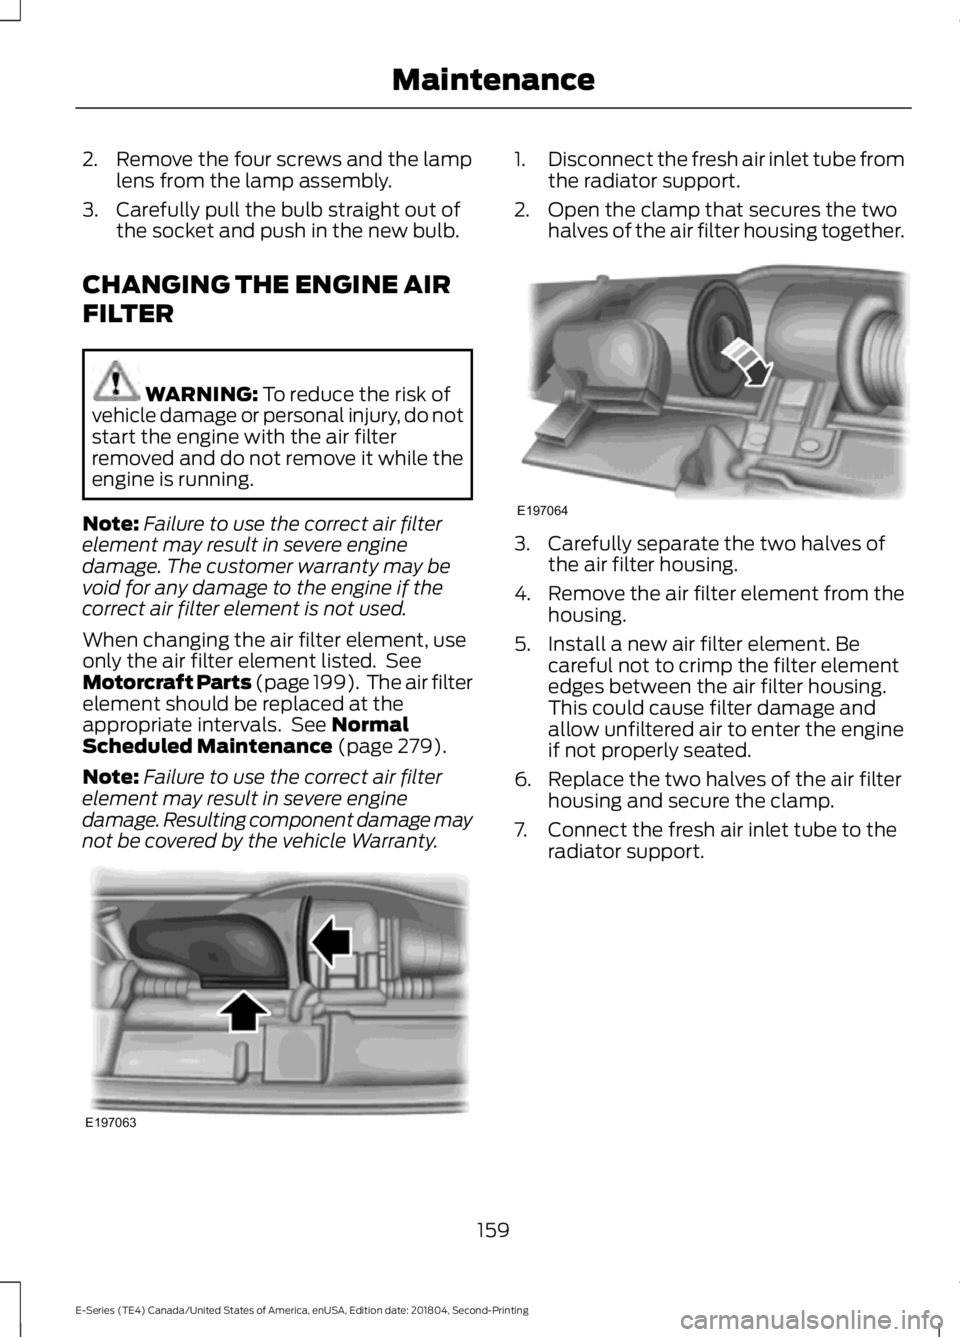
Disconnect the fresh air inlet tube from
the radiator support.
2. Open the clamp that secures the two halves of the air filter housing together. 3. Carefully separate the two halves of
the air filter housing.
4. Remove the air filter element from the
housing.
5. Install a new air filter element. Be careful not to crimp the filter element
edges between the air filter housing.
This could cause filter damage and
allow unfiltered air to enter the engine
if not properly seated.
6. Replace the two halves of the air filter housing and secure the clamp.
7. Connect the fresh air inlet tube to the radiator support.
159
E-Series (TE4) Canada/United States of America, enUSA, Edition date: 201804, Second-Printing MaintenanceE197063 E197064
Page 190 of 329
If your vehicle is equipped with
dual rear wheels it is
recommended that the front and
rear tires (in pairs) be rotated only
side to side. We do not
recommend splitting up the dual
rear wheels. Rotate them side to
side as a set. After tire rotation,
inflation pressures must be
adjusted for the tires new
positions in accordance with
vehicle requirements.
USING SNOW CHAINS
WARNING: Snow tires must be
the same size, load index, and speed
rating as those originally provided by
Ford. Use of any tire or wheel not
recommended by Ford can affect the
safety and performance of your vehicle,
which could result in an increased risk of
loss of vehicle control, vehicle rollover,
personal injury, and death. Additionally,
the use of non-recommended tires and
wheels could cause steering, suspension,
axle, transfer case, or power transfer unit
failure. It is also strongly advised to
follow the Ford recommended tire
inflation pressure found on the Safety
Compliance Certification Label (affixed
to either the door hinge pillar, door-latch
post, or the door edge that meets the
door-latch post, next to the driver ’s
seating position), or Tire Label which is
located on the B-Pillar or the edge of the
driver door. Failure to follow the tire
pressure recommendations can cause
uneven treadwear patterns and
adversely affect the way your vehicle
handles. The tires on your vehicle have all-weather
treads to provide traction in rain and snow.
However, in some climates, you may need
to use snow tires and cables. If you need
to use cables, it is recommended that steel
wheels (of the same size and
specifications) be used, as cables may chip
aluminum wheels.
Note:
The suspension insulation and
bumpers help prevent vehicle damage. Do
not remove these components from your
vehicle when using snow tires and chains.
Follow these guidelines when using snow
tires and chains:
• If possible, avoid fully loading your
vehicle.
• Use only SAE Class S chains.
• Install chains securely, verifying that
the chains do not touch any wiring,
brake lines or fuel lines.
• Drive cautiously. If you hear the chains
rub or bang against your vehicle, stop
and retighten the chains. If this does
not work, remove the chains to prevent
damage to your vehicle.
• Remove the tire chains when they are
no longer needed. Do not use tire
chains on dry roads.
If you have any questions regarding snow
chains or cables, please contact your
authorized dealer.
187
E-Series (TE4) Canada/United States of America, enUSA, Edition date: 201804, Second-Printing Wheels and Tires
Page 197 of 329
When driving with the full-size dissimilar
spare wheel and tire assembly, do not:
•
Exceed 70 mph (113 km/h).
• Use more than one dissimilar spare
wheel and tire assembly at a time.
• Use commercial car washing
equipment.
• Use snow chains on the end of the
vehicle with the dissimilar spare wheel
and tire assembly.
The usage of a full-size dissimilar spare
wheel and tire assembly can lead to
impairment of the following:
• Handling, stability and braking
performance.
• Comfort and noise.
• Ground clearance and parking at curbs.
• Winter weather driving capability.
• Wet weather driving capability.
• All-wheel driving capability.
When driving with the full-size dissimilar
spare wheel and tire assembly additional
caution should be given to:
• Towing a trailer.
• Driving vehicles equipped with a
camper body.
• Driving vehicles with a load on the
cargo rack.
Drive cautiously when using a full-size
dissimilar spare wheel and tire assembly
and seek service as soon as possible.
Tire Change Procedure WARNING:
When one of the front
wheels is off the ground, the
transmission alone will not prevent the
vehicle from moving or slipping off the
jack, even if the transmission is in park
(P). WARNING:
To help prevent your
vehicle from moving when changing a
wheel, shift the transmission into park
(P), set the parking brake and use an
appropriate block or wheel chock to
secure the wheel diagonally opposite to
the wheel being changed. For example,
when changing the front left wheel,
place an appropriate block or wheel
chock on the right rear wheel. WARNING:
Do not get under a
vehicle that is only supported by a
vehicle jack. WARNING:
Do not attempt to
change a tire on the side of the vehicle
close to moving traffic. Pull far enough
off the road to avoid the danger of being
hit when operating the jack or changing
the wheel. WARNING:
Always use the jack
provided as original equipment with your
vehicle. If using a jack other than the one
provided, make sure the jack capacity is
adequate for the vehicle weight,
including any vehicle cargo or
modifications. If you are unsure if the jack
capacity is adequate, contact the
authorized dealer.
Note: Passengers should not remain in your
vehicle when the vehicle is being jacked.
Removing the flat wheel and tire
1. Park on a level surface, set the parking
brake and activate the hazard flashers.
2. Place the transmission in park (P) and
turn the engine off.
194
E-Series (TE4) Canada/United States of America, enUSA, Edition date: 201804, Second-Printing Wheels and Tires
Page 199 of 329
4. Lower the wheel by turning the jack
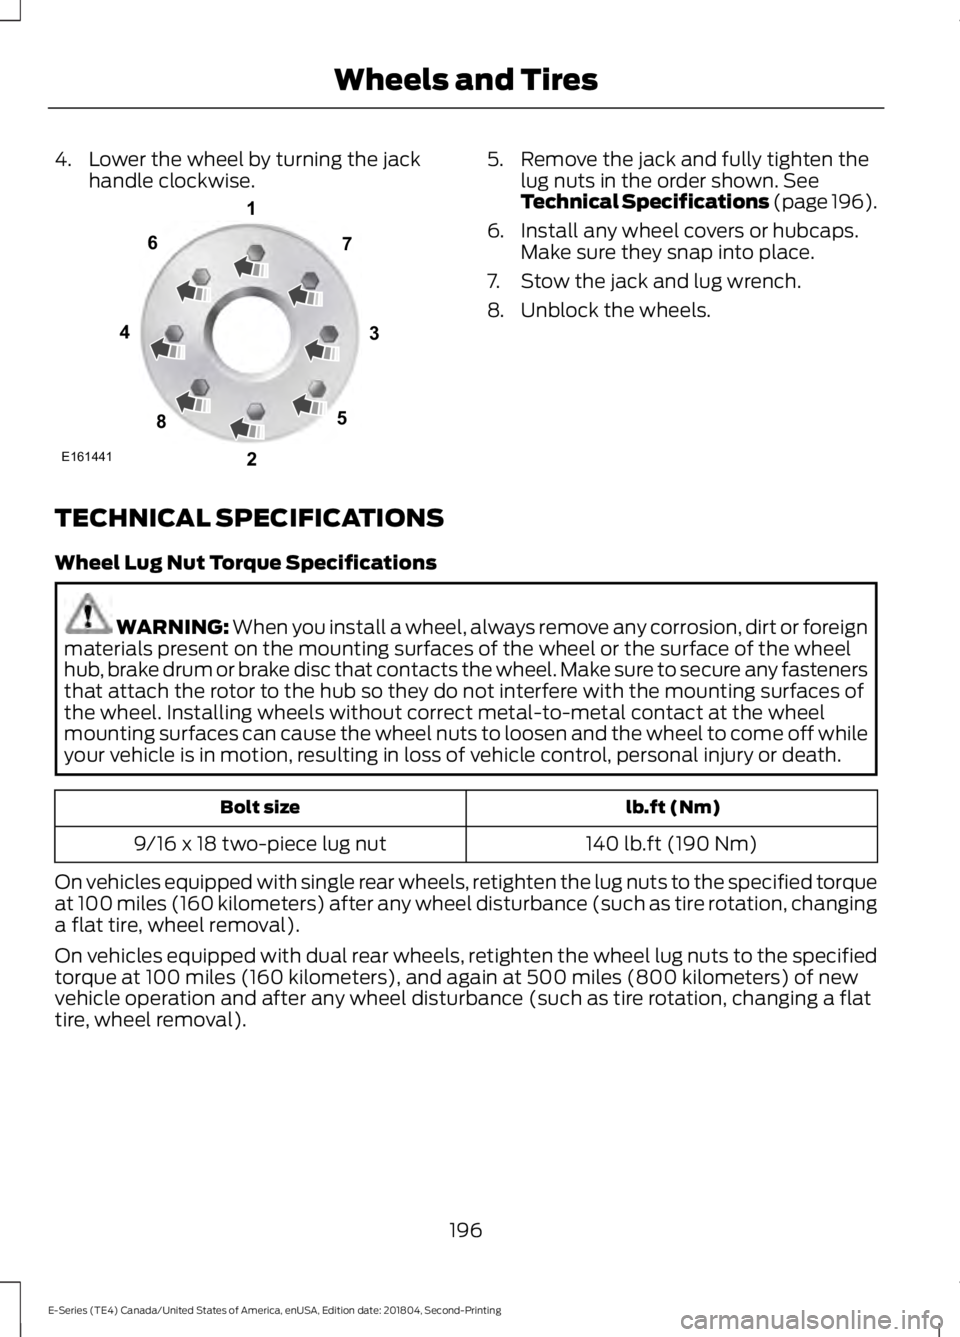
handle clockwise. 5. Remove the jack and fully tighten the
lug nuts in the order shown. See
Technical Specifications (page 196).
6. Install any wheel covers or hubcaps. Make sure they snap into place.
7. Stow the jack and lug wrench.
8. Unblock the wheels.
TECHNICAL SPECIFICATIONS
Wheel Lug Nut Torque Specifications WARNING:
When you install a wheel, always remove any corrosion, dirt or foreign
materials present on the mounting surfaces of the wheel or the surface of the wheel
hub, brake drum or brake disc that contacts the wheel. Make sure to secure any fasteners
that attach the rotor to the hub so they do not interfere with the mounting surfaces of
the wheel. Installing wheels without correct metal-to-metal contact at the wheel
mounting surfaces can cause the wheel nuts to loosen and the wheel to come off while
your vehicle is in motion, resulting in loss of vehicle control, personal injury or death. lb.ft (Nm)
Bolt size
140 lb.ft (190 Nm)
9/16 x 18 two-piece lug nut
On vehicles equipped with single rear wheels, retighten the lug nuts to the specified torque
at 100 miles (160 kilometers) after any wheel disturbance (such as tire rotation, changing
a flat tire, wheel removal).
On vehicles equipped with dual rear wheels, retighten the wheel lug nuts to the specified
torque at 100 miles (160 kilometers), and again at 500 miles (800 kilometers) of new
vehicle operation and after any wheel disturbance (such as tire rotation, changing a flat
tire, wheel removal).
196
E-Series (TE4) Canada/United States of America, enUSA, Edition date: 201804, Second-Printing Wheels and TiresE161441
13
4
27
6
5
8
Page 245 of 329

Action and Description
Message
Get help from SYNC by using questions, helpful hints or asking you for
a specific action. To turn these prompts on or off:
PROMPTS
1.Press the OK button to select and scroll to select between On and
Off.
2. Press the
OK button when the desired selection appears in the
display. SYNC returns you to the Advanced menu.
1. Press
OK to select and then scroll through the languages. Choose
between English, Français and Español. Once selected, all of the
radio displays and prompts are in the selected language.
2. Press
OK when the desired selection appears in the display. If you
change the language setting, the display indicates that the system
is updating. When complete, SYNC returns you to the Advanced
menu.
LANGUAGES
Return to the factory default settings. This selection does not erase
your indexed information, for example phonebook, call history, text
messages or paired devices.
DEFAULTS
Press the
OK button to select and then press OK again when the
following message appears in the display.
RESTORE?
Completely erase all information stored on SYNC, for example
phonebook, call history, text messages and paired devices, and return
the system to the factory default settings.
MASTER
RESET
Press OK to select. The display indicates when complete. SYNC returns
you to the Advanced menu.
Press
OK to select.
SYNC REBOOT
Press OK to select. You only need to pressthe OK button once. SYNC will be unre- sponsive for 2-4 minutes while it is
rebooting. Wait 2-4 minutes before
attempting to execute a SYNC command
CONFIRM REBOOT?
Install applications you have downloaded.
INSTALL APP
Press the
OK button and scroll to select. Press the OK button to
confirm.
Access the Auto Version number as well as the FDN number.
SYSTEM INFO
Press the
OK button to select.
Exit the current menu.
RETURN
242
E-Series (TE4) Canada/United States of America, enUSA, Edition date: 201804, Second-Printing SYNC™
Page 246 of 329
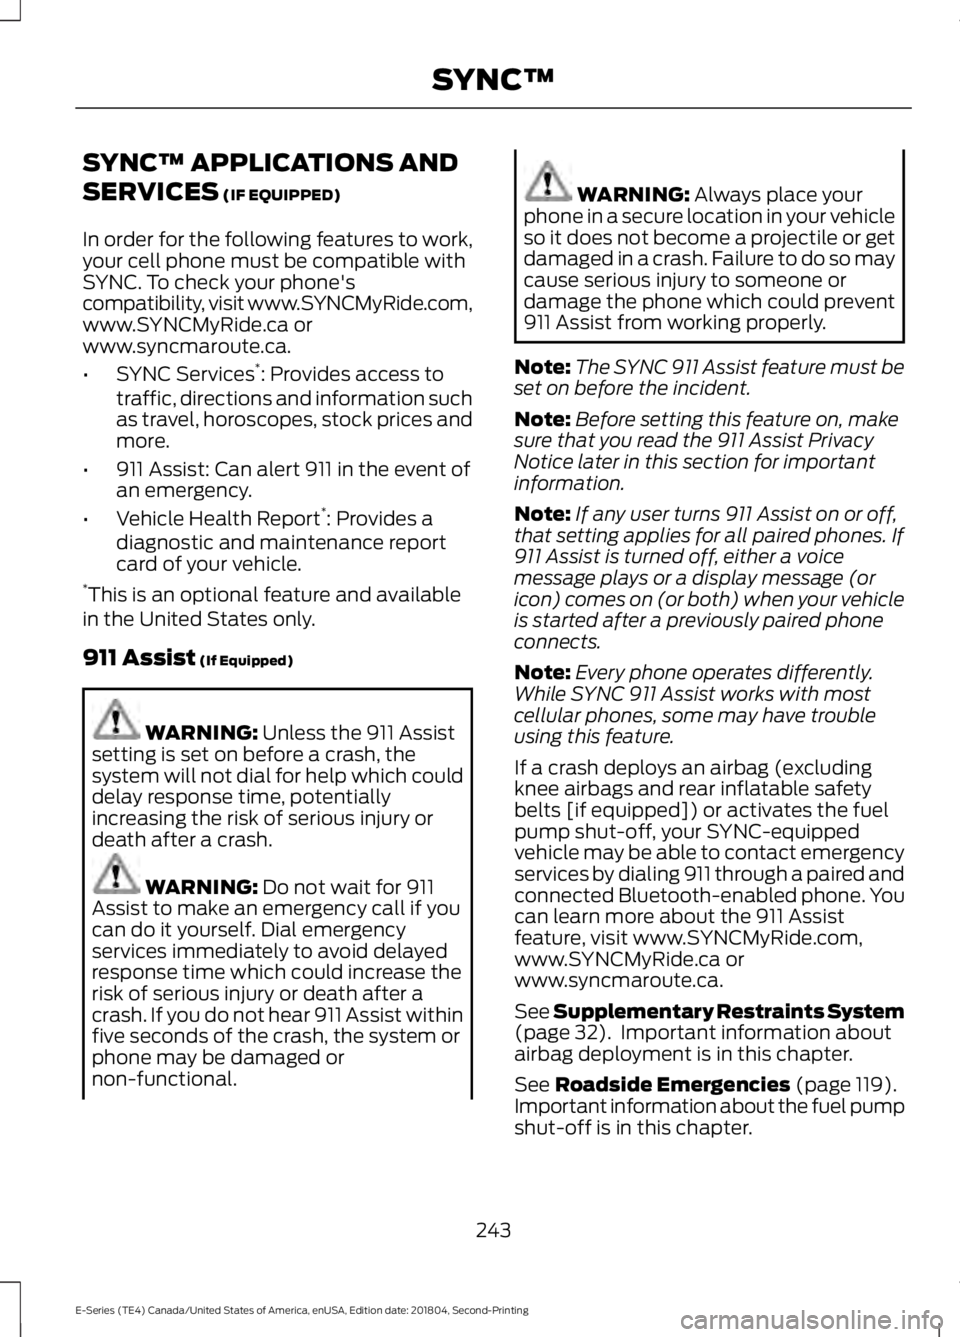
SYNC™ APPLICATIONS AND
SERVICES (IF EQUIPPED)
In order for the following features to work,
your cell phone must be compatible with
SYNC. To check your phone's
compatibility, visit www.SYNCMyRide.com,
www.SYNCMyRide.ca or
www.syncmaroute.ca.
• SYNC Services *
: Provides access to
traffic, directions and information such
as travel, horoscopes, stock prices and
more.
• 911 Assist: Can alert 911 in the event of
an emergency.
• Vehicle Health Report *
: Provides a
diagnostic and maintenance report
card of your vehicle.
* This is an optional feature and available
in the United States only.
911 Assist
(If Equipped) WARNING:
Unless the 911 Assist
setting is set on before a crash, the
system will not dial for help which could
delay response time, potentially
increasing the risk of serious injury or
death after a crash. WARNING:
Do not wait for 911
Assist to make an emergency call if you
can do it yourself. Dial emergency
services immediately to avoid delayed
response time which could increase the
risk of serious injury or death after a
crash. If you do not hear 911 Assist within
five seconds of the crash, the system or
phone may be damaged or
non-functional. WARNING:
Always place your
phone in a secure location in your vehicle
so it does not become a projectile or get
damaged in a crash. Failure to do so may
cause serious injury to someone or
damage the phone which could prevent
911 Assist from working properly.
Note: The SYNC 911 Assist feature must be
set on before the incident.
Note: Before setting this feature on, make
sure that you read the 911 Assist Privacy
Notice later in this section for important
information.
Note: If any user turns 911 Assist on or off,
that setting applies for all paired phones. If
911 Assist is turned off, either a voice
message plays or a display message (or
icon) comes on (or both) when your vehicle
is started after a previously paired phone
connects.
Note: Every phone operates differently.
While SYNC 911 Assist works with most
cellular phones, some may have trouble
using this feature.
If a crash deploys an airbag (excluding
knee airbags and rear inflatable safety
belts [if equipped]) or activates the fuel
pump shut-off, your SYNC-equipped
vehicle may be able to contact emergency
services by dialing 911 through a paired and
connected Bluetooth-enabled phone. You
can learn more about the 911 Assist
feature, visit www.SYNCMyRide.com,
www.SYNCMyRide.ca or
www.syncmaroute.ca.
See
Supplementary Restraints System
(page 32). Important information about
airbag deployment is in this chapter.
See
Roadside Emergencies (page 119).
Important information about the fuel pump
shut-off is in this chapter.
243
E-Series (TE4) Canada/United States of America, enUSA, Edition date: 201804, Second-Printing SYNC™
Page 266 of 329
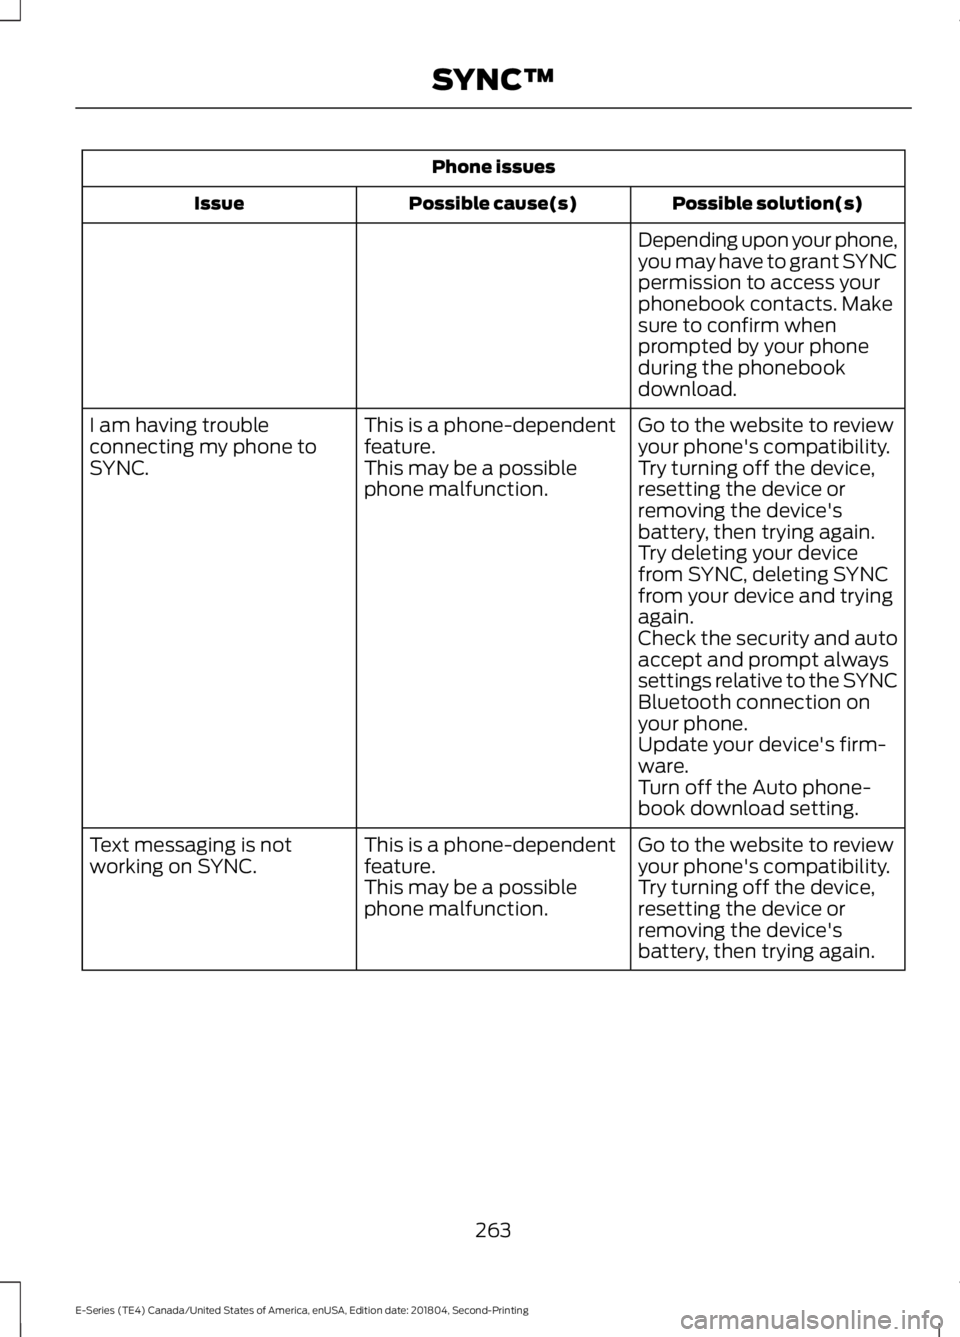
Phone issues
Possible solution(s)
Possible cause(s)
Issue
Depending upon your phone,
you may have to grant SYNC
permission to access your
phonebook contacts. Make
sure to confirm when
prompted by your phone
during the phonebook
download.
Go to the website to review
your phone's compatibility.
This is a phone-dependent
feature.
I am having trouble
connecting my phone to
SYNC.
Try turning off the device,
resetting the device or
removing the device's
battery, then trying again.
This may be a possible
phone malfunction.
Try deleting your device
from SYNC, deleting SYNC
from your device and trying
again.
Check the security and auto
accept and prompt always
settings relative to the SYNC
Bluetooth connection on
your phone.
Update your device's firm-
ware.
Turn off the Auto phone-
book download setting.
Go to the website to review
your phone's compatibility.
This is a phone-dependent
feature.
Text messaging is not
working on SYNC.
Try turning off the device,
resetting the device or
removing the device's
battery, then trying again.
This may be a possible
phone malfunction.
263
E-Series (TE4) Canada/United States of America, enUSA, Edition date: 201804, Second-Printing SYNC™