2019 DODGE GRAND CARAVAN remove seats
[x] Cancel search: remove seatsPage 43 of 490
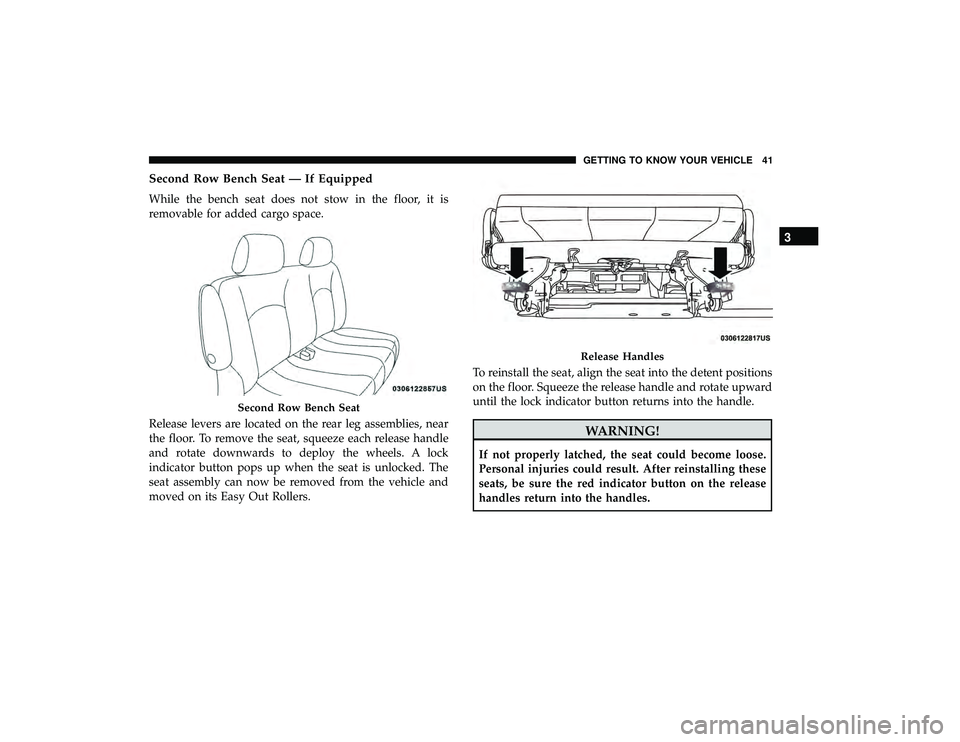
Second Row Bench Seat — If Equipped
While the bench seat does not stow in the floor, it is
removable for added cargo space.
Release levers are located on the rear leg assemblies, near
the floor. To remove the seat, squeeze each release handle
and rotate downwards to deploy the wheels. A lock
indicator button pops up when the seat is unlocked. The
seat assembly can now be removed from the vehicle and
moved on its Easy Out Rollers.To reinstall the seat, align the seat into the detent positions
on the floor. Squeeze the release handle and rotate upward
until the lock indicator button returns into the handle.
WARNING!
If not properly latched, the seat could become loose.
Personal injuries could result. After reinstalling these
seats, be sure the red indicator button on the release
handles return into the handles.
Second Row Bench Seat
Release Handles
3
GETTING TO KNOW YOUR VEHICLE 41
Page 51 of 490
WARNING!
•Persons who are unable to feel pain to the skin
because of advanced age, chronic illness, diabetes,
spinal cord injury, medication, alcohol use, exhaus-
tion or other physical condition must exercise care
when using the seat heater. It may cause burns even
at low temperatures, especially if used for long
periods of time.
• Do not place anything on the seat or seatback that
insulates against heat, such as a blanket or cushion.
This may cause the seat heater to overheat. Sitting in
a seat that has been overheated could cause serious
burns due to the increased surface temperature of the
seat.
Plastic Grocery Bag Retainer Hooks
Retainer hooks which will hold plastic grocery bag handles
are built into the seatbacks of all rear seats and some front
seats. The floor supports the partial weight of the bagged
goods.
HEAD RESTRAINTS
Head restraints are designed to reduce the risk of injury by
restricting head movement in the event of a rear impact.
Head restraints should be adjusted so that the top of the
head restraint is located above the top of your ear.
WARNING!
• All occupants, including the driver, should not oper-
ate a vehicle or sit in a vehicle’s seat until the head
restraints are placed in their proper positions in
order to minimize the risk of neck injury in the event
of a crash.
• Head restraints should never be adjusted while the
vehicle is in motion. Driving a vehicle with the head
restraints improperly adjusted or removed could
cause serious injury or death in the event of a
collision.
3
GETTING TO KNOW YOUR VEHICLE 49
Page 56 of 490
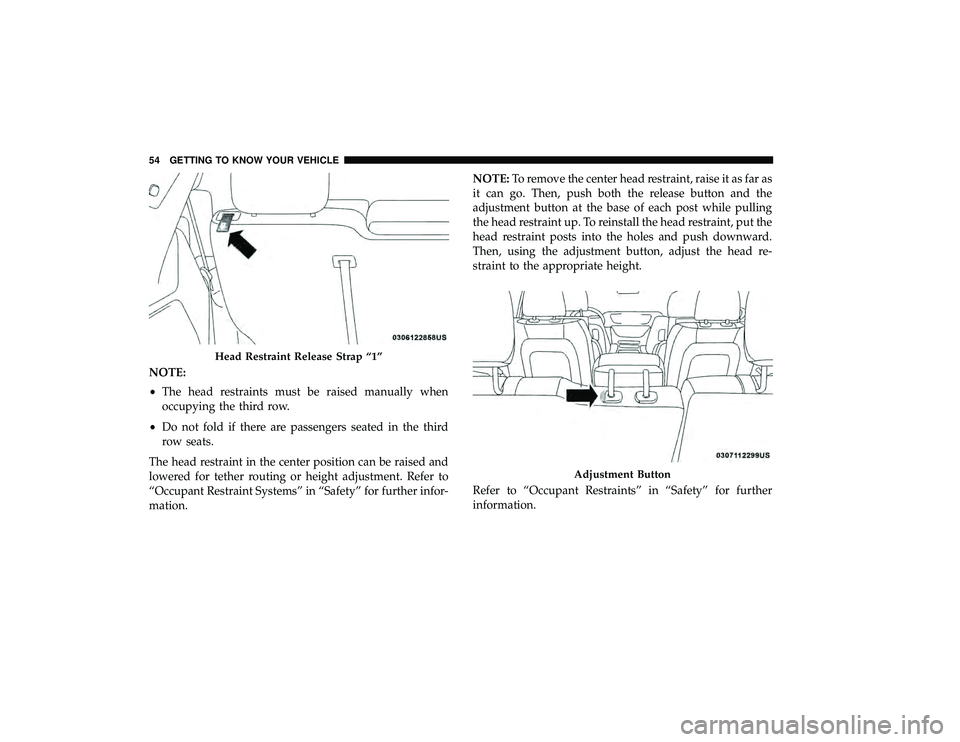
NOTE:
•The head restraints must be raised manually when
occupying the third row.
• Do not fold if there are passengers seated in the third
row seats.
The head restraint in the center position can be raised and
lowered for tether routing or height adjustment. Refer to
“Occupant Restraint Systems” in “Safety” for further infor-
mation. NOTE:
To remove the center head restraint, raise it as far as
it can go. Then, push both the release button and the
adjustment button at the base of each post while pulling
the head restraint up. To reinstall the head restraint, put the
head restraint posts into the holes and push downward.
Then, using the adjustment button, adjust the head re-
straint to the appropriate height.
Refer to “Occupant Restraints” in “Safety” for further
information.
Head Restraint Release Strap “1”
Adjustment Button
54 GETTING TO KNOW YOUR VEHICLE
Page 99 of 490
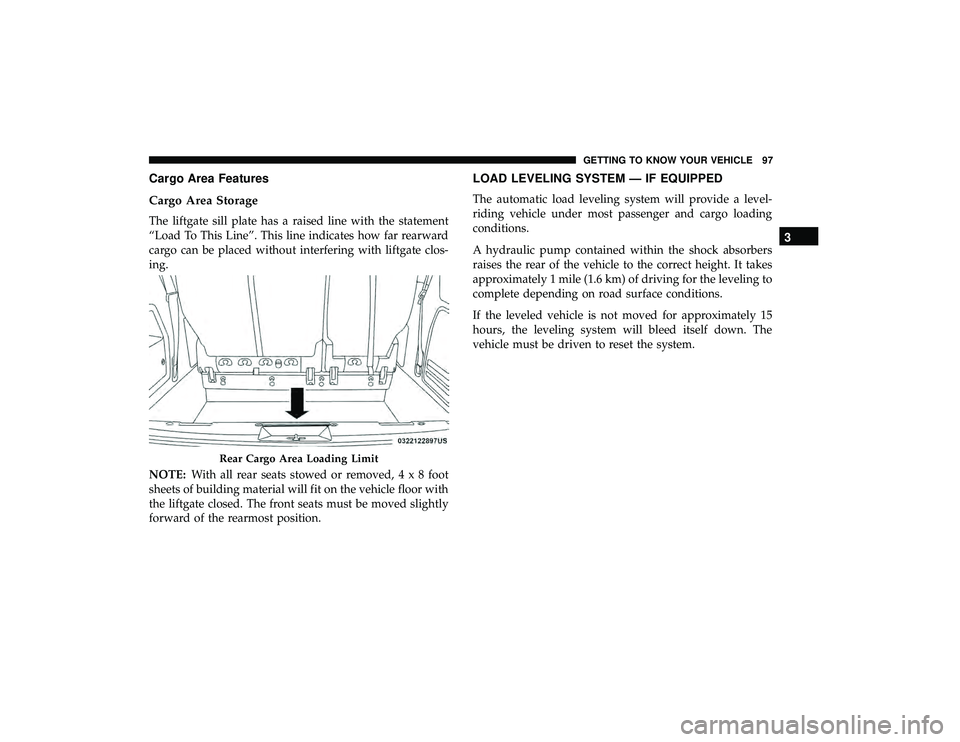
Cargo Area Features
Cargo Area Storage
The liftgate sill plate has a raised line with the statement
“Load To This Line”. This line indicates how far rearward
cargo can be placed without interfering with liftgate clos-
ing.
NOTE:With all rear seats stowed or removed,4x8foot
sheets of building material will fit on the vehicle floor with
the liftgate closed. The front seats must be moved slightly
forward of the rearmost position.
LOAD LEVELING SYSTEM — IF EQUIPPED
The automatic load leveling system will provide a level-
riding vehicle under most passenger and cargo loading
conditions.
A hydraulic pump contained within the shock absorbers
raises the rear of the vehicle to the correct height. It takes
approximately 1 mile (1.6 km) of driving for the leveling to
complete depending on road surface conditions.
If the leveled vehicle is not moved for approximately 15
hours, the leveling system will bleed itself down. The
vehicle must be driven to reset the system.
Rear Cargo Area Loading Limit
3
GETTING TO KNOW YOUR VEHICLE 97
Page 196 of 490
In Automatic Locking Mode, the shoulder belt is automati-
cally pre-locked. The seat belt will still retract to remove
any slack in the shoulder belt. Use the Automatic Locking
Mode anytime a child restraint is installed in a seating
position that has a seat belt with this feature. Children 12
years old and under should always be properly restrained
in the rear seat of a vehicle with a rear seat.
WARNING!
•Never place a rear-facing child restraint in front of an
air bag. A deploying passenger front air bag can
cause death or serious injury to a child 12 years or
younger, including a child in a rear-facing child
restraint.
• Never install a rear-facing child restraint in the front
seat of a vehicle. Only use a rear-facing child re-
straint in the rear seat. If the vehicle does not have a
rear seat, do not transport a rear-facing child restraint
in that vehicle.
How To Engage The Automatic Locking Mode
1. Buckle the combination lap and shoulder belt.
2. Grasp the shoulder portion and pull downward until the entire seat belt is extracted. 3. Allow the seat belt to retract. As the seat belt retracts,
you will hear a clicking sound. This indicates the seat
belt is now in the Automatic Locking Mode.
How To Disengage The Automatic Locking Mode
Unbuckle the combination lap/shoulder belt and allow it
to retract completely to disengage the Automatic Locking
Mode and activate the vehicle sensitive (emergency) lock-
ing mode.WARNING!
• The seat belt assembly must be replaced if the
switchable Automatic Locking Retractor (ALR) fea-
ture or any other seat belt function is not working
properly when checked according to the procedures
in the Service Manual.
• Failure to replace the seat belt assembly could in-
crease the risk of injury in collisions.
• Do not use the Automatic Locking Mode to restrain
occupants who are wearing the seat belt or children
who are using booster seats. The locked mode is only
used to install rear-facing or forward-facing child
restraints that have a harness for restraining the
child.
194 SAFETY
Page 216 of 490
WARNING!(Continued)
•After a child restraint is installed in the vehicle, do
not move the vehicle seat forward or rearward be-
cause it can loosen the child restraint attachments.
Remove the child restraint before adjusting the ve-
hicle seat position. When the vehicle seat has been
adjusted, reinstall the child restraint.
• When your child restraint is not in use, secure it in
the vehicle with the seat belt or LATCH anchorages,
or remove it from the vehicle. Do not leave it loose in
the vehicle. In a sudden stop or accident, it could
strike the occupants or seatbacks and cause serious
personal injury.
Children Too Large For Booster Seats
Children who are large enough to wear the shoulder belt
comfortably, and whose legs are long enough to bend over
the front of the seat when their back is against the seatback,
should use the seat belt in a rear seat. Use this simple 5-step
test to decide whether the child can use the vehicle’s seat
belt alone:
1. Can the child sit all the way back against the back of the vehicle seat? 2. Do the child’s knees bend comfortably over the front of
the vehicle seat – while the child is still sitting all the
way back?
3. Does the shoulder belt cross the child’s shoulder be- tween the neck and arm?
4. Is the lap part of the belt as low as possible, touching the child’s thighs and not the stomach?
5. Can the child stay seated like this for the whole trip?
If the answer to any of these questions was “no,” then the
child still needs to use a booster seat in this vehicle. If the
child is using the lap/shoulder belt, check seat belt fit
periodically and make sure the seat belt buckle is latched.
A child’s squirming or slouching can move the belt out of
position. If the shoulder belt contacts the face or neck,
move the child closer to the center of the vehicle, or use a
booster seat to position the seat belt on the child correctly.
WARNING!
Never allow a child to put the shoulder belt under an
arm or behind their back. In a crash, the shoulder belt
will not protect a child properly, which may result in
serious injury or death. A child must always wear both
the lap and shoulder portions of the seat belt correctly.
214 SAFETY
Page 226 of 490
1. Loosen the adjusters on the lower straps and on thetether strap of the child seat so that you can more easily
attach the hooks or connectors to the vehicle anchor-
ages.
2. Place the child seat between the lower anchorages for that seating position. For some second row seats, you
may need to recline the seat and / or raise the head
restraint (if adjustable) to get a better fit. If the rear seat
can be moved forward and rearward in the vehicle, you
may wish to move it to its rear-most position to make
room for the child seat. You may also move the front seat
forward to allow more room for the child seat.
3. Attach the lower hooks or connectors of the child restraint to the lower anchorages in the selected seating
position.
4. If the child restraint has a tether strap, connect it to the top tether anchorage. See the section “Installing Child
Restraints Using the Top Tether Anchorage” for direc-
tions to attach a tether anchor.
5. Tighten all of the straps as you push the child restraint rearward and downward into the seat. Remove slack in
the straps according to the child restraint manufactur-
er ’s instructions. 6. Test that the child restraint is installed tightly by pulling
back and forth on the child seat at the belt path. It
should not move more than 1 inch (25.4 mm) in any
direction.
How To Stow An Unused Switchable-ALR (ALR)
Seat Belt:
When using the LATCH attaching system to install a child
restraint, stow all ALR seat belts that are not being used by
other occupants or being used to secure child restraints. An
unused belt could injure a child if they play with it and
accidentally lock the seat belt retractor. Before installing a
child restraint using the LATCH system, buckle the seat
belt behind the child restraint and out of the child’s reach.
If the buckled seat belt interferes with the child restraint
installation, instead of buckling it behind the child re-
straint, route the seat belt through the child restraint belt
path and then buckle it. Do not lock the seat belt. Remind
all children in the vehicle that the seat belts are not toys and
that they should not play with them.
224 SAFETY
Page 385 of 490
•It is important that the drain holes in the lower edges of
the doors, rocker panels, and trunk be kept clear and
open.
• If you detect any stone chips or scratches in the paint,
touch them up immediately. The cost of such repairs is
considered the responsibility of the owner.
• If your vehicle is damaged due to a collision or similar
cause that destroys the paint and protective coating,
have your vehicle repaired as soon as possible. The cost
of such repairs is considered the responsibility of the
owner.
• If you carry special cargo such as chemicals, fertilizers,
de-icer salt, etc., be sure that such materials are well
packaged and sealed.
• If a lot of driving is done on gravel roads, consider mud
or stone shields behind each wheel.
• Use Mopar Touch Up Paint on scratches as soon as
possible. An authorized dealer has touch up paint to
match the color of your vehicle.INTERIORS
Seats And Fabric Parts
Use Mopar Total Clean to clean fabric upholstery and
carpeting.
WARNING!
Do not use volatile solvents for cleaning purposes.
Many are potentially flammable, and if used in closed
areas they may cause respiratory harm.
Seat Belt Maintenance
Do not bleach, dye or clean the belts with chemical solvents
or abrasive cleaners. This will weaken the fabric. Sun
damage can also weaken the fabric.
If the belts need cleaning, use a mild soap solution or
lukewarm water. Do not remove the belts from the vehicle
to wash them. Dry with a soft cloth.
Replace the belts if they appear frayed or worn or if the
buckles do not work properly.8
SERVICING AND MAINTENANCE 383