2019 DODGE GRAND CARAVAN chime
[x] Cancel search: chimePage 183 of 490
Seat Belt Systems
Buckle up even though you are an excellent driver, even on
short trips. Someone on the road may be a poor driver and
could cause a collision that includes you. This can happen
far away from home or on your own street.
Research has shown that seat belts save lives, and they can
reduce the seriousness of injuries in a collision. Some of the
worst injuries happen when people are thrown from the
vehicle. Seat belts reduce the possibility of ejection and the
risk of injury caused by striking the inside of the vehicle.
Everyone in a motor vehicle should be belted at all times.
Enhanced Seat Belt Use Reminder System (BeltAlert)
Driver and Passenger BeltAlert (if equipped)
BeltAlert is a feature intended to remind the driver
and outboard front seat passenger (if equipped with
outboard front passenger seat BeltAlert) to buckle their
seat belts. The Belt Alert feature is active whenever the
ignition switch is in the START or ON/RUN position.
Initial Indication
If the driver is unbuckled when the ignition switch is first
in the START or ON/RUN position, a chime will signal for a few seconds. If the driver or outboard front seat passen-
ger (if equipped with outboard front passenger seat
BeltAlert) is unbuckled when the ignition switch is first in
the START or ON/RUN position the Seat Belt Reminder
Light will turn on and remain on until both outboard front
seat belts are buckled. The outboard front passenger seat
BeltAlert is not active when an outboard front passenger
seat is unoccupied.
BeltAlert Warning Sequence
The BeltAlert warning sequence is activated when the
vehicle is moving above a specified vehicle speed range
and the driver or outboard front seat passenger is unbuck-
led (if equipped with outboard front passenger seat
BeltAlert) (the outboard front passenger seat BeltAlert is
not active when the outboard front passenger seat is
unoccupied). The BeltAlert warning sequence starts by
blinking the Seat Belt Reminder Light and sounding an
intermittent chime. Once the BeltAlert warning sequence
has completed, the Seat Belt Reminder Light will remain on
until the seat belts are buckled. The BeltAlert warning
sequence may repeat based on vehicle speed until the
driver and occupied outboard front seat passenger seat
belts are buckled. The driver should instruct all occupants
to buckle their seat belts.
5
SAFETY 181
Page 200 of 490
The ORC turns on the Air Bag Warning Light in the
instrument panel for approximately four to eight seconds
for a self-check when the ignition switch is first in the
ON/RUN position. After the self-check, the Air Bag Warn-
ing Light will turn off. If the ORC detects a malfunction in
any part of the system, it turns on the Air Bag Warning
Light, either momentarily or continuously. A single chime
will sound to alert you if the light comes on again after
initial startup.
The ORC also includes diagnostics that will illuminate the
instrument panel Air Bag Warning Light if a malfunction is
detected that could affect the air bag system. The diagnos-
tics also record the nature of the malfunction. While the air
bag system is designed to be maintenance free, if any of the
following occurs, have an authorized dealer service the air
bag system immediately.
•The Air Bag Warning Light does not come on during the
four to eight seconds when the ignition switch is first in
the ON/RUN position.
• The Air Bag Warning Light remains on after the four to
eight-second interval.
• The Air Bag Warning Light comes on intermittently or
remains on while driving. NOTE:
If the speedometer, tachometer, or any engine
related gauges are not working, the Occupant Restraint
Controller (ORC) may also be disabled. In this condition
the air bags may not be ready to inflate for your protection.
Have an authorized dealer service the air bag system
immediately.
WARNING!
Ignoring the Air Bag Warning Light in your instrument
panel could mean you won’t have the air bag system to
protect you in a collision. If the light does not come on
as a bulb check when the ignition is first turned on,
stays on after you start the vehicle, or if it comes on as
you drive, have an authorized dealer service the air bag
system immediately.
Front Air Bags
This vehicle has front air bags and lap/shoulder belts for
both the driver and front passenger. The front air bags are
a supplement to the seat belt restraint systems. The driver
front air bag is mounted in the center of the steering wheel.
The passenger front air bag is mounted in the instrument
panel, above the glove compartment. The words “SRS
AIRBAG” or “AIRBAG” are embossed on the air bag
covers.
198 SAFETY
Page 237 of 490
Whenever a change is noticed in the sound of the exhaust
system, when exhaust fumes can be detected inside the
vehicle, or when the underside or rear of the vehicle is
damaged, have a competent mechanic inspect the complete
exhaust system and adjacent body areas for broken, dam-
aged, deteriorated, or mispositioned parts. Open seams or
loose connections could permit exhaust fumes to seep into
the passenger compartment. In addition, inspect the ex-
haust system each time the vehicle is raised for lubrication
or oil change. Replace as required.
Safety Checks You Should Make Inside The Vehicle
Seat Belts
Inspect the seat belt system periodically, checking for cuts,
frays, and loose parts. Damaged parts must be replaced
immediately. Do not disassemble or modify the system.
Front seat belt assemblies must be replaced after a collision.
Rear seat belt assemblies must be replaced after a collision
if they have been damaged (i.e., bent retractor, torn web-
bing, etc.). If there is any question regarding seat belt or
retractor condition, replace the seat belt.
Air Bag Warning Light
The Air Bag warning lightwill turn on for four to
eight seconds as a bulb check when the ignition switch
is first turned to ON/RUN. If the light is either not on
during starting, stays on, or turns on while driving,
have the system inspected at an authorized dealer as
soon as possible. After the bulb check, this light will
illuminate with a single chime when a fault with the Air
Bag System has been detected. It will stay on until the
fault is removed. If the light comes on intermittently or
remains on while driving, have an authorized dealer
service the vehicle immediately.
Refer to “Occupant Restraint Systems” in “Safety” for
further information.
Defroster
Check operation by selecting the defrost mode and place
the blower control on high speed. You should be able to
feel the air directed against the windshield. See an autho-
rized dealer for service if your defroster is inoperable.
5
SAFETY 235
Page 246 of 490
When the parking brake is applied with the ignition switch
in the ON position, the “Brake Warning Light” in the
instrument cluster will illuminate.
NOTE:
•When the parking brake is applied and the automatic
transmission is placed in gear, the “Brake Warning
Light” will flash. If vehicle speed is detected, a chime
will sound to alert the driver. Fully release the parking
brake before attempting to move the vehicle.
• This light only shows that the parking brake is applied.
It does not show the degree of brake application.
When parking on a hill, it is important to turn the front
wheels toward the curb on a downhill grade and away
from the curb on an uphill grade. For vehicles equipped
with an automatic transmission, apply the parking brake
before placing the gear selector in PARK, otherwise the
load on the transmission locking mechanism may make it
difficult to move the gear selector out of PARK. The
parking brake should always be applied whenever the
driver is not in the vehicle.WARNING!
• When exiting the vehicle, always remove the key fob
from the ignition and lock your vehicle.
• Never leave children alone in a vehicle, or with
access to an unlocked vehicle.
• Allowing children to be in a vehicle unattended is
dangerous for a number of reasons. A child or others
could be seriously or fatally injured. Children
should be warned not to touch the parking brake,
brake pedal or the gear selector.
• Do not leave the key fob in or near the vehicle (or in
a location accessible to children), and do not leave
the ignition in the ACC or ON/ RUN mode. A child
could operate power windows, other controls, or
move the vehicle.
• Be sure the parking brake is fully disengaged before
driving; failure to do so can lead to brake failure and
a collision.
• Always fully apply the parking brake when leaving
your vehicle, or it may roll and cause damage or
injury. Also be certain to leave the transmission in
PARK. Failure to do so may allow the vehicle to roll
and cause damage or injury.
244 STARTING AND OPERATING
Page 264 of 490
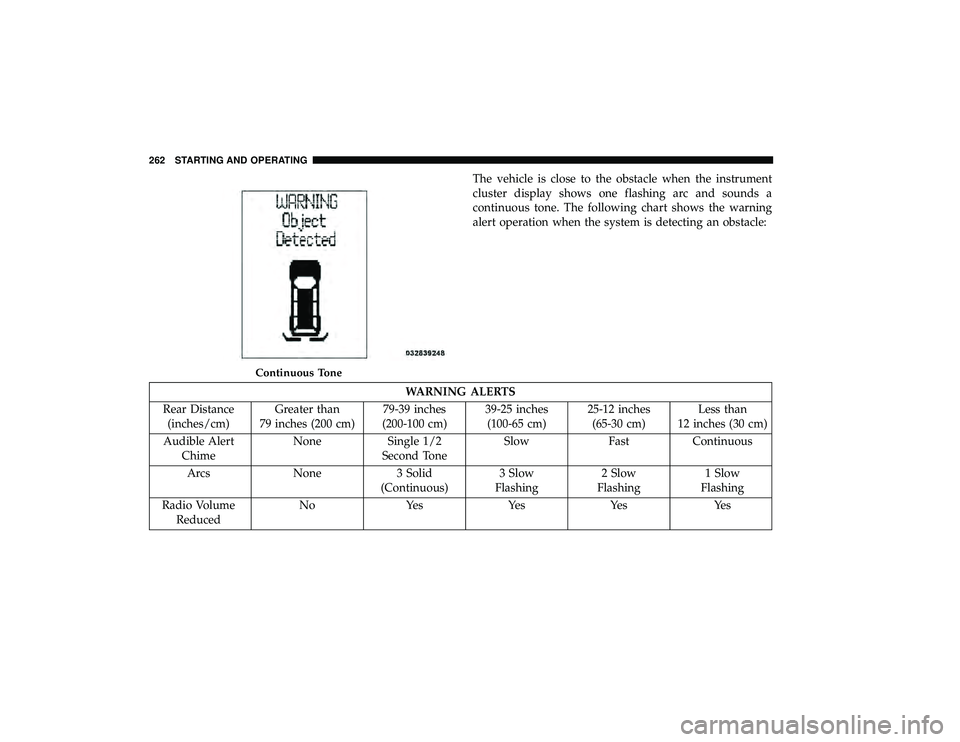
The vehicle is close to the obstacle when the instrument
cluster display shows one flashing arc and sounds a
continuous tone. The following chart shows the warning
alert operation when the system is detecting an obstacle:
WARNING ALERTS
Rear Distance (inches/cm) Greater than
79 inches (200 cm) 79-39 inches
(200-100 cm) 39-25 inches
(100-65 cm) 25-12 inches
(65-30 cm) Less than
12 inches (30 cm)
Audible Alert Chime None Single 1/2
Second Tone Slow Fast Continuous
Arcs None 3 Solid (Continuous)3 Slow
Flashing 2 Slow
Flashing 1 Slow
Flashing
Radio Volume Reduced No Yes Yes Yes Yes
Continuous Tone
262 STARTING AND OPERATING
Page 265 of 490
NOTE:ParkSense will reduce the radio volume, if on,
when the system is sounding an audio tone.
Enabling/Disabling ParkSense
ParkSense can be enabled and disabled through the
Customer-Programmable Features section of the instru-
ment cluster display. The available choices are: OFF, Sound
Only, or Sound and Display.
When ParkSense is disabled, the instrument cluster will
display the “PARK ASSIST SYSTEM OFF” message for
approximately five seconds. When the gear selector is
moved to REVERSE and the system is disabled, the instru-
ment cluster display will display the “PARK ASSIST SYS-
TEM OFF” message for as long as the vehicle is in
REVERSE.
Refer to “Instrument Cluster Display” in “Getting To Know
Your Instrument Panel” for further information.
Service The ParkSense Rear Park Assist System
During vehicle start up, when the ParkSense Rear Park
Assist System has detected a faulted condition, the instru-
ment cluster will actuate a single chime, once per ignition
cycle, and it will display the “SERVICE PARK ASSIST
SYSTEM” message. When the gear selector is moved to
REVERSE and the system has detected a faulted condition, the instrument cluster display will display the “SERVICE
PARK ASSIST SYSTEM” message for as long as the vehicle
is in REVERSE. Under this condition, ParkSense will not
operate.
Refer to “Instrument Cluster Display” in “Getting To Know
Your Instrument Panel” for further information.
If “SERVICE PARK ASSIST SYSTEM” appears in the in-
strument cluster display after making sure the rear fascia/
bumper is free from snow, ice, mud, dirt and debris, see
your authorized dealer.
Cleaning The ParkSense System
Clean the ParkSense sensors with water, car wash soap and
a soft cloth. Do not use rough or hard cloths. Do not scratch
or poke the sensors. Otherwise, you could damage the
sensors.
ParkSense System Usage Precautions
NOTE:
•
Ensure that the rear bumper is free of snow, ice, mud,
dirt and debris to keep the ParkSense system operating
properly.
• Jackhammers, large trucks, and other vibrations could
affect the performance of ParkSense.
6
STARTING AND OPERATING 263
Page 329 of 490

3. Disconnect the positive(+)end of the jumper cable from
the positive (+)post of the booster battery.
4. Disconnect the opposite end of the positive (+)jumper
cable from the positive (+)post of the vehicle with the
discharged battery.
If frequent jump starting is required to start your vehicle,
you should have the battery and charging system in-
spected at an authorized dealer.
CAUTION!
Accessories plugged into the vehicle power outlets
draw power from the vehicle’s battery, even when not
in use (i.e., cellular devices, etc.). Eventually, if plugged
in long enough without engine operation, the vehicle’s
battery will discharge sufficiently to degrade battery
life and/or prevent the engine from starting.
IF YOUR ENGINE OVERHEATS
In any of the following situations, you can reduce the
potential for overheating your engine by taking the appro-
priate action.
• On the highways — slow down. •
In city traffic — while stopped, place the transmission in
NEUTRAL, but do not increase engine idle speed.
CAUTION!
Driving with a hot cooling system could damage your
vehicle. If the temperature gauge reads “H,” pull over
and stop the vehicle. Idle the vehicle with the air
conditioner turned off until the pointer drops back
into the normal range. If the pointer remains on the
“H” and you hear continuous chimes, turn the engine
off immediately and call for service.
NOTE: There are steps that you can take to slow down an
impending overheat condition:
• If your Air Conditioner (A/C) is on, turn it off. The A/C
system adds heat to the engine cooling system and
turning the A/C off can help remove this heat.
• You can also turn the temperature control to maximum
heat, the mode control to floor and the blower control to
high. This allows the heater core to act as a supplement
to the radiator and aids in removing heat from the
engine cooling system.
7
IN CASE OF EMERGENCY 327