2019 DODGE GRAND CARAVAN reset
[x] Cancel search: resetPage 138 of 490

Fuel Economy
Push and release theupordown arrow button until “Fuel
Economy” displays highlighted in the instrument cluster
display and push the rightarrow button. The following
Fuel Economy functions display in the instrument cluster
display:
• Average Fuel Economy (MPG or L/100 km)
• Distance To Empty (mi or km)
• Current Fuel Economy (MPG or L/100 km)
Vehicle Speed
Push and release the upordown arrow button until
“Vehicle Speed” displays highlighted in the instrument
cluster display and push the rightarrow button. Push and
release the rightarrow button to display the current speed
in mph or km/h. Pushing the rightarrow button a second
time will toggle the unit of measure between mph
or km/h.
NOTE: Changing the unit of measure in the Vehicle Speed
menu will not change the unit of measure in the instrument
cluster display.
Trip Info
Push and release the upordown arrow button until “Trip
Info” is highlighted in the instrument cluster display and
push the rightbutton. Push and release the upordown
arrow button to highlight one of the following functions:
• Trip A
• Trip B
• Elapsed Time
• Trip Reset
Tire Pressure
Push and release the upordown arrow button until “Tire
PSI:” displays highlighted in the instrument cluster dis-
play. Push and release the rightarrow button to view a
graphic of the vehicle with a tire pressure value at each
corner of the graphic.
Units
Push and release the upordown arrow button until
“Units” displays highlighted in the instrument cluster
display and push the rightarrow button. The instrument
cluster display, odometer, and navigation system (if
equipped) can be changed between English and Metric
units of measure. To make your selection, scroll up or
136 GETTING TO KNOW YOUR INSTRUMENT PANEL
Page 146 of 490

Calibrate Compass
Push therightarrow button to calibrate the compass.
TRIP COMPUTER
Push and release the up or down arrow button until “Trip
Info” is highlighted in the instrument cluster display and
push the right button. Push and release the up or down
arrow button to highlight one of the following functions.
Trip A
•Shows the total distance traveled for Trip A since the last
reset.
• Shows the elapsed time traveled for Trip A since the last
reset.
Trip B
• Shows the total distance traveled for Trip B since the last
reset.
• Shows the elapsed time traveled for Trip B since the last
reset. Elapsed Time
Shows the total elapsed time of travel since the last reset
when the ignition switch is in the ACC position. Elapsed
time will increment when the ignition switch is in the ON
or START position.
To Reset A Trip Function
Reset will only occur while a resettable function is selected
(highlighted). Push and hold the right arrow button to
clear the resettable function being displayed.
WARNING LIGHTS AND MESSAGES
The warning/indicator lights will illuminate in the instru-
ment panel together with a dedicated message and/or
acoustic signal when applicable. These indications are
indicative and precautionary and as such must not be
considered as exhaustive and/or alternative to the infor-
mation contained in the Owner ’s Manual, which you are
advised to read carefully in all cases. Always refer to the
information in this chapter in the event of a failure indica-
tion. All active telltales will display first if applicable. The
system check menu may appear different based upon
equipment options and current vehicle status. Some tell-
tales are optional and may not appear.
144 GETTING TO KNOW YOUR INSTRUMENT PANEL
Page 198 of 490

WARNING!
•All occupants, including the driver, should not oper-
ate a vehicle or sit in a vehicle’s seat until the head
restraints are placed in their proper positions in
order to minimize the risk of neck injury in the event
of a collision.
• Do not place items over the top of the Active Head
Restraint, such as coats, seat covers or portable DVD
players. These items may interfere with the opera-
tion of the Active Head Restraint in the event of a
collision and could result in serious injury or death.
• Active Head Restraints may be deployed if they are
struck by an object such as a hand, foot or loose
cargo. To avoid accidental deployment of the Active
Head Restraint, ensure that all cargo is secured, as
loose cargo could contact the Active Head Restraint
during sudden stops. Failure to follow this warning
could cause personal injury if the Active Head Re-
straint is deployed.
NOTE: For more information on properly adjusting and
positioning the head restraint, refer to “Head Restraints” in
“Getting To Know Your Vehicle.” Resetting Active Head Restraints (AHR)
If the Active Head Restraints are triggered during a colli-
sion, the front half of the head restraint will be extended
forward and separated from the rear half of the head
restraint (See Image). Do not drive your vehicle after the
AHRs have deployed. The head restraint must be reset into
the original position to best protect the occupant for all
types of collisions. An authorized FCA US LLC dealer must
reset the AHRs on the driver ’s and front passenger ’s seat
before driving. Personally attempting to reset the AHRs
Active Head Restraint (AHR) Deployed
196 SAFETY
Page 199 of 490

may result in damage to the AHRs that could impair their
function.
WARNING!
Deployed AHRs are not able to best protect you in all
types of collisions. Have deployed AHRs reset by an
authorized dealer immediately.
Supplemental Restraint Systems (SRS)
Some of the safety features described in this section may be
standard equipment on some models, or may be optional
equipment on others. If you are not sure, ask an authorized
dealer.
The air bag system must be ready to protect you in a
collision. The Occupant Restraint Controller (ORC) moni-
tors the internal circuits and interconnecting wiring asso-
ciated with the electrical Air Bag System Components.
Your vehicle may be equipped with the following Air Bag
System Components:
Air Bag System Components
•Occupant Restraint Controller (ORC)
• Air Bag Warning Light
•Steering Wheel and Column
• Instrument Panel
• Knee Impact Bolsters
• Driver and Front Passenger Air Bags
• Seat Belt Buckle Switch
• Supplemental Side Air Bags
• Supplemental Knee Air Bags
• Front and Side Impact Sensors
• Seat Belt Pretensioners
• Seat Track Position Sensors
Air Bag Warning Light
The ORC monitors the readiness of the electronic parts of
the air bag system whenever the ignition switch
is in the START or ON/RUN position. If the
ignition switch is in the OFF position or in the
ACC position, the air bag system is not on and
the air bags will not inflate.
The ORC contains a backup power supply system that may
deploy the air bag system even if the battery loses power or
it becomes disconnected prior to deployment.
5
SAFETY 197
Page 210 of 490

NOTE:After an accident, remember to cycle the ignition
to the STOP (OFF/LOCK) position and remove the key
from the ignition switch to avoid draining the battery.
Carefully check the vehicle for fuel leaks in the engine
compartment and on the ground near the engine compart-
ment and fuel tank before resetting the system and starting
the engine. If there are no fuel leaks or damage to the
vehicle electrical devices (e.g. headlights) after an accident,
reset the system by following the procedure described
below. If you have any doubt, contact an authorized dealer.
Enhanced Accident Response System Reset
Procedure
In order to reset the Enhanced Accident Response System
functions after an event, the ignition switch must be
changed from ignition START or ON/RUN to ignition OFF.
Carefully check the vehicle for fuel leaks in the engine
compartment and on the ground near the engine compart-
ment and fuel tank before resetting the system and starting
the engine.
Maintaining Your Air Bag System
WARNING!
• Modifications to any part of the air bag system could
cause it to fail when you need it. You could be
injured if the air bag system is not there to protect
you. Do not modify the components or wiring, in-
cluding adding any kind of badges or stickers to the
steering wheel hub trim cover or the upper passenger
side of the instrument panel. Do not modify the front
bumper, vehicle body structure, or add aftermarket
side steps or running boards.
• It is dangerous to try to repair any part of the air bag
system yourself. Be sure to tell anyone who works on
your vehicle that it has an air bag system.
(Continued)
208 SAFETY
Page 254 of 490

Transmission Limp Home Mode
Transmission function is monitored electronically for ab-
normal conditions. If a condition is detected that could
result in transmission damage, Transmission Limp Home
Mode is activated. In this mode, the transmission remains
in third gear regardless of which forward gear is selected.
PARK, REVERSE, and NEUTRAL will continue to operate.
The Malfunction Indicator Light (MIL) may be illuminated.
Limp Home Mode allows the vehicle to be driven to an
authorized dealer for service without damaging the trans-
mission.
In the event of a momentary problem, the transmission can
be reset to regain all forward gears by performing the
following steps:
1. Stop the vehicle.
2. Shift the transmission into PARK.
3. Turn the ignition OFF.
4. Wait approximately 10 seconds.
5. Restart the engine.
6. Shift into the desired gear range. If the problem is nolonger detected, the transmission will return to normal
operation. NOTE:
Even if the transmission can be reset, we recom-
mend that you visit an authorized dealer at your earliest
possible convenience. An authorized dealer has diagnostic
equipment to assess the condition of your transmission.
If the transmission cannot be reset, authorized dealer
service is required.
Electronic Range Select (ERS) Operation
The Electronic Range Select (ERS) shift control allows the
driver to limit the highest available gear when the trans-
mission is in DRIVE. For example, if you set the transmis-
sion gear limit to 4 (fourth gear), the transmission will not
shift above fourth gear (except to prevent engine over-
speed), but will shift through the lower gears normally.
You can switch between DRIVE and ERS mode at any
vehicle speed. When the gear selector is in the DRIVE
position, the transmission will operate automatically, shift-
ing between all available gears. Tapping the gear selector to
the left (-) will activate ERS mode, display the current gear
in the instrument cluster, and set that gear as the top
available gear. Once in ERS mode, tapping the gear selector
to the left (-) or right (+) will change the top available gear.
252 STARTING AND OPERATING
Page 257 of 490

WARNING!
Fluid level should be checked on a level surface and
with the engine off to prevent injury from moving
parts and to ensure accurate fluid level reading. Do not
overfill. Use only manufacturer’s recommended power
steering fluid.
CAUTION!
Do not use chemical flushes in your power steering
system as the chemicals can damage your power steer-
ing components. Such damage is not covered by the
New Vehicle Limited Warranty.
If necessary, add fluid to restore to the proper indicated
level. With a clean cloth, wipe any spilled fluid from all
surfaces. Refer to “Fluids And Lubricants” in “Technical
Specifications” for the correct fluid type.
SPEED CONTROL — IF EQUIPPED
When engaged, the Speed Control takes over accelerator
operations at speeds greater than 25 mph (40 km/h).
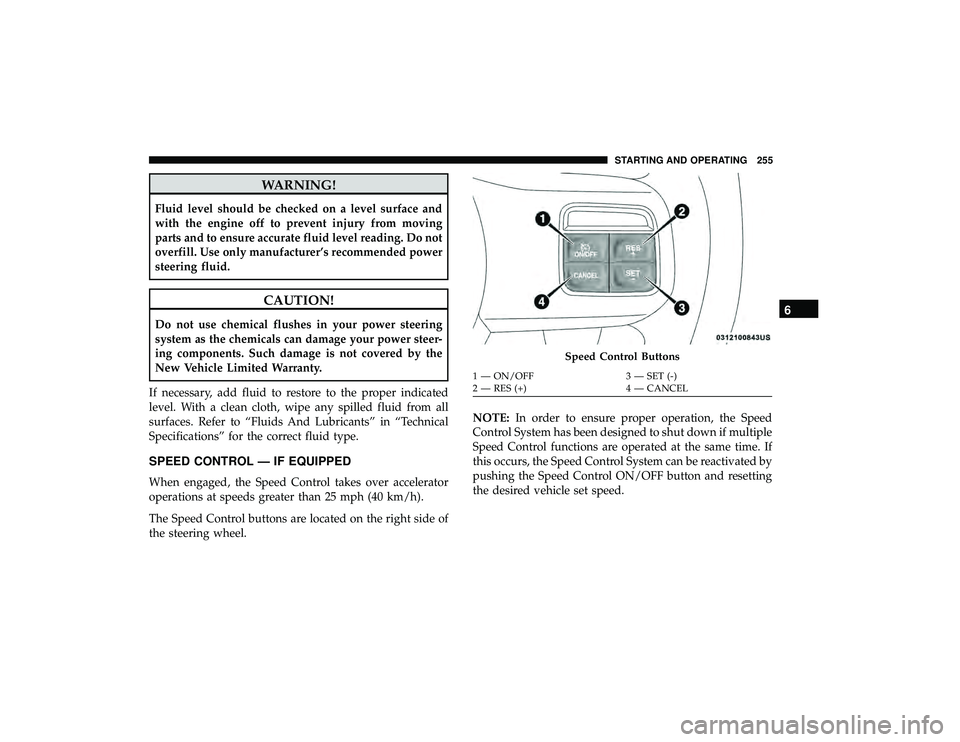
The Speed Control buttons are located on the right side of
the steering wheel. NOTE:
In order to ensure proper operation, the Speed
Control System has been designed to shut down if multiple
Speed Control functions are operated at the same time. If
this occurs, the Speed Control System can be reactivated by
pushing the Speed Control ON/OFF button and resetting
the desired vehicle set speed.
Speed Control Buttons
1 — ON/OFF 3 — SET (-)
2 — RES (+) 4 — CANCEL
6
STARTING AND OPERATING 255
Page 337 of 490

SCHEDULED SERVICING
Your vehicle is equipped with an automatic oil change
indicator system. The oil change indicator system will
remind you that it is time to take your vehicle in for
scheduled maintenance.
Based on engine operation conditions, the oil change
indicator message will illuminate. This means that service
is required for your vehicle. Operating conditions such as
frequent short-trips, trailer tow, extremely hot or cold
ambient temperatures, and E85 fuel usage will influence
when the “Oil Change Required” message is displayed.
Severe Operating Conditions can cause the change oil
message to illuminate as early as 3,500 miles (5,600 km)
since last reset. Have your vehicle serviced as soon as
possible, within the next 500 miles (805 km).
Your authorized dealer will reset the oil change indicator
message after completing the scheduled oil change. If a
scheduled oil change is performed by someone other than
your authorized dealer, the message can be reset by
referring to the steps described under “Instrument Cluster
Display” in “Getting To Know Your Instrument Panel” for
further information.NOTE:
Under no circumstances should oil change inter-
vals exceed 10,000 miles (16,000 km), 12 months or 350
hours of engine run time, whichever comes first. The 350
hours of engine run or idle time is generally only a concern
for fleet customers.
Severe Duty All Models
Change engine oil at 4,000 miles (6,500 km) if the vehicle is
operated in a dusty and off road environment or is
operated predominately at idle or only very low engine
RPM’s. This type of vehicle use is considered Severe Duty.
Once A Month Or Before A Long Trip:
• Check engine oil level.
• Check windshield washer fluid level.
• Check tire pressure and look for unusual wear or
damage. Rotate tires at the first sign of irregular wear,
even if it occurs before the oil indicator system turns on.
• Check the fluid levels of the coolant reservoir, brake
master cylinder, and power steering and fill as needed.
• Check function of all interior and exterior lights.
8
SERVICING AND MAINTENANCE 335