Page 403 of 496

NOTE:
•FCA US LLC or your dealer may contact you directly
regarding software updates.
• To help further improve vehicle security and minimize
the potential risk of a security breach, vehicle owners
should:
• Routinely check www.driveuconnect.com (U.S. Resi-
dents) or www.driveuconnect.ca (Canadian Residents)
to learn about available Uconnect software updates.
• Only connect and use trusted media devices (e.g.
personal mobile phones, USBs, CDs).
Privacy of any wireless and wired communications cannot
be assured. Third parties may unlawfully intercept infor-
mation and private communications without your consent.
For further information, refer to “Data Collection & Pri-
vacy” in your Uconnect Owner ’s Manual Supplement or
“Onboard Diagnostic System (OBD II) Cybersecurity” in
“Getting To Know Your Instrument Panel”.
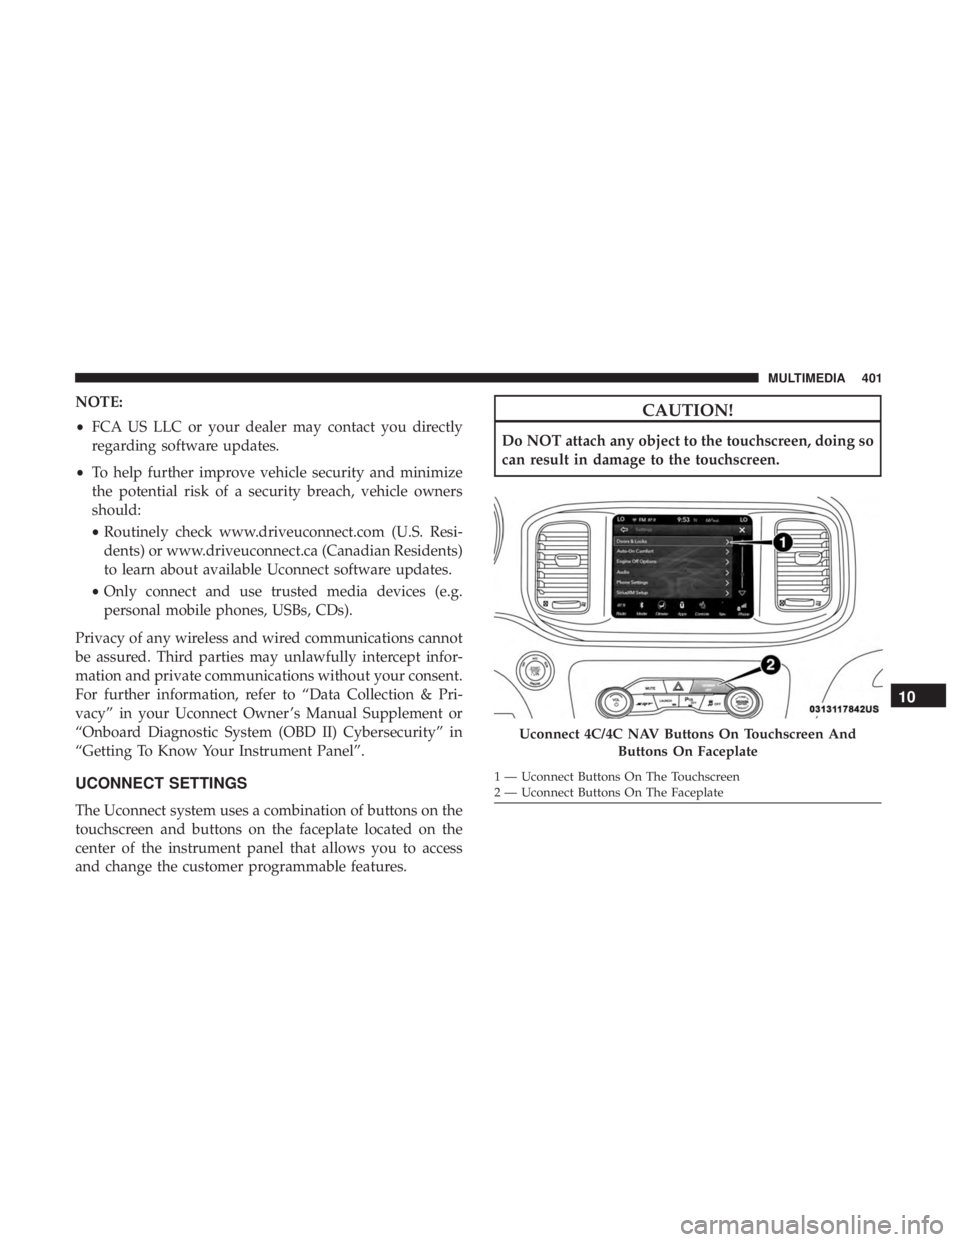
UCONNECT SETTINGS
The Uconnect system uses a combination of buttons on the
touchscreen and buttons on the faceplate located on the
center of the instrument panel that allows you to access
and change the customer programmable features.
CAUTION!
Do NOT attach any object to the touchscreen, doing so
can result in damage to the touchscreen.
Uconnect 4C/4C NAV Buttons On Touchscreen And Buttons On Faceplate
1 — Uconnect Buttons On The Touchscreen
2 — Uconnect Buttons On The Faceplate
10
MULTIMEDIA 401
Page 405 of 496
Display
After pressing the “Display” button on the touchscreen, the
following settings will be available:
Setting NameSelectable Options
Display Mode AutoManual
Display Brightness With Headlights ON +–
NOTE:
•When in the “Display Brightness With Headlights ON” display, you may select the brightness with the headlights
on.
•To make changes to the �Display Brightness With Headlights ON� setting, the headlights must be on and the inte-
rior dimmer switch must not be in the �party�or�parade� positions.
Display Brightness With Headlights OFF +–
NOTE:
•When in the “Display Brightness With Headlights OFF” display, you may select the brightness with the headlights
off. Adjust the brightness from (1–10) with the “+” and “–” buttons on the touchscreen.
•To make changes to the �Display Brightness With Headlights OFF� setting, the headlights must be off and the inte-
rior dimmer switch must not be in the �party�or�parade� positions.
10
MULTIMEDIA 403
Page 411 of 496

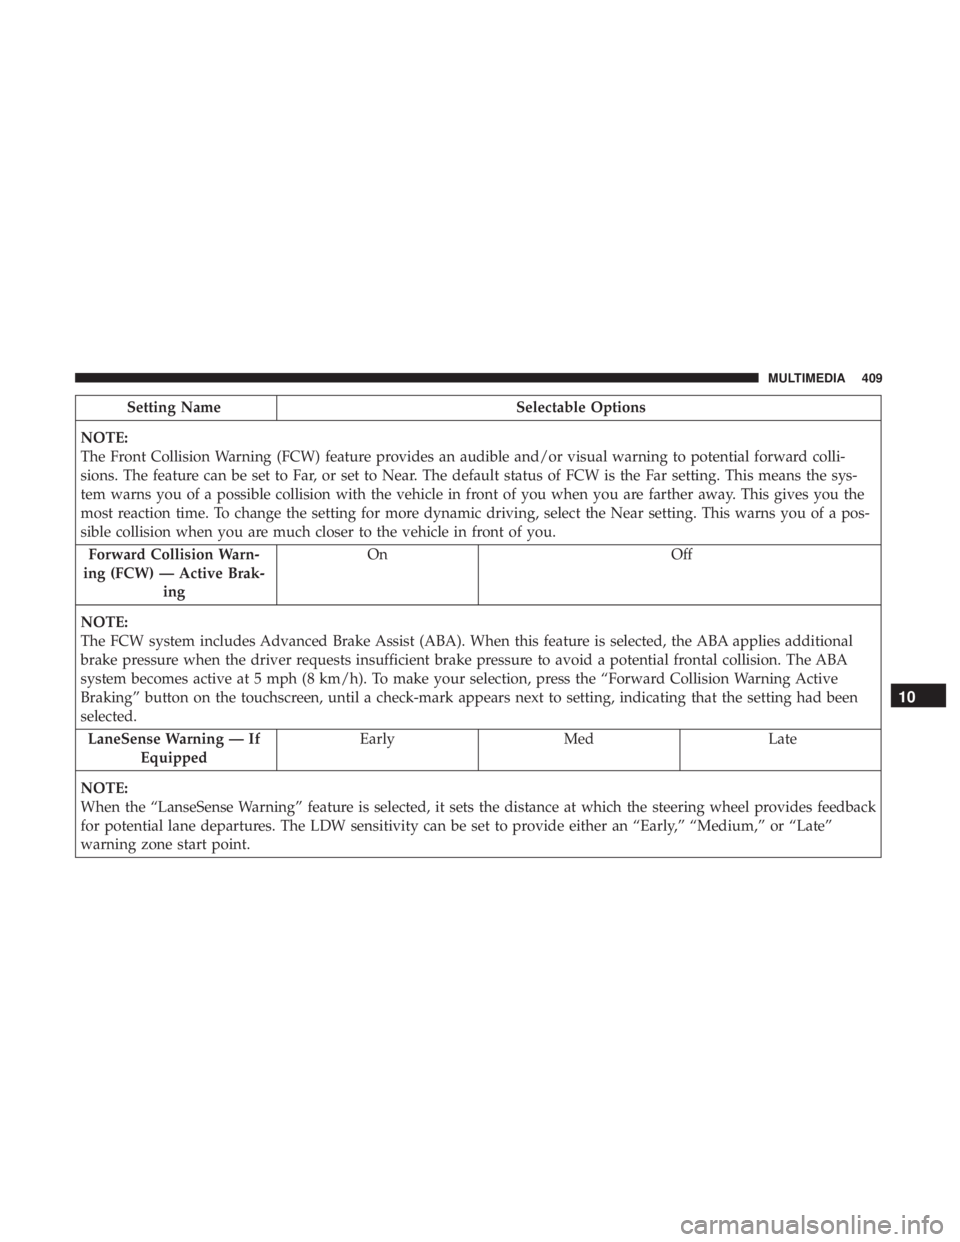
Setting NameSelectable Options
NOTE:
The Front Collision Warning (FCW) feature provides an audible and/or visual warning to potential forward colli-
sions. The feature can be set to Far, or set to Near. The default status of FCW is the Far setting. This means the sys-
tem warns you of a possible collision with the vehicle in front of you when you are farther away. This gives you the
most reaction time. To change the setting for more dynamic driving, select the Near setting. This warns you of a pos-
sible collision when you are much closer to the vehicle in front of you. Forward Collision Warn-
ing (FCW) — Active Brak- ing On
Off
NOTE:
The FCW system includes Advanced Brake Assist (ABA). When this feature is selected, the ABA applies additional
brake pressure when the driver requests insufficient brake pressure to avoid a potential frontal collision. The ABA
system becomes active at 5 mph (8 km/h). To make your selection, press the “Forward Collision Warning Active
Braking” button on the touchscreen, until a check-mark appears next to setting, indicating that the setting had been
selected. LaneSense Warning — If Equipped Early
Med Late
NOTE:
When the “LanseSense Warning” feature is selected, it sets the distance at which the steering wheel provides feedback
for potential lane departures. The LDW sensitivity can be set to provide either an “Early,” “Medium,” or “Late”
warning zone start point.
10
MULTIMEDIA 409
Page 412 of 496

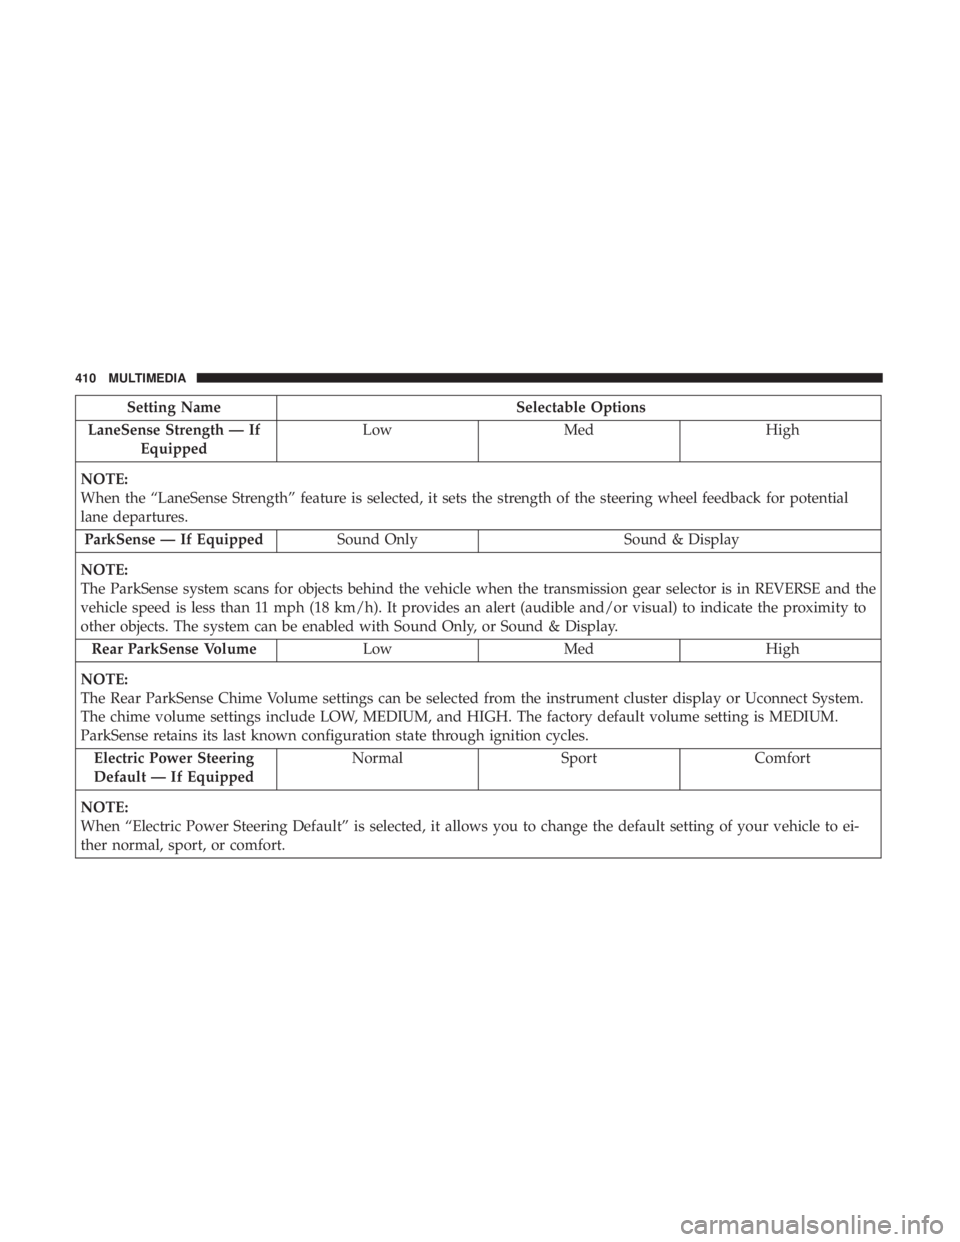
Setting NameSelectable Options
LaneSense Strength — If Equipped Low
Med High
NOTE:
When the “LaneSense Strength” feature is selected, it sets the strength of the steering wheel feedback for potential
lane departures. ParkSense — If Equipped Sound Only Sound & Display
NOTE:
The ParkSense system scans for objects behind the vehicle when the transmission gear selector is in REVERSE and the
vehicle speed is less than 11 mph (18 km/h). It provides an alert (audible and/or visual) to indicate the proximity to
other objects. The system can be enabled with Sound Only, or Sound & Display. Rear ParkSense Volume LowMed High
NOTE:
The Rear ParkSense Chime Volume settings can be selected from the instrument cluster display or Uconnect System.
The chime volume settings include LOW, MEDIUM, and HIGH. The factory default volume setting is MEDIUM.
ParkSense retains its last known configuration state through ignition cycles. Electric Power Steering
Default — If Equipped Normal
SportComfort
NOTE:
When “Electric Power Steering Default” is selected, it allows you to change the default setting of your vehicle to ei-
ther normal, sport, or comfort.
410 MULTIMEDIA
Page 419 of 496
Key Off Options
After pressing the “Key Off Options” button on the touch-
screen, the following settings will be available:
Setting NameSelectable Options
Easy Exit Seat — If Equipped OnOff
NOTE:
When the “Easy Exit Seat” feature is selected, the driver ’s seat will automatically move rearward once the engine is
shut off. Key Off Power Delay 0 sec45 sec
5 mins 10 mins
NOTE:
When the “Key Off Power Delay” feature is selected, the power window switches, radio, Uconnect Phone system (if
equipped), DVD video system (if equipped), power sunroof (if equipped), and power outlets will remain active for
up to ten minutes after the ignition is cycled to OFF. Opening either front door will cancel this feature. To change the
Key Off Power Delay setting, press the “+” or “-” button on the touchscreen to select your desired time interval, and
choose from “0 seconds,” “45 seconds,” “5 minutes” or “10 minutes.”
10
MULTIMEDIA 417
Page 420 of 496
Setting NameSelectable Options
Headlight Off Delay 0 sec30 sec
60 sec 90 sec
NOTE:
When the “Headlight Off Delay” feature is selected, the driver can choose to have the headlights remain on for 0, 30,
60, or 90 seconds when exiting the vehicle. To change the Headlight Off Delay status press the “+” or “–” button on
the touchscreen to select your desired time interval.
Audio
After pressing the “Audio” button on the touchscreen, the
following settings will be available:
Setting Name Selectable Options
Balance/Fade “Speaker” Icon Arrow Buttons
NOTE:
The “Balance/Fade” feature allows you to adjust the Balance and Fade settings. Press and drag the speaker icon, use
the arrows to adjust, or tap the “Speaker” icon to readjust to the center.
418 MULTIMEDIA
Page 421 of 496
Setting NameSelectable Options
Equalizer +–
NOTE:
•The “Equalizer” feature allows you to adjust the Bass, Mid and Treble settings. Adjust the settings with the “+”
and “–” setting buttons on the touchscreen or by selecting any point on the scale between the “+” and “–” buttons
on the touchscreen.
•Bass/Mid/Treble allow you to simply slide your finger up or down to change the setting as well as press directly
on the desired setting.
Speed Adjusted Vol- ume Off 1 2 3
NOTE:
The “Speed Adjusted Volume” feature increases or decreases volume relative to vehicle speed. To change the Speed
Adjusted Volume press the “Off,” “1,” “2” or “3” button on the touchscreen. Surround Sound — If Equipped On Off
NOTE:
The “Surround Sound” feature provides simulated surround sound mode. To make your selection, press the “Sur-
round Sound” button on the touchscreen, select “On” or “Off.”
10
MULTIMEDIA 419
Page 427 of 496
The following describes each feature and its operation:
Home
When Home is selected, a series of widgets (gauges) can be
customized by the user. Follow these steps to change a
widget:
1. Press any of the gauges to change them.2. Press the pencil icon and select the following option
from the menu:
• Set Widget: Top Left
• Set Widget: Top Right
• Set Widget: Bottom Left
• Set Widget: Bottom Right
3. After selecting a Widget location: select the gauge to display:
• Gauge: Oil Temp
• Gauge: Oil Pressure
• Gauge: Coolant Temp
• Gauge: Battery Voltage
• Gauge: Trans Temp — If Equipped with an Automatic
Transmission
• Gauge: Boost Pressure — If Equipped
• Gauge: Air/Fuel Ratio — If Equipped
• Gauge: I/C Coolant Temp — If Equipped
• Gauge: Intake Air Temp
• Gauge: Engine Torque
• Gauge: Engine Power
• Gauge: G-Force
• Gauge: Steering Angle
Performance Pages — Home
10
MULTIMEDIA 425