Page 430 of 496

The “Tickets” contain the timers listed below:
•Reaction Time
Measures the driver’s reaction time for launching the
vehicle against a simulated drag strip timing light (behav-
ior modeled after 500 Sportsman Tree) displayed in the
instrument cluster display.
NOTE: The Reaction Time, MPH, ⅛and ¼ Mile timers will
be “ready” when the vehicle is at 0 MPH (0 km/h).
• 0-60 MPH (0-100 km/h)
Displays the time it takes for the vehicle to go from 0 to
60 mph (0 to 100 km/h).
• 0-100 MPH (0-160 km/h)
Displays the time it takes for the vehicle to go from 0 to
100 mph (0 to 160 km/h).
• ⅛ Mile (200 meter) ET
Displays the time it takes for the vehicle to go an ⅛mile
(200 meters).
• ⅛ Mile (200 meter) MPH
Displays the vehicle speed at the time ⅛mile (200 meters)
was reached. •
¼ Mile (400 meter) ET
Displays the time it takes for the vehicle to go ¼ mile
(400 meters).
• ¼ Mile (400 meter) MPH
Displays the speed the vehicle was at when ¼ mile
(400 meters) was reached.
• Brake Distance ft
Displays the distance it takes the vehicle to make a full
stop.
NOTE: The distance measurement will be aborted if the
brake pedal is released or the parking brake is engaged,
before the vehicle comes to a complete stop.
• Brake from MPH
Displays the speed the vehicle is traveling when the brake
pedal is pressed.
NOTE: Brake Distance and Speed timers only displays
�ready� when vehicle is traveling at greater than 30 MPH
(48 km/h).
428 MULTIMEDIA
Page 433 of 496

When G-Force is selected, the following features will be
available:
•Vehicle Speed:
Measures the current speed of the vehicle in either mph
or km/h, starting at zero with no maximum value.
• Front G-Force:
Measures the deceleration force present on the driver
during a braking maneuver.
• Right G-Force:
Measures the force pulling toward the right during a left
turn maneuver.
• Left G-Forces:
Measures the force pulling toward the left during a right
turn maneuver.
• Rear G-Forces:
Measures the acceleration force present on the driver.
NOTE: Front, Right, Left, and Rear G-Froces are all peak
values. These readings can be reset by clearing peak
G-Force on the instrument cluster •
Steering Wheel Angle:
Steering Wheel Angle utilizes the steering angle sensor to
measure the degree of the steering wheel relative to zero.
The zero degree measurement indicates a steering wheel
straight ahead position. When the steering angle value is
negative, this indicates a turn to the left, and when the
steering angle value is positive, a turn to the right.
The friction circle display shows instantaneous G-Force as
a highlight and previous G-Force as dots within the circle.
The system records previous G-Force for three minutes. If
there are multiple samples at a given point, the color of the
dot will darken from blue to red. Vectors more frequent
will show in red; infrequent vectors will show in blue.
10
MULTIMEDIA 431
Page 438 of 496

through the Uconnect system and may be accessed by
performing any of the following:
•Pushing the SRT button on the instrument panel switch
bank.
• Selecting “SRT Modes” from the “Apps” menu.
• Selecting “Drive Modes” from within the Performance
Pages menu. NOTE:
Not all options listed in this manual are available
on every vehicle. Refer to the chart below for all available
Drive Mode vehicle configurations.
Engine/
Transmis- sion Red Key/
700+ to 717/ 797 HP Black Key/
500 HP Transmis-
sion Paddle
Shifters Suspension Steering –
If
Equipped Traction
6.2L MTX X X N/A N/A X X X 6.2L ATX XXXXXI fEquipped X
The SRT Drive Modes main screen displays the current
drive mode and real-time status of the vehicle’s perfor-
mance configuration. The selectable Drive Modes buttons
are Track, Sport, Custom, or Auto and will be highlighted
when displaying the current configuration. Information
shown below each drive mode button will indicate the
actual status of each system, along with a graphic that
displays the status of the vehicle’s components. The color
red indicates “Track,” orange “Sport,” and yellow “Street.” If the system status shown does not match the current
drive mode set up, a message will be displayed indicating
which values are not matching the current mode and why.
NOTE:
ESC Full-Off can be activated across all of the Drive
Mode features by pushing and holding the ESC Off button
on the instrument panel switch bank for five seconds.
436 MULTIMEDIA
Page 439 of 496
Listed below are the available Drive Modes:
Track Mode
Pressing the “Track” button on the touchscreen will acti-
vate the configuration for typical track driving. The Trans-
mission, Traction, Steering, and Suspension systems are all
set to their “Track” settings highlighted in red. The Paddle
Shifters are enabled.
Sport Mode
Pressing the “Sport” button on the touchscreen will acti-
vate the configuration for typical enthusiast driving. The
Traction, Transmission, Steering, and Suspension systems
are all set to their “Sport” settings highlighted in orange.
The Paddle Shifters are enabled.Drive Modes (Track)
Drive Modes (Sport)
10
MULTIMEDIA 437
Page 447 of 496
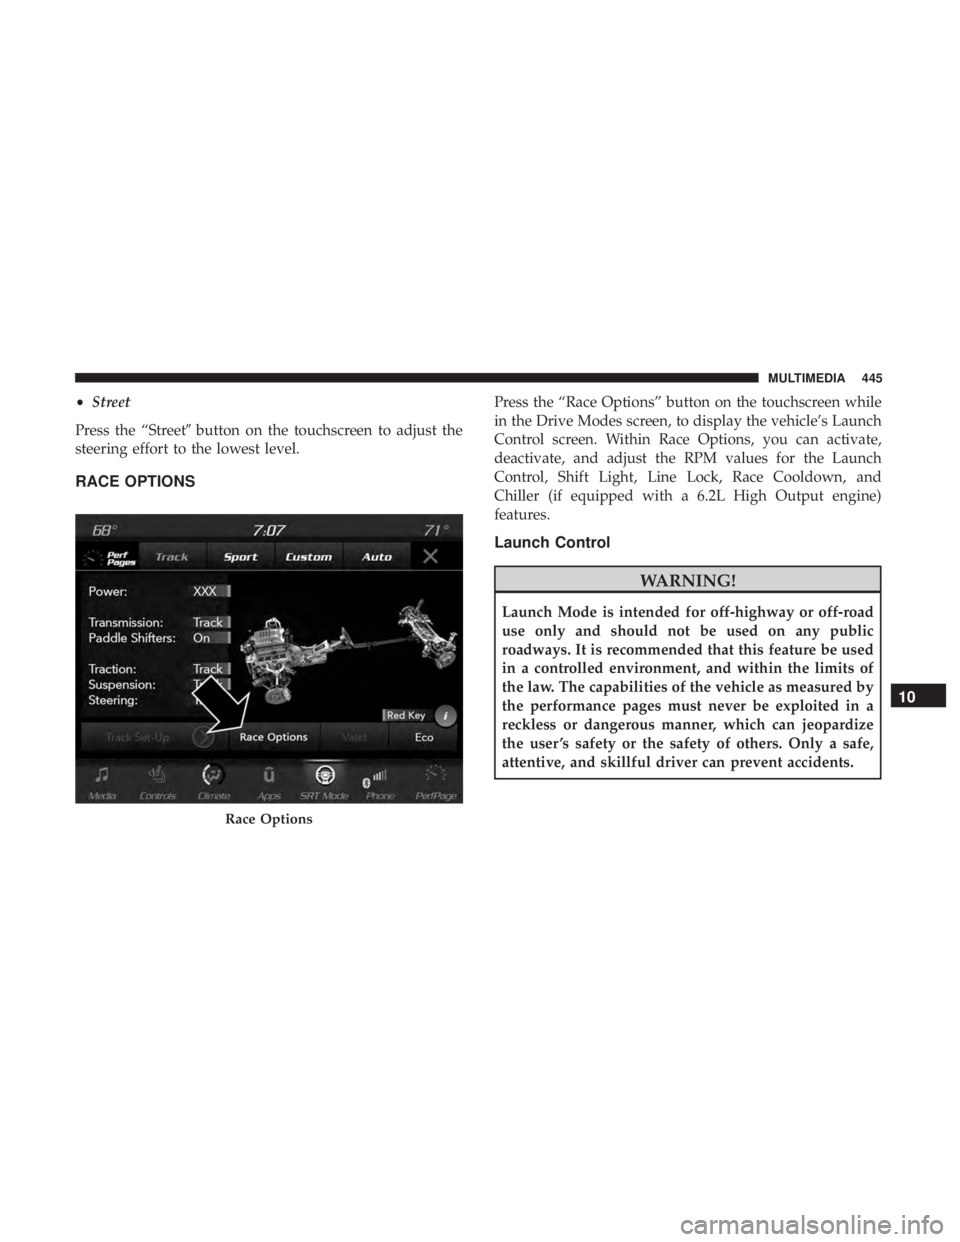
•Street
Press the “Street� button on the touchscreen to adjust the
steering effort to the lowest level.
RACE OPTIONS
Press the “Race Options” button on the touchscreen while
in the Drive Modes screen, to display the vehicle’s Launch
Control screen. Within Race Options, you can activate,
deactivate, and adjust the RPM values for the Launch
Control, Shift Light, Line Lock, Race Cooldown, and
Chiller (if equipped with a 6.2L High Output engine)
features.
Launch Control
WARNING!
Launch Mode is intended for off-highway or off-road
use only and should not be used on any public
roadways. It is recommended that this feature be used
in a controlled environment, and within the limits of
the law. The capabilities of the vehicle as measured by
the performance pages must never be exploited in a
reckless or dangerous manner, which can jeopardize
the user ’s safety or the safety of others. Only a safe,
attentive, and skillful driver can prevent accidents.
Race Options
10
MULTIMEDIA 445
Page 450 of 496
Shift Light
To actuate the Shift Light feature, press the “Shift Light”
button on the touchscreen, and then press the “Shift Light
On” button on the touchscreen. Activation is shown on the
instrument cluster display. Pressing the “Shift Light RPM
Set-Up” button on the touchscreen will take you to the
Shift Light RPM Set-Up screen.NOTE:
The only time the shift light comes on, is when the
shifter is placed into Sport Mode. It will not work with
paddle shifters.
The Shift Light RPM Set-Up allows you to set the shift light
to actuate for gears 1, 2, 3, 4, and 5-8. By pressing and
releasing the up/down arrow buttons on the touchscreen
above and below each listed gear, the RPM values will
Shift Light
Shift Light RPM Set-Up
448 MULTIMEDIA
Page 451 of 496
 and 2000–6250
(6.2L High Output). The Shift")
change in increments of 250 RPM. Pressing and holding the
arrows will change the RPM values in increments of 500
RPM, ranging from 2000–6000 RPM (6.2L) and 2000–6250
(6.2L High Output). The Shift Light setup screen may only
be accessed if the feature is enabled. Press the “Reset to
Factory Default” button on the touchscreen to change back
to factory settings, or press the “Shift Light Off” button on
the touchscreen to turn the system off completely.
Race Cooldown — If Equipped
Race Cooldown is a selectable After-Run Cooling Feature.
Race Cooldown is a feature activated by selecting the Race
Cooldown button under Race Options within the Drive
Modes pages.
To enable this feature, the vehicle will check to ensure the
engine is off, the hood is closed, the status of the battery
and system are good, and determine if cooling is required.
After making a pass down the drag strip, this feature helps
cool the car after the engine has been shut down. The
radiator fan and low temperature radiator coolant pump
remain on after engine shutdown for a period up to 10
minutes or until target temperature is reached.A graph in the radio can show the resulting intercooler
coolant temperature in real time while the vehicle ignition
is in run position with the engine off.
NOTE: Race Cooldown feature (After-Run) will only come
on with engine off. The temperature will display with
engine running also, but After-Run Cooling will not be
functioning.
Race Cooldown
10
MULTIMEDIA 449
Page 461 of 496
Media
Uconnect offers connections via USB, Bluetooth and auxil-
iary ports (if equipped). Voice operation is only available
for connected USB and AUX devices.
Push the VR button
. After the beep, say one of the
following commands and follow the prompts to switch
your media source or choose an artist.
• “Change source to Bluetooth”
• “Change source to AUX”
• “Change source to USB”
• “Play artist Beethoven”; “ Play albumGreatest Hits”;
“ Play song Moonlight Sonata”; “ Play genreClassical”
TIP: Press the Browse button on the touchscreen to see all
of the music on your USB device. Your Voice Command
must match exactlyhow the artist, album, song and genre
information is displayed.
Phone
Making and answering hands-free phone calls is easy with
Uconnect. When the Phonebook button is illuminated on
your touchscreen, your system is ready. Check
UconnectPhone.com for mobile phone compatibility and
pairing instructions.
Uconnect 4C/4C NAV Media10
MULTIMEDIA 459


. Voice operation is only available
for connected USB and AUX devices.
Push the VR button
. After the beep, say")