2019 DODGE CHARGER instrument panel
[x] Cancel search: instrument panelPage 200 of 560
Rollover Events
Side Air Bags are designed to activate in certain rollover
events. The ORC determines whether the deployment of
the Side Air Bags in a particular rollover event is appro-
priate, based on the severity and type of collision. Vehicle
damage by itself is not a good indicator of whether or not
Side Air Bags should have deployed.
The Side Air Bags will not deploy in all rollover events. The
rollover sensing system determines if a rollover event may
be in progress and whether deployment is appropriate. In
the event the vehicle experiences a rollover or near rollover
event, and deployment of the Side Air Bags is appropriate,
the rollover sensing system will also deploy the seat belt
pretensioners on both sides of the vehicle.
The SABICs may help reduce the risk of partial or complete
ejection of vehicle occupants through side windows in
certain rollover or side impact events.Air Bag System Components
NOTE:The Occupant Restraint Controller (ORC) monitors
the internal circuits and interconnecting wiring associated
with electrical Air Bag System Components listed below:
• Occupant Restraint Controller (ORC)
• Air Bag Warning Light
•Steering Wheel and Column
• Instrument Panel
• Knee Impact Bolsters
• Driver and Front Passenger Air Bags
• Seat Belt Buckle Switch
• Supplemental Side Air Bags
• Supplemental Knee Air Bags
• Front and Side Impact Sensors
• Seat Belt Pretensioners
• Seat Track Position Sensors
198 SAFETY
Page 203 of 560
Enhanced Accident Response System Reset
Procedure
In order to reset the Enhanced Accident Response System
functions after an event, the ignition switch must be
changed from ignition START or ON/RUN to ignition OFF.
Carefully check the vehicle for fuel leaks in the engine
compartment and on the ground near the engine compart-
ment and fuel tank before resetting the system and starting
the engine.
Maintaining Your Air Bag System
WARNING!
•Modifications to any part of the air bag system could
cause it to fail when you need it. You could be
injured if the air bag system is not there to protect
you. Do not modify the components or wiring, in-
cluding adding any kind of badges or stickers to the
steering wheel hub trim cover or the upper passenger
side of the instrument panel. Do not modify the front
bumper, vehicle body structure, or add aftermarket
side steps or running boards.
(Continued)
WARNING! (Continued)
•It is dangerous to try to repair any part of the air bag
system yourself. Be sure to tell anyone who works on
your vehicle that it has an air bag system.
• Do not attempt to modify any part of your air bag
system. The air bag may inflate accidentally or may
not function properly if modifications are made.
Take your vehicle to an authorized dealer for any air
bag system service. If your seat, including your trim
cover and cushion, needs to be serviced in any way
(including removal or loosening/tightening of seat
attachment bolts), take the vehicle to an authorized
dealer. Only manufacturer approved seat accessories
may be used. If it is necessary to modify the air bag
system for persons with disabilities, contact an au-
thorized dealer.
Event Data Recorder (EDR)
This vehicle is equipped with an event data recorder
(EDR). The main purpose of an EDR is to record, in certain
crash or near crash-like situations, such as an air bag
deployment or hitting a road obstacle, data that will assist
in understanding how a vehicle’s systems performed. The
5
SAFETY 201
Page 225 of 560
Lights
Have someone observe the operation of brake lights and
exterior lights while you work the controls. Check turn
signal and high beam indicator lights on the instrument
panel.
Door Latches
Check for proper closing, latching, and locking.
Fluid Leaks
Check area under the vehicle after overnight parking for
fuel, coolant, oil, or other fluid leaks. Also, if gasoline
fumes are detected or if fuel, or brake fluid leaks are
suspected. The cause should be located and corrected
immediately.
5
SAFETY 223
Page 237 of 560
100 to 300 miles (161 to 483 km):
•Press the accelerator pedal slowly and not more than
halfway to avoid rapid acceleration in lower gears (1st to
3rd gears).
• Avoid aggressive braking.
• Drive with the engine speed less than 5,000 RPM.
• Maintain vehicle speed below 70 mph (112 km/h) and
observe local speed limits.
300 to 500 miles (483 to 805 km):
• Exercise the full engine rpm range, shifting manually
(paddles or gear shift) at higher rpms when possible.
• Do not perform sustained operation with the accelerator
pedal at wide open throttle.
• Maintain vehicle speed below 85 mph (136 km/h) and
observe local speed limits.
For the first 1500 miles (2414 km):
• Do not participate in track events, sport driving schools,
or similar activities during the first 1500 miles (2414 km).
NOTE: Check engine oil with every refueling and add if
necessary. Oil and fuel consumption may be higher
through the first oil change interval.PARKING BRAKE
Before leaving the vehicle, make sure that the parking
brake is fully applied and place the gear selector in the
PARK position.
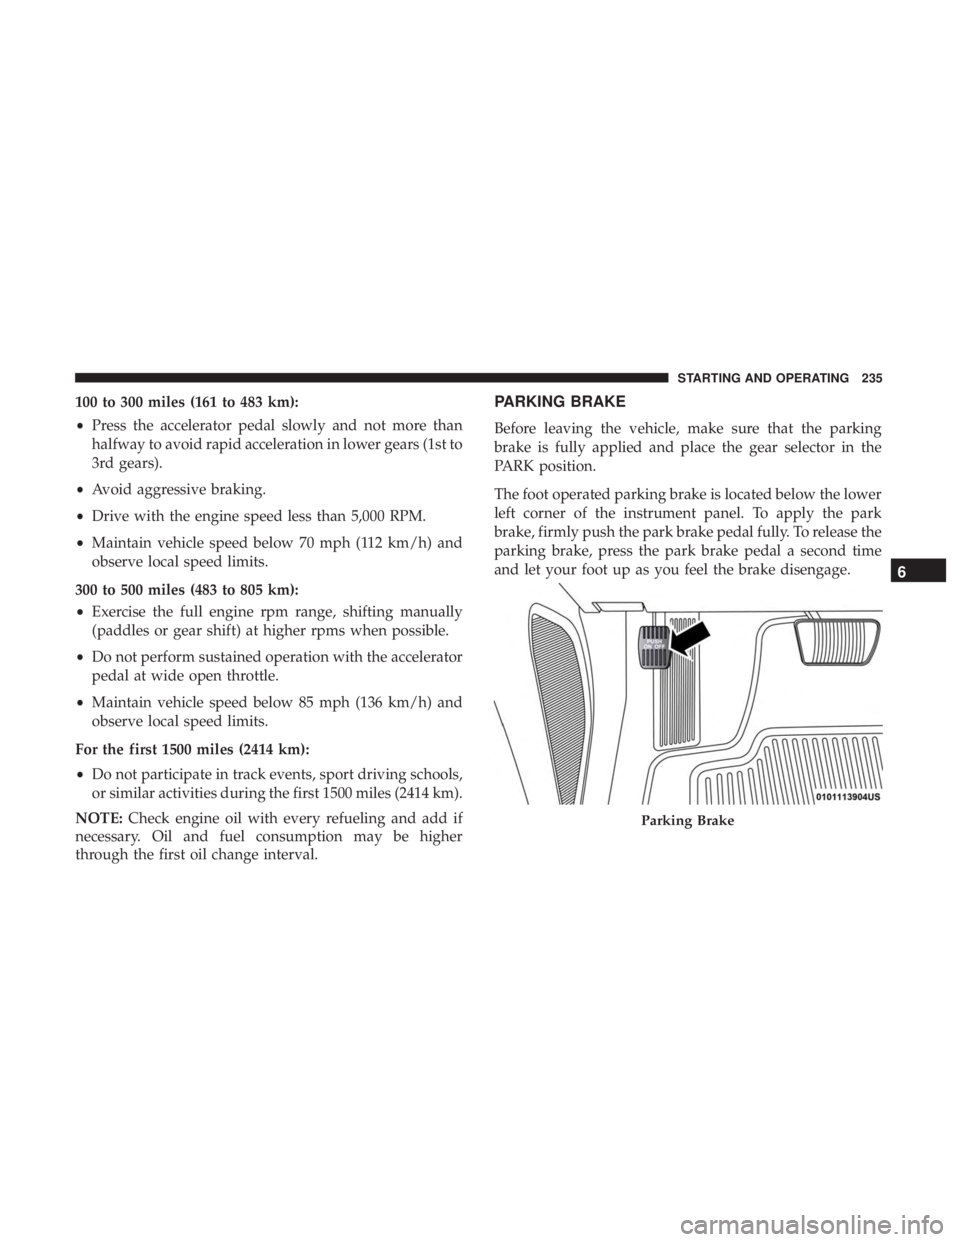
The foot operated parking brake is located below the lower
left corner of the instrument panel. To apply the park
brake, firmly push the park brake pedal fully. To release the
parking brake, press the park brake pedal a second time
and let your foot up as you feel the brake disengage.
Parking Brake
6
STARTING AND OPERATING 235
Page 251 of 560

SPORT MODE — WITHOUT PERFORMANCE
CONTROL
Your vehicle is equipped with a Sport Mode feature. This
mode is a configuration set up for typical enthusiast
driving. The engine, transmission, and steering systems are
all set to their SPORT settings. Sport Mode will provide
improved throttle response and modified shifting for an
enhanced driving experience, as well the greatest amount
of steering feel. This mode may be activated and deacti-
vated by pushing the Sport button on the instrument panel
switch bank.
For vehicles equipped with Drive Modes or a “SUPER
TRACK PACK” button, refer to “Uconnect Settings” in
“Multimedia” for further information.
FUEL SAVER TECHNOLOGY 5.7L AND 6.4L ONLY —
IF EQUIPPED
This feature offers improved fuel economy by shutting off
four of the engine’s eight cylinders during light load and
cruise conditions. The system is automatic with no driver
inputs or additional driving skills required.
NOTE:This system may take some time to return to full
functionality after a battery disconnect.
POWER STEERING
The electric power steering system will give you good
vehicle response and increased ease of maneuverability in
tight spaces. The system will vary its assist to provide light
efforts while parking and good feel while driving. If the
electric steering system experiences a fault that prevents it
from providing assist, you will still have the ability to steer
the vehicle manually.
WARNING!
Continued operation with reduced assist could pose a
safety risk to yourself and others. Service should be
obtained as soon as possible.
Alternate electric power steering efforts can be selected
through the Uconnect System. Refer to ”Customer Pro-
grammable Features” within “Uconnect Settings” in “Mul-
timedia” for further information.
If the Electric Power Steering warning icon is
displayed and the “SERVICE POWER STEERING”
or the “POWER STEERING ASSIST OFF – SER-
VICE SYSTEM” message is displayed within the
instrument cluster display, this indicates the vehicle needs to
6
STARTING AND OPERATING 249
Page 252 of 560
be taken to the dealer for service. Refer to “Warning Lights
And Messages” in “Getting To Know Your Instrument Panel”
for further information.
NOTE:
•Even if the power steering assistance is no longer
operational, it is still possible to steer the vehicle. Under
these conditions there will be a substantial increase in
steering effort, especially at low speeds and during
parking maneuvers.
• If the condition persists, see your authorized dealer for
service.
If the Steering icon is displayed and the “POWER STEER-
ING SYSTEM OVER TEMP” message is displayed on the
instrument cluster screen, they indicate that extreme steer-
ing maneuvers may have occurred which caused an over
temperature condition in the power steering system. Once
driving conditions are safe, pull over and let the vehicle
idle for a few moments until the icon and message turn off.
SPEED CONTROL — IF EQUIPPED
When engaged, the Speed Control takes over accelerator
operations at speeds greater than 25 mph (40 km/h) or
20 mph (32 km/h), depending on engine size and axle ratio.
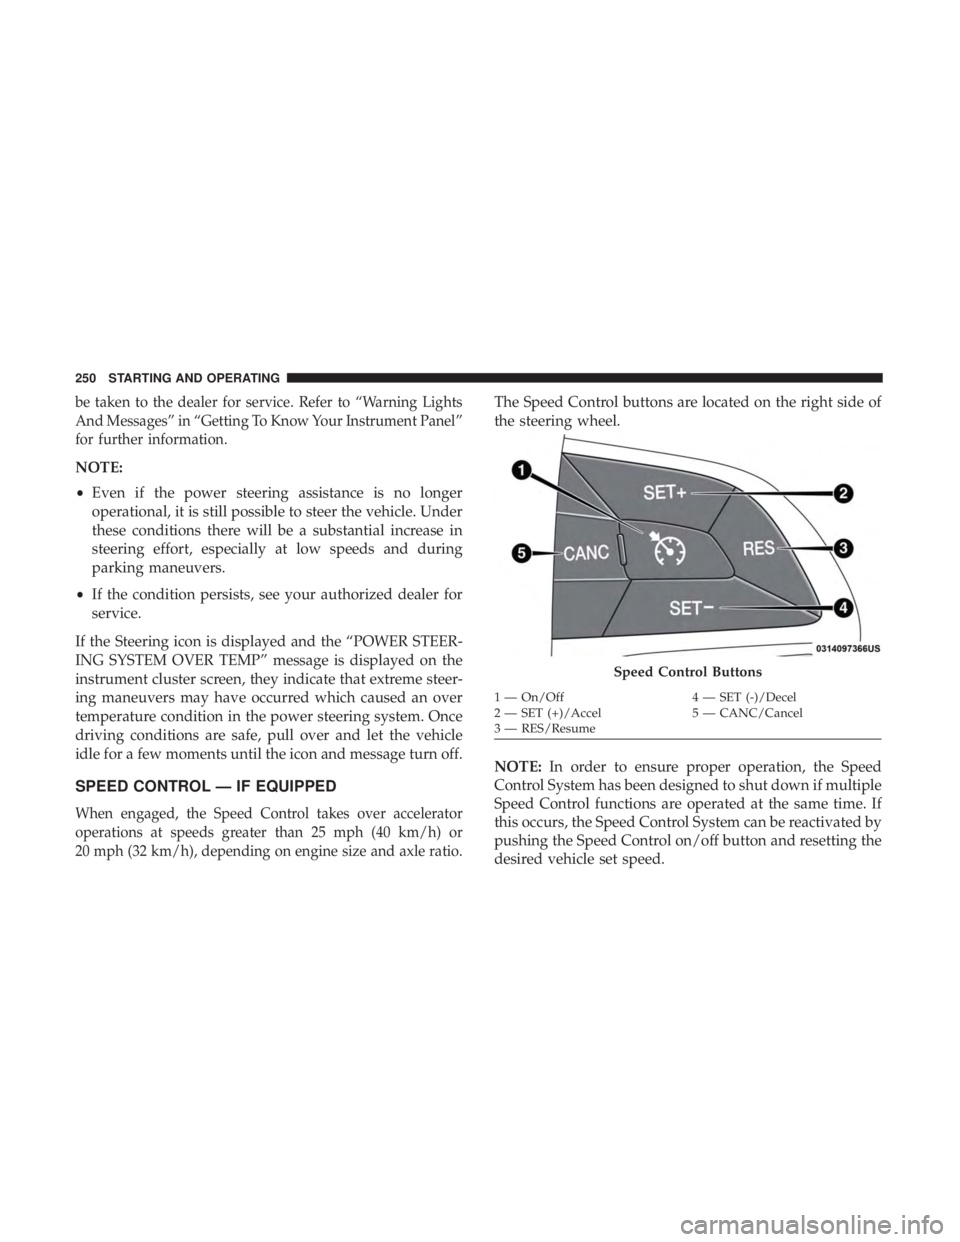
The Speed Control buttons are located on the right side of
the steering wheel.
NOTE: In order to ensure proper operation, the Speed
Control System has been designed to shut down if multiple
Speed Control functions are operated at the same time. If
this occurs, the Speed Control System can be reactivated by
pushing the Speed Control on/off button and resetting the
desired vehicle set speed.
Speed Control Buttons
1 — On/Off 4 — SET (-)/Decel
2 — SET (+)/Accel 5 — CANC/Cancel
3 — RES/Resume
250 STARTING AND OPERATING
Page 253 of 560

To Activate
Push the on/off button to activate the Speed Control.
“CRUISE CONTROL READY” will appear in the instru-
ment cluster display to indicate the Speed Control is on. To
turn the system off, push the on/off button a second time.
“CRUISE CONTROL OFF” will appear in the instrument
cluster display to indicate the Speed Control is off. The
system should be turned off when not in use.
WARNING!
Leaving the Speed Control system on when not in use
is dangerous. You could accidentally set the system or
cause it to go faster than you want. You could lose
control and have an accident. Always leave the system
OFF when you are not using it.
To Set A Desired Speed
Turn the Speed Control on. When the vehicle has reached
the desired speed, push the SET (+) or SET (-) button and
release. Release the accelerator and the vehicle will operate
at the selected speed. Once a speed has been set, a message
“CRUISE CONTROL SET TO MPH (km/h)” will appearindicating what speed was set. A cruise indicator lamp,
along with set speed will also appear and stay on in the
instrument cluster when the speed is set.
To Vary The Speed Setting
To Increase Speed
When the Speed Control is set, you can increase speed by
pushing the SET
(+)button.
The driver’s preferred units can be selected through the
instrument cluster display. Refer to “Getting To Know Your
Instrument Panel” for more information. The speed incre-
ment shown is dependant on the chosen speed unit of U.S.
(mph) or Metric (km/h):
U.S. Speed (mph)
• Pushing the SET (+)button once will result ina1mph
increase in set speed. Each subsequent tap of the button
results in an increase of 1 mph.
• If the button is continually pushed, the set speed will
continue to increase until the button is released, then the
new set speed will be established.
6
STARTING AND OPERATING 251
Page 254 of 560
Metric Speed (km/h)
•Pushing the SET (+)button once will result in a 1 km/h
increase in set speed. Each subsequent tap of the button
results in an increase of 1 km/h.
• If the button is continually pushed, the set speed will
continue to increase until the button is released, then the
new set speed will be established.
To Decrease Speed
When the Speed Control is set, you can decrease speed by
pushing the SET (-)button.
The driver’s preferred units can be selected through the
instrument cluster display. Refer to “Getting To Know Your
Instrument Panel” for more information. The speed decre-
ment shown is dependant on the chosen speed unit of U.S.
(mph) or Metric (km/h):
U.S. Speed (mph)
• Pushing the SET (-)button once will result in a 1 mph
decrease in set speed. Each subsequent tap of the button
results in a decrease of 1 mph.
• If the button is continually pushed, the set speed will
continue to decrease until the button is released, then the
new set speed will be established. Metric Speed (km/h)
•
Pushing the SET (-)button once will result in a 1 km/h
decrease in set speed. Each subsequent tap of the button
results in a decrease of 1 km/h.
• If the button is continually pushed, the set speed will
continue to decrease until the button is released, then the
new set speed will be established.
To Accelerate For Passing
Press the accelerator as you would normally. When the
pedal is released, the vehicle will return to the set speed.
Using Speed Control On Hills
The transmission may downshift on hills to maintain the
vehicle set speed.
NOTE: The Speed Control system maintains speed up and
down hills. A slight speed change on moderate hills is
normal.
On steep hills, a greater speed loss or gain may occur so it
may be preferable to drive without Speed Control.
252 STARTING AND OPERATING