Page 290 of 560
2. Open the fuel filler door.
NOTE:In certain cold conditions, ice may prevent the fuel
door from opening. If this occurs, lightly push on the fuel
door to break the ice buildup and re-release the fuel door
using the inside release button. Do not pry on the door. 3. There is no fuel filler cap. A flapper door inside the pipe
seals the system.
4. Insert the fuel nozzle fully into the filler pipe – the nozzle opens and holds the flapper door while refuel-
ing.
NOTE: Only the correct size nozzle opens the latches
allowing the flapper door to open.
5. Fill the vehicle with fuel – when the fuel nozzle “clicks” or shuts off the fuel tank is full.
6. Maintain nozzle in filler for 5 seconds to allow nozzle to drain.
7. Remove the fuel nozzle and close the fuel door.
NOTE: A funnel is provided (located in the trunk in the
spare tire area) to open the flapper door to allow for
emergency refueling with a gas can.
Fuel Filler Door
288 STARTING AND OPERATING
Page 291 of 560
WARNING!
•Never have any smoking materials lit in or near the
vehicle when the fuel door is open or the tank is
being filled.
(Continued)
WARNING! (Continued)
•Never add fuel when the engine is running. This is
in violation of most state and federal fire regulations
and may cause the “Malfunction Indicator Light” to
turn on.
• A fire may result if fuel is pumped into a portable
container that is inside of a vehicle. You could be
burned. Always place fuel containers on the ground
while filling.
CAUTION!
To avoid fuel spillage and overfilling, do not “top off”
the fuel tank after filling.Fuel Funnel
6
STARTING AND OPERATING 289
Page 292 of 560
Emergency Fuel Filler Door Release
If you are unable to open the fuel filler door, use the fuel
filler door emergency release located in the trunk.
Follow the steps below to open the fuel door in case of an
emergency:
1. Open the trunk.
2. Remove the access cover (located on the left side innertrim panel). 3. Pull the release cable.
Access Cover
Release Cable
290 STARTING AND OPERATING
Page 303 of 560
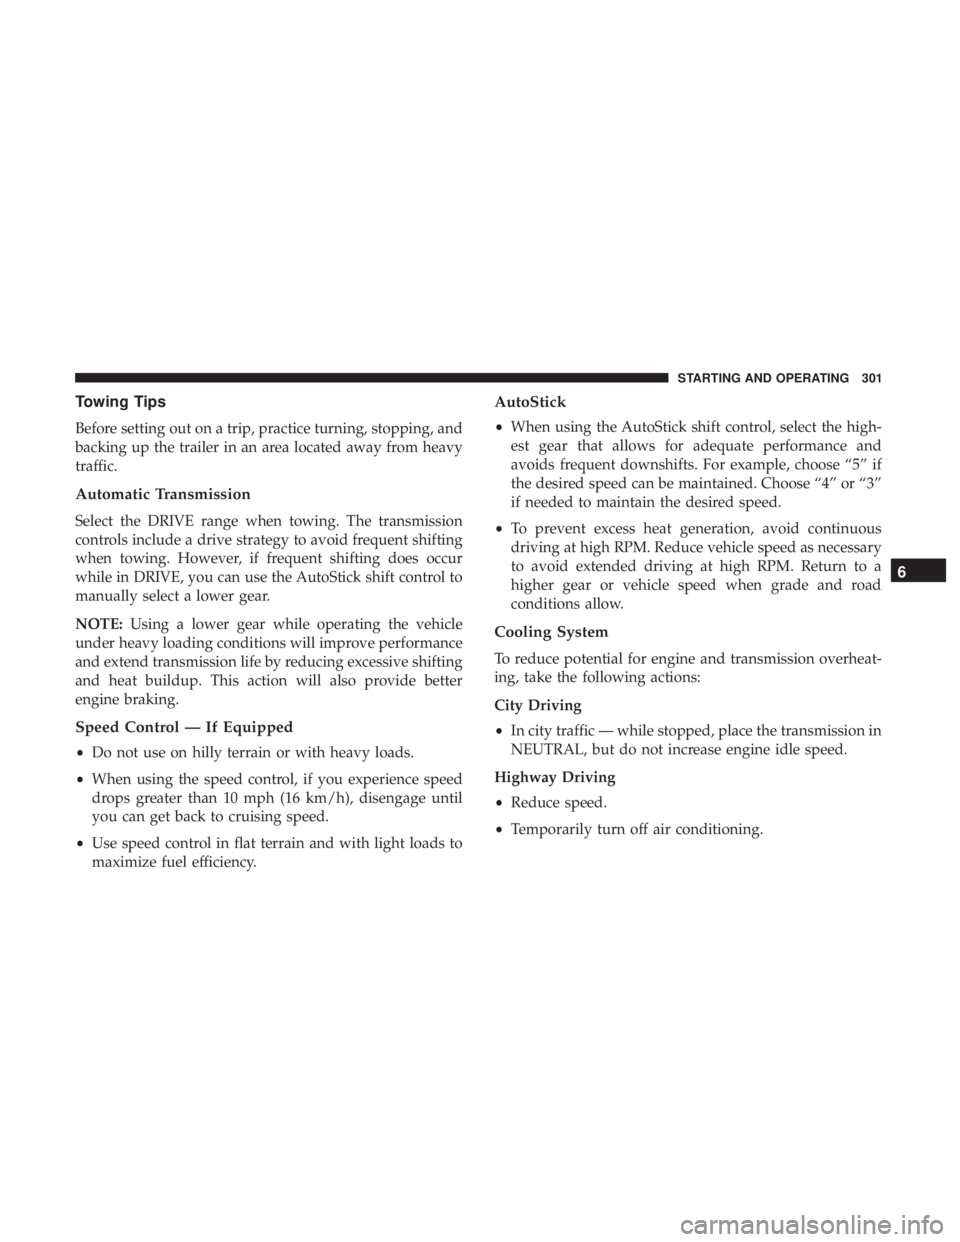
Towing Tips
Before setting out on a trip, practice turning, stopping, and
backing up the trailer in an area located away from heavy
traffic.
Automatic Transmission
Select the DRIVE range when towing. The transmission
controls include a drive strategy to avoid frequent shifting
when towing. However, if frequent shifting does occur
while in DRIVE, you can use the AutoStick shift control to
manually select a lower gear.
NOTE:Using a lower gear while operating the vehicle
under heavy loading conditions will improve performance
and extend transmission life by reducing excessive shifting
and heat buildup. This action will also provide better
engine braking.
Speed Control — If Equipped
• Do not use on hilly terrain or with heavy loads.
• When using the speed control, if you experience speed
drops greater than 10 mph (16 km/h), disengage until
you can get back to cruising speed.
• Use speed control in flat terrain and with light loads to
maximize fuel efficiency.
AutoStick
• When using the AutoStick shift control, select the high-
est gear that allows for adequate performance and
avoids frequent downshifts. For example, choose “5” if
the desired speed can be maintained. Choose “4” or “3”
if needed to maintain the desired speed.
• To prevent excess heat generation, avoid continuous
driving at high RPM. Reduce vehicle speed as necessary
to avoid extended driving at high RPM. Return to a
higher gear or vehicle speed when grade and road
conditions allow.
Cooling System
To reduce potential for engine and transmission overheat-
ing, take the following actions:
City Driving
• In city traffic — while stopped, place the transmission in
NEUTRAL, but do not increase engine idle speed.
Highway Driving
• Reduce speed.
• Temporarily turn off air conditioning.
6
STARTING AND OPERATING 301
Page 324 of 560
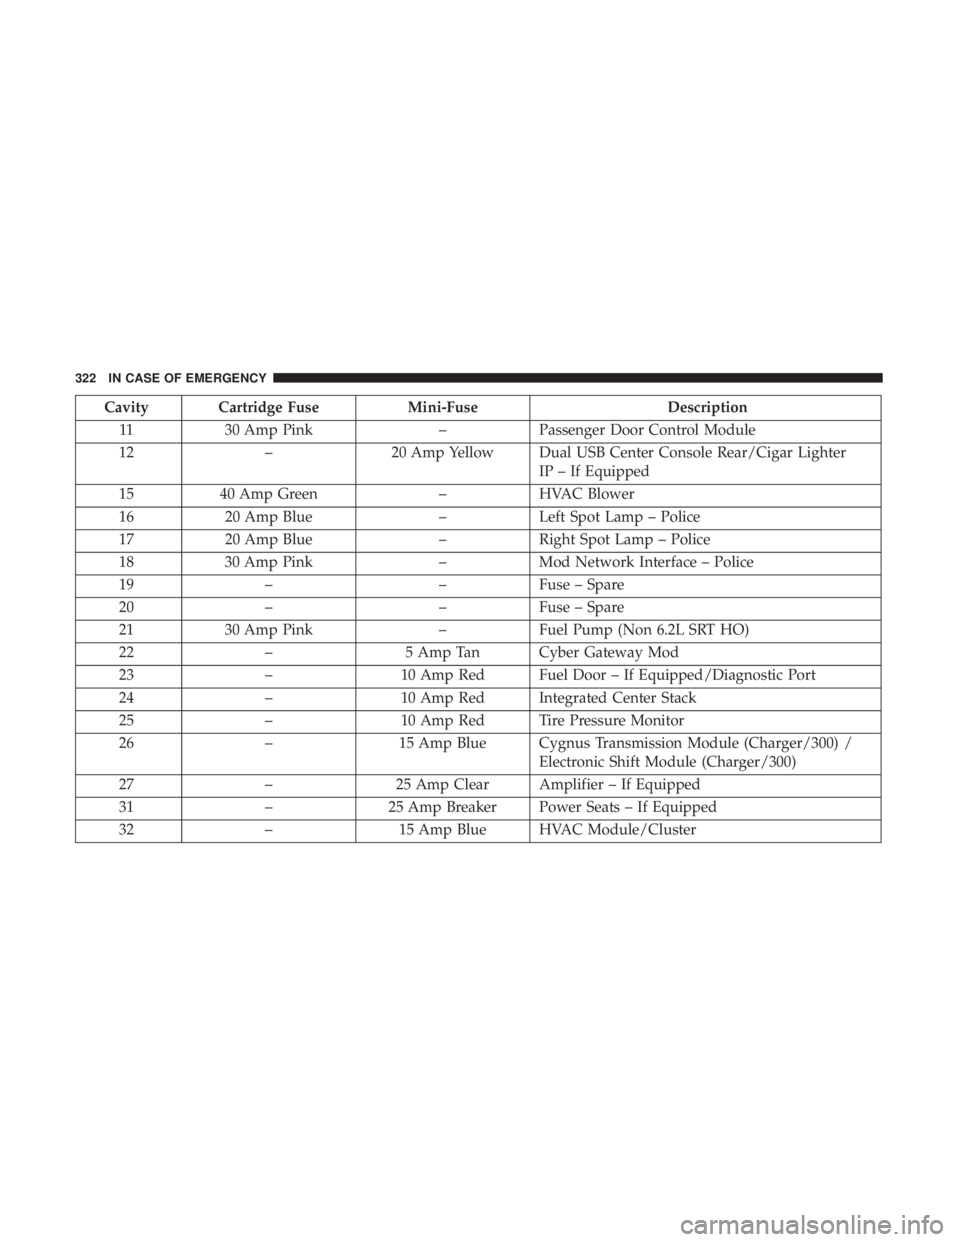
Cavity Cartridge FuseMini-FuseDescription
11 30 Amp Pink –Passenger Door Control Module
12 –20 Amp Yellow Dual USB Center Console Rear/Cigar Lighter
IP – If Equipped
15 40 Amp Green –HVAC Blower
16 20 Amp Blue –Left Spot Lamp – Police
17 20 Amp Blue –Right Spot Lamp – Police
18 30 Amp Pink –Mod Network Interface – Police
19 – –Fuse – Spare
20 – –Fuse – Spare
21 30 Amp Pink –Fuel Pump (Non 6.2L SRT HO)
22 –5 Amp Tan Cyber Gateway Mod
23 –10 Amp Red Fuel Door – If Equipped/Diagnostic Port
24 –10 Amp Red Integrated Center Stack
25 –10 Amp Red Tire Pressure Monitor
26 –15 Amp Blue Cygnus Transmission Module (Charger/300) /
Electronic Shift Module (Charger/300)
27 –25 Amp Clear Amplifier – If Equipped
31 –25 Amp Breaker Power Seats – If Equipped
32 –15 Amp Blue HVAC Module/Cluster
322 IN CASE OF EMERGENCY
Page 325 of 560
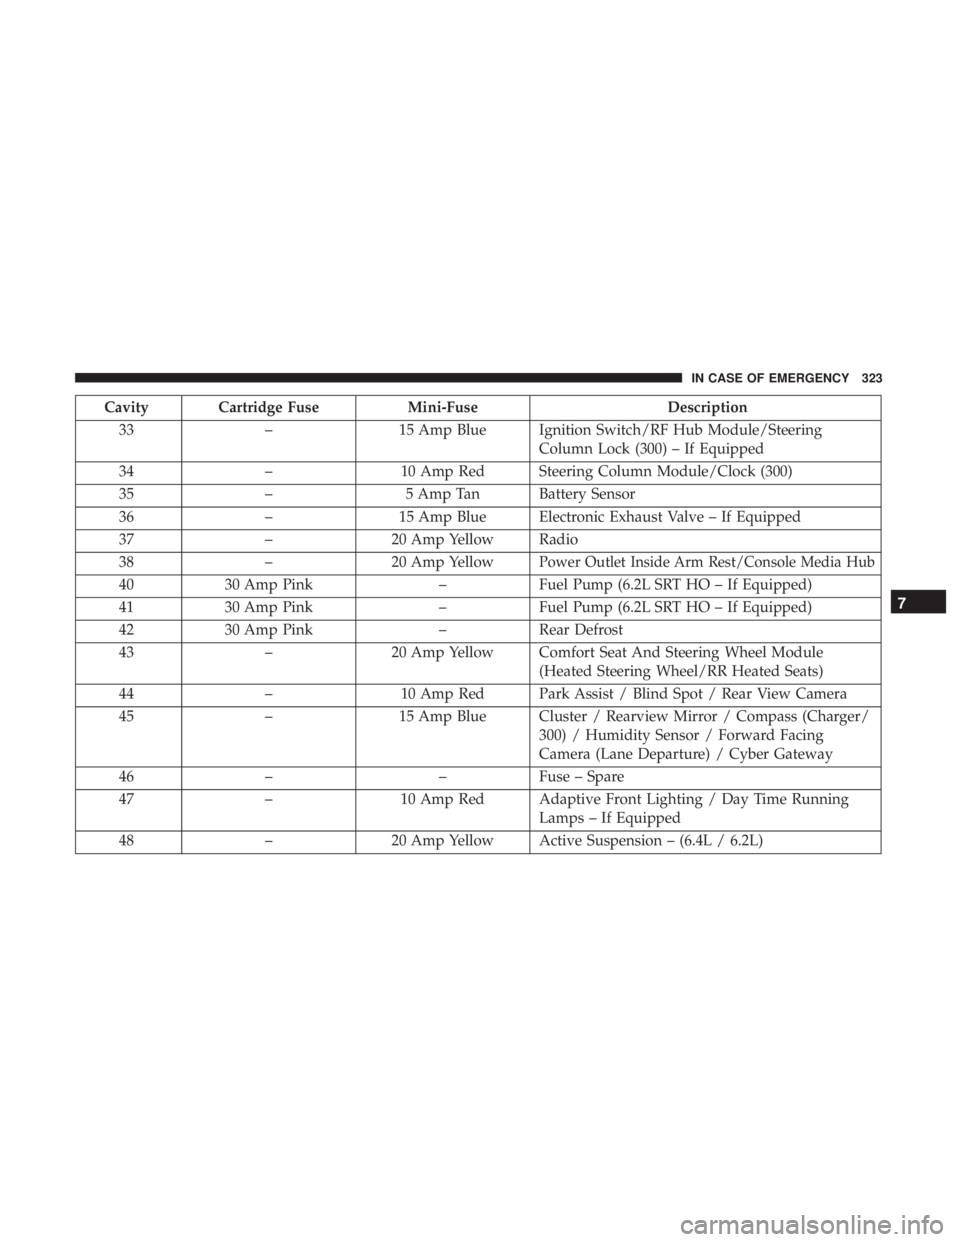
Cavity Cartridge FuseMini-FuseDescription
33 –15 Amp Blue Ignition Switch/RF Hub Module/Steering
Column Lock (300) – If Equipped
34 –10 Amp Red Steering Column Module/Clock (300)
35 –5 Amp Tan Battery Sensor
36 –15 Amp Blue Electronic Exhaust Valve – If Equipped
37 –20 Amp Yellow Radio
38 –20 Amp Yellow
Power Outlet Inside Arm Rest/Console Media Hub
4030 Amp Pink –Fuel Pump (6.2L SRT HO – If Equipped)
41 30 Amp Pink –Fuel Pump (6.2L SRT HO – If Equipped)
42 30 Amp Pink –Rear Defrost
43 –20 Amp Yellow Comfort Seat And Steering Wheel Module
(Heated Steering Wheel/RR Heated Seats)
44 –10 Amp Red Park Assist / Blind Spot / Rear View Camera
45 –15 Amp Blue Cluster / Rearview Mirror / Compass (Charger/
300) / Humidity Sensor / Forward Facing
Camera (Lane Departure) / Cyber Gateway
46 – –Fuse – Spare
47 –10 Amp Red Adaptive Front Lighting / Day Time Running
Lamps – If Equipped
48 –20 Amp Yellow Active Suspension – (6.4L / 6.2L)
7
IN CASE OF EMERGENCY 323
Page 363 of 560
SCHEDULED SERVICING
3.6L And 5.7L Engines
Your vehicle is equipped with an automatic oil change
indicator system. The oil change indicator system will
remind you that it is time to take your vehicle in for
scheduled maintenance.
Based on engine operation conditions, the oil change
indicator message will illuminate. This means that service
is required for your vehicle. Operating conditions such as
frequent short-trips, trailer tow, extremely hot or cold
ambient temperatures, and E85 fuel usage will influence
when the “Change Oil” or “Oil Change Required” message
is displayed. Severe Operating Conditions can cause the
change oil message to illuminate as early as 3,500 miles
(5,600 km) since last reset. Have your vehicle serviced as
soon as possible, within the next 500 miles (800 km).
The “Oil Change Required” message will be displayed in
the instrument cluster and a single chime will sound,
indicating that an oil change is necessary.
Your authorized dealer will reset the oil change indicator
message after completing the scheduled oil change. If a
scheduled oil change is performed by someone other than
your authorized dealer, the message can be reset by referring
to “Instrument Cluster Display” in “Getting To Know Your
Instrument Panel” for further information.
NOTE:Under no circumstances should oil change inter-
vals exceed 10,000 miles (16,000 km), 12 months or
350 hours of engine run time, whichever comes first. The
350 hours of engine run or idle time is generally only a
concern for fleet customers.
Severe Duty All Models
Change Engine Oil at 4,000 miles (6,500 km) or 350 hours of
engine run time if the vehicle is operated in a dusty and
off-road environment, or is operated predominantly at idle
or only very low engine RPM’s. This type of vehicle use is
considered Severe Duty.
8
SERVICING AND MAINTENANCE 361
Page 368 of 560
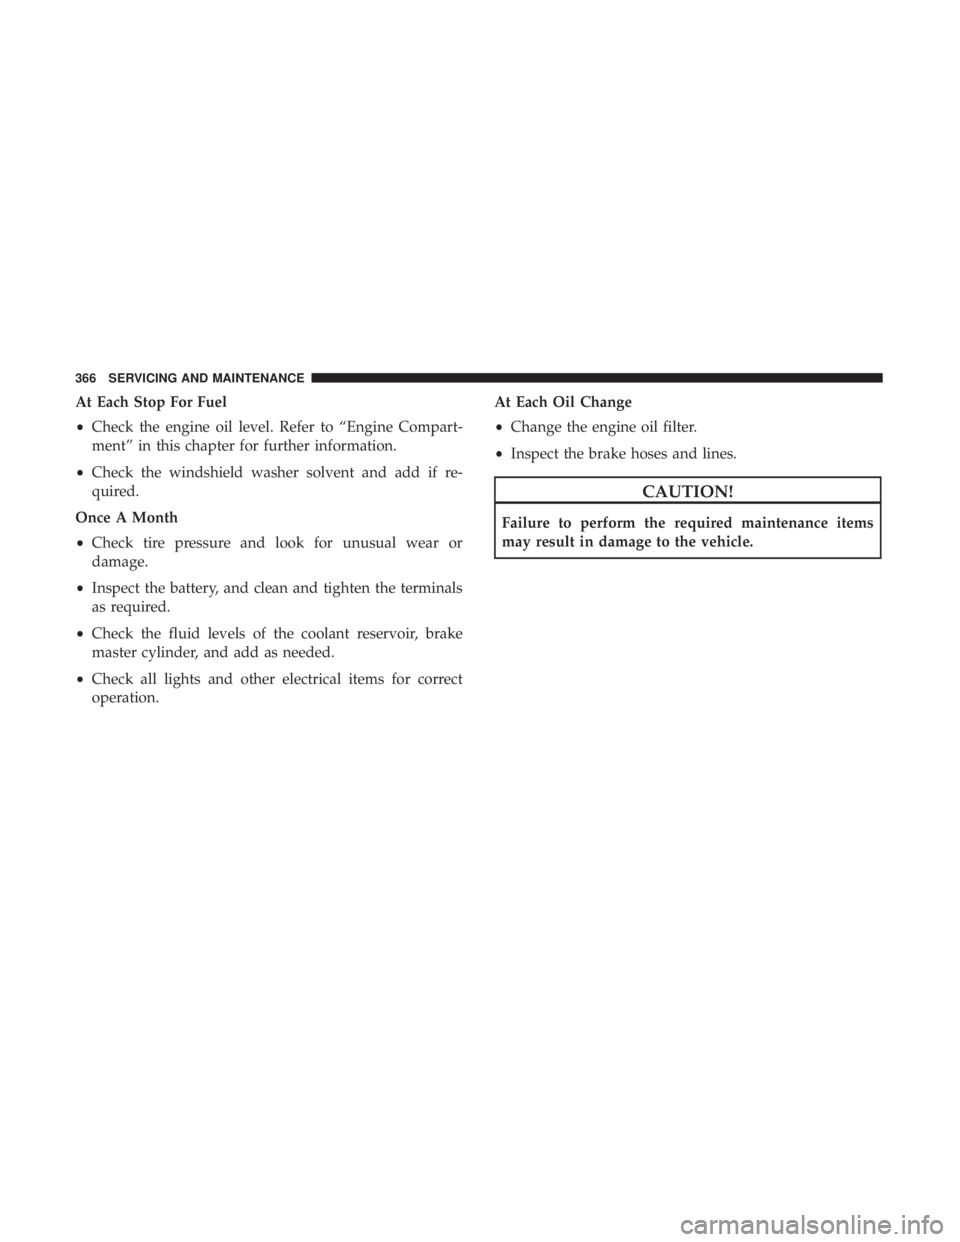
At Each Stop For Fuel
•Check the engine oil level. Refer to “Engine Compart-
ment” in this chapter for further information.
• Check the windshield washer solvent and add if re-
quired.
Once A Month
• Check tire pressure and look for unusual wear or
damage.
• Inspect the battery, and clean and tighten the terminals
as required.
• Check the fluid levels of the coolant reservoir, brake
master cylinder, and add as needed.
• Check all lights and other electrical items for correct
operation. At Each Oil Change
•
Change the engine oil filter.
• Inspect the brake hoses and lines.
CAUTION!
Failure to perform the required maintenance items
may result in damage to the vehicle.
366 SERVICING AND MAINTENANCE