Page 447 of 560

•Routinely check www.driveuconnect.com (U.S. Resi-
dents) or www.driveuconnect.ca (Canadian Residents)
to learn about available Uconnect software updates.
• Only connect and use trusted media devices (e.g.
personal mobile phones, USBs, CDs).
Privacy of any wireless and wired communications cannot
be assured. Third parties may unlawfully intercept infor-
mation and private communications without your consent.
For further information, refer to “Data Collection & Pri-
vacy” in your Uconnect Owner ’s Manual Supplement or
“Onboard Diagnostic System (OBD II) Cybersecurity” in
“Getting To Know Your Instrument Panel”.
UCONNECT SETTINGS
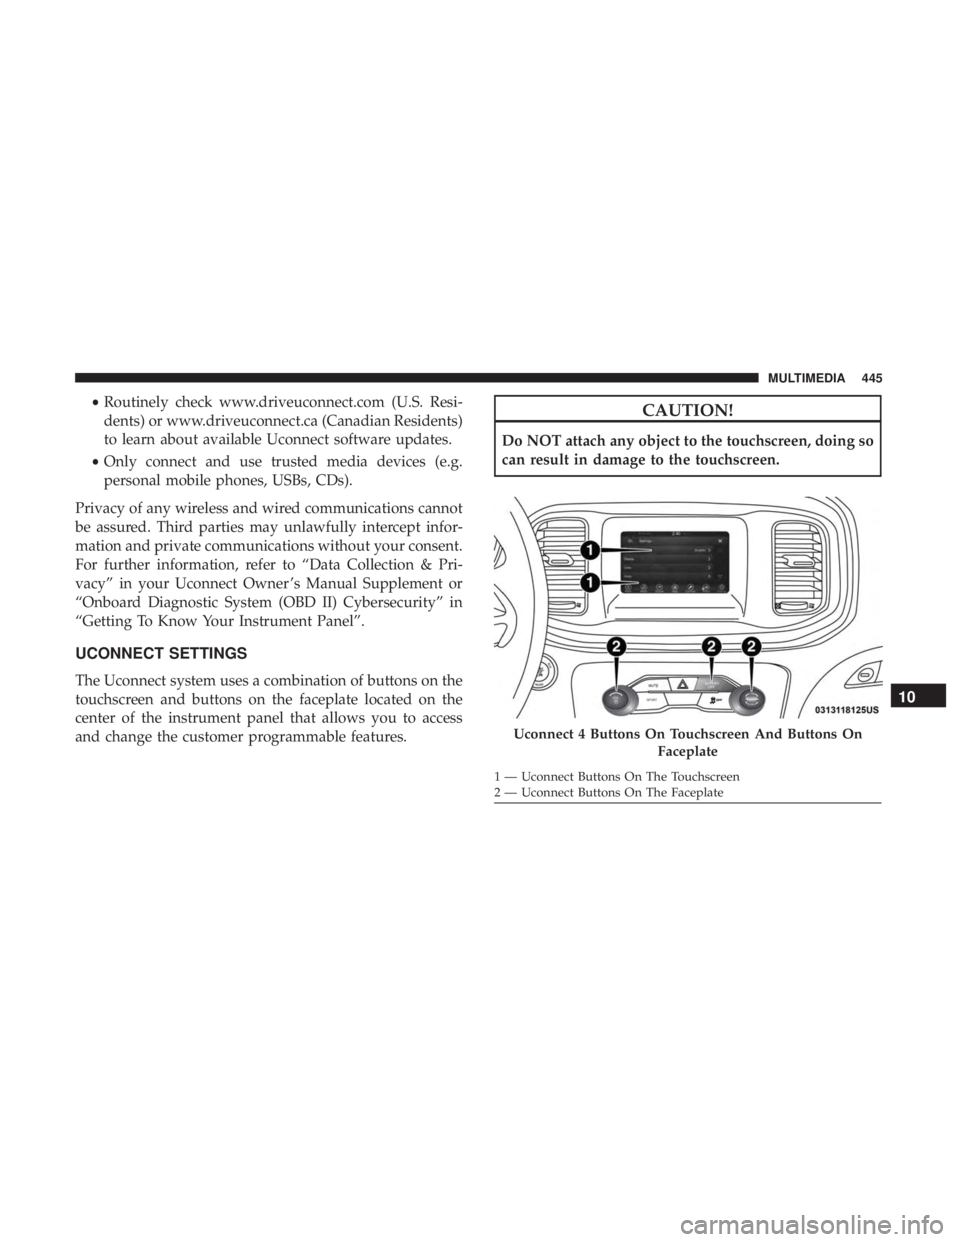
The Uconnect system uses a combination of buttons on the
touchscreen and buttons on the faceplate located on the
center of the instrument panel that allows you to access
and change the customer programmable features.
CAUTION!
Do NOT attach any object to the touchscreen, doing so
can result in damage to the touchscreen.
Uconnect 4 Buttons On Touchscreen And Buttons On Faceplate
1 — Uconnect Buttons On The Touchscreen
2 — Uconnect Buttons On The Faceplate
10
MULTIMEDIA 445
Page 460 of 560

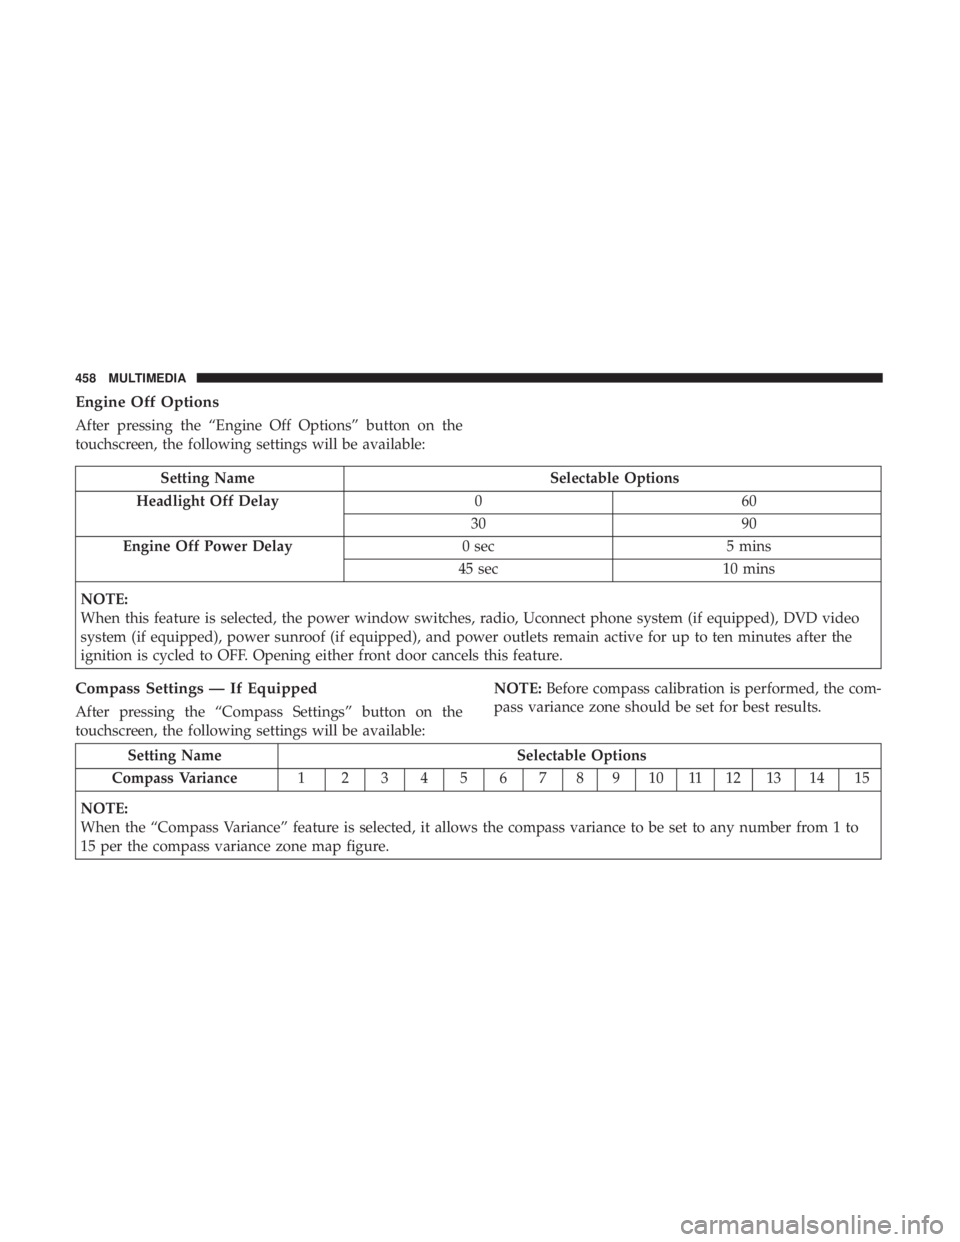
Engine Off Options
After pressing the “Engine Off Options” button on the
touchscreen, the following settings will be available:
Setting NameSelectable Options
Headlight Off Delay 060
30 90
Engine Off Power Delay 0 sec5 mins
45 sec 10 mins
NOTE:
When this feature is selected, the power window switches, radio, Uconnect phone system (if equipped), DVD video
system (if equipped), power sunroof (if equipped), and power outlets remain active for up to ten minutes after the
ignition is cycled to OFF. Opening either front door cancels this feature.
Compass Settings — If Equipped
After pressing the “Compass Settings” button on the
touchscreen, the following settings will be available: NOTE:
Before compass calibration is performed, the com-
pass variance zone should be set for best results.
Setting Name Selectable Options
Compass Variance 1 23456789101112131415
NOTE:
When the “Compass Variance” feature is selected, it allows the compass variance to be set to any number from 1 to
15 per the compass variance zone map figure.
458 MULTIMEDIA
Page 462 of 560

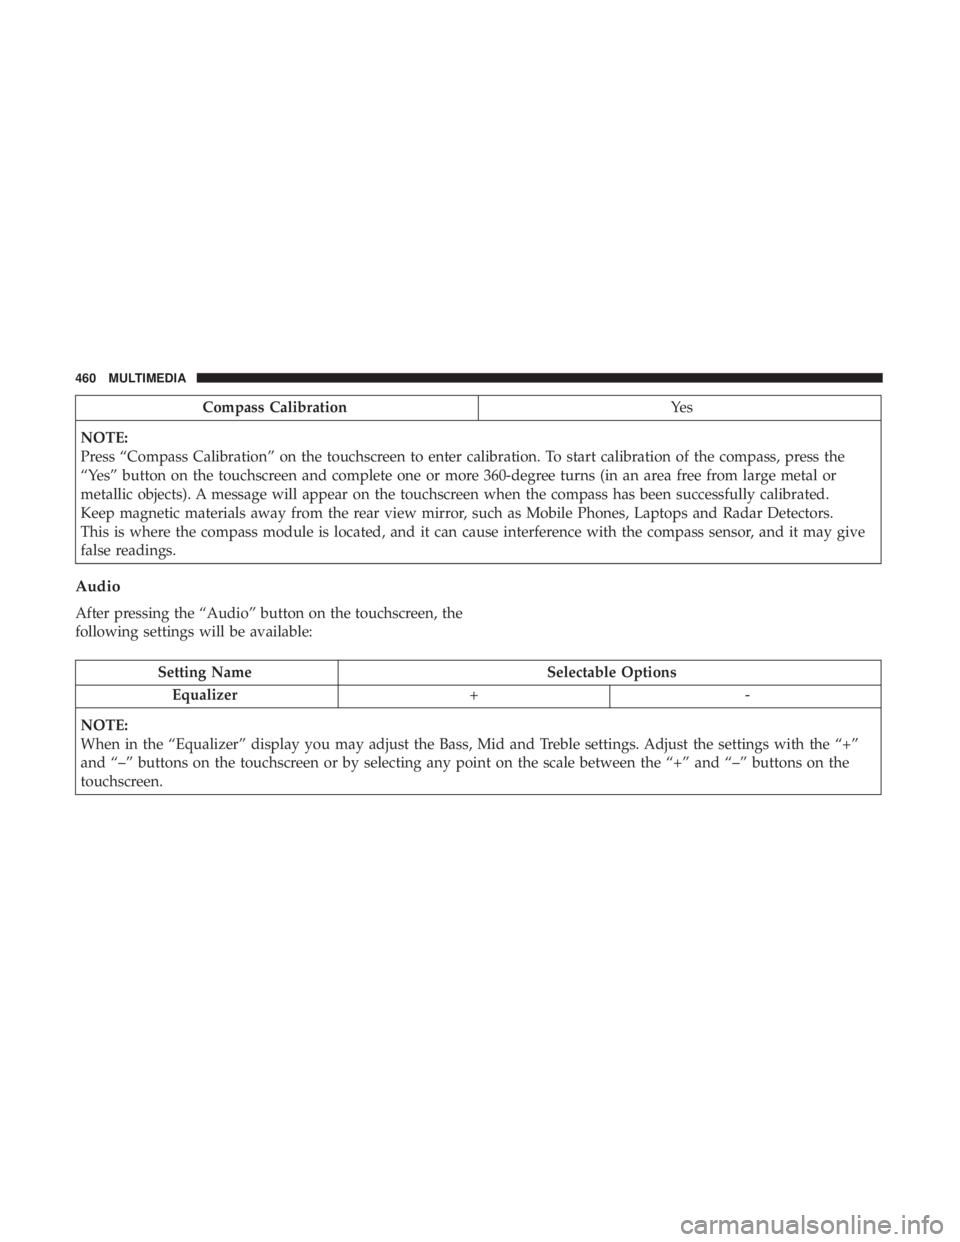
Compass CalibrationYe s
NOTE:
Press “Compass Calibration” on the touchscreen to enter calibration. To start calibration of the compass, press the
“Yes” button on the touchscreen and complete one or more 360-degree turns (in an area free from large metal or
metallic objects). A message will appear on the touchscreen when the compass has been successfully calibrated.
Keep magnetic materials away from the rear view mirror, such as Mobile Phones, Laptops and Radar Detectors.
This is where the compass module is located, and it can cause interference with the compass sensor, and it may give
false readings.
Audio
After pressing the “Audio” button on the touchscreen, the
following settings will be available:
Setting Name Selectable Options
Equalizer +-
NOTE:
When in the “Equalizer” display you may adjust the Bass, Mid and Treble settings. Adjust the settings with the “+”
and “–” buttons on the touchscreen or by selecting any point on the scale between the “+” and “–” buttons on the
touchscreen.
460 MULTIMEDIA
Page 464 of 560
Setting NameSelectable Options
Auto Play — If Equipped OnOff
NOTE: The Auto Play feature allows a media device to begin playing when the media device is plugged in. To make
your selection, press the On or Off buttons to activate or deactivate Auto Play.
Phone/Bluetooth
After pressing the “Phone/Bluetooth” button on the touch-
screen, the following settings will be available:
Setting Name Selectable Options
Do Not Disturb List of Settings
NOTE: Press “Do Not Disturb” to access the available settings. The following settings are: Auto Reply (both, text,
call), Auto Reply Message (custom, default), and Custom Auto Reply Message (create message).
Paired Phones/Devices List of Paired Phones/Devices
NOTE:
This feature shows which phones are paired to the Phone/Bluetooth system. For further information, refer to the
Uconnect Owner ’s Manual Supplement.
462 MULTIMEDIA
Page 468 of 560

Customer Programmable Features — Uconnect
4C/4C NAV Settings
Press the “Apps”button (if equipped), and then press
the “Settings” button on the touchscreen to display the
menu setting screen. In this mode, the Uconnect system
allows you to access programmable features that may be
equipped such as Language, Display, Units, Voice, Clock
& Date, Safety & Driving Assistance, Mirrors & Wipers,
Lights, Doors & Locks, Auto-On Comfort, Key Off
Options, Audio, Phone/Bluetooth, SiriusXM Setup, Reset,
and System Information.
NOTE: Depending on the vehicle’s options, feature set-
tings may vary. When making a selection, press the button on the touch-
screen to enter the desired mode. Once in the desired
mode, press and release the preferred setting “option” until
a check-mark appears next to the setting, showing that
setting has been selected. Once the setting is complete,
press the “X” button on the touchscreen to close out of the
settings screen. Pressing the up or down arrow button on
the right side of the screen will allow you to toggle up or
down through the available settings.
Language
After pressing the “Language” button on the touchscreen,
the following settings will be available:
Setting Name
Selectable Options
Set Language EnglishFrançais Español
Display
After pressing the “Display” button on the touchscreen, the
following settings will be available:
Setting Name Selectable Options
Display Mode AutoManual
466 MULTIMEDIA
Page 483 of 560
Key Off Options
After pressing the “Key Off Options” button on the touch-
screen, the following settings will be available:
Setting NameSelectable Options
Easy Exit Seat — If Equipped OnOff
NOTE:
When the “Easy Exit Seat” feature is selected, the driver ’s seat will automatically move rearward once the engine is
shut off. Key Off Power Delay 0 sec45 sec
5 mins 10 mins
NOTE:
When the “Key Off Power Delay” feature is selected, the power window switches, radio, Uconnect Phone system
(if equipped), DVD video system (if equipped), power sunroof (if equipped), and power outlets will remain active for
up to ten minutes after the ignition is cycled to OFF. Opening either front door will cancel this feature. To change the
Key Off Power Delay setting, press the “+” or “-” button on the touchscreen to select your desired time interval, and
choose from “0 seconds,” “45 seconds,” “5 minutes” or “10 minutes.”
10
MULTIMEDIA 481
Page 486 of 560
Setting NameSelectable Options
AUX Volume Offset — If Equipped -3+3
NOTE:
The “AUX Volume Offset” feature provides the ability to tune the audio level for portable devices connected through
the AUX input. To make your selection, press the AUX Volume Match button on the touchscreen, choose a level from
–3 to +3. Auto Play OnOff
NOTE:
The “Auto Play” feature allows a media device to begin playing when the media device is plugged in. To make your
selection, press the On or Off buttons to activate or deactivate Auto Play.
Phone/Bluetooth Settings
After pressing the “Phone/Bluetooth Settings” button on
the touchscreen, the following settings will be available:
Setting Name Selectable Options
Do Not Disturb List of Settings
NOTE:
Press “Do Not Disturb” to access the available settings. The following settings are: Auto Reply (both, text, call), Auto
Reply Message (custom, default), and Custom Auto Reply Message (create message).
484 MULTIMEDIA
Page 487 of 560
Setting NameSelectable Options
Paired Phones and Audio Sources List Of Paired Phones and Audio Sources
NOTE:
The “Paired Phones and Audio Sources” feature shows which phones and audio sources are paired to the Phone and
Audio Sources Settings system. For further information, refer to the Uconnect Owner ’s Manual Supplement. Smartphone Projection Manager OnOff
NOTE: Pressing “Smartphone Projection Manager” feature allows you to see a list of all connected phones and gives
you the option to determine which phone will be used for projection (Apple CarPlay or Android Auto).
SiriusXM Setup — If Equipped
After pressing the “SiriusXM Setup” button on the touch-
screen, the following settings will be available:
Setting Name Selectable Options
Tune Start OnOff
Channel Skip Name of Channel
NOTE: SiriusXM can be programmed to skip channels. To make your selection, press the “Channel Skip” button on
the touchscreen, select the channels you would like to skip.10
MULTIMEDIA 485