Page 388 of 560
2. To disengage the wiper blade from the wiper arm, flipup the locking tab.
3. Slide the wiper blade down towards the base of the wiper arm. 4. With the wiper blade disengaged, remove the wiper
blade from the wiper arm by holding the wiper arm
with one hand and separating the wiper blade from the
wiper arm with the other hand (move the wiper blade
down toward the base of the wiper arm and away from
the J hook in the end of the wiper arm).
5. Gently lower the wiper arm onto the glass.
Wiper Locking Assembly
1—Wiper
2 — Locking Tab
3—WiperArm
Removing Wiper From Wiper Arm
1—Wiper
2 — Locking Tab
3 — Wiper Arm J Hook
386 SERVICING AND MAINTENANCE
Page 389 of 560

Installing The Front Wipers
1. Lift the wiper arm off of the glass, until the wiper arm isin the full up position.
2. Position the wiper blade under the hook on the tip of the wiper arm with the wiper locking tab open.
3. Insert the receiver bracket on the wiper assembly into the hook on the tip of the arm through the opening in
the wiper blade under the locking tab.
4. Slide the wiper blade onto the arm until motion stops, then fold down the locking tab to secure.
NOTE: The locking tab will not snap into place until the
blade is properly positioned on the wiper arm hook.
5. Gently lower the wiper blade onto the glass.
Exhaust System
The best protection against carbon monoxide entry into the
vehicle body is a properly maintained engine exhaust system.
If you notice a change in the sound of the exhaust system;
or if the exhaust fumes can be detected inside the vehicle;
or when the underside or rear of the vehicle is damaged; have an authorized technician inspect the complete ex-
haust system and adjacent body areas for broken, dam-
aged, deteriorated, or mispositioned parts. Open seams or
loose connections could permit exhaust fumes to seep into
the passenger compartment. In addition, have the exhaust
system inspected each time the vehicle is raised for lubri-
cation or oil change. Replace as required.
WARNING!
•
Exhaust gases can injure or kill. They contain carbon
monoxide (CO), which is colorless and odorless.
Breathing it can make you unconscious and can
eventually poison you. To avoid breathing CO, refer
to “Safety Tips” in “Safety” for further information.
• A hot exhaust system can start a fire if you park over
materials that can burn. Such materials might be
grass or leaves coming into contact with your exhaust
system. Do not park or operate your vehicle in areas
where your exhaust system can contact anything that
can burn.
8
SERVICING AND MAINTENANCE 387
Page 437 of 560

NOTE:
•Use seasonally adjusted E-85 fuel (ASTM D5798). With
non-seasonally adjusted E-85 fuel, hard starting and
rough idle following start up may be experienced even if
the above recommendations are followed, especially
when the ambient temperature is below 32°F (0°C).
•
Some additives used in regular gasoline are not fully
compatible with E-85 and may form deposits in your
engine. To eliminate driveability issues that may be caused
by these deposits, a supplemental gasoline additive, such
as Mopar Injector Cleanup or Techron may be used.
Selection Of Engine Oil For Flexible Fuel Vehicles
(E-85) And Gasoline Vehicles
FFV vehicles operated on E-85 require specially formulated
engine oils. These special requirements are included in
Mopar engine oils, and in equivalent oils meeting FCA US
Material Standard MS-6395. It is recommended that engine
oils that are API Certified and meet the requirements of
Material Standard MS-6395 be used. MS-6395 contains
additional requirements, developed during extensive fleet
testing, to provide additional protection to FCA US LLC
engines.
Starting
The characteristics of E-85 fuel make it unsuitable for use
when ambient temperatures fall below 0°F (-18°C). In the
range of 0°F (-18°C) to 32°F (0°C), an increase in the time it
takes for your engine to start may be experienced, and a
deterioration in driveability (sags and/or hesitations) until
the engine is fully warmed up. These issues may be
improved with the use of seasonally adjusted E-85 fuel.
NOTE: Use of the engine block heater (if equipped) may
improve engine start time when using E-85 fuel when the
ambient temperature is less than 32°F (0°C).
Cruising Range
Because E-85 fuel contains less energy per gallon/liter than
gasoline, an increase in fuel consumption will be experi-
enced. The miles per gallon (mpg)/kilometers per liter and
the driving range will decrease by approximately 30%,
compared to gasoline operation.9
TECHNICAL SPECIFICATIONS 435
Page 451 of 560
Clock & Date
After pressing the “Clock & Date” button on the touch-
screen, the following settings will be available:
Setting NameSelectable Options
Sync Time With GPS — If Equipped On
Off
NOTE:
The “Sync Time With GPS” feature will allow you to automatically have the radio set the time. Set Time +–
Set Format 12 hour24 hour
AM PM
Set Date Up ArrowDown Arrow
NOTE:
When in this display, you may set the date manually. Press the “Set Date” button on the touchscreen then press the
corresponding arrows above and below the current date to adjust.
10
MULTIMEDIA 449
Page 457 of 560

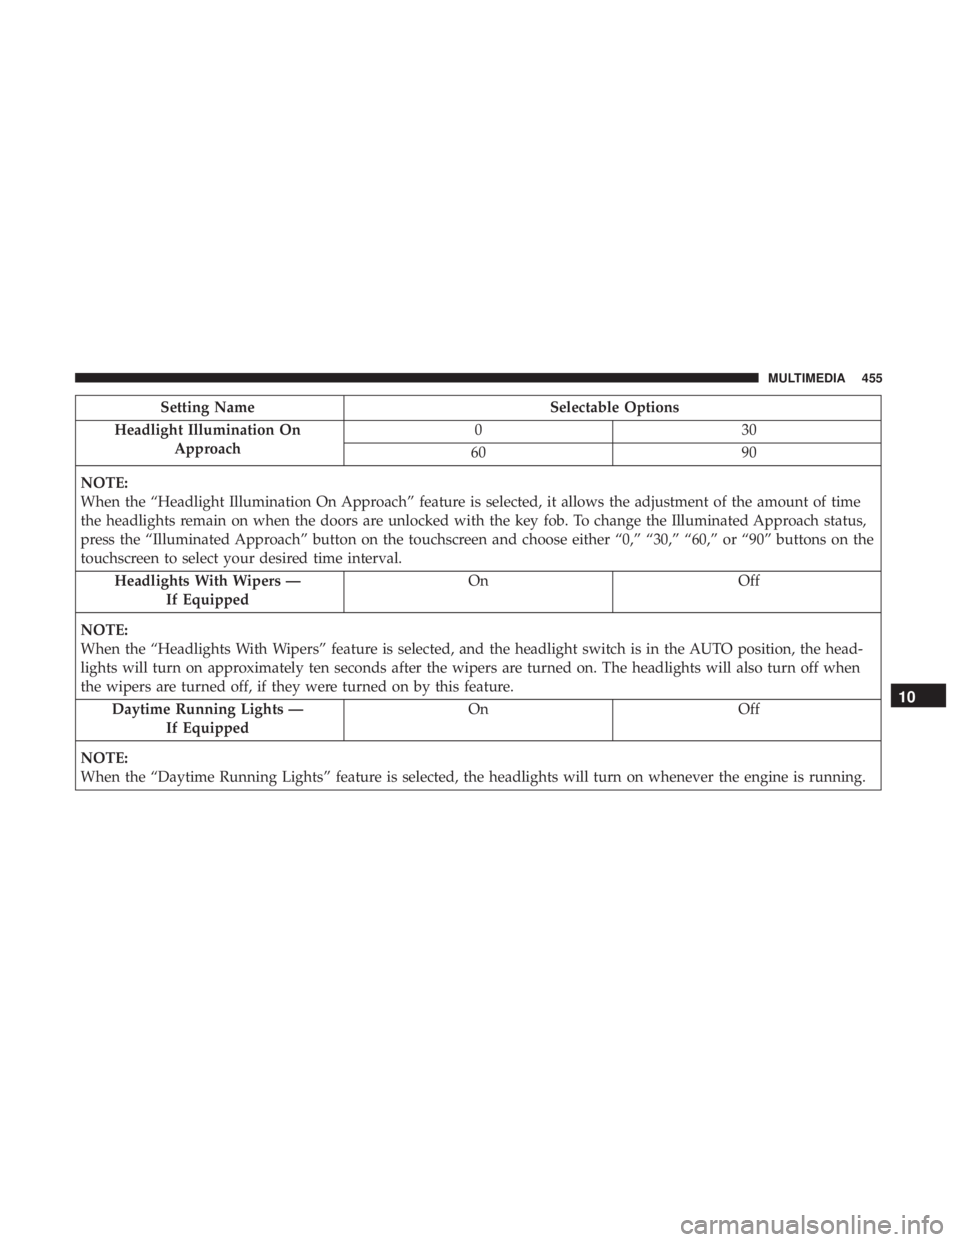
Setting NameSelectable Options
Headlight Illumination On Approach 03
0
60 90
NOTE:
When the “Headlight Illumination On Approach” feature is selected, it allows the adjustment of the amount of time
the headlights remain on when the doors are unlocked with the key fob. To change the Illuminated Approach status,
press the “Illuminated Approach” button on the touchscreen and choose either “0,” “30,” “60,” or “90” buttons on the
touchscreen to select your desired time interval. Headlights With Wipers — If Equipped On
Off
NOTE:
When the “Headlights With Wipers” feature is selected, and the headlight switch is in the AUTO position, the head-
lights will turn on approximately ten seconds after the wipers are turned on. The headlights will also turn off when
the wipers are turned off, if they were turned on by this feature. Daytime Running Lights — If Equipped On
Off
NOTE:
When the “Daytime Running Lights” feature is selected, the headlights will turn on whenever the engine is running.
10
MULTIMEDIA 455
Page 458 of 560
Setting NameSelectable Options
Flash Lights With Lock OnOff
NOTE:
When the “Flash Lights With Locks” feature is selected, the exterior lights will flash when the doors are locked or
unlocked with the key fob. This feature may be selected with or without the sound horn on lock feature selected.
Doors & Locks
After pressing the “Doors & Locks” button on the touch-
screen, the following settings will be available:
Setting Name Selectable Options
Auto Door Locks — If Equipped OnOff
Auto Unlock On Exit OnOff
Flash Lights With Lock OnOff
NOTE:
When this feature is selected, the exterior lights flashes when the doors are locked or unlocked with the key fob.
This feature may be selected with or without the sound horn on lock feature selected. Sound Horn With Lock Off1st Press 2nd Press
Sound Horn With Remote Start OnOff
456 MULTIMEDIA
Page 459 of 560
Setting NameSelectable Options
1st Press of Key Fob Unlocks AllDriver
NOTE:
This feature allows you to program your remote door locks to open “All doors” or only the “Driver door” with the
first push of the key fob or grabbing the Passive Entry door handle. Passive Entry — If Equipped OnOff
NOTE:
This feature allows you to lock and unlock the vehicle’s door(s) without having to push the key fob lock or unlock
buttons. It automatically unlocks the doors when the outside door handle is grabbed. Personal Settings Linked To Key Fob — If Equipped On
Off
NOTE:
•This feature provides automatic recall of all settings stored to a memory location (driver ’s seat, exterior mirrors,
steering column position and radio station pre-sets) to enhance driver mobility when entering and exiting the
vehicle.
•The seat returns to the memorized seat location (if Personal Settings Linked to Key Fob is set to on) when the key
fob is used to unlock the door.
10
MULTIMEDIA 457
Page 466 of 560

Restore Settings
After pressing the “Restore Settings” button on the touch-
screen, the following settings will be available:
Setting NameSelectable Options
Restore Settings YesCancel
NOTE:
When the “Restore Settings” feature is selected it will reset the Display, Clock, Audio, and Radio Settings to their default
settings. If “Yes” is selected, a pop-up will appear asking �Are you sure you want to reset your settings to default?” Select
“Yes” to restore, or “Cancel” to exit.
Reset App Drawer to Default Order Ok Cancel
NOTE:
When this feature is selected, it will reset all settings to their default settings. To restore the settings to their default
setting, press the “Restore Settings” button on the touchscreen. A pop-up will appear asking �Are you sure you want
to reset your settings to default?”
Restore Apps OkCancel
Clear Personal Data YesCancel
NOTE: When the “Clear Personal Data” feature is selected it will remove all personal data including Clock, Audio,
Radio, Bluetooth devices, Apps, and Favorites.
Modem Reset OkCancel
464 MULTIMEDIA