2019 DODGE CHALLENGER SRT wheel
[x] Cancel search: wheelPage 241 of 500
8. When conditions 4 through 7 have been met, the instru-ment cluster display will read “Launch Ready Release
Brake”.
9. Keep the vehicle pointed straight.
Launch mode will be active until the vehicle reaches
62 mph (100 km/h), at which point the ESC system will
return to its current ESC mode.
Launch mode will abort before launch completion, display
“Launch Aborted” in the cluster under any the following
conditions:
• The accelerator pedal is released during launch.
• The ESC system detects that the vehicle is no longer
moving in a straight line.
• The “ESC OFF” button is pushed to change the system
to another mode.
NOTE: After launch mode has been aborted, ESC will
return to its current ESC mode.
Manual Transmission — If Equipped
Vehicles with a manual transmission have an adjustable
launch RPM controlled through the Uconnect system. Launch Mode is only available when the following proce-
dure is followed:
1. Push the LAUNCH button on the center stack switch
bank.
NOTE: Pushing the SRT button on the center stack or
pressing the “Apps” button on the touchscreen are two
other options to access launch mode features. Please refer
to “Uconnect Settings” in “Multimedia” for further infor-
mation.
2. Slide the RPM slider bar on the touchscreen. This screen will allow you to adjust your launch RPM’s for opti-
mum launch/traction.
3. Press the “Activate Launch Mode” button on the touch- screen.
4. Make sure the vehicle is not moving.
5. Make sure the steering wheel is pointing straight.
6. Fully depress the clutch pedal and make sure the vehicle is in first gear.
6
STARTING AND OPERATING 239
Page 242 of 500
7. While holding the clutch depressed, rapidly apply andhold the accelerator pedal to wide open throttle. The
engine speed will hold at the pre-selected launch RPM.
The engine speed will hold at the RPM that was set in
the “Launch RPM Set-up” screen.
NOTE: Messages will appear in the instrument cluster to
inform the driver if one or more of the above conditions
have not been met.
8. When conditions 4 through 7 have been met, the instru- ment cluster display will read “Launch Ready Release
Clutch”. Release the clutch quickly and continue to hold
the throttle to execute launch. Refer to “Manual Trans-
mission – If Equipped” in this section for further infor-
mation.
Release the clutch and continue to hold wide open throttle
to launch.
9. Keep the vehicle pointed straight.
Launch mode will be active until the vehicle reaches
62 mph (100 km/h), at which point the ESC system will
return to its current ESC mode.
Launch mode will abort before launch completion, display
“Launch Aborted” in the cluster and return to ESC Full ON
under any the following conditions: •
The brake is applied during launch.
• The ESC system detects that the vehicle is no longer
moving in a straight line.
• The “ESC OFF” button is pushed to change the ESC
system to another mode.
NOTE: After launch mode has been aborted, ESC will
return to its current ESC mode.
CAUTION!
Do not attempt to shift when the drive wheels are
spinning and do not have traction. Damage to the
transmission may occur.
Guidelines For Track Use
NOTE: Because of the extreme conditions encountered
during track use, any damage or wear associated with
track use may not be covered by warranty.
• If your SRT vehicle is equipped with Drive Modes, they
will alter the vehicle’s performance in various driving
situations. It is recommended that your vehicle operates
in SPORT or TRACK modes during the track event.
240 STARTING AND OPERATING
Page 246 of 500
SPEED CONTROL — IF EQUIPPED
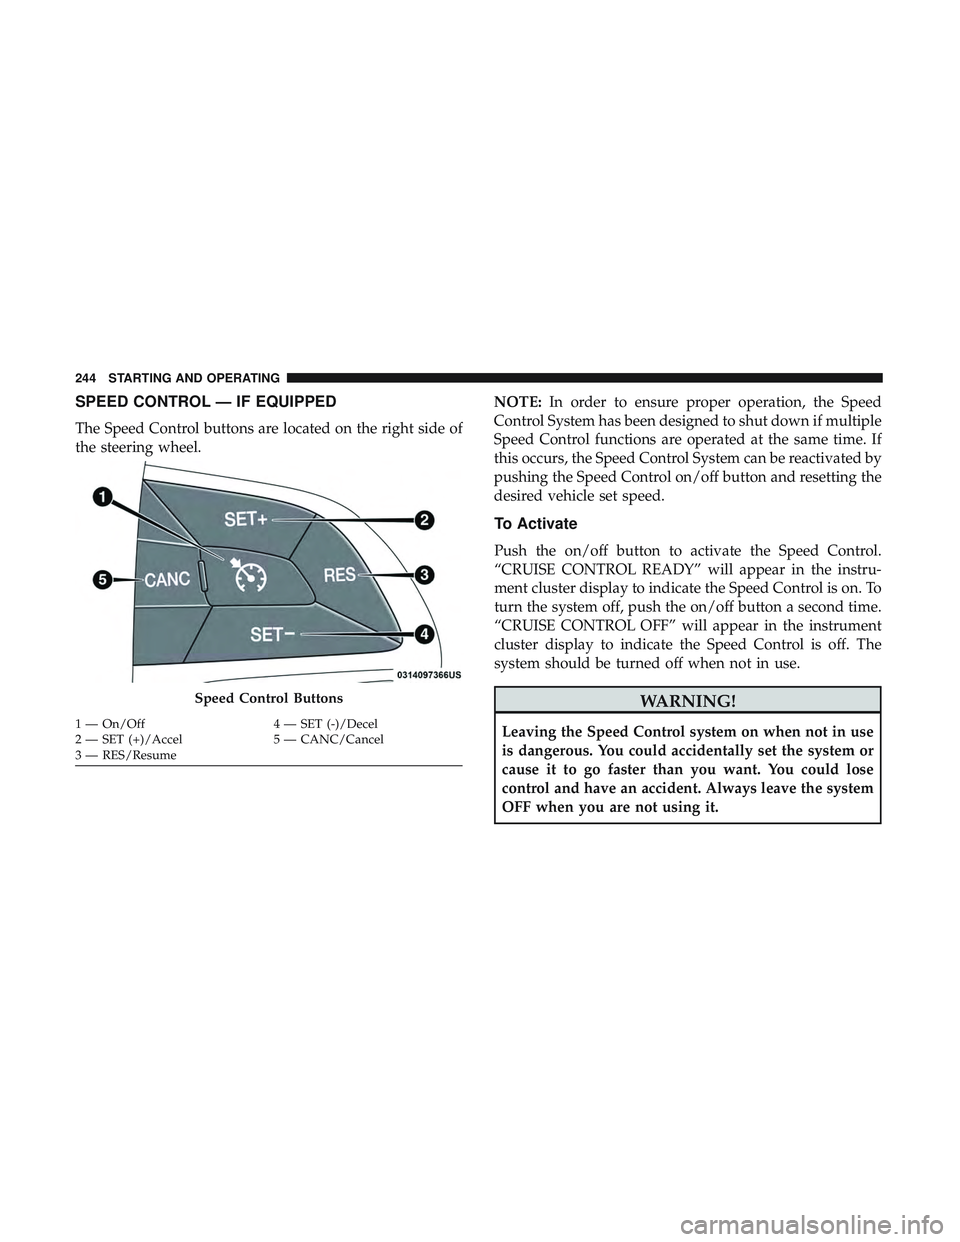
The Speed Control buttons are located on the right side of
the steering wheel.NOTE:
In order to ensure proper operation, the Speed
Control System has been designed to shut down if multiple
Speed Control functions are operated at the same time. If
this occurs, the Speed Control System can be reactivated by
pushing the Speed Control on/off button and resetting the
desired vehicle set speed.
To Activate
Push the on/off button to activate the Speed Control.
“CRUISE CONTROL READY” will appear in the instru-
ment cluster display to indicate the Speed Control is on. To
turn the system off, push the on/off button a second time.
“CRUISE CONTROL OFF” will appear in the instrument
cluster display to indicate the Speed Control is off. The
system should be turned off when not in use.
WARNING!
Leaving the Speed Control system on when not in use
is dangerous. You could accidentally set the system or
cause it to go faster than you want. You could lose
control and have an accident. Always leave the system
OFF when you are not using it.
Speed Control Buttons
1 — On/Off 4 — SET (-)/Decel
2 — SET (+)/Accel 5 — CANC/Cancel
3 — RES/Resume 244 STARTING AND OPERATING
Page 251 of 500
Adaptive Cruise Control (ACC) Operation
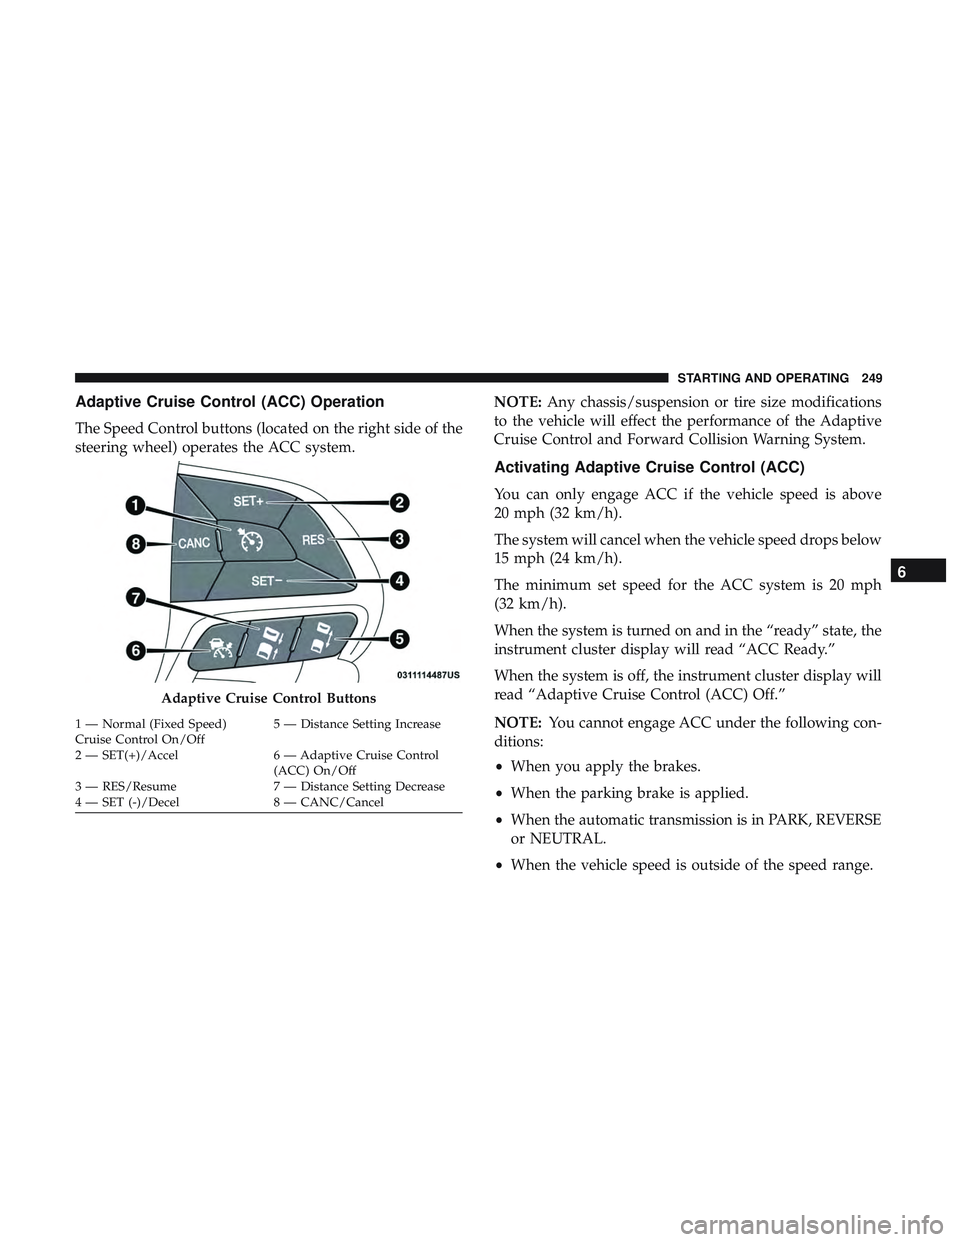
The Speed Control buttons (located on the right side of the
steering wheel) operates the ACC system.NOTE:
Any chassis/suspension or tire size modifications
to the vehicle will effect the performance of the Adaptive
Cruise Control and Forward Collision Warning System.
Activating Adaptive Cruise Control (ACC)
You can only engage ACC if the vehicle speed is above
20 mph (32 km/h).
The system will cancel when the vehicle speed drops below
15 mph (24 km/h).
The minimum set speed for the ACC system is 20 mph
(32 km/h).
When the system is turned on and in the “ready” state, the
instrument cluster display will read “ACC Ready.”
When the system is off, the instrument cluster display will
read “Adaptive Cruise Control (ACC) Off.”
NOTE: You cannot engage ACC under the following con-
ditions:
• When you apply the brakes.
• When the parking brake is applied.
• When the automatic transmission is in PARK, REVERSE
or NEUTRAL.
• When the vehicle speed is outside of the speed range.
Adaptive Cruise Control Buttons
1 — Normal (Fixed Speed)
Cruise Control On/Off 5 — Distance Setting Increase
2 — SET(+)/Accel 6 — Adaptive Cruise Control (ACC) On/Off
3 — RES/Resume 7 — Distance Setting Decrease
4 — SET (-)/Decel 8 — CANC/Cancel
6
STARTING AND OPERATING 249
Page 259 of 500
Adaptive Cruise Control (ACC) Menu
The instrument cluster display will show the current ACC
system settings. The instrument cluster display is located
in the center of the instrument cluster. The information it
displays depends on ACC system status.
Push the Adaptive Cruise Control (ACC) on/off button
(located on the steering wheel) until one of the following
appears in the instrument cluster display:
Adaptive Cruise Control Off
When ACC is deactivated, the display will read “Adaptive
Cruise Control Off.”
Adaptive Cruise Control Ready
When ACC is activated, but the vehicle speed setting has
not been selected, the display will read “Adaptive Cruise
Control Ready.”
Adaptive Cruise Control Set
When the SET (+) or the SET (-) button (located on the
steering wheel) is pushed, the display will read “ACC
SET.”
When ACC is set, the set speed will show in the instrument
cluster display.The ACC screen may display once again if any ACC
activity occurs, which may include any of the following:
•
System Cancel
• Driver Override
• System Off
• ACC Proximity Warning
• ACC Unavailable Warning
• The instrument cluster display will return to the last
display selected after five seconds of no ACC display
activity
Display Warnings And Maintenance
“Wipe Front Radar Sensor In Front Of Vehicle”
Warning
The “ACC/FCW Unavailable Wipe Front Radar Sensor”
warning will display and also a chime will indicate when
conditions temporarily limit system performance.
This most often occurs at times of poor visibility, such as in
snow or heavy rain. The ACC system may also become
temporarily blinded due to obstructions, such as mud, dirt
or ice. In these cases, the instrument cluster display will
display “ACC/FCW Unavailable Wipe Front Radar Sen-
sor” and the system will deactivate.
6
STARTING AND OPERATING 257
Page 275 of 500
When the vehicle is shifted out of REVERSE (with Camera
Delay turned off), the rear camera mode is exited and the
last touchscreen appears again.
When enabled, active guide lines are overlaid on the image
to illustrate the width of the vehicle and its projected
backup path based on the steering wheel position. The
active guide lines will show separate zones that will help
indicate the distance to the rear of the vehicle.If the vehicle speed remains below 8 mph (13 km/h), the
rear view camera image will continue to be displayed until
the transmission is shifted into PARK, the vehicle’s ignition
is cycled to the OFF position, or the image defeat [X] button
is pressed.
Different colored zones indicate the distance to the rear of
the vehicle.
The following table shows the approximate distances for
each zone:
Zone
Distance To The Rear Of The Vehicle
Red 0 - 1 ft (0 - 30 cm)
Yellow 1 ft - 6.5 ft (30 cm - 2 m)
Green 6.5 ft or greater (2 m or greater)
WARNING!
Drivers must be careful when backing up even when
using the ParkView Rear Back Up Camera. Always
check carefully behind your vehicle, and be sure to
(Continued)
WARNING!(Continued)
check for pedestrians, animals, other vehicles, obstruc-
tions, or blind spots before backing up. You are re-
sponsible for the safety of your surroundings and must
continue to pay attention while backing up. Failure to
do so can result in serious injury or death.
6
STARTING AND OPERATING 273
Page 278 of 500
VEHICLE LOADING
The load carrying capacity of your vehicle is shown on the
“Vehicle Certification Label”. This information should be
used for passenger and luggage loading as indicated.
Do not exceed the specified Gross Vehicle Weight Rating
(GVWR) or the Gross Axle Weight Rating (GAWR).
Vehicle Certification Label
Your vehicle has a Vehicle Certification Label affixed to the
drivers side B-Pillar or the rear of the driver ’s door.
The label contains the following information:
•Name of manufacturer
• Month and year of manufacture
• Gross Vehicle Weight Rating (GVWR)
• Gross Axle Weight Rating (GAWR) front
• Gross Axle Weight Rating (GAWR) rear
• Vehicle Identification Number (VIN)
• Type of vehicle
• Month, Day, and Hour of manufacture (MDH)
The bar code allows a computer scanner to read the VIN.
Gross Vehicle Weight Rating (GVWR)
The GVWR is the total allowable weight of your vehicle.
This includes driver, passengers, and cargo. The total load
must be limited so that you do not exceed the GVWR.
Gross Axle Weight Rating (GAWR)
The GAWR is the maximum capacity of the front and rear
axles. Distribute the load over the front and rear axles
evenly. Make sure that you do not exceed either front or
rear GAWR.
WARNING!
Because the front wheels steer the vehicle, it is impor-
tant that you do not exceed the maximum front or rear
GAWR. A dangerous driving condition can result if
either rating is exceeded. You could lose control of the
vehicle and have a collision.
Overloading
The load carrying components (axle, springs, tires, wheels,
etc.) of your vehicle will provide satisfactory service as
long as you do not exceed the GVWR and the front and
rear GAWR.
276 STARTING AND OPERATING
Page 279 of 500
The best way to figure out the total weight of your vehicle
is to weigh it when it is fully loaded and ready for
operation. Weigh it on a commercial scale to ensure that it
is not over the GVWR.
Figure out the weight on the front and rear of the vehicle
separately. It is important that you distribute the load
evenly over the front and rear axles.
Overloading can cause potential safety hazards and
shorten useful service life. Heavier axles or suspension
components do not necessarily increase the vehicle’s
GVWR.
Loading
To load your vehicle properly, first figure out its empty
weight, axle-by-axle and side-by-side. Store heavier items
down low and be sure you distribute their weight as
evenly as possible. Stow all loose items securely before
driving. If weighing the loaded vehicle shows that you
have exceeded either GAWR, but the total load is within
the specified GVWR, you must redistribute the weight.
Improper weight distribution can have an adverse effect on
the way your vehicle steers and handles and the way the
brakes operate.NOTE:
Refer to the “Vehicle Certification Label” affixed to
the rear of the driver’s door for your vehicle’s GVWR and
GAWRs.
TRAILER TOWING
Trailer towing is not permitted with this vehicle.
RECREATIONAL TOWING (BEHIND MOTORHOME,
ETC.)
Recreational towing (with all four wheels on the ground, or
using a tow dolly) is NOT ALLOWED. The only accept-
able method for towing this vehicle (behind another ve-
hicle) is on a vehicle trailer with all four wheels OFFthe
ground.
CAUTION!
Towing this vehicle in violation of the above require-
ments can cause severe engine and/or transmission
damage. Damage from improper towing is not covered
under the New Vehicle Limited Warranty.
6
STARTING AND OPERATING 277