2019 DODGE CHALLENGER trunk release
[x] Cancel search: trunk releasePage 22 of 532
To Unlock The Doors
Push and release the unlock button on the key fob once to
unlock the driver’s door or twice within five seconds to
unlock all doors.
The turn signal lights will flash to acknowledge the unlock
signal. The illuminated entry system will also be activated.
NOTE:All door unlock settings can be programmed to
your convenience through Uconnect Settings. Refer to
“Uconnect Settings” in “Multimedia” for further informa-
tion.
• Unlock the driver door on the first push of the key fob
unlock button.
• Unlock all doors on the first push of the key fob unlock
button.
NOTE: To unlock doors and trunk with passive entry, refer
to “Keyless Enter-N-Go — Passive Entry” located in
“Doors” in “Getting To Know Your Vehicle” for further
information. NOTE:
When you use the key fob to open any door, the
courtesy lights, overhead lights, and approach lighting in
the outside mirrors (if equipped) will turn on. Refer to
“Interior Lights” in “Getting To Know Your Vehicle” for
further information.
1st Press Of Key Fob Unlocks
This feature lets you program the system to unlock either
the driver’s door or all doors on the first push of the unlock
button on the key fob.
To change the current setting, refer to “Uconnect Settings”
in “Multimedia” for further information.
Flash Lights With Lock
This feature will cause the turn signal lights to flash when
the doors are locked with the key fob. This feature can be
turned on or turned off. To change the current setting, refer
to “Uconnect Settings” in “Multimedia” for further infor-
mation.
20 GETTING TO KNOW YOUR VEHICLE
Page 23 of 532
Headlight Illumination On Approach
This feature activates the headlights for up to 90 seconds
when the doors are unlocked with the key fob. The time for
this feature is programmable, on vehicles equipped,
through Uconnect Settings. To change the current setting,
refer to “Uconnect Settings” in “Multimedia” for further
information.
To Unlatch The Trunk
Push the trunk button on the key fob two times within five
seconds to unlatch the trunk.
If the vehicle is equipped with Passive Entry, refer to
“Keyless Enter-N-Go — Passive Entry” under “Getting To
Know Your Vehicle” for further information.
To Lock The Doors And Trunk
Push and release the lock button on the key fob to lock all
doors.
The turn signal lights will flash and the horn will chirp to
acknowledge the signal if programmed. Refer to “Uconnect
Settings” in “Multimedia” for further programmable infor-
mation.NOTE:
To lock the doors with passive entry, Refer to
“Keyless Enter-N-Go — Passive Entry” located in “Doors”
in “Getting To Know Your Vehicle” for further information.
If one or more doors are open, or the trunk is open, the
doors will lock. The doors will unlock automatically if the
key fob is left inside the passenger compartment, otherwise
the doors will stay locked.
Sound Horn With Lock
This feature will cause the horn to chirp when the doors are
locked with the key fob. This feature can be turned on or
turned off. To change the current setting, refer to
“Uconnect Settings” in “Multimedia” for further informa-
tion.
Using The Panic Alarm
To turn the Panic Alarm feature on or off, push the Panic
button on the key fob. When the Panic Alarm is activated,
the turn signals will flash, the horn will pulse on and off,
and the interior lights will turn on.
The Panic Alarm will stay on for three minutes unless you
turn it off by either pushing the Panic button a second time
or drive the vehicle at a speed of 15 mph (24 km/h) or
greater.
3
GETTING TO KNOW YOUR VEHICLE 21
Page 32 of 532

Remote Start Abort Message On The Instrument
Cluster Display — If Equipped
The following messages will display in the instrument
cluster display if the vehicle fails to remote start or exits
remote start prematurely:
•Remote Start Aborted — Door Open
• Remote Start Aborted — Hood Open
• Remote Start Aborted — Fuel Low
• Remote Start Aborted — Trunk Open
• Remote Start Disabled — Start Vehicle To Reset
The message will stay active until the ignition is turned to
the ON/RUN position.
To Enter Remote Start Mode
Push and release the remote start button on the key fob
twice within five seconds. The vehicle doors will lock, the
parking lights will flash, and the horn will chirp twice (if
programmed). Then, the engine will start, and the vehicle
will remain in the Remote Start mode for a 15-minute cycle. NOTE:
•
If an engine fault is present or fuel level is low, the
vehicle will start and then shut down in 10 seconds.
• The park lamps will turn on and remain on during
Remote Start mode.
• For security, power window and power sunroof opera-
tion (if equipped) are disabled when the vehicle is in the
Remote Start mode.
• The engine can be started two consecutive times with
the key fob. However, the ignition must be cycled by
pushing the START/STOP button twice (or the ignition
switch must be cycled to the ON/RUN position) before
you can repeat the start sequence for a third cycle.
To Exit Remote Start Mode Without Driving The
Vehicle
Push and release the remote start button one time or allow
the engine to run for the entire 15-minute cycle.
NOTE: To avoid unintentional shutdowns, the system will
disable with a one time push of the remote start button for
two seconds after receiving a valid remote start request.
30 GETTING TO KNOW YOUR VEHICLE
Page 35 of 532
All of the key fobs provided with your new vehicle have
been programmed to the vehicle electronics.
Key Programming
Programming key fobs may be performed at an authorized
dealer.
Replacement Keys
NOTE:Only key fobs that are programmed to the vehicle
electronics can be used to start and operate the vehicle.
Once a key fob is programmed to a vehicle, it cannot be
programmed to any other vehicle.
CAUTION!
• Always remove the key fobs from the vehicle and
lock all doors when leaving the vehicle unattended.
• For vehicles equipped with Keyless Enter-N-Go —
Ignition, always remember to place the ignition in
the OFF position.
NOTE: Duplication of key fobs may be performed at an
authorized dealer. This procedure consists of programming
a blank key fob to the vehicle electronics. A blank key fob
is one that has never been programmed. When having the Sentry Key Immobilizer System serviced,
bring all vehicle keys with you to an authorized dealer.
General Information
The following regulatory statement applies to all radio
frequency (RF) devices equipped in this vehicle:
This device complies with Part 15 of the FCC Rules and
with Industry Canada license-exempt RSS standard(s).
Operation is subject to the following two conditions:
1. This device may not cause harmful interference, and
2. This device must accept any interference received, in-
cluding interference that may cause undesired opera-
tion.
NOTE: Changes or modifications not expressly approved
by the party responsible for compliance could void the
user ’s authority to operate the equipment.
VEHICLE SECURITY ALARM — IF EQUIPPED
The vehicle security alarm monitors the vehicle doors for
unauthorized entry and the keyless push button ignition
for unauthorized operation. While the vehicle security
alarm is armed, interior switches for door locks and trunk
release are disabled. If something triggers the alarm, the
3
GETTING TO KNOW YOUR VEHICLE 33
Page 86 of 532
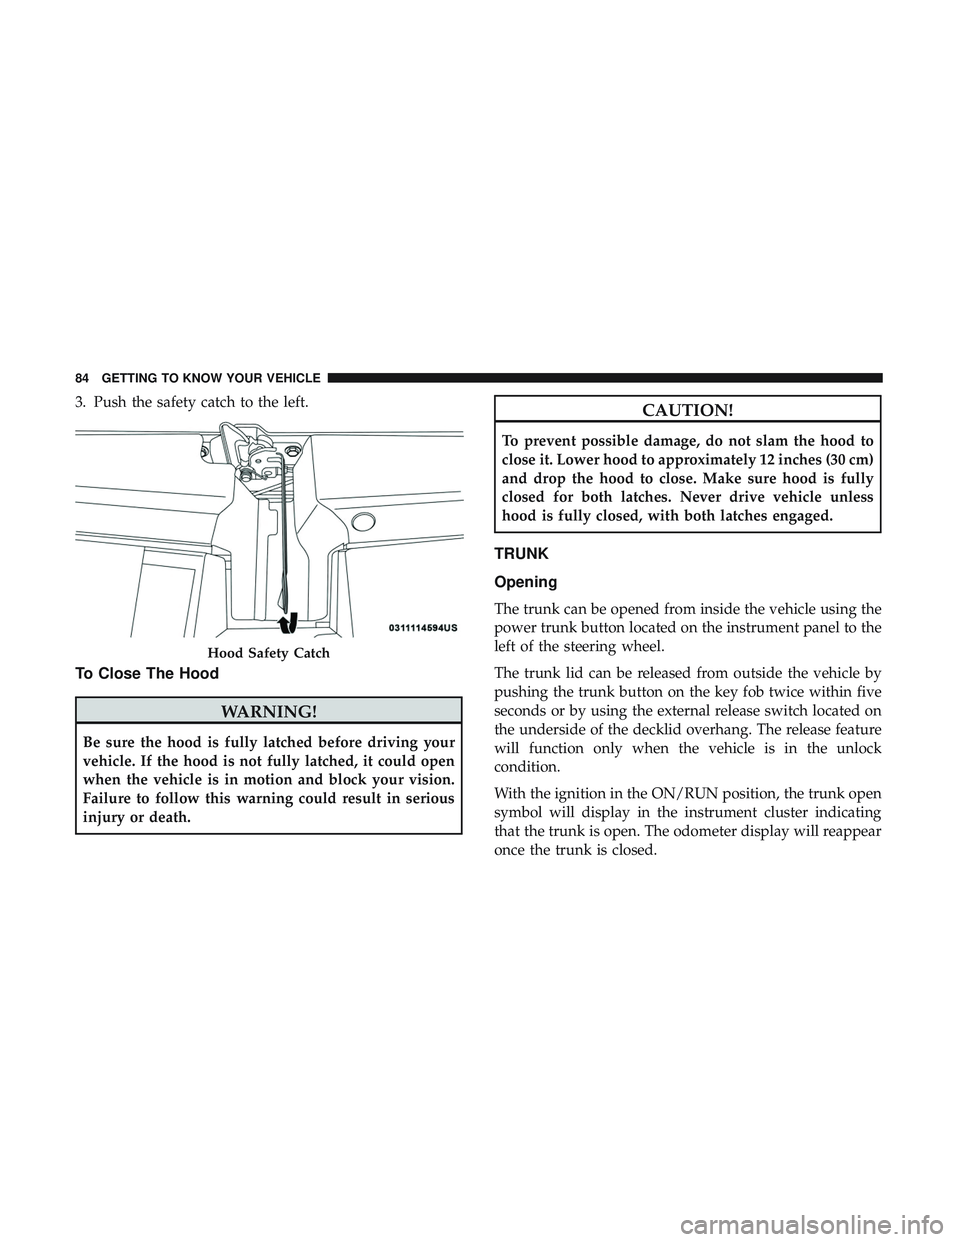
3. Push the safety catch to the left.
To Close The Hood
WARNING!
Be sure the hood is fully latched before driving your
vehicle. If the hood is not fully latched, it could open
when the vehicle is in motion and block your vision.
Failure to follow this warning could result in serious
injury or death.
CAUTION!
To prevent possible damage, do not slam the hood to
close it. Lower hood to approximately 12 inches (30 cm)
and drop the hood to close. Make sure hood is fully
closed for both latches. Never drive vehicle unless
hood is fully closed, with both latches engaged.
TRUNK
Opening
The trunk can be opened from inside the vehicle using the
power trunk button located on the instrument panel to the
left of the steering wheel.
The trunk lid can be released from outside the vehicle by
pushing the trunk button on the key fob twice within five
seconds or by using the external release switch located on
the underside of the decklid overhang. The release feature
will function only when the vehicle is in the unlock
condition.
With the ignition in the ON/RUN position, the trunk open
symbol will display in the instrument cluster indicating
that the trunk is open. The odometer display will reappear
once the trunk is closed.
Hood Safety Catch
84 GETTING TO KNOW YOUR VEHICLE
Page 87 of 532
With the ignition in the OFF position, the trunk open
symbol will display until the trunk is closed.
NOTE:Refer to “Keyless Enter-N-Go — Passive Entry” in
”Doors” in “Getting To Know Your Vehicle” for further
information on trunk operation with the Passive Entry
feature.
Opening From Inside The Vehicle
Interior Power Trunk Release
The trunk can be opened from inside the
vehicle using the power trunk release
button located on the instrument panel
to the left of the steering wheel.
NOTE:The transmission must be in
PARK before the button will operate.
Opening From Outside The Vehicle
To Unlock/Open The Trunk
The trunk may be unlocked/opened using either of the
following methods:
• Key Fob Trunk Release Button
• Passive Entry Button Key Fob Trunk Release Button
Push the power trunk button on the key fob
twice within five seconds to release the trunk.
Passive Entry Button
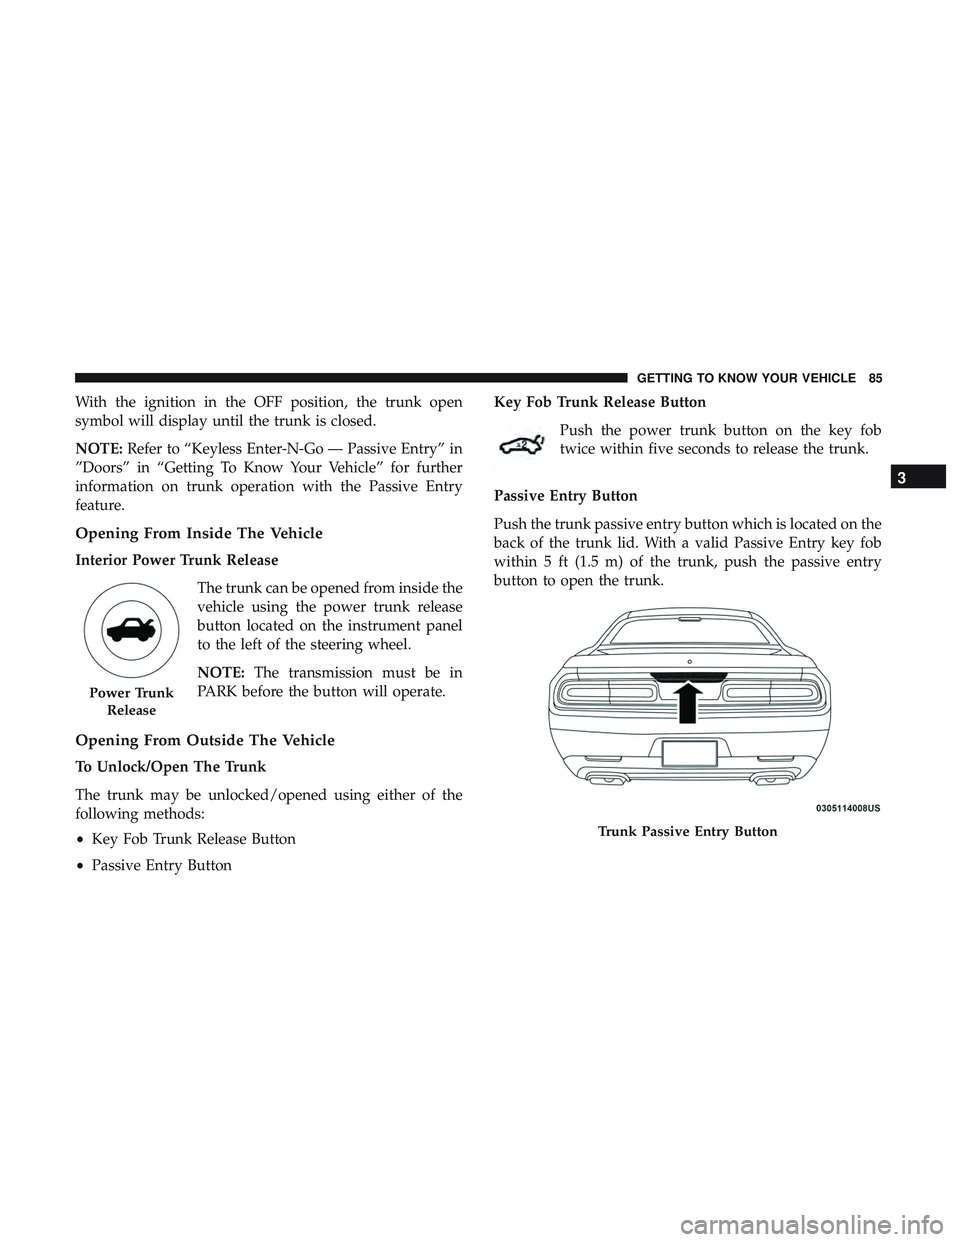
Push the trunk passive entry button which is located on the
back of the trunk lid. With a valid Passive Entry key fob
within 5 ft (1.5 m) of the trunk, push the passive entry
button to open the trunk.
Power Trunk Release
Trunk Passive Entry Button
3
GETTING TO KNOW YOUR VEHICLE 85
Page 88 of 532
Closing
With one or more hands placed on the outside trunk
surface push the trunk lid down until you hear the trunk
lock latch into place.
NOTE:Before closing the trunk lid make sure your key fob
isn’t inside the trunk area. The trunk will latch then
automatically unlock if the key fob is sensed not allowing
the key fob to be locked in the trunk area.
Trunk Safety
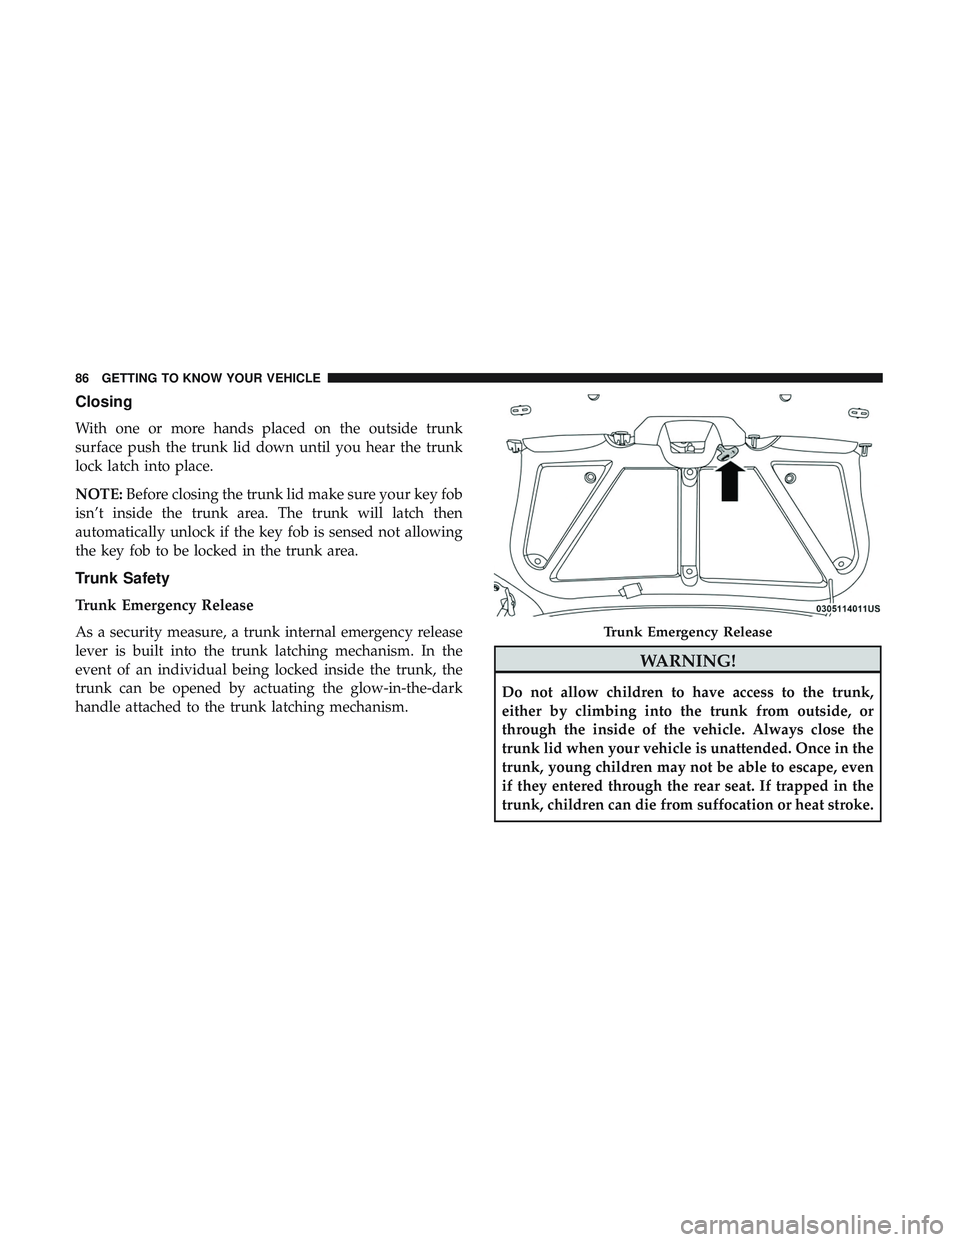
Trunk Emergency Release
As a security measure, a trunk internal emergency release
lever is built into the trunk latching mechanism. In the
event of an individual being locked inside the trunk, the
trunk can be opened by actuating the glow-in-the-dark
handle attached to the trunk latching mechanism.
WARNING!
Do not allow children to have access to the trunk,
either by climbing into the trunk from outside, or
through the inside of the vehicle. Always close the
trunk lid when your vehicle is unattended. Once in the
trunk, young children may not be able to escape, even
if they entered through the rear seat. If trapped in the
trunk, children can die from suffocation or heat stroke.
Trunk Emergency Release
86 GETTING TO KNOW YOUR VEHICLE
Page 319 of 532
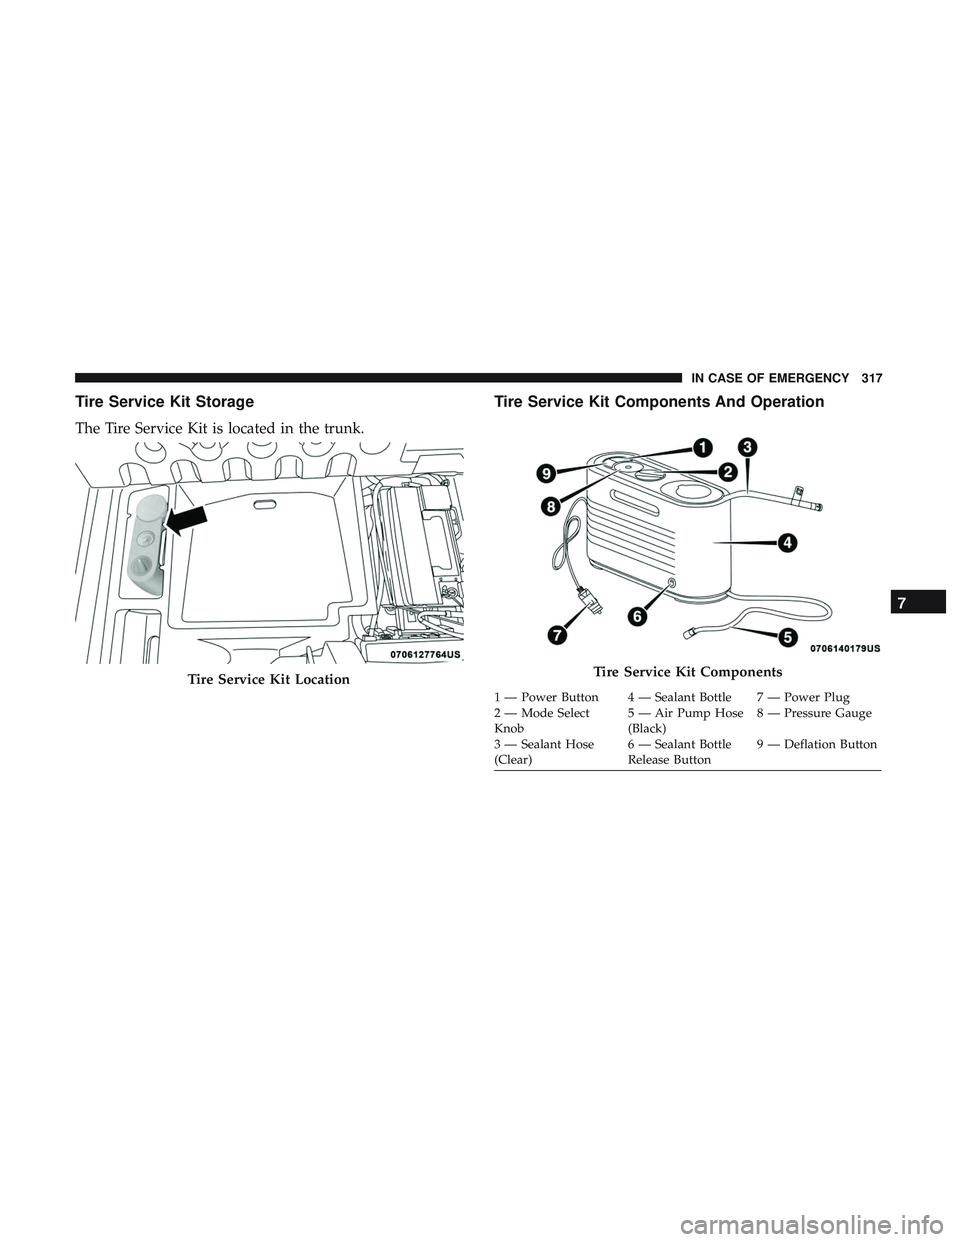
Tire Service Kit Storage
The Tire Service Kit is located in the trunk.
Tire Service Kit Components And Operation
Tire Service Kit LocationTire Service Kit Components
1 — Power Button 4 — Sealant Bottle 7 — Power Plug
2 — Mode Select
Knob5 — Air Pump Hose
(Black)8 — Pressure Gauge
3 — Sealant Hose
(Clear) 6 — Sealant Bottle
Release Button9 — Deflation Button
7
IN CASE OF EMERGENCY 317