Page 337 of 532
SERVICING AND MAINTENANCE
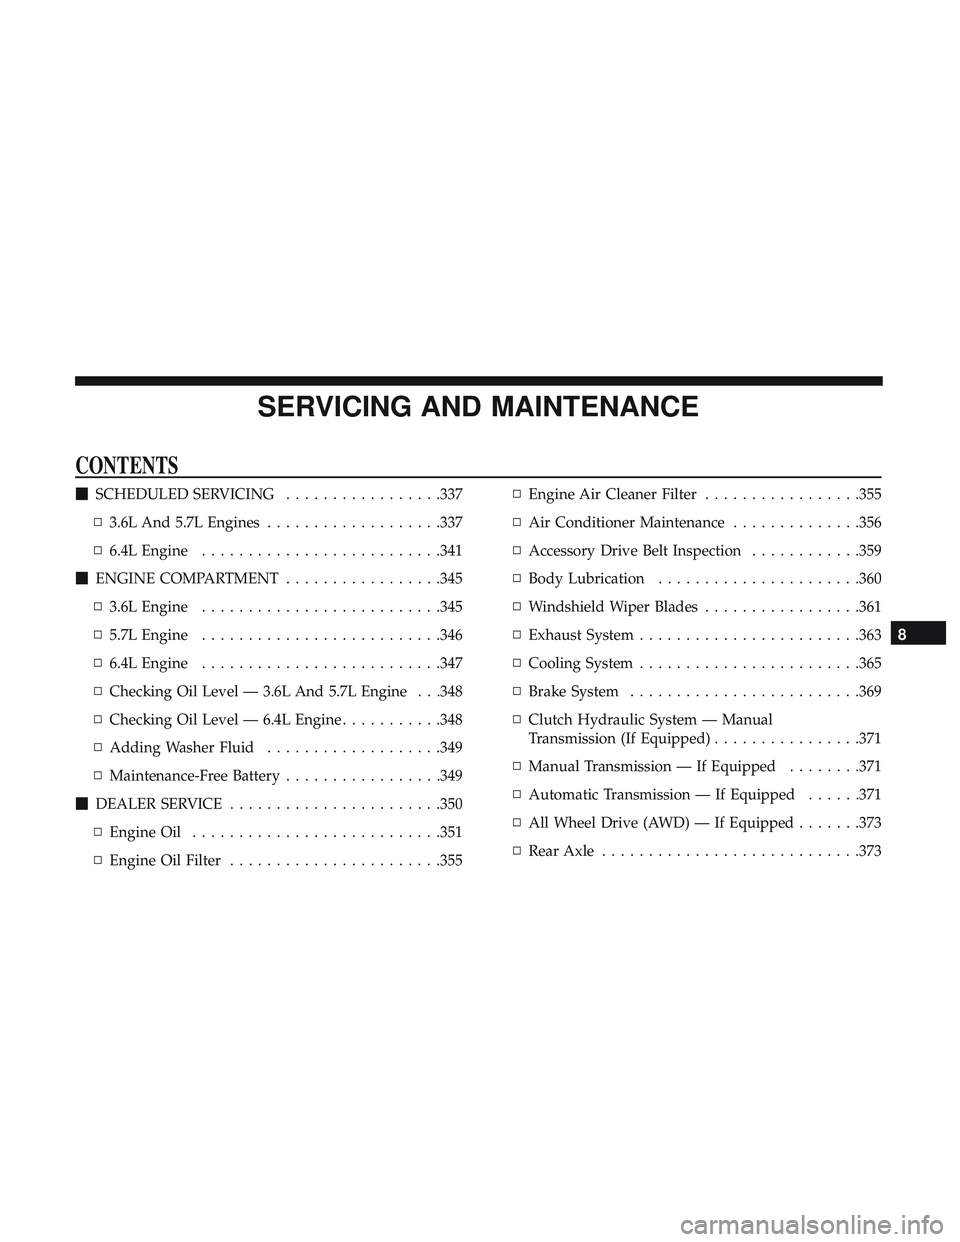
CONTENTS
�SCHEDULED SERVICING .................337
▫ 3.6L And 5.7L Engines ...................337
▫ 6.4L Engine ......................... .341
� ENGINE COMPARTMENT .................345
▫ 3.6L Engine ......................... .345
▫ 5.7L Engine ......................... .346
▫ 6.4L Engine ......................... .347
▫ Checking Oil Level — 3.6L And 5.7L Engine . . .348
▫ Checking Oil Level — 6.4L Engine ...........348
▫ Adding Washer Fluid ...................349
▫ Maintenance-Free Battery .................349
� DEALER SERVICE ...................... .350
▫ Engine Oil .......................... .351
▫ Engine Oil Filter ...................... .355▫
Engine Air Cleaner Filter .................355
▫ Air Conditioner Maintenance ..............356
▫ Accessory Drive Belt Inspection ............359
▫ Body Lubrication ..................... .360
▫ Windshield Wiper Blades .................361
▫ Exhaust System ....................... .363
▫ Cooling System ....................... .365
▫ Brake System ........................ .369
▫ Clutch Hydraulic System — Manual
Transmission (If Equipped) ................371
▫ Manual Transmission — If Equipped ........371
▫ Automatic Transmission — If Equipped ......371
▫ All Wheel Drive (AWD) — If Equipped .......373
▫ Rear
Axle ........................... .373
8
Page 340 of 532
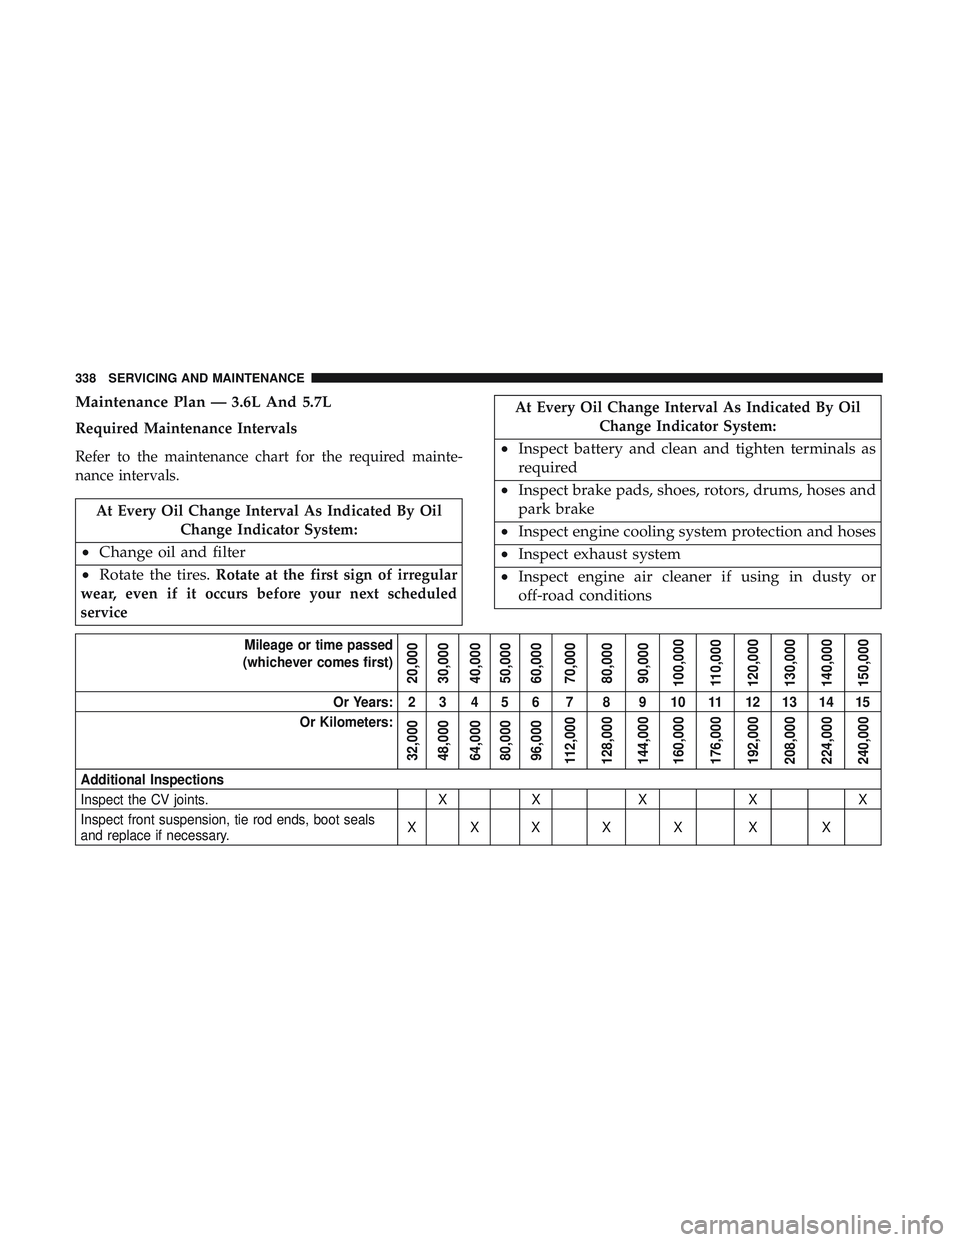
Maintenance Plan — 3.6L And 5.7L
Required Maintenance Intervals
Refer to the maintenance chart for the required mainte-
nance intervals.
At Every Oil Change Interval As Indicated By OilChange Indicator System:
•Change oil and filter
• Rotate the tires.
Rotate at the first sign of irregular
wear, even if it occurs before your next scheduled
service
At Every Oil Change Interval As Indicated By Oil Change Indicator System:
•Inspect battery and clean and tighten terminals as
required
• Inspect brake pads, shoes, rotors, drums, hoses and
park brake
• Inspect engine cooling system protection and hoses
• Inspect exhaust system
• Inspect engine air cleaner if using in dusty or
off-road conditions
Mileage or time passed
(whichever comes first)
20,000
30,000
40,000
50,000
60,000
70,000
80,000
90,000
100,000
110,000
120,000
130,000
140,000
150,000
Or Years: 2 3 4 5 6 7 8 9 10 11 12 13 14 15
Or Kilometers:
32,000
48,000
64,000
80,000
96,000
112,000
128,000
144,000
160,000
176,000
192,000
208,000
224,000
240,000
Additional Inspections
Inspect the CV joints. XX X XX
Inspect front suspension, tie rod ends, boot seals
and replace if necessary. XXX X X X X
338 SERVICING AND MAINTENANCE
Page 344 of 532
At Each Stop For Fuel
•Check the engine oil level. Refer to “Engine Compart-
ment” in this chapter for further information.
•
Check the windshield washer solvent and add if required.
Once A Month
• Check tire pressure and look for unusual wear or
damage.
• Inspect the battery, and clean and tighten the terminals
as required.
• Check the fluid levels of the coolant reservoir, brake
master cylinder, and add as needed. •
Check all lights and other electrical items for correct
operation.
At Each Oil Change
• Change the engine oil filter.
• Inspect the brake hoses and lines.
CAUTION!
Failure to perform the required maintenance items
may result in damage to the vehicle.
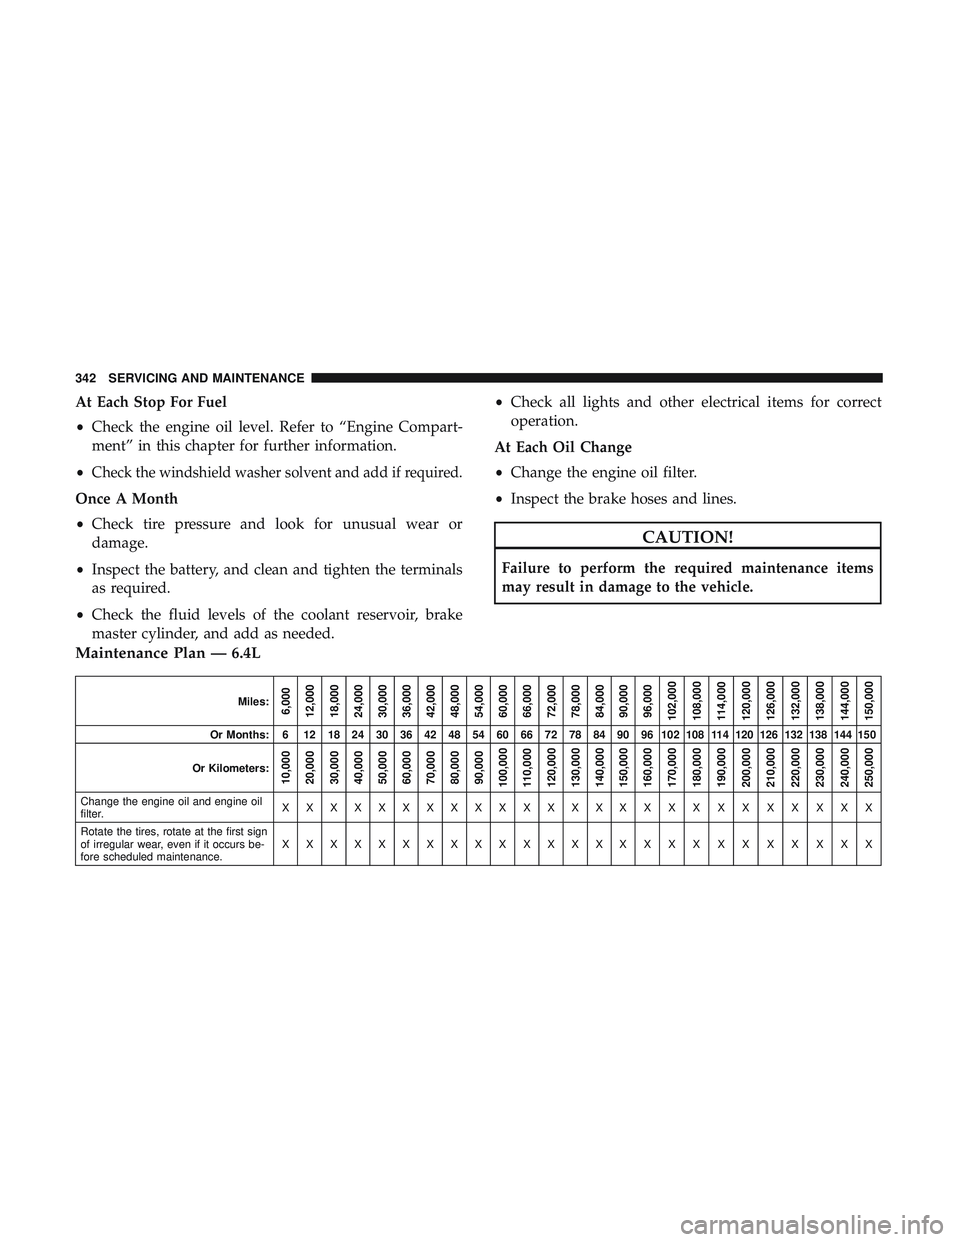
Maintenance Plan — 6.4L
Miles:6,000
12,000
18,000
24,000
30,000
36,000
42,000
48,000
54,000
60,000
66,000
72,000
78,000
84,000
90,000
96,000
102,000
108,000
114,000
120,000
126,000
132,000
138,000
144,000
150,000
Or Months: 6 12 18 24 30 36 42 48 54 60 66 72 78 84 90 96 102 108 114 120 126 132 138 144 150
Or Kilometers:
10,000
20,000
30,000
40,000
50,000
60,000
70,000
80,000
90,000
100,000
110,000
120,000
130,000
140,000
150,000
160,000
170,000
180,000
190,000
200,000
210,000
220,000
230,000
240,000
250,000
Change the engine oil and engine oil
filter. XXXXXXXXXXXXXXXXXXXXXXXXX
Rotate the tires, rotate at the first sign
of irregular wear, even if it occurs be-
fore scheduled maintenance. XXXXXXXXXXXXXXXXXXXXXXXXX
342 SERVICING AND MAINTENANCE
Page 347 of 532
ENGINE COMPARTMENT
3.6L Engine
1 — Remote Jump Start (Positive Battery Post)
2 — Power Distribution Center (Fuses)
3 — Remote Jump Start (Negative Battery Post)
4 — Brake Fluid Reservoir Access Cover
5 — Engine Coolant Pressure Cap6 — Engine Coolant Reservoir
7 — Air Cleaner Filter
8 — Engine Oil Fill
9 — Engine Oil Dipstick
10 — Washer Fluid Reservoir
8
SERVICING AND MAINTENANCE 345
Page 348 of 532
5.7L Engine
1 — Washer Fluid Reservoir
2 — Power Distribution Center (Fuses)
3 — Engine Oil Dipstick
4 — Engine Oil Fill5 — Engine Coolant Pressure Cap
6 — Brake Fluid Reservoir Access Cover
7 — Engine Coolant Reservoir
8 — Air Cleaner Filter
346 SERVICING AND MAINTENANCE
Page 349 of 532
6.4L Engine
1 — Washer Fluid Reservoir6 — Brake Fluid Reservoir Access Cover
2 — Remote Jump Start (Positive Battery Post) 7 — Engine Coolant Reservoir
3 — Power Distribution Center (Fuses) 8 — Air Cleaner Filter
4 — Remote Jump Start (Negative Battery Post) 9 — Engine Coolant Pressure Cap
5 — Engine Oil Fill 10 — Engine Oil Dipstick
8
SERVICING AND MAINTENANCE 347
Page 355 of 532
Lubricants which do not have both the engine oil certifi-
cation mark and the correct SAE viscosity grade number
should not be used.
Engine Oil Viscosity (SAE Grade) — 5.7L Engine
Mopar SAE 5W-20 engine oil approved to FCA Material
Standard MS-6395 such as Pennzoil, Shell Helix Ultra or
equivalent is recommended for all operating temperatures.
This engine oil improves low temperature starting and
vehicle fuel economy.
The engine oil filler cap also shows the recommended
engine oil viscosity for your engine. For information on
engine oil filler cap location, refer to the “Engine Compart-
ment” illustration in this section.
NOTE:Vehicles equipped with a 5.7L engine must use SAE
5W-20 oil. Failure to do so may result in improper opera-
tion of the Fuel Saver Technology. Refer to “Fuel Saver
Technology – If Equipped” in “Starting And Operating” for
further information.
Lubricants which do not have both the engine oil certifi-
cation mark and the correct SAE viscosity grade number
should not be used.
Engine Oil Viscosity — 6.4L Engine
Use Pennzoil Ultra Platinum 0W-40 engine or equivalent
Mopar oil meeting the FCA Material Standard MS-12633
for use in all operating temperatures.
The engine oil filler cap also shows the recommended
engine oil viscosity for your engine. For information on
engine oil filler cap location, refer to “Engine Compart-
ment” in this section for further information.
Synthetic Engine Oils
You may use synthetic engine oils provided the recom-
mended oil quality requirements are met, and the recom-
mended maintenance intervals for oil and filter changes are
followed.
Synthetic engine oils which do not have both the engine oil
certification mark and the correct SAE viscosity grade
number should not be used.
Shaker Hood — If Equipped
Shaker Hood Oil Filler
For vehicles equipped with a “Shaker Hood”, the upper
scoop will need to be removed so that oil can be properly
added to the engine.
8
SERVICING AND MAINTENANCE 353
Page 356 of 532
To do this, you will need follow the procedure below:
1. Remove the four nuts with the Shaker tool located inglove compartment.
2. Lift off the upper scoop.
NOTE: Be sure to clean off all debris around or inside for
the shaker assembly.
3. Locate the oil fill cover in base assembly to expose the oil fill cap.
4. Remove oil fill cap to add oil.
5. Re-install shaker assembly.
Shaker Hood Air Filter Cleaning
1. Remove the air filter from the intake and set the filter clamp a side.
2. Measure the length of the filter media.
3. Fill a bucket with warm clean water to the depth matching the filter media measurement and add a mild
household detergent or air filter cleaning solution.
4. Without allowing the solution to flow back into the inside of the air filter, submerge the filter media in to the
water and let it soak for ten minutes. 5. Empty the bucket filled with dirty water and repeat
steps 3 and 4.
6. Refill the bucket with clean warm water and rinse the filter by rotating the filter.
NOTE: The water should be clean with no signs of dirt in
the bucket.
7. Allow the filter to air dry. Re-install the filter on the intake system once it is dry.
Shaker Hood Removal And Cleaning
1. Remove the four nuts with the Shaker tool located in glove compartment.
2. Lift off the upper scoop.
NOTE: Be sure to clean off all debris around or inside for
the shaker assembly.
3. Using a water and mild detergent clean the following locations.
— The water drain slot located at the front forward edge of
the shaker assembly.
— The seals attached to the scoop and air box.
354 SERVICING AND MAINTENANCE