2019 DODGE CHALLENGER warning light
[x] Cancel search: warning lightPage 218 of 532

NOTE:
•When the parking brake is applied and the transmission
is placed in gear, the “Brake Warning Light” will flash. If
vehicle speed is detected, a chime will sound to alert the
driver. Fully release the parking brake before attempting
to move the vehicle.
• This light only shows that the parking brake is applied.
It does not show the degree of brake application.
When parking on a hill, it is important to turn the front
wheels toward the curb on a downhill grade and away
from the curb on an uphill grade. For vehicles equipped
with an automatic transmission, apply the parking brake
before placing the gear selector in PARK, otherwise the
load on the transmission locking mechanism may make it
difficult to move the gear selector out of PARK. The
parking brake should always be applied whenever the
driver is not in the vehicle.
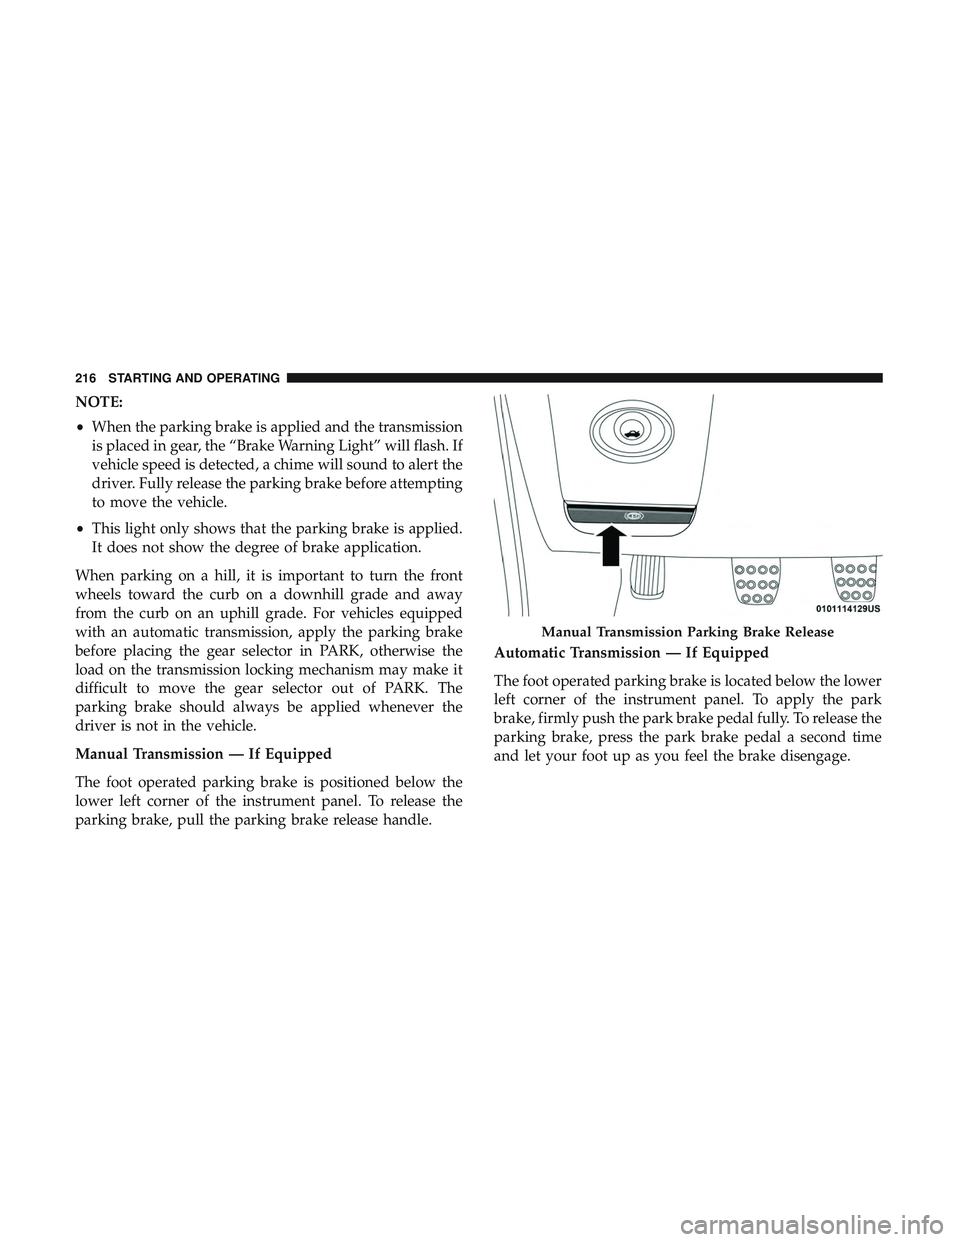
Manual Transmission — If Equipped
The foot operated parking brake is positioned below the
lower left corner of the instrument panel. To release the
parking brake, pull the parking brake release handle. Automatic Transmission — If Equipped
The foot operated parking brake is located below the lower
left corner of the instrument panel. To apply the park
brake, firmly push the park brake pedal fully. To release the
parking brake, press the park brake pedal a second time
and let your foot up as you feel the brake disengage.
Manual Transmission Parking Brake Release
216 STARTING AND OPERATING
Page 220 of 532

CAUTION!
If the Brake Warning Light remains on with the park-
ing brake released, a brake system malfunction is
indicated. Have the brake system serviced by an au-
thorized dealer immediately.
MANUAL TRANSMISSION — IF EQUIPPED
Six-Speed Manual Transmission
WARNING!
You or others could be injured if you leave the vehicle
unattended without having the park brake fully ap-
plied. The park brake should always be applied when
the driver is not in the vehicle, especially on an incline.
CAUTION!
•Never drive with your foot resting on the clutch
pedal, or try to hold the vehicle on a hill with the
clutch pedal partially engaged, as this will cause
abnormal wear on the clutch. Refer to “Electronic
Brake Control System/Hill Start Assist” in “Safety”
for further information.
• Failure to press the clutch pedal fully to the floor
may cause increased shift efforts, and may result in
damage to the clutch and transmission.
• Do not rest your hand on the shift lever while
driving, as this may result in transmission synchro-
nizer damage.
• Do not attempt to shift the transmission if the rear
wheels are spinning due to loss of traction. Damage
to the transmission may occur.
218 STARTING AND OPERATING
Page 234 of 532

SPORT MODE — WITHOUT PERFORMANCE
CONTROL
Your vehicle is equipped with a Sport Mode feature. This
mode is a configuration set up for typical enthusiast
driving. The engine, transmission (when equipped with
automatic transmission), and steering systems are all set to
their SPORT settings. Sport Mode will provide improved
throttle response and modified shifting for an enhanced
driving experience, as well the greatest amount of steering
feel. This mode may be activated and deactivated by
pushing the Sport button on the instrument panel switch
bank.
NOTE:If equipped with a manual transmission, th e1-4
Skip Shift Feature is disabled in SPORT Mode.
For vehicles equipped with Drive Modes or a “SUPER
TRACK PAK” button, refer to “Performance Pages — If
Equipped” in “Multimedia” for further information.
FUEL SAVER TECHNOLOGY 5.7L AND 6.4L ONLY
— IF EQUIPPED
This feature offers improved fuel economy by shutting off
four of the engine’s eight cylinders during light load and
cruise conditions. The system is automatic with no driver
inputs or additional driving skills required. NOTE:
This system may take some time to return to full
functionality after a battery disconnect.
POWER STEERING
The electric power steering system will give you good
vehicle response and increased ease of maneuverability in
tight spaces. The system will vary its assist to provide light
efforts while parking and good feel while driving. If the
electric steering system experiences a fault that prevents it
from providing assist, you will still have the ability to steer
the vehicle manually.
WARNING!
Continued operation with reduced assist could pose a
safety risk to yourself and others. Service should be
obtained as soon as possible.
Alternate electric power steering efforts can be selected
through the Uconnect System. Refer to ”Customer Pro-
grammable Features” within “Uconnect Settings” in “Mul-
timedia” for further information. If the Electric Power Steering warning icon is
displayed and the “SERVICE POWER STEER-
ING” or the “POWER STEERING ASSIST OFF –
232 STARTING AND OPERATING
Page 235 of 532

SERVICE SYSTEM” message is displayed within the in-
strument cluster display, this indicates the vehicle needs to
be taken to the dealer for service. Refer to “Warning Lights
And Messages” in “Getting To Know Your Instrument
Panel” for further information.
NOTE:
•Even if the power steering assistance is no longer
operational, it is still possible to steer the vehicle. Under
these conditions there will be a substantial increase in
steering effort, especially at low speeds and during
parking maneuvers.
• If the condition persists, see your authorized dealer for
service.
If the Steering icon is displayed and the “POWER STEER-
ING SYSTEM OVER TEMP” message is displayed on the
instrument cluster screen, they indicate that extreme steer-
ing maneuvers may have occurred which caused an over
temperature condition in the power steering system. Once
driving conditions are safe, pull over and let the vehicle
idle for a few moments until the icon and message turn off.SPEED CONTROL — IF EQUIPPED
When engaged, the Speed Control takes over accelerator
operations at speeds greater than 25 mph (40 km/h) or
20 mph (32 km/h), depending on engine size and axle
ratio.
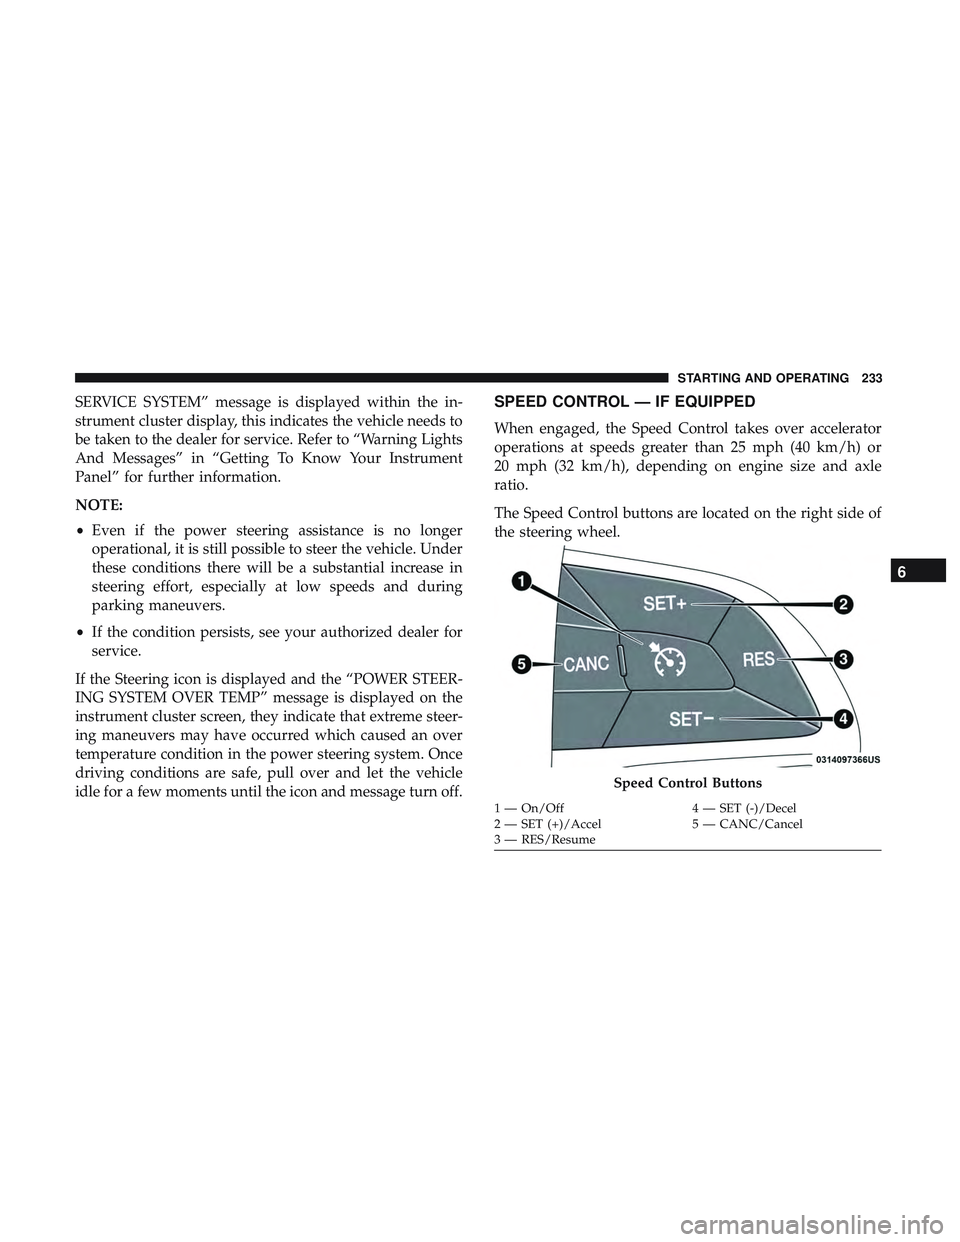
The Speed Control buttons are located on the right side of
the steering wheel.
Speed Control Buttons
1 — On/Off 4 — SET (-)/Decel
2 — SET (+)/Accel 5 — CANC/Cancel
3 — RES/Resume
6
STARTING AND OPERATING 233
Page 238 of 532

WARNING!
Speed Control can be dangerous where the system
cannot maintain a constant speed. Your vehicle could
go too fast for the conditions, and you could lose
control and have an accident. Do not use Speed Control
in heavy traffic or on roads that are winding, icy,
snow-covered or slippery.
To Resume Speed
To resume a previously set speed, push the RES button and
release. Resume can be used at any speed above 20 mph
(32 km/h).
To Deactivate
A soft tap on the brake pedal, pushing the CANC button,
or normal brake pressure while slowing the vehicle will
deactivate the Speed Control without erasing the set speed
from memory.
Pushing the on/off button or turning the ignition switch
OFF erases the set speed from memory.
ADAPTIVE CRUISE CONTROL (ACC) —
IF EQUIPPED
Adaptive Cruise Control (ACC) increases the driving con-
venience provided by cruise control while traveling on
highways and major roadways. However, it is not a safety
system and not designed to prevent collisions.Speed
Control function performs differently. Please refer to the
proper section within this chapter.
ACC will allow you to keep cruise control engaged in light
to moderate traffic conditions without the constant need to
reset your cruise control. ACC utilizes a radar sensor and a
forward facing camera designed to detect a vehicle directly
ahead of you.
NOTE:
• If the sensor does not detect a vehicle ahead of you, ACC
will maintain a fixed set speed.
• If the ACC sensor detects a vehicle ahead, ACC will
apply limited braking or accelerate (not to exceed the
original set speed) automatically to maintain a preset
following distance, while matching the speed of the
vehicle ahead.
236 STARTING AND OPERATING
Page 247 of 532

To increase the distance setting, push the Distance Setting —
Increase button and release. Each time the button is pushed,
the distance setting increases by one bar (longer).
To decrease the distance setting, push the Distance Setting —
Decrease button and release. Each time the button is pushed,
the distance setting decreases by one bar (shorter).
If there is no vehicle ahead, the vehicle will maintain the set
speed. If a slower moving vehicle is detected in the same
lane, the instrument cluster display will show the “Sensed
Vehicle Indicator” icon, and the system adjusts vehicle speed
automatically to maintain the distance setting, regardless of
the set speed.
The vehicle will then maintain the set distance until:
•The vehicle ahead accelerates to a speed above the set
speed.
• The vehicle ahead moves out of your lane or view of the
sensor.
• The distance setting is changed.
• The system disengages. (Refer to the information on
ACC Activation).
The maximum braking applied by ACC is limited; how-
ever, the driver can always apply the brakes manually, if
necessary.
NOTE: The brake lights will illuminate whenever the ACC
system applies the brakes.
A Proximity Warning will alert the driver if ACC predicts
that its maximum braking level is not sufficient to maintain
the set distance. If this occurs, a visual alert “BRAKE” will
flash in the instrument cluster display and a chime will
sound while ACC continues to apply its maximum braking
capacity.
Distance Setting 1 Bar (Short)
6
STARTING AND OPERATING 245
Page 265 of 532

CAUTION!
•To avoid vehicle damage, ParkView should only be
used as a parking aid. The ParkView camera is
unable to view every obstacle or object in your drive
path.
• To avoid vehicle damage, the vehicle must be driven
slowly when using ParkView to be able to stop in
time when an obstacle is seen. It is recommended
that the driver look frequently over his/her shoulder
when using ParkView.
NOTE: If snow, ice, mud, or any foreign substance builds
up on the camera lens, clean the lens, rinse with water, and
dry with a soft cloth. Do not cover the lens.
REFUELING THE VEHICLE
The gas cap is located behind the fuel filler door on the left
side of the vehicle. Use a finger to pull open the door. If the
gas cap is lost or damaged, be sure the replacement cap is
for use with this vehicle. NOTE:
When removing the fuel filler cap, lay the cap
tether in the hook, located on the fuel filler door.
WARNING!
• Never have any smoking materials lit in or near the
vehicle when the fuel door is open or the tank is
being filled.
•
Never add fuel when the engine is running. This is in
violation of most state and federal fire regulations and
may cause the “Malfunction Indicator Light” to turn on.
(Continued)
Fuel Filler Cap
6
STARTING AND OPERATING 263
Page 266 of 532

WARNING!(Continued)
•A fire may result if fuel is pumped into a portable
container that is inside of a vehicle. You could be
burned. Always place fuel containers on the ground
while filling.
CAUTION!
• Damage to the fuel system or emissions control
system could result from using an improper fuel
tank filler tube cap.
• A poorly fitting fuel filler cap could let impurities
into the fuel system.
• A poorly fitting fuel filler cap may cause the “Mal-
function Indicator Light (MIL)” to turn on.
• To avoid fuel spillage and overfilling, do not “top
off” the fuel tank after filling. When the fuel nozzle
“clicks” or shuts off, the fuel tank is full. NOTE:
•
When the fuel nozzle “clicks” or shuts off, the fuel tank
is full.
• Tighten the gas cap until you hear a “clicking” sound.
This is an indication that the gas cap is tightened
properly. The MIL in the instrument cluster may turn on
if the gas cap is not secured properly. Make sure that the
gas cap is tightened each time the vehicle is refueled.Loose Fuel Filler Cap Message
If the vehicle diagnostic system determines that the fuel
filler cap is loose, improperly installed, or damaged, a
”gASCAP” message will display in the odometer or a
“Check Gascap” message will display in the instrument
cluster. If this occurs, tighten the fuel filler cap properly
and press the Trip Odometer button to turn off the mes-
sage. If the problem continues, the message will appear the
next time the vehicle is started.
A loose, improperly installed, or damaged fuel filler cap
may also turn on the MIL.
264 STARTING AND OPERATING