Page 304 of 532
4. Remove the spare tire.
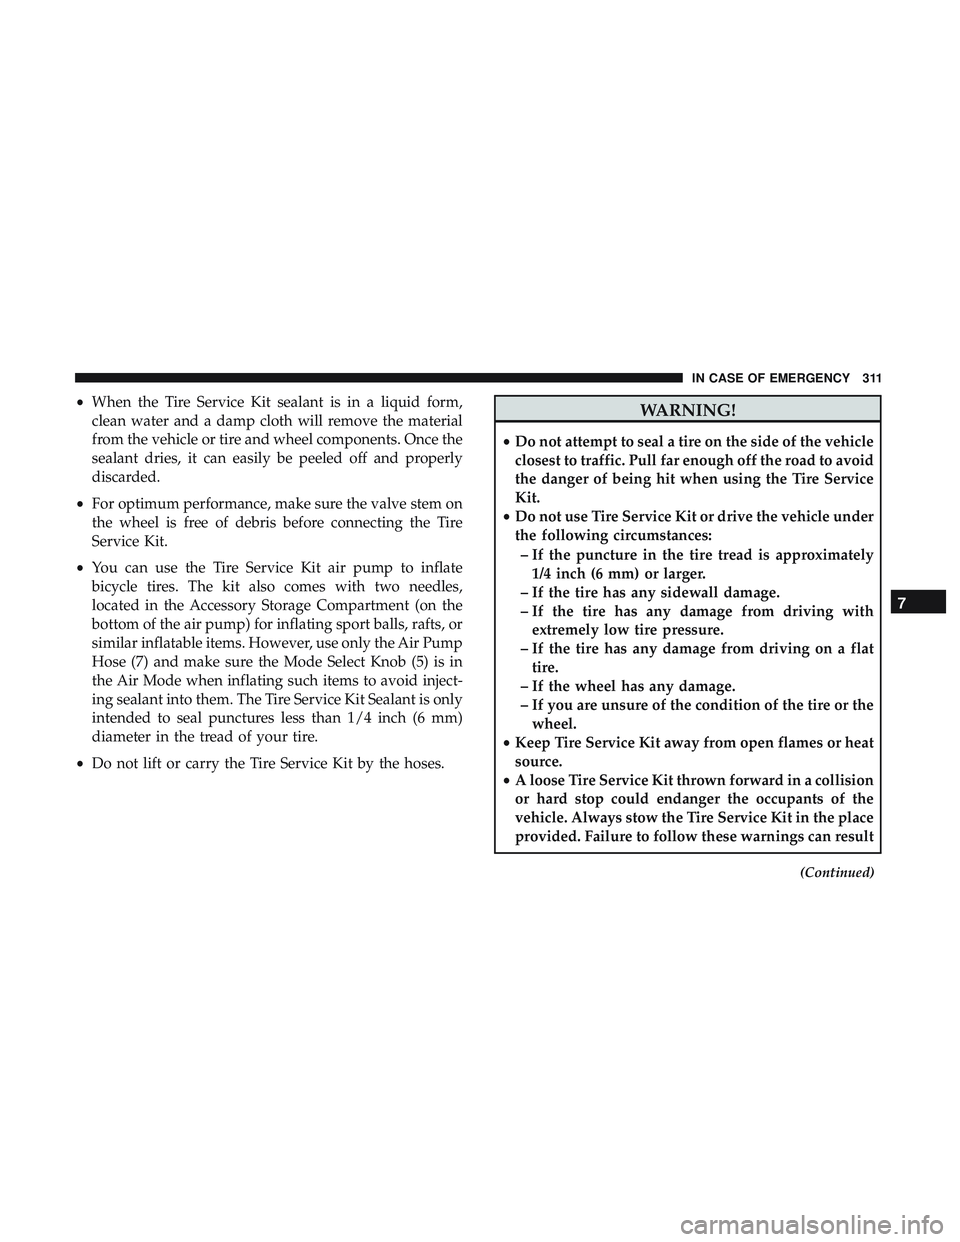
5. Rotate the fastener securing the jack counterclockwise toremove it. 6. Remove the jack and lug wrench assembly from under
the spare tire. Turn the jack screw to the left to loosen the
lug wrench, and remove the wrench from the jack
assembly.
WARNING!
A loose tire or jack thrown forward in a collision or
hard stop could endanger the occupants of the vehicle.
Always stow the jack parts and the spare tire in the
places provided. Have the deflated (flat) tire repaired
or replaced immediately.
Spare Tire FastenerJack Fastener
302 IN CASE OF EMERGENCY
Page 309 of 532

7. Mount the spare tire.
CAUTION!
Do not attempt to raise the vehicle by jacking on
locations other than those indicated.NOTE:
•For vehicles so equipped, do not attempt to install a
center cap or wheel cover on the compact spare.
• Refer to “Compact Spare Tire” and to “Limited-Use
Spare” under “Tires—General Information” in “Servic-
ing And Maintenance” for additional warnings, cau-
tions, and information about the spare tire, its use, and
operation.
8. Install the lug nuts with the cone shaped end of the lug nut toward the wheel. Lightly tighten the lug nuts.
WARNING!
To avoid the risk of forcing the vehicle off the jack, do
not tighten the wheel nuts fully until the vehicle has
been lowered. Failure to follow this warning may
result in serious injury.
9. Lower the vehicle to the ground by turning the jack handle counterclockwise.
10. Refer to “Torque Specifications” in “Technical Specifi- cations” section for proper lug nut torque.
Mounting Spare Tire
7
IN CASE OF EMERGENCY 307
Page 310 of 532

11. Stow the jack, tools and flat tire. Make sure the base ofthe jack faces the front of the vehicle before tightening
down the fastener.
WARNING!
A loose tire or jack thrown forward in a collision or
hard stop could endanger the occupants of the vehicle.
Always stow the jack parts and the spare tire in the
places provided. Have the deflated (flat) tire repaired
or replaced immediately.
Road Tire Installation
1. Mount the road tire on the axle.
2. Install the remaining lug nuts with the cone shaped endof the nut toward the wheel. Lightly tighten the lug
nuts.
WARNING!
To avoid the risk of forcing the vehicle off the jack, do
not tighten the wheel nuts fully until the vehicle has
been lowered. Failure to follow this warning may
result in serious injury. 3. Lower the vehicle to the ground by turning the jack
handle counterclockwise.
4. Refer to “Torque Specifications” in “Technical Specifica- tions” for proper lug nut torque.
5. After 25 miles (40 km), check the lug nut torque with a torque wrench to ensure that all lug nuts are properly
seated against the wheel.
TIRE SERVICE KIT — IF EQUIPPED
Small punctures up to 1/4 inch (6 mm) in the tire tread can
be sealed with Tire Service Kit. Foreign objects (e.g., screws
or nails) should not be removed from the tire. Tire Service
Kit can be used in outside temperatures down to approxi-
mately -4°F (-20°C).
This kit will provide a temporary tire seal, allowing you to
drive your vehicle up to 100 miles (160 km) with a
maximum speed of 50 mph (80 km/h).
308 IN CASE OF EMERGENCY
Page 313 of 532

•When the Tire Service Kit sealant is in a liquid form,
clean water and a damp cloth will remove the material
from the vehicle or tire and wheel components. Once the
sealant dries, it can easily be peeled off and properly
discarded.
• For optimum performance, make sure the valve stem on
the wheel is free of debris before connecting the Tire
Service Kit.
• You can use the Tire Service Kit air pump to inflate
bicycle tires. The kit also comes with two needles,
located in the Accessory Storage Compartment (on the
bottom of the air pump) for inflating sport balls, rafts, or
similar inflatable items. However, use only the Air Pump
Hose (7) and make sure the Mode Select Knob (5) is in
the Air Mode when inflating such items to avoid inject-
ing sealant into them. The Tire Service Kit Sealant is only
intended to seal punctures less than 1/4 inch (6 mm)
diameter in the tread of your tire.
• Do not lift or carry the Tire Service Kit by the hoses.WARNING!
•Do not attempt to seal a tire on the side of the vehicle
closest to traffic. Pull far enough off the road to avoid
the danger of being hit when using the Tire Service
Kit.
• Do not use Tire Service Kit or drive the vehicle under
the following circumstances:
– If the puncture in the tire tread is approximately 1/4 inch (6 mm) or larger.
– If the tire has any sidewall damage.
– If the tire has any damage from driving with extremely low tire pressure.
– If the tire has any damage from driving on a flat tire.
– If the wheel has any damage.
– If you are unsure of the condition of the tire or the wheel.
• Keep Tire Service Kit away from open flames or heat
source.
• A loose Tire Service Kit thrown forward in a collision
or hard stop could endanger the occupants of the
vehicle. Always stow the Tire Service Kit in the place
provided. Failure to follow these warnings can result
(Continued)
7
IN CASE OF EMERGENCY 311
Page 321 of 532

•The Sealant Bottle (4) and Sealant Hose (3) are a one tire
application use and need to be replaced after each use.
Always replace these components immediately at your
original equipment vehicle dealer.
• When the Tire Service Kit sealant is in a liquid form,
clean water and a damp cloth will remove the material
from the vehicle or tire and wheel components. Once the
sealant dries, it can easily be peeled off and properly
discarded.
• For optimum performance, make sure the valve stem on
the wheel is free of debris before connecting the Tire
Service Kit.
• You can use the Tire Service Kit air pump to inflate
bicycle tires. The kit also comes with two needles,
located in the Accessory Storage Compartment (on the
bottom of the air pump) for inflating sport balls, rafts, or
similar inflatable items. However, use only the Air Pump
Hose (5) and make sure the Mode Select Knob (2) is in
the Air Mode when inflating such items to avoid inject-
ing sealant into them. The Tire Service Kit Sealant is only
intended to seal punctures less than 1/4 inch (6 mm)
diameter in the tread of your tire.
• Do not lift or carry the Tire Service Kit by the hoses.WARNING!
•Do not attempt to seal a tire on the side of the vehicle
closest to traffic. Pull far enough off the road to avoid
the danger of being hit when using the Tire Service
Kit.
• Do not use Tire Service Kit or drive the vehicle under
the following circumstances:
– If the puncture in the tire tread is approximately 1/4 inch (6 mm) or larger.
– If the tire has any sidewall damage.
– If the tire has any damage from driving with extremely low tire pressure.
– If the tire has any damage from driving on a flat tire.
– If the wheel has any damage.
– If you are unsure of the condition of the tire or the wheel.
• Keep Tire Service Kit away from open flames or heat
source.
• A loose Tire Service Kit thrown forward in a collision
or hard stop could endanger the occupants of the
vehicle. Always stow the Tire Service Kit in the place
provided. Failure to follow these warnings can result
(Continued)
7
IN CASE OF EMERGENCY 319
Page 330 of 532

to the radiator and aids in removing heat from the
engine cooling system.
WARNING!
You or others can be badly burned by hot engine
coolant (antifreeze) or steam from your radiator. If you
see or hear steam coming from under the hood, do not
open the hood until the radiator has had time to cool.
Never try to open a cooling system pressure cap when
the radiator or coolant bottle is hot.
CAUTION!
Driving with a hot cooling system could damage your
vehicle. If the temperature gauge reads HOT (H), pull
over and stop the vehicle. Idle the vehicle with the air
conditioner turned off until the pointer drops back
into the normal range. If the pointer remains on HOT
(H), and you hear continuous chimes, turn the engine
off immediately and call for service.
MANUAL PARK RELEASE — 8–SPEED
TRANSMISSION
WARNING!
Always secure your vehicle by fully applying the
parking brake before activating the Manual Park Re-
lease. In addition, you should be seated in the driver’s
seat with your foot firmly on the brake pedal when
activating the Manual Park Release. Activating the
Manual Park Release will allow your vehicle to roll
away if it is not secured by the parking brake, or by
proper connection to a tow vehicle. Activating the
Manual Park Release on an unsecured vehicle could
lead to serious injury or death for those in or around
the vehicle.
In order to move the vehicle in cases where the transmis-
sion will not shift out of PARK (such as a dead battery), a
Manual Park Release is available.
328 IN CASE OF EMERGENCY
Page 332 of 532

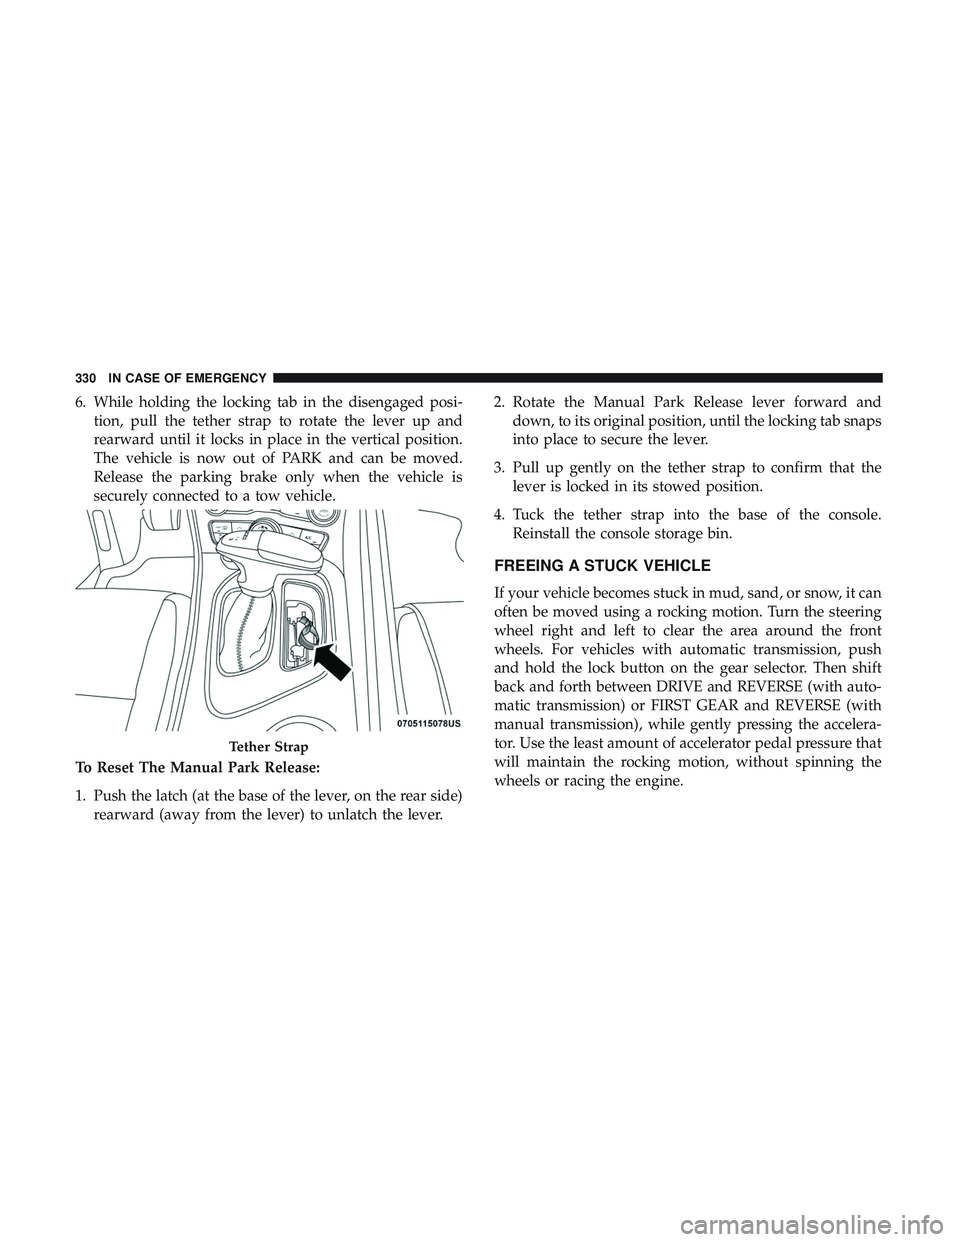
6. While holding the locking tab in the disengaged posi-tion, pull the tether strap to rotate the lever up and
rearward until it locks in place in the vertical position.
The vehicle is now out of PARK and can be moved.
Release the parking brake only when the vehicle is
securely connected to a tow vehicle.
To Reset The Manual Park Release:
1. Push the latch (at the base of the lever, on the rear side) rearward (away from the lever) to unlatch the lever. 2. Rotate the Manual Park Release lever forward and
down, to its original position, until the locking tab snaps
into place to secure the lever.
3. Pull up gently on the tether strap to confirm that the lever is locked in its stowed position.
4. Tuck the tether strap into the base of the console. Reinstall the console storage bin.
FREEING A STUCK VEHICLE
If your vehicle becomes stuck in mud, sand, or snow, it can
often be moved using a rocking motion. Turn the steering
wheel right and left to clear the area around the front
wheels. For vehicles with automatic transmission, push
and hold the lock button on the gear selector. Then shift
back and forth between DRIVE and REVERSE (with auto-
matic transmission) or FIRST GEAR and REVERSE (with
manual transmission), while gently pressing the accelera-
tor. Use the least amount of accelerator pedal pressure that
will maintain the rocking motion, without spinning the
wheels or racing the engine.
Tether Strap
330 IN CASE OF EMERGENCY
Page 334 of 532
TOWING A DISABLED VEHICLE
This section describes procedures for towing a disabled
vehicle using a commercial towing service.
Towing Condition Wheels OFF TheGroundRWD MODELS AWD MODELS
Flat Tow NONEIf transmission is operable:
•Transmission in NEUTRAL
• 30 mph (48 km/h) maxspeed
• 30 miles (48 km) maxdistance NOT ALLOWED
Wheel Lift Or Dolly Tow Front
NOT RECOMMENDED (but,
if used, same limitations as above) NOT ALLOWED
Rear NOT RECOMMENDED NOT RECOMMENDED, but, if
used:
•Ignition in ON/RUN mode
• Transmission in NEUTRAL
(NOT in PARK)
Flatbed ALL BEST METHOD BEST METHOD
332 IN CASE OF EMERGENCY