Page 439 of 532
Compass CalibrationYe s
NOTE:
Press “Compass Calibration” on the touchscreen to enter calibration. To start calibration of the compass, press the “Yes” but-
ton on the touchscreen and complete one or more 360-degree turns (in an area free from large metal or metallic objects). A
message will appear on the touchscreen when the compass has been successfully calibrated.
Keep magnetic materials away from the rear view mirror, such as Mobile Phones, Laptops and Radar Detectors. This is
where the compass module is located, and it can cause interference with the compass sensor, and it may give false readings.
Compass Variance Zone Map10
MULTIMEDIA 437
Page 442 of 532
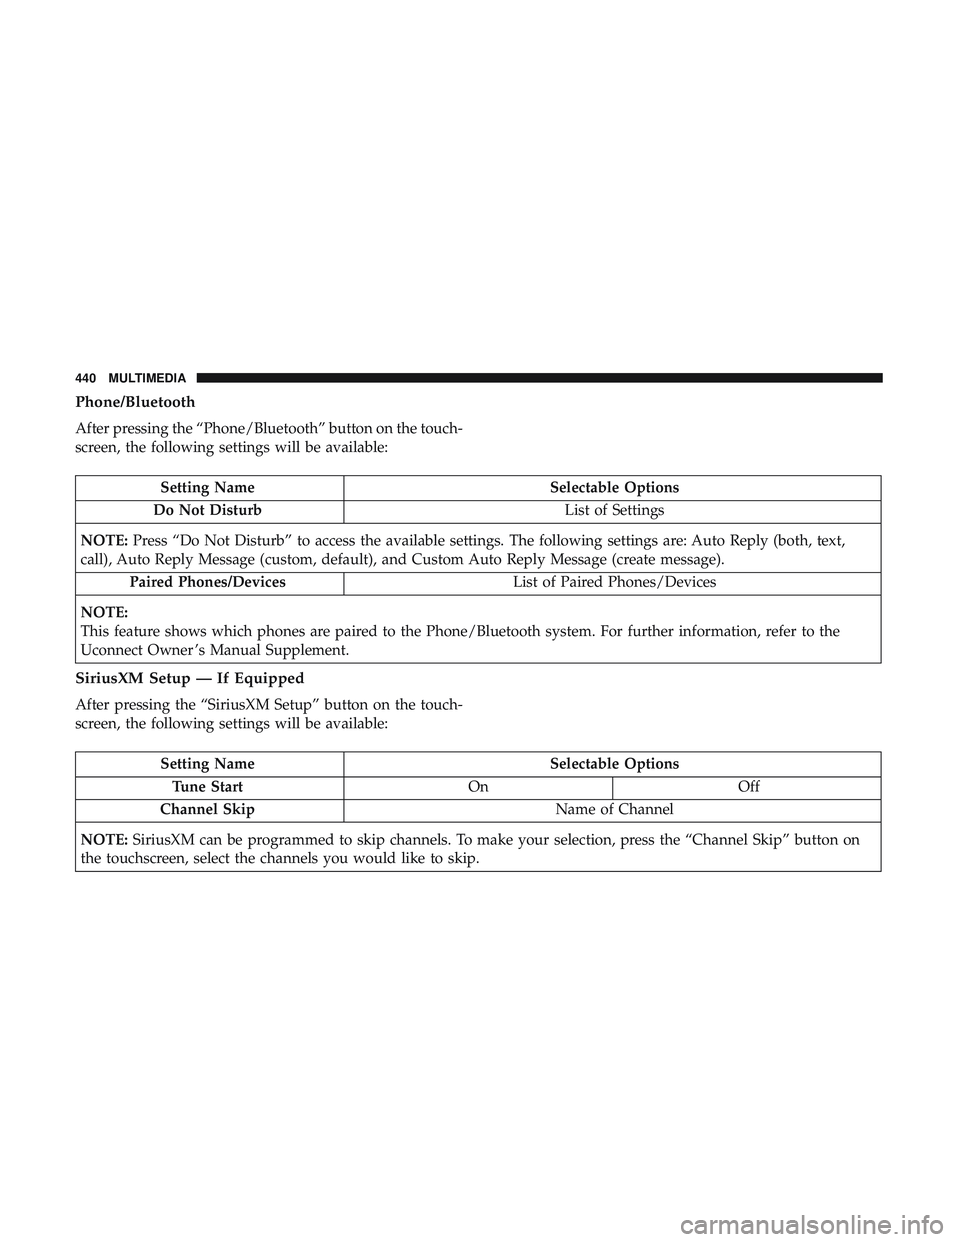
Phone/Bluetooth
After pressing the “Phone/Bluetooth” button on the touch-
screen, the following settings will be available:
Setting NameSelectable Options
Do Not Disturb List of Settings
NOTE: Press “Do Not Disturb” to access the available settings. The following settings are: Auto Reply (both, text,
call), Auto Reply Message (custom, default), and Custom Auto Reply Message (create message).
Paired Phones/Devices List of Paired Phones/Devices
NOTE:
This feature shows which phones are paired to the Phone/Bluetooth system. For further information, refer to the
Uconnect Owner ’s Manual Supplement.
SiriusXM Setup — If Equipped
After pressing the “SiriusXM Setup” button on the touch-
screen, the following settings will be available:
Setting Name Selectable Options
Tune Start OnOff
Channel Skip Name of Channel
NOTE: SiriusXM can be programmed to skip channels. To make your selection, press the “Channel Skip” button on
the touchscreen, select the channels you would like to skip.
440 MULTIMEDIA
Page 445 of 532

System Information
After pressing the “System Information” button on the
touchscreen, the following settings will be available:
Setting NameSelectable Options
Software License System Software Information Screen
NOTE:
When the “Software License” feature is selected, a “System Software Information” screen will appear, displaying the
system software version. You can also update your maps with a USB device. Please see your authorized dealer for
further information.
Customer Programmable Features — Uconnect
4C/4C NAV Settings
Press the “Apps” button (if equipped), and then
press the “Settings” button on the touchscreen to dis-
play the menu setting screen. In this mode, the
Uconnect system allows you to access programmable
features that may be equipped such as Language, Dis-
play, Units, Voice, Clock & Date, Safety & Driving
Assistance, Mirrors & Wipers, Lights, Doors & Locks,
Auto-On Comfort, Key Off Options, Audio, Phone/
Bluetooth, SiriusXM Setup, Reset, and System Informa-
tion.
NOTE: Depending on the vehicle’s options, feature set-
tings may vary.
When making a selection, press the button on the touch-
screen to enter the desired mode. Once in the desired
mode, press and release the preferred setting “option” until
a check-mark appears next to the setting, showing that
setting has been selected. Once the setting is complete,
press the “X” button on the touchscreen to close out of the
settings screen. Pressing the up or down arrow button on
the right side of the screen will allow you to toggle up or
down through the available settings.
10
MULTIMEDIA 443
Page 459 of 532
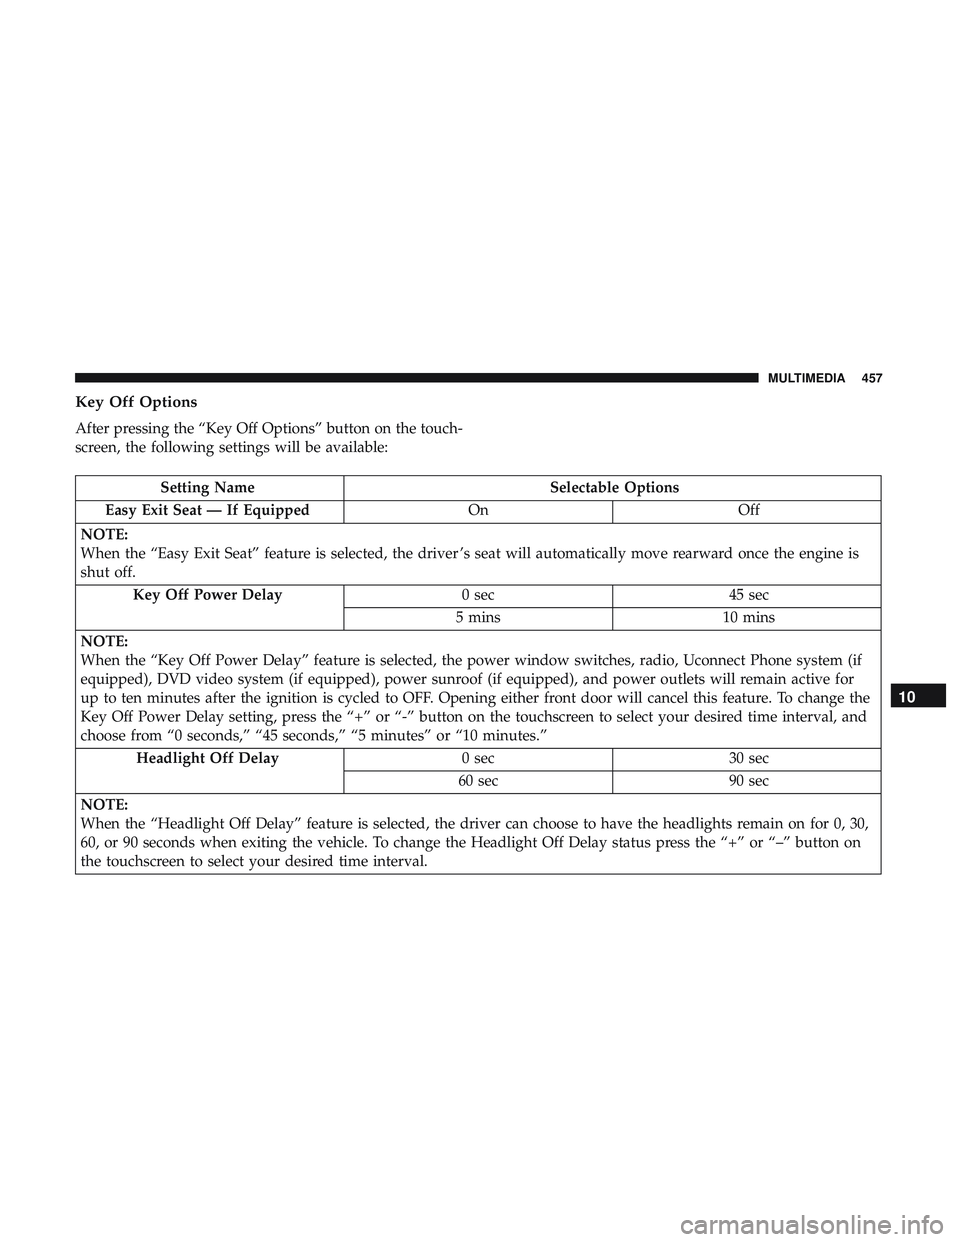
Key Off Options
After pressing the “Key Off Options” button on the touch-
screen, the following settings will be available:
Setting NameSelectable Options
Easy Exit Seat — If Equipped OnOff
NOTE:
When the “Easy Exit Seat” feature is selected, the driver ’s seat will automatically move rearward once the engine is
shut off. Key Off Power Delay 0 sec45 sec
5 mins 10 mins
NOTE:
When the “Key Off Power Delay” feature is selected, the power window switches, radio, Uconnect Phone system (if
equipped), DVD video system (if equipped), power sunroof (if equipped), and power outlets will remain active for
up to ten minutes after the ignition is cycled to OFF. Opening either front door will cancel this feature. To change the
Key Off Power Delay setting, press the “+” or “-” button on the touchscreen to select your desired time interval, and
choose from “0 seconds,” “45 seconds,” “5 minutes” or “10 minutes.” Headlight Off Delay 0 sec30 sec
60 sec 90 sec
NOTE:
When the “Headlight Off Delay” feature is selected, the driver can choose to have the headlights remain on for 0, 30,
60, or 90 seconds when exiting the vehicle. To change the Headlight Off Delay status press the “+” or “–” button on
the touchscreen to select your desired time interval.
10
MULTIMEDIA 457
Page 462 of 532
Phone/Bluetooth Settings
After pressing the “Phone/Bluetooth Settings” button on
the touchscreen, the following settings will be available:
Setting NameSelectable Options
Do Not Disturb List of Settings
NOTE:
Press “Do Not Disturb” to access the available settings. The following settings are: Auto Reply (both, text, call), Auto
Reply Message (custom, default), and Custom Auto Reply Message (create message). Paired Phones and Audio Sources List Of Paired Phones and Audio Sources
NOTE:
The “Paired Phones and Audio Sources” feature shows which phones and audio sources are paired to the Phone and
Audio Sources Settings system. For further information, refer to the Uconnect Owner ’s Manual Supplement. Smartphone Projection Manager OnOff
NOTE: Pressing “Smartphone Projection Manager” feature allows you to see a list of all connected phones and gives
you the option to determine which phone will be used for projection (Apple CarPlay or Android Auto).
460 MULTIMEDIA
Page 485 of 532
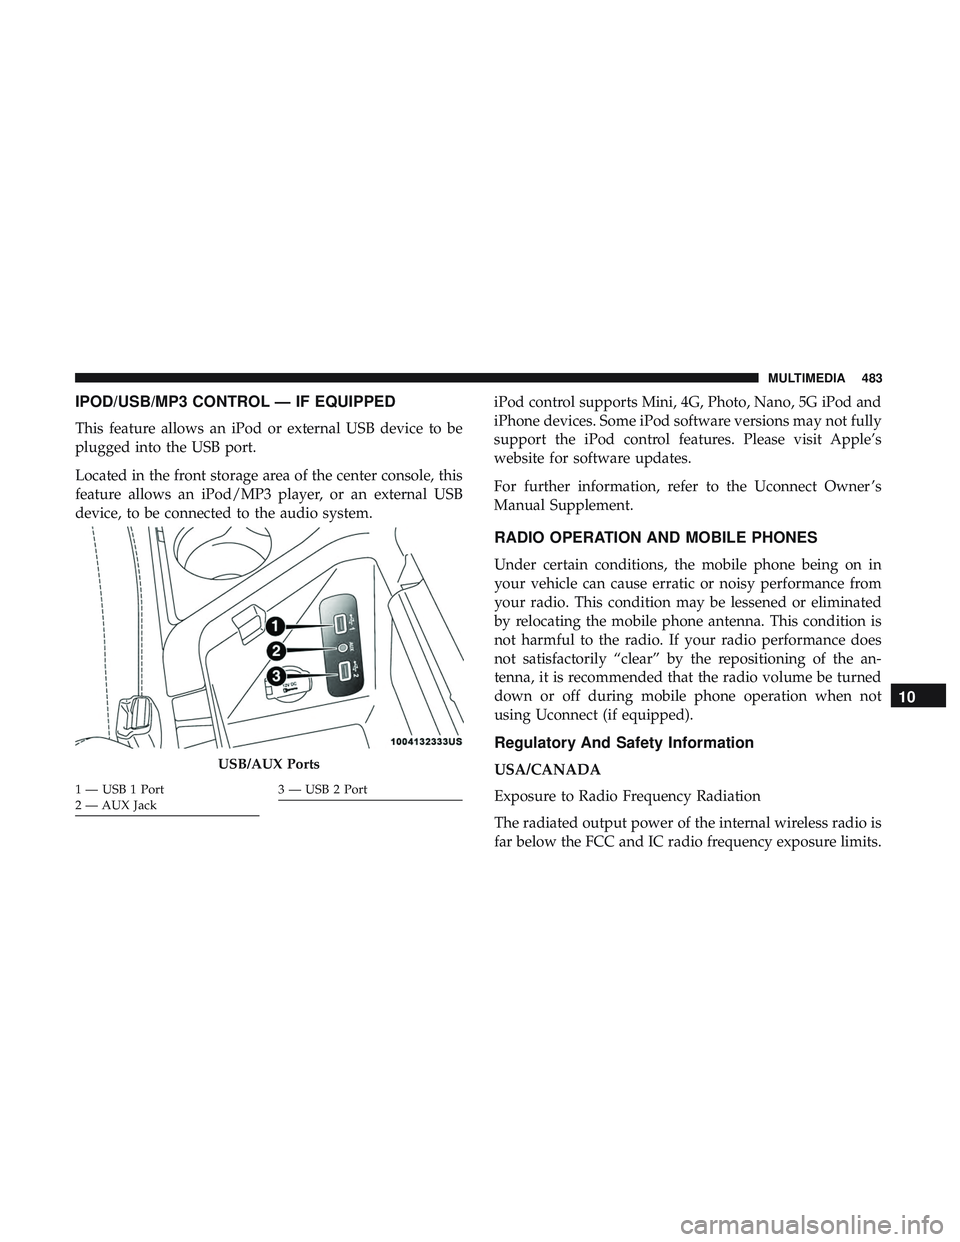
IPOD/USB/MP3 CONTROL — IF EQUIPPED
This feature allows an iPod or external USB device to be
plugged into the USB port.
Located in the front storage area of the center console, this
feature allows an iPod/MP3 player, or an external USB
device, to be connected to the audio system.iPod control supports Mini, 4G, Photo, Nano, 5G iPod and
iPhone devices. Some iPod software versions may not fully
support the iPod control features. Please visit Apple’s
website for software updates.
For further information, refer to the Uconnect Owner ’s
Manual Supplement.
RADIO OPERATION AND MOBILE PHONES
Under certain conditions, the mobile phone being on in
your vehicle can cause erratic or noisy performance from
your radio. This condition may be lessened or eliminated
by relocating the mobile phone antenna. This condition is
not harmful to the radio. If your radio performance does
not satisfactorily “clear” by the repositioning of the an-
tenna, it is recommended that the radio volume be turned
down or off during mobile phone operation when not
using Uconnect (if equipped).
Regulatory And Safety Information
USA/CANADA
Exposure to Radio Frequency Radiation
The radiated output power of the internal wireless radio is
far below the FCC and IC radio frequency exposure limits.USB/AUX Ports
1 — USB 1 Port
2 — AUX Jack3 — USB 2 Port
10
MULTIMEDIA 483
Page 486 of 532
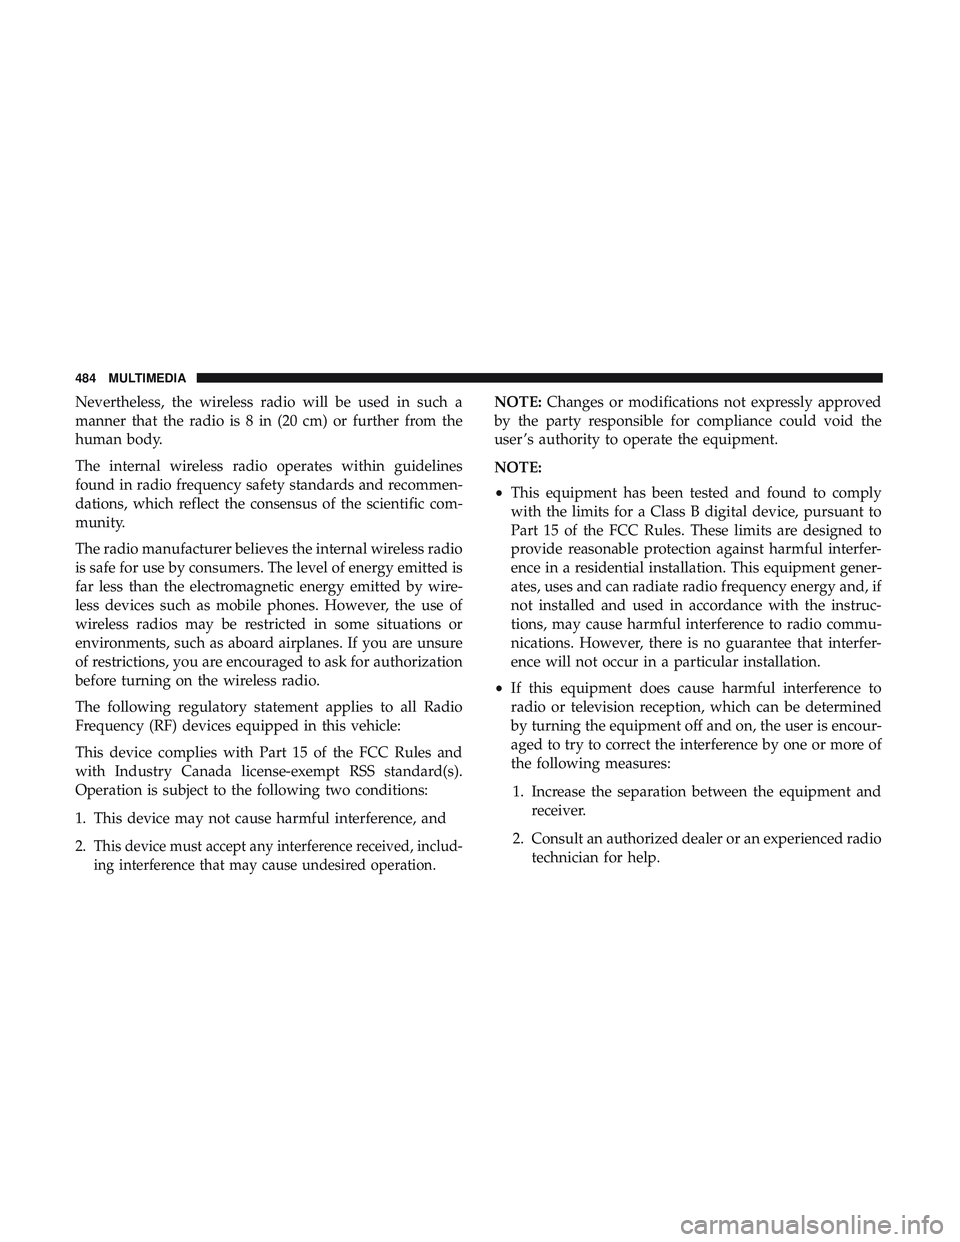
Nevertheless, the wireless radio will be used in such a
manner that the radio is 8 in (20 cm) or further from the
human body.
The internal wireless radio operates within guidelines
found in radio frequency safety standards and recommen-
dations, which reflect the consensus of the scientific com-
munity.
The radio manufacturer believes the internal wireless radio
is safe for use by consumers. The level of energy emitted is
far less than the electromagnetic energy emitted by wire-
less devices such as mobile phones. However, the use of
wireless radios may be restricted in some situations or
environments, such as aboard airplanes. If you are unsure
of restrictions, you are encouraged to ask for authorization
before turning on the wireless radio.
The following regulatory statement applies to all Radio
Frequency (RF) devices equipped in this vehicle:
This device complies with Part 15 of the FCC Rules and
with Industry Canada license-exempt RSS standard(s).
Operation is subject to the following two conditions:
1. This device may not cause harmful interference, and
2.
This device must accept any interference received, includ-
ing interference that may cause undesired operation.
NOTE:Changes or modifications not expressly approved
by the party responsible for compliance could void the
user ’s authority to operate the equipment.
NOTE:
• This equipment has been tested and found to comply
with the limits for a Class B digital device, pursuant to
Part 15 of the FCC Rules. These limits are designed to
provide reasonable protection against harmful interfer-
ence in a residential installation. This equipment gener-
ates, uses and can radiate radio frequency energy and, if
not installed and used in accordance with the instruc-
tions, may cause harmful interference to radio commu-
nications. However, there is no guarantee that interfer-
ence will not occur in a particular installation.
• If this equipment does cause harmful interference to
radio or television reception, which can be determined
by turning the equipment off and on, the user is encour-
aged to try to correct the interference by one or more of
the following measures:
1. Increase the separation between the equipment and receiver.
2. Consult an authorized dealer or an experienced radio technician for help.
484 MULTIMEDIA
Page 488 of 532
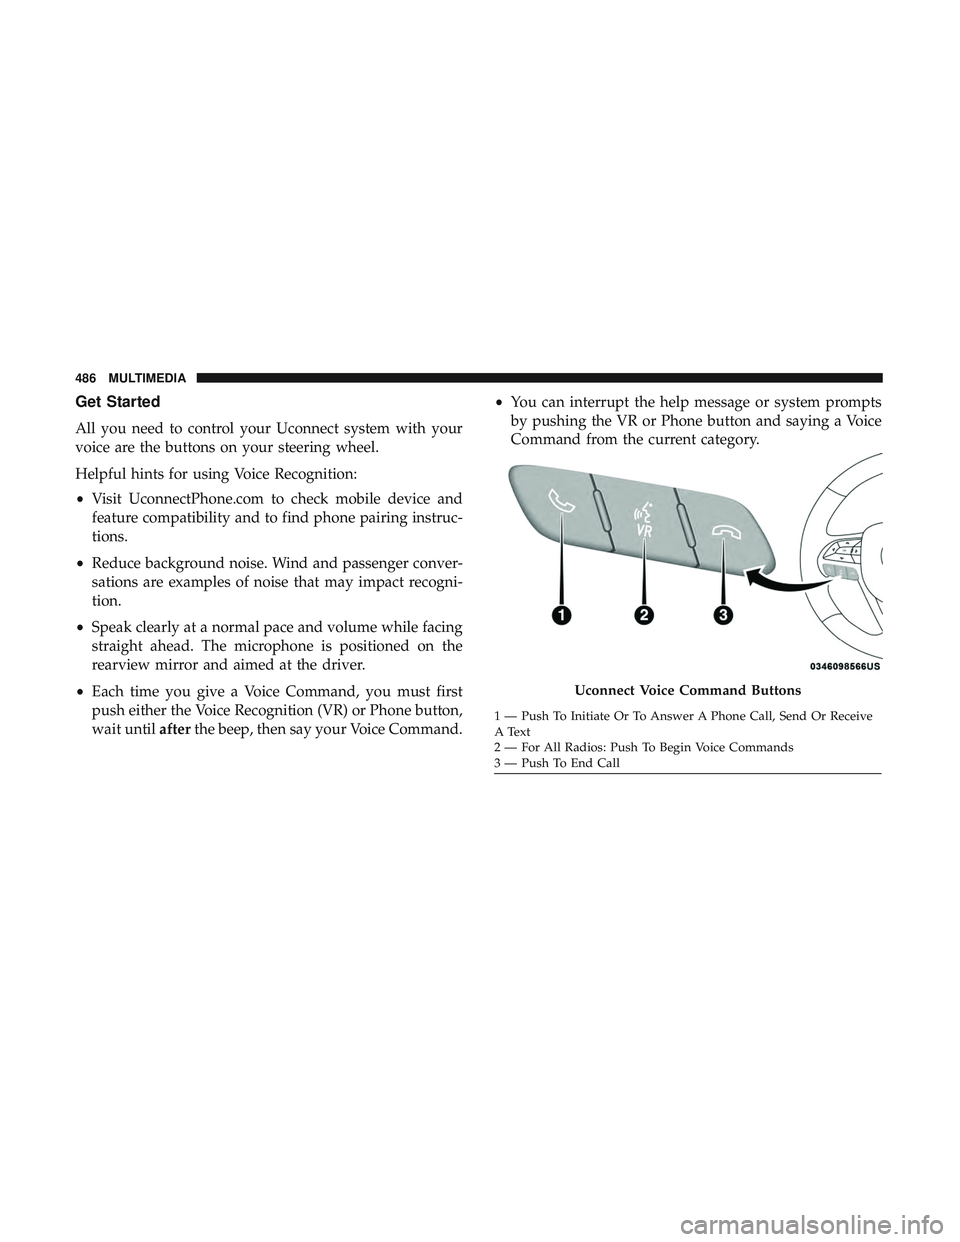
Get Started
All you need to control your Uconnect system with your
voice are the buttons on your steering wheel.
Helpful hints for using Voice Recognition:
•Visit UconnectPhone.com to check mobile device and
feature compatibility and to find phone pairing instruc-
tions.
• Reduce background noise. Wind and passenger conver-
sations are examples of noise that may impact recogni-
tion.
• Speak clearly at a normal pace and volume while facing
straight ahead. The microphone is positioned on the
rearview mirror and aimed at the driver.
• Each time you give a Voice Command, you must first
push either the Voice Recognition (VR) or Phone button,
wait until afterthe beep, then say your Voice Command. •
You can interrupt the help message or system prompts
by pushing the VR or Phone button and saying a Voice
Command from the current category.
Uconnect Voice Command Buttons
1 — Push To Initiate Or To Answer A Phone Call, Send Or Receive
A Text
2 — For All Radios: Push To Begin Voice Commands
3 — Push To End Call
486 MULTIMEDIA