Page 307 of 532

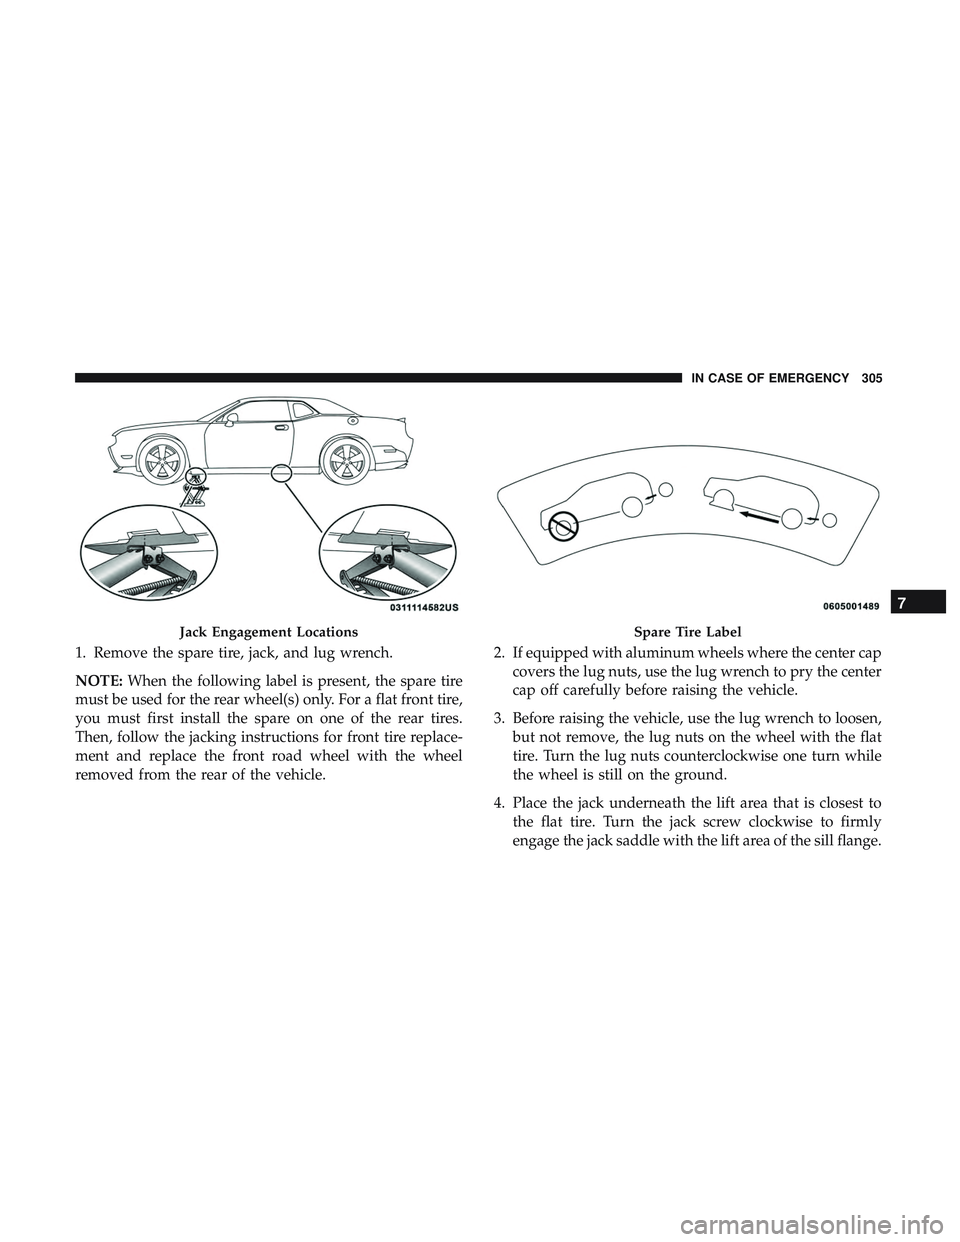
1. Remove the spare tire, jack, and lug wrench.
NOTE:When the following label is present, the spare tire
must be used for the rear wheel(s) only. For a flat front tire,
you must first install the spare on one of the rear tires.
Then, follow the jacking instructions for front tire replace-
ment and replace the front road wheel with the wheel
removed from the rear of the vehicle. 2. If equipped with aluminum wheels where the center cap
covers the lug nuts, use the lug wrench to pry the center
cap off carefully before raising the vehicle.
3. Before raising the vehicle, use the lug wrench to loosen, but not remove, the lug nuts on the wheel with the flat
tire. Turn the lug nuts counterclockwise one turn while
the wheel is still on the ground.
4. Place the jack underneath the lift area that is closest to the flat tire. Turn the jack screw clockwise to firmly
engage the jack saddle with the lift area of the sill flange.
Jack Engagement LocationsSpare Tire Label
7
IN CASE OF EMERGENCY 305
Page 309 of 532

7. Mount the spare tire.
CAUTION!
Do not attempt to raise the vehicle by jacking on
locations other than those indicated.NOTE:
•For vehicles so equipped, do not attempt to install a
center cap or wheel cover on the compact spare.
• Refer to “Compact Spare Tire” and to “Limited-Use
Spare” under “Tires—General Information” in “Servic-
ing And Maintenance” for additional warnings, cau-
tions, and information about the spare tire, its use, and
operation.
8. Install the lug nuts with the cone shaped end of the lug nut toward the wheel. Lightly tighten the lug nuts.
WARNING!
To avoid the risk of forcing the vehicle off the jack, do
not tighten the wheel nuts fully until the vehicle has
been lowered. Failure to follow this warning may
result in serious injury.
9. Lower the vehicle to the ground by turning the jack handle counterclockwise.
10. Refer to “Torque Specifications” in “Technical Specifi- cations” section for proper lug nut torque.
Mounting Spare Tire
7
IN CASE OF EMERGENCY 307
Page 310 of 532

11. Stow the jack, tools and flat tire. Make sure the base ofthe jack faces the front of the vehicle before tightening
down the fastener.
WARNING!
A loose tire or jack thrown forward in a collision or
hard stop could endanger the occupants of the vehicle.
Always stow the jack parts and the spare tire in the
places provided. Have the deflated (flat) tire repaired
or replaced immediately.
Road Tire Installation
1. Mount the road tire on the axle.
2. Install the remaining lug nuts with the cone shaped endof the nut toward the wheel. Lightly tighten the lug
nuts.
WARNING!
To avoid the risk of forcing the vehicle off the jack, do
not tighten the wheel nuts fully until the vehicle has
been lowered. Failure to follow this warning may
result in serious injury. 3. Lower the vehicle to the ground by turning the jack
handle counterclockwise.
4. Refer to “Torque Specifications” in “Technical Specifica- tions” for proper lug nut torque.
5. After 25 miles (40 km), check the lug nut torque with a torque wrench to ensure that all lug nuts are properly
seated against the wheel.
TIRE SERVICE KIT — IF EQUIPPED
Small punctures up to 1/4 inch (6 mm) in the tire tread can
be sealed with Tire Service Kit. Foreign objects (e.g., screws
or nails) should not be removed from the tire. Tire Service
Kit can be used in outside temperatures down to approxi-
mately -4°F (-20°C).
This kit will provide a temporary tire seal, allowing you to
drive your vehicle up to 100 miles (160 km) with a
maximum speed of 50 mph (80 km/h).
308 IN CASE OF EMERGENCY
Page 428 of 532
Clock
After pressing the “Clock” button on the touchscreen, the
following settings will be available:
Setting NameSelectable Options
Sync Time With GPS — If Equipped On
Off
NOTE:
The “Sync Time With GPS” feature will allow you to automatically have the radio set the time. Set Time Hours +–
Set Time Minutes +–
Time Format 12 hrs24 hrs
Show Time In Status Bar — If Equipped On
Off
NOTE:
The “Show Time In Status Bar” feature will allow you to turn on or shut off the digital clock in the status bar.
426 MULTIMEDIA
Page 443 of 532

Setting NameSelectable Options
Subscription Information Subscription Info
NOTE:
New vehicle purchasers or lessees will receive a free limited time subscription to SiriusXM Satellite Radio with your
radio. Following the expiration of the free services, it will be necessary to access the information on the Subscription
Information screen to re-subscribe.
1. Press the “Subscription Info” button on the touchscreen to access the Subscription Information screen.
2. Write down the SIRIUS ID numbers for your receiver. To reactivate your service, either call the number listed on the screen or visit the provider online.
Restore Settings
After pressing the “Restore Settings” button on the touch-
screen, the following settings will be available:
Setting Name Selectable Options
Restore Settings YesCancel
NOTE:
When the “Restore Settings” feature is selected it will reset the Display, Clock, Audio, and Radio Settings to their de-
fault settings. If “Yes” is selected, a pop-up will appear asking �Are you sure you want to reset your settings to de-
fault?” Select “Yes” to restore, or “Cancel” to exit.10
MULTIMEDIA 441
Page 444 of 532

Setting NameSelectable Options
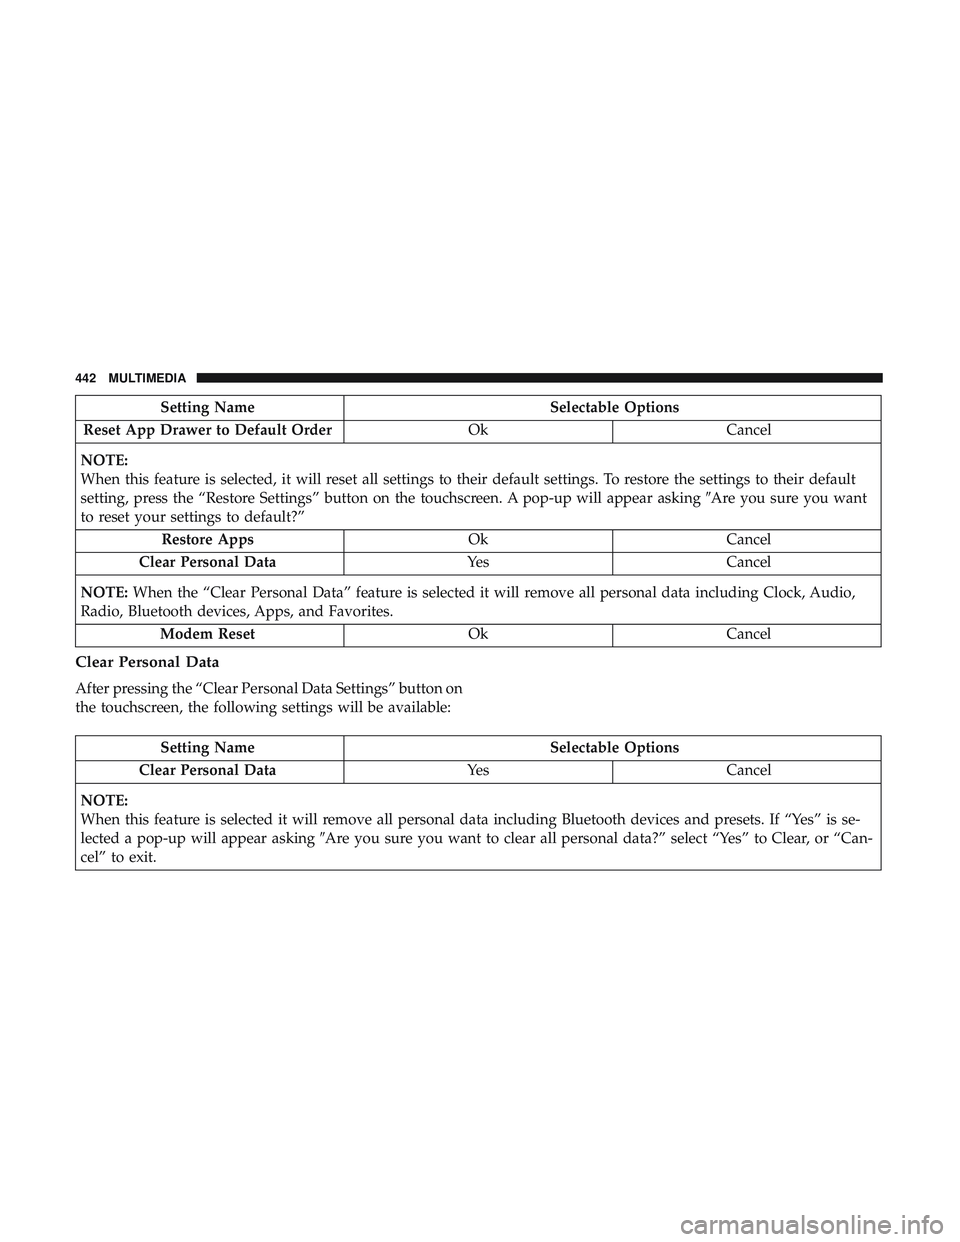
Reset App Drawer to Default Order OkCancel
NOTE:
When this feature is selected, it will reset all settings to their default settings. To restore the settings to their default
setting, press the “Restore Settings” button on the touchscreen. A pop-up will appear asking �Are you sure you want
to reset your settings to default?”
Restore Apps OkCancel
Clear Personal Data YesCancel
NOTE: When the “Clear Personal Data” feature is selected it will remove all personal data including Clock, Audio,
Radio, Bluetooth devices, Apps, and Favorites.
Modem Reset OkCancel
Clear Personal Data
After pressing the “Clear Personal Data Settings” button on
the touchscreen, the following settings will be available:
Setting Name Selectable Options
Clear Personal Data YesCancel
NOTE:
When this feature is selected it will remove all personal data including Bluetooth devices and presets. If “Yes” is se-
lected a pop-up will appear asking �Are you sure you want to clear all personal data?” select “Yes” to Clear, or “Can-
cel” to exit.
442 MULTIMEDIA
Page 445 of 532

System Information
After pressing the “System Information” button on the
touchscreen, the following settings will be available:
Setting NameSelectable Options
Software License System Software Information Screen
NOTE:
When the “Software License” feature is selected, a “System Software Information” screen will appear, displaying the
system software version. You can also update your maps with a USB device. Please see your authorized dealer for
further information.
Customer Programmable Features — Uconnect
4C/4C NAV Settings
Press the “Apps” button (if equipped), and then
press the “Settings” button on the touchscreen to dis-
play the menu setting screen. In this mode, the
Uconnect system allows you to access programmable
features that may be equipped such as Language, Dis-
play, Units, Voice, Clock & Date, Safety & Driving
Assistance, Mirrors & Wipers, Lights, Doors & Locks,
Auto-On Comfort, Key Off Options, Audio, Phone/
Bluetooth, SiriusXM Setup, Reset, and System Informa-
tion.
NOTE: Depending on the vehicle’s options, feature set-
tings may vary.
When making a selection, press the button on the touch-
screen to enter the desired mode. Once in the desired
mode, press and release the preferred setting “option” until
a check-mark appears next to the setting, showing that
setting has been selected. Once the setting is complete,
press the “X” button on the touchscreen to close out of the
settings screen. Pressing the up or down arrow button on
the right side of the screen will allow you to toggle up or
down through the available settings.
10
MULTIMEDIA 443
Page 449 of 532
Voice
After pressing the “Voice” button on the touchscreen, the
following settings will be available:
Setting NameSelectable Options
Voice Response Length Brief Detailed
Show Command List Neverw/Help Always
Clock & Date
After pressing the “Clock & Date” button on the touch-
screen, the following settings will be available:
Setting Name Selectable Options
Sync Time With GPS — If Equipped On
Off
NOTE:
The “Sync Time With GPS” feature will allow you to automatically have the radio set the time. Set Time Hours +–
Set Time Minutes +–
Time Format 12 hrs24 hrs
AM PM
10
MULTIMEDIA 447