Page 293 of 532
General Information
The fuses protect electrical systems against excessive cur-
rent.
When a device does not work, you must check the fuse
element inside the blade fuse for a break/melt.
Also, please be aware that when using power outlets for
extended periods of time with the engine off may result in
vehicle battery discharge.
Underhood Fuses
The Front Power Distribution Center is located in the
engine compartment. This module contains fuses and
relays. Fuse cavity location and descriptions are printed on
the inside of the power distribution center cover.
Blade Fuses1—Fuse Element2—Blade Fuse with a good/functional fuse element.3—Blade fuse with a NOT functional / BAD fuse element (blown fuse).
Front Power Distribution Center
7
IN CASE OF EMERGENCY 291
Page 295 of 532
Cavity Cartridge FuseMini-FuseDescription
11 –20 Amp Yellow Horns
12 – 10 Amp Red Air Conditioning Clutch
13 – – Fuse – Spare
14 – – Fuse – Spare
15 –20 Amp Yellow Left HID – If Equipped
16 –20 Amp Yellow Right HID – If Equipped
18 50 Amp Red –Radiator Fan – (Non 6.2L Supercharged)
19 50 Amp Red –Electric Power Steering #2 – If Equipped
20 30 Amp Pink – Wiper Motor
21 30 Amp Pink
20 Amp Blue – Police –
Headlamp Washers – If Equipped
Police Bat Feed #2
22 40 Amp Green / 20 Amp Blue – Police –
Engine Cooling Pump (6.2L Supercharged) / Police
Bat Feed # 3
23 20 Amp Blue –Police Bat Feed # 1
24 50 Amp Red / 20 Amp Blue –
Radiator Fan (6.2L Supercharged) / Police Ignition
Run/ACC Feed # 3
28 – – Fuse – Spare
29 – 15 Amp Blue Transmission Control Module (Challenger / Char-
ger Police) / Electronic Shift Module (Challenger)
30 – – Fuse – Spare
7
IN CASE OF EMERGENCY 293
Page 296 of 532
Cavity Cartridge FuseMini-FuseDescription
31 – 25 Amp Clear Engine Module
32 – – Fuse – Spare
33 – – Fuse – Spare
34 – 25 Amp Clear Powertrain #1
35 –20 Amp Yellow Powertrain #2
36 – 10 Amp Red Anti-Lock Brake Module / Steering Column Lock
Module (300 if equipped)
37 – 10 Amp Red Engine Controller / Rad Fan Relays (Charger/300)
/ Electric Power Steering Module (Charger/300) /5-Speed TCM
38 – 10 Amp Red Airbag Module
39 – 10 Amp Red EPS (Challenger) / EHPS (Police) / AC Clutch Re-
lay / Vacuum Pump Relay / Rad Fan Relays(Challenger)
48 – 10 Amp Red AWD Module / Front Axle Disconnect – If
Equipped
49 – – Fuse – Spare
50 – – Fuse – Spare
51 –20 Amp Yellow Vacuum Pump
52 – 5 Amp Tan Adaptive Cruise – If Equipped
53 – – Fuse – Spare
294 IN CASE OF EMERGENCY
Page 303 of 532

JACKING AND TIRE CHANGING
WARNING!
•Do not attempt to change a tire on the side of the
vehicle close to moving traffic. Pull far enough off
the road to avoid the danger of being hit when
operating the jack or changing the wheel.
• Being under a jacked-up vehicle is dangerous. The
vehicle could slip off the jack and fall on you. You
could be crushed. Never put any part of your body
under a vehicle that is on a jack. If you need to get
under a raised vehicle, take it to a service center
where it can be raised on a lift.
• Never start or run the engine while the vehicle is on
a jack.
• The jack is designed to be used as a tool for changing
tires only. The jack should not be used to lift the
vehicle for service purposes. The vehicle should be
jacked on a firm level surface only. Avoid ice or
slippery areas.
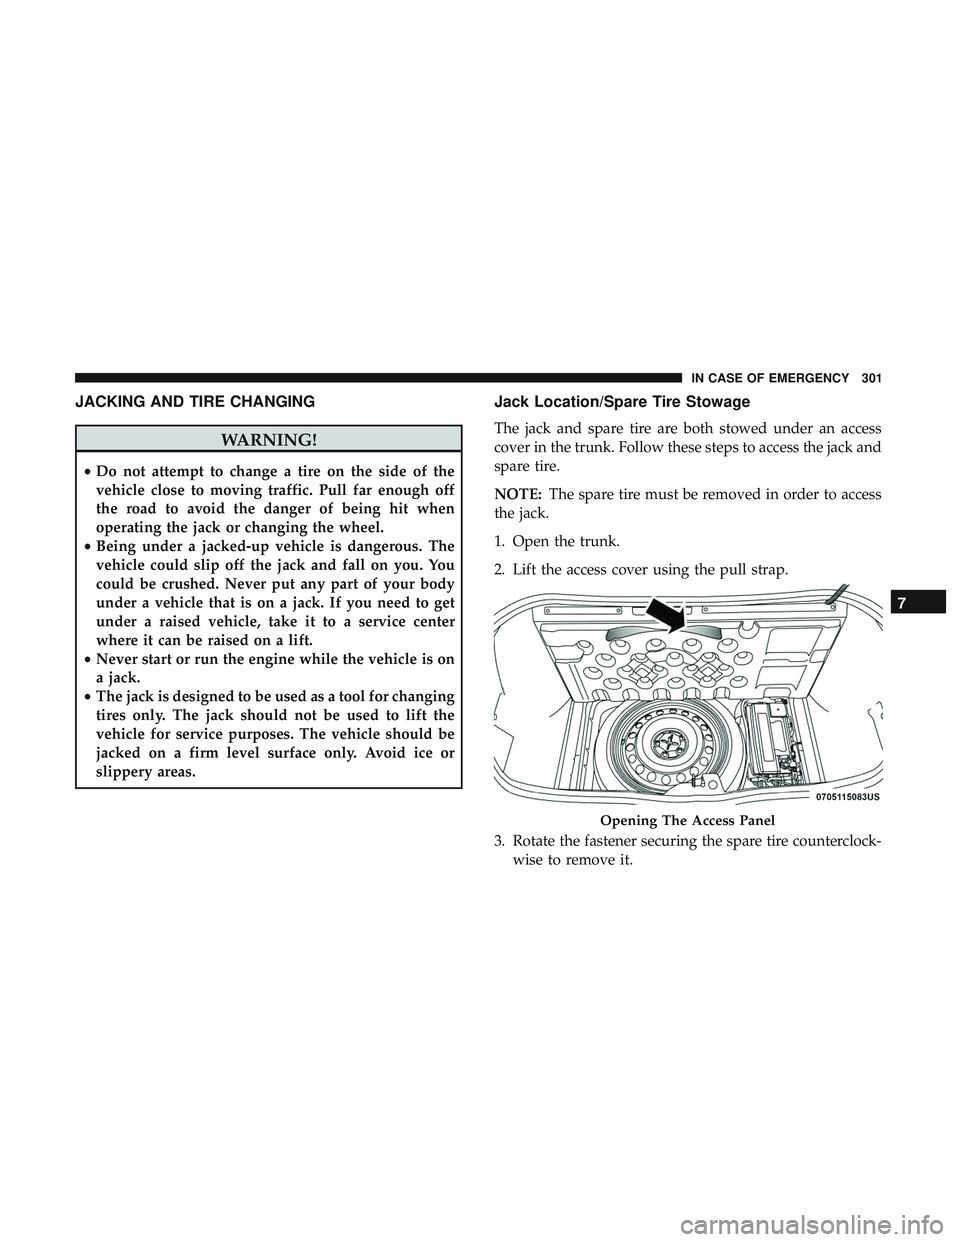
Jack Location/Spare Tire Stowage
The jack and spare tire are both stowed under an access
cover in the trunk. Follow these steps to access the jack and
spare tire.
NOTE: The spare tire must be removed in order to access
the jack.
1. Open the trunk.
2. Lift the access cover using the pull strap.
3. Rotate the fastener securing the spare tire counterclock- wise to remove it.
Opening The Access Panel
7
IN CASE OF EMERGENCY 301
Page 306 of 532
WARNING!(Continued)
•Never start or run the engine with the vehicle on a
jack.
• Do not let anyone sit in the vehicle when it is on a
jack.
• Do not get under the vehicle when it is on a jack. If
you need to get under a raised vehicle, take it to a
service center where it can be raised on a lift.
• Only use the jack in the positions indicated and for
lifting this vehicle during a tire change.
• If working on or near a roadway, be extremely
careful of motor traffic.
CAUTION!
Do not attempt to raise the vehicle by jacking on
locations other than those indicated in the Jacking
Instructions for this vehicle.
Jack Warning Label
304 IN CASE OF EMERGENCY
Page 315 of 532

5. Uncoil the Power Plug (8) and insert the plug into thevehicle’s 12 Volt power outlet.
NOTE: Do not remove foreign objects (e.g., screws or
nails) from the tire.
(C) Injecting Tire Service Kit Sealant Into The
Deflated Tire:
• Always start the engine before turning ON the Tire
Service Kit.
NOTE: Manual transmission vehicles must have the park-
ing brake engaged and the gear selector in NEUTRAL.
• After pushing the Power Button (4), the sealant (white
fluid) will flow from the Sealant Bottle (1) through the
Sealant Hose (6) and into the tire.
NOTE: Sealant may leak out through the puncture in the
tire.
If the sealant (white fluid) does not flow within0–10
seconds through the Sealant Hose (6):
1. Push the Power Button (4) to turn Off the Tire Service Kit. Disconnect the Sealant Hose (6) from the valve stem.
Make sure the valve stem is free of debris. Reconnect the
Sealant Hose (6) to the valve stem. Check that the Mode Select Knob (5) is in the Sealant Mode position and not
Air Mode. Push the Power Button (4) to turn On the Tire
Service Kit.
2. Connect the Power Plug (8) to a different 12 Volt power outlet in your vehicle or another vehicle, if available.
Make sure the engine is running before turning ON the
Tire Service Kit.
3. The Sealant Bottle (1) may be empty due to previous use. Call for assistance.
NOTE: If the Mode Select Knob (5) is on Air Mode and the
pump is operating, air will dispense from the Air Pump
Hose (7) only, not the Sealant Hose (6).
If the sealant (white fluid) does flow through the Sealant
Hose (6):
1. Continue to operate the pump until sealant is no longer flowing through the hose (typically takes 30 - 70 sec-
onds). As the sealant flows through the Sealant Hose (6),
the Pressure Gauge (3) can read as high as 70 psi
(4.8 Bar). The Pressure Gauge (3) will decrease quickly
from approximately 70 psi (4.8 Bar) to the actual tire
pressure when the Sealant Bottle (1) is empty.
7
IN CASE OF EMERGENCY 313
Page 323 of 532

5. Uncoil the Power Plug (7) and insert the plug into thevehicle’s 12 Volt power outlet.
NOTE: Do not remove foreign objects (e.g., screws or
nails) from the tire.
(C) Injecting Tire Service Kit Sealant Into The
Deflated Tire:
• Always start the engine before turning ON the Tire
Service Kit.
NOTE: Manual transmission vehicles must have the park-
ing brake engaged and the gear selector in NEUTRAL.
• After pushing the Power Button (1), the sealant (white
fluid) will flow from the Sealant Bottle (4) through the
Sealant Hose (3) and into the tire.
NOTE: Sealant may leak out through the puncture in the
tire.
If the sealant (white fluid) does not flow within0–10
seconds through the Sealant Hose (3):
1. Push the Power Button (1) to turn Off the Tire Service Kit. Disconnect the Sealant Hose (3) from the valve stem.
Make sure the valve stem is free of debris. Reconnect the
Sealant Hose (3) to the valve stem. Check that the Mode Select Knob (2) is in the Sealant Mode position and not
Air Mode. Push the Power Button (1) to turn On the Tire
Service Kit.
2. Connect the Power Plug (7) to a different 12 Volt power outlet in your vehicle or another vehicle, if available.
Make sure the engine is running before turning ON the
Tire Service Kit.
3. The Sealant Bottle (4) may be empty due to previous use. Call for assistance.
NOTE: If the Mode Select Knob (2) is on Air Mode and the
pump is operating, air will dispense from the Air Pump
Hose (5) only, not the Sealant Hose (3).
If the sealant (white fluid) does flow through the Sealant
Hose (3):
1. Continue to operate the pump until sealant is no longer flowing through the hose (typically takes 30 - 70 sec-
onds). As the sealant flows through the Sealant Hose (3),
the Pressure Gauge (8) can read as high as 70 psi
(4.8 Bar). The Pressure Gauge (8) will decrease quickly
from approximately 70 psi (4.8 Bar) to the actual tire
pressure when the Sealant Bottle (4) is empty.
7
IN CASE OF EMERGENCY 321
Page 327 of 532

NOTE:When using a portable battery booster pack, follow
the manufacturer’s operating instructions and precautions.
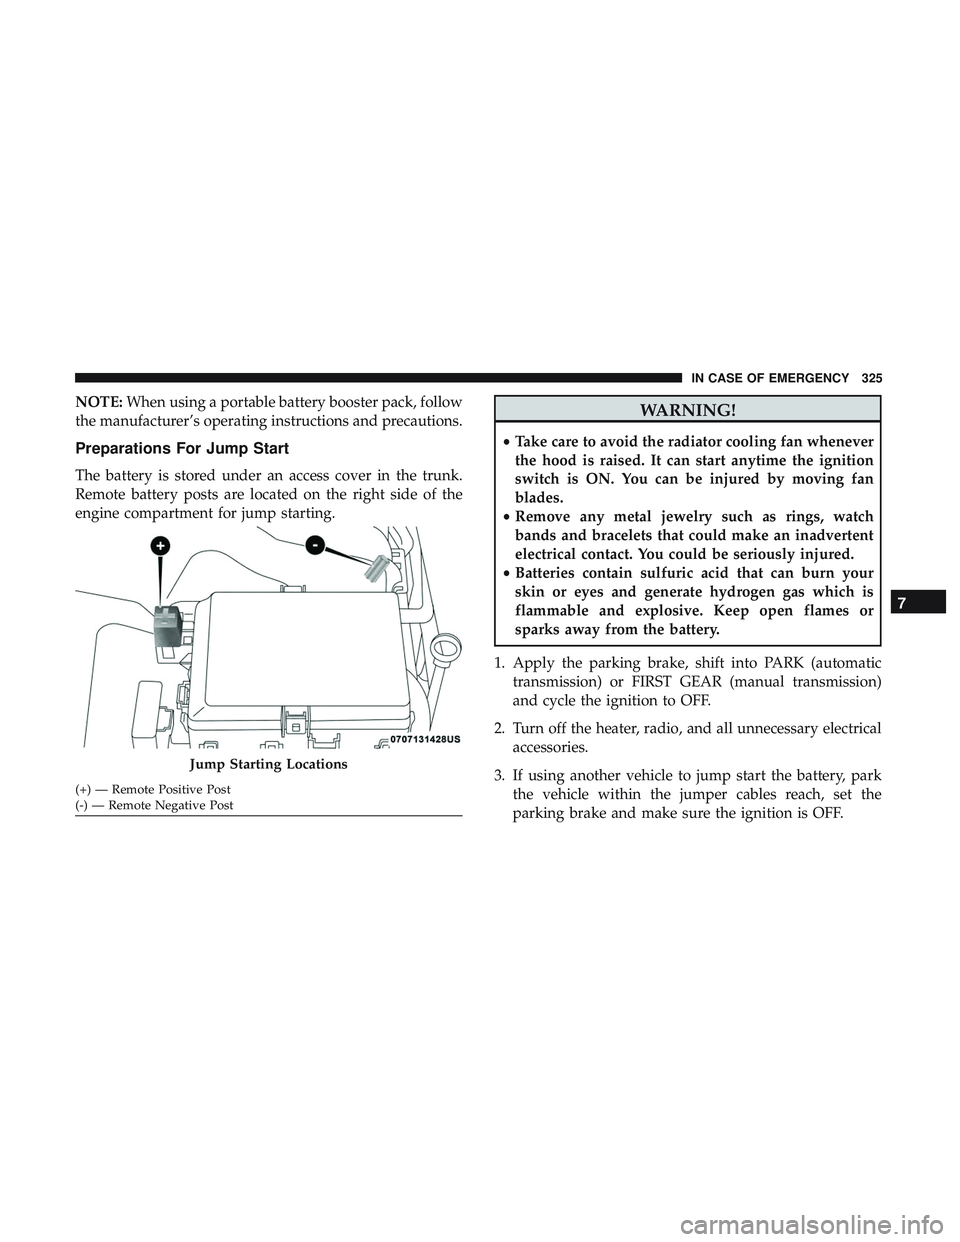
Preparations For Jump Start
The battery is stored under an access cover in the trunk.
Remote battery posts are located on the right side of the
engine compartment for jump starting.
WARNING!
• Take care to avoid the radiator cooling fan whenever
the hood is raised. It can start anytime the ignition
switch is ON. You can be injured by moving fan
blades.
• Remove any metal jewelry such as rings, watch
bands and bracelets that could make an inadvertent
electrical contact. You could be seriously injured.
• Batteries contain sulfuric acid that can burn your
skin or eyes and generate hydrogen gas which is
flammable and explosive. Keep open flames or
sparks away from the battery.
1. Apply the parking brake, shift into PARK (automatic transmission) or FIRST GEAR (manual transmission)
and cycle the ignition to OFF.
2. Turn off the heater, radio, and all unnecessary electrical accessories.
3. If using another vehicle to jump start the battery, park the vehicle within the jumper cables reach, set the
parking brake and make sure the ignition is OFF.
Jump Starting Locations
(+) — Remote Positive Post
(-) — Remote Negative Post
7
IN CASE OF EMERGENCY 325