Page 608 of 718
Audio
After pressing the “Audio” button on the touchscreen, the
following settings will be available:
Setting NameSelectable Options
Equalizer BassMidTreble
NOTE:
When in this display you may adjust the “Bass”, “Mid” and “Treble” settings. Adjust the settings with the “+” and
“–” setting buttons on the touchscreen or by selecting any point on the scale between the “+” and “–” buttons on the
touchscreen. Bass/Mid/Treble also allow you to simply slide your finger up or down to change the setting, as well as
press directly on the desired setting. Balance/Fade Up Arrow
Button Down Ar-
row Button Left Arrow
Button Right Ar-
row Button Center “C”
Button
NOTE:
When in this display you may adjust the “Balance/Fade” of the audio by using the “Arrow” button on the touch-
screen to adjust the sound level from the front and rear or right and left side speakers. Press the “Center ‘C’ Button”
on the touchscreen to reset the balance and fade to the factory setting.
606 MULTIMEDIA
Page 612 of 718
Phone/Bluetooth
After pressing the “Phone/Bluetooth” button on the touch-
screen, the following settings will be available:
Setting NameSelectable Options
Phone Pop-ups Displayed in Cluster OnOff
Do Not Disturb List of Settings
NOTE:
The “Do Not Disturb” feature allows the paired phone to send a predetermined call, text, or both, to any incoming
call, or text, before sending it directly to voicemail. It also keeps a counter of all missed calls and texts while on the
road. Paired Phones and Audio Devices List of Paired Phones
NOTE:
This feature shows which phones are paired to the Phone/Bluetooth system. For further information, refer to the
Uconnect Owner ’s Manual Supplement. Smartphone Projection Manager List Of Connected Phones
NOTE:
Pressing “Smartphone Projection Manager” feature allows you to see a list of all connected phones and gives you the
option to determine which phone will be used for projection (Apple CarPlay or Android Auto).
610 MULTIMEDIA
Page 615 of 718

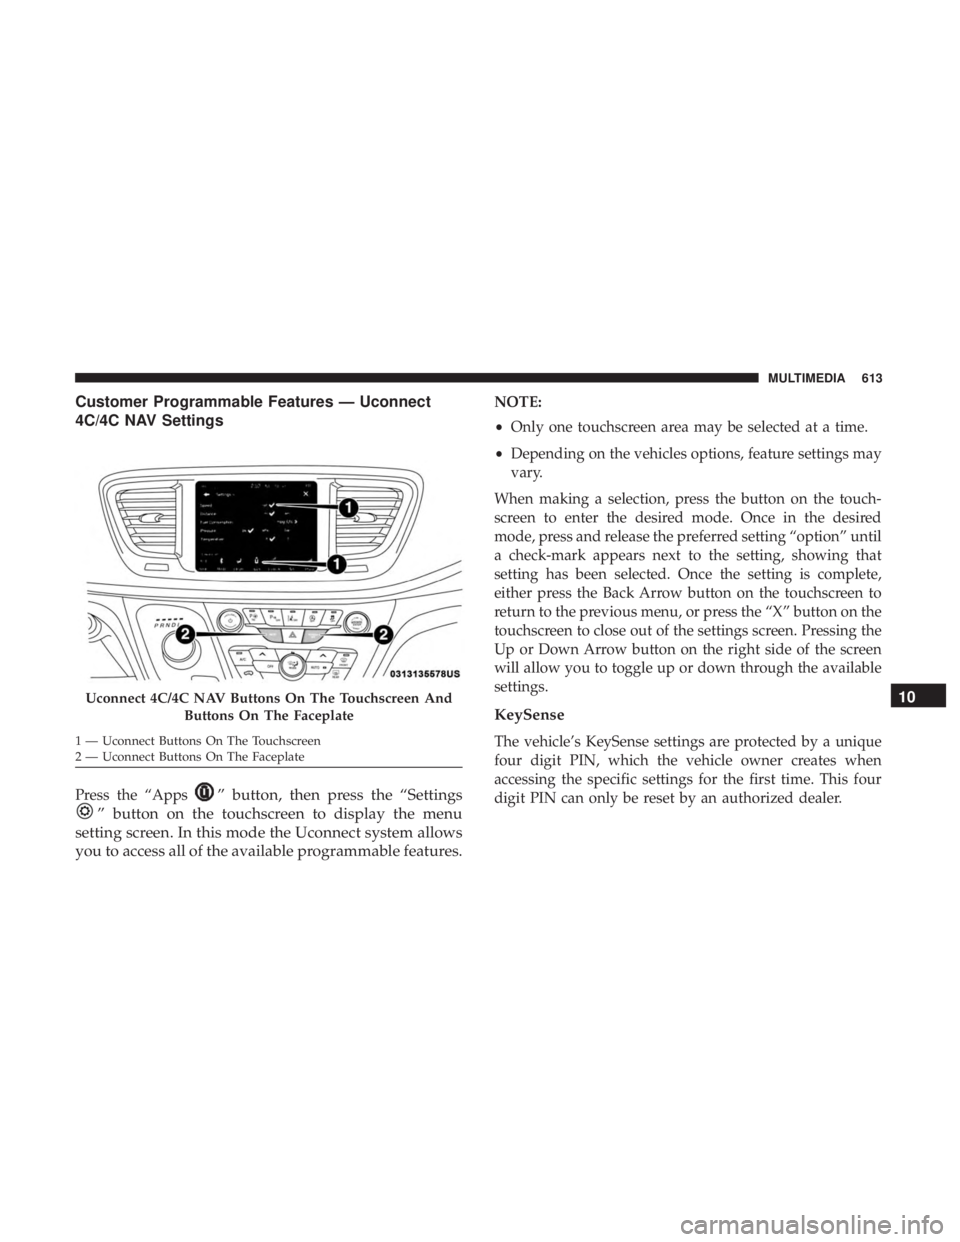
Customer Programmable Features — Uconnect
4C/4C NAV Settings
Press the “Apps” button, then press the “Settings
” button on the touchscreen to display the menu
setting screen. In this mode the Uconnect system allows
you to access all of the available programmable features.
NOTE:
• Only one touchscreen area may be selected at a time.
• Depending on the vehicles options, feature settings may
vary.
When making a selection, press the button on the touch-
screen to enter the desired mode. Once in the desired
mode, press and release the preferred setting “option” until
a check-mark appears next to the setting, showing that
setting has been selected. Once the setting is complete,
either press the Back Arrow button on the touchscreen to
return to the previous menu, or press the “X” button on the
touchscreen to close out of the settings screen. Pressing the
Up or Down Arrow button on the right side of the screen
will allow you to toggle up or down through the available
settings.
KeySense
The vehicle’s KeySense settings are protected by a unique
four digit PIN, which the vehicle owner creates when
accessing the specific settings for the first time. This four
digit PIN can only be reset by an authorized dealer.
Uconnect 4C/4C NAV Buttons On The Touchscreen And Buttons On The Faceplate
1 — Uconnect Buttons On The Touchscreen
2 — Uconnect Buttons On The Faceplate
10
MULTIMEDIA 613
Page 619 of 718
Setting NameSelectable Options
1. Press the “Subscription Info” button on the touchscreen to access the Subscription Information screen.
2. Write down the Sirius ID numbers for your receiver. To reactivate your service, either call the number listed on the screen or visit the provider online.
SiriusXM Travel Link is a separate subscription.
Language
After pressing the “Language” button on the touchscreen,
the following settings will be available:
Setting Name Selectable Options
Language List of Languages
NOTE:
When the “Set Language” feature is selected, you may select one of multiple languages (English / Français / Espa-
ñol) for all display nomenclature, including the trip functions and the navigation system (if equipped). Press the “Set
Language” button on the touchscreen, then press the desired language button on the touchscreen until a check-mark
appears next to the language, showing that setting has been selected.
10
MULTIMEDIA 617
Page 620 of 718
Display
After pressing the “Display” button on the touchscreen, the
following settings will be available:
Setting NameSelectable Options
Display Mode Manual Auto
Display Brightness With Headlights ON +-
NOTE:
To make changes to the �Display Brightness with Headlights ON� setting, the headlights must be on and the interior
dimmer switch must not be in the �party�or�parade� positions.
Display Brightness With Headlights OFF +-
NOTE:
To make changes to the �Display Brightness with Headlights OFF� setting, the headlights must be off and the interior
dimmer switch must not be in the �party�or�parade� positions.
Set Theme OnOff
NOTE:
When the “Set Theme” feature is selected, you may select the theme for the display screen. To make your selection,
press the �Set Theme� button on the touchscreen, then select the desired theme option button until a check-mark ap-
pears showing that the setting has been selected.
618 MULTIMEDIA
Page 621 of 718
Setting NameSelectable Options
Touchscreen Beep OnOff
Control Screen Time-Out — If Equipped On
Off
NOTE:
When the “Control Screen Time-Out” feature is selected, the Controls Screen will stay open for five seconds before
the screen times out. With the feature deselected, the screen will stay open until it is manually closed. Navigation Turn-By-Turn In Cluster — If Equipped On
Off
NOTE:
When the “Navigation Turn-By-Turn In Cluster” feature is selected, the turn-by-turn directions will appear in the in-
strument cluster display as the vehicle approaches a designated turn within a programmed route. Phone Pop-ups Displayed in Cluster On
Off
10
MULTIMEDIA 619
Page 623 of 718
Camera
After pressing the “Camera” button on the touchscreen, the
following settings will be available:
Setting NameSelectable Options
Surround View Camera — If Equipped On
Off
NOTE:
The “Surround View Camera” feature displays a complete 360 degree view of the vehicle’s exterior environment
while backing up. Surround View Camera Delay — If Equipped On
Off
NOTE:
The “Surround View Camera Delay” setting determines whether or not the screen will display the 360 degree view
image with guidelines for up to ten seconds after the vehicle is shifted out of REVERSE. This delay will be canceled if
the vehicle’s speed exceeds 8 mph (13 km/h), the transmission is shifted into PARK, or the ignition is switched to the
OFF position.
10
MULTIMEDIA 621
Page 624 of 718

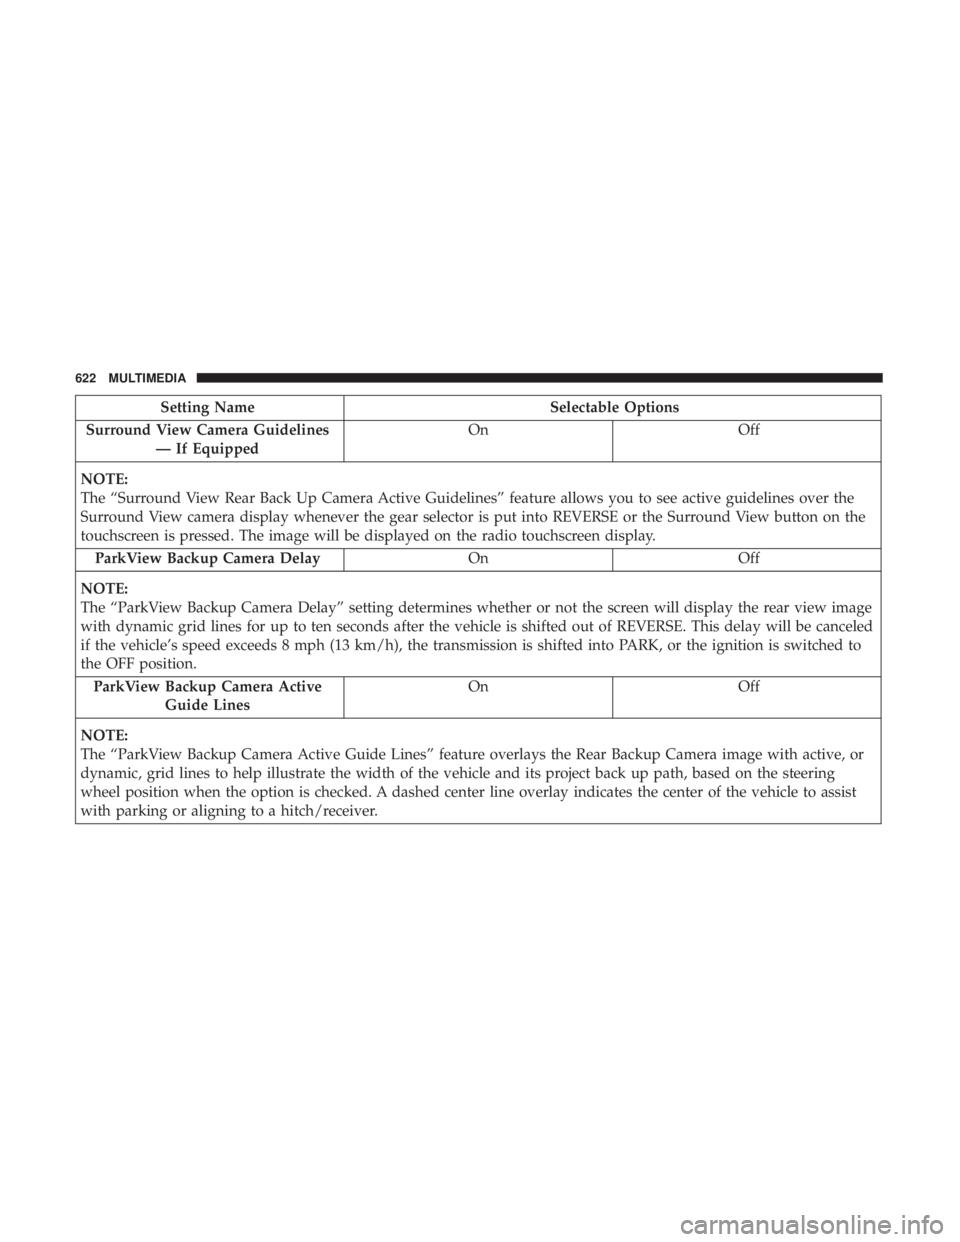
Setting NameSelectable Options
Surround View Camera Guidelines — If Equipped On
Off
NOTE:
The “Surround View Rear Back Up Camera Active Guidelines” feature allows you to see active guidelines over the
Surround View camera display whenever the gear selector is put into REVERSE or the Surround View button on the
touchscreen is pressed. The image will be displayed on the radio touchscreen display. ParkView Backup Camera Delay OnOff
NOTE:
The “ParkView Backup Camera Delay” setting determines whether or not the screen will display the rear view image
with dynamic grid lines for up to ten seconds after the vehicle is shifted out of REVERSE. This delay will be canceled
if the vehicle’s speed exceeds 8 mph (13 km/h), the transmission is shifted into PARK, or the ignition is switched to
the OFF position. ParkView Backup Camera Active Guide Lines On
Off
NOTE:
The “ParkView Backup Camera Active Guide Lines” feature overlays the Rear Backup Camera image with active, or
dynamic, grid lines to help illustrate the width of the vehicle and its project back up path, based on the steering
wheel position when the option is checked. A dashed center line overlay indicates the center of the vehicle to assist
with parking or aligning to a hitch/receiver.
622 MULTIMEDIA