Page 179 of 718

Power Inverter — If Equipped
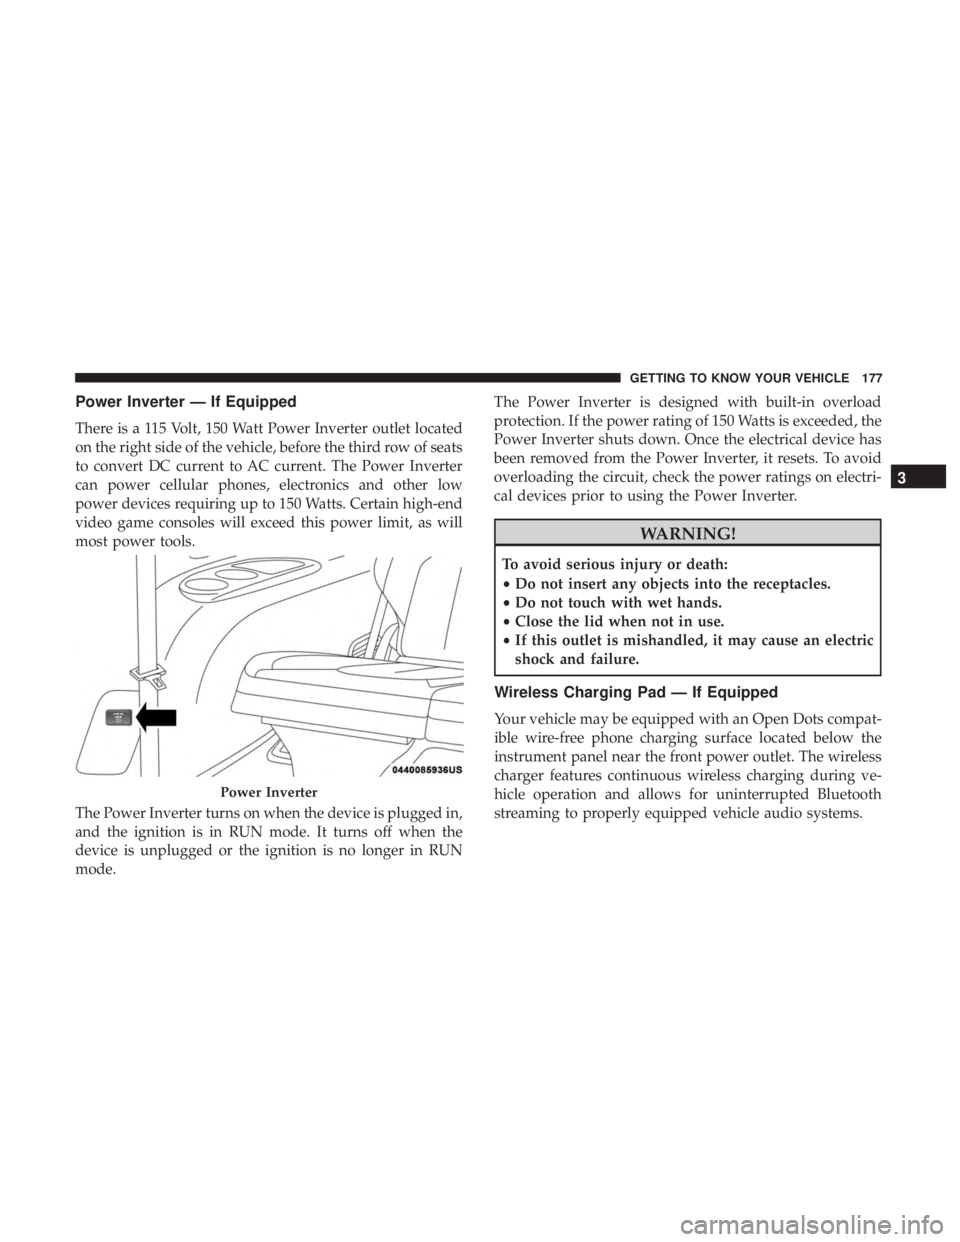
There is a 115 Volt, 150 Watt Power Inverter outlet located
on the right side of the vehicle, before the third row of seats
to convert DC current to AC current. The Power Inverter
can power cellular phones, electronics and other low
power devices requiring up to 150 Watts. Certain high-end
video game consoles will exceed this power limit, as will
most power tools.
The Power Inverter turns on when the device is plugged in,
and the ignition is in RUN mode. It turns off when the
device is unplugged or the ignition is no longer in RUN
mode.The Power Inverter is designed with built-in overload
protection. If the power rating of 150 Watts is exceeded, the
Power Inverter shuts down. Once the electrical device has
been removed from the Power Inverter, it resets. To avoid
overloading the circuit, check the power ratings on electri-
cal devices prior to using the Power Inverter.
WARNING!
To avoid serious injury or death:
•
Do not insert any objects into the receptacles.
• Do not touch with wet hands.
• Close the lid when not in use.
• If this outlet is mishandled, it may cause an electric
shock and failure.
Wireless Charging Pad — If Equipped
Your vehicle may be equipped with an Open Dots compat-
ible wire-free phone charging surface located below the
instrument panel near the front power outlet. The wireless
charger features continuous wireless charging during ve-
hicle operation and allows for uninterrupted Bluetooth
streaming to properly equipped vehicle audio systems.
Power Inverter
3
GETTING TO KNOW YOUR VEHICLE 177
Page 612 of 718
Phone/Bluetooth
After pressing the “Phone/Bluetooth” button on the touch-
screen, the following settings will be available:
Setting NameSelectable Options
Phone Pop-ups Displayed in Cluster OnOff
Do Not Disturb List of Settings
NOTE:
The “Do Not Disturb” feature allows the paired phone to send a predetermined call, text, or both, to any incoming
call, or text, before sending it directly to voicemail. It also keeps a counter of all missed calls and texts while on the
road. Paired Phones and Audio Devices List of Paired Phones
NOTE:
This feature shows which phones are paired to the Phone/Bluetooth system. For further information, refer to the
Uconnect Owner ’s Manual Supplement. Smartphone Projection Manager List Of Connected Phones
NOTE:
Pressing “Smartphone Projection Manager” feature allows you to see a list of all connected phones and gives you the
option to determine which phone will be used for projection (Apple CarPlay or Android Auto).
610 MULTIMEDIA
Page 614 of 718
Restore Settings
After pressing the “Restore Settings” button on the touch-
screen, the following settings will be available:
Setting NameSelectable Options
Reset App Drawer to Default Order OKCancel
Restore Settings to Default OKCancel
NOTE:
When the “Restore Settings to Default” feature is selected it resets all settings to their default settings. Clear Personal Data OKCancel
NOTE: When the “Clear Personal Data” feature is selected it will remove all personal data including Bluetooth de-
vices and presets.
612 MULTIMEDIA
Page 637 of 718
Phone/Bluetooth
After pressing the “Phone/Bluetooth” button on the touch-
screen, the following settings will be available:
Setting NameSelectable Options
Phone Pop-ups Displayed in Cluster OnOff
Do Not Disturb List Of Settings
NOTE:
Press “Do Not Disturb” to access the available settings. The following settings are: Auto Reply (both, text, call), Auto
Reply Message (custom, default) and Custom Auto Reply Message (create message). Paired Phones And Audio Devices List Of Paired Phones
NOTE:
This feature shows which phones and audio devices are paired to the Phone/Bluetooth system. For further informa-
tion, refer to the Uconnect Owner ’s Manual Supplement. Smartphone Projection Manager OnOff
10
MULTIMEDIA 635
Page 640 of 718
Setting NameSelectable Options
Clear Personal Data OKCancel
NOTE:
When the “Clear Personal Data” feature is selected it will remove all personal data including Bluetooth devices and
presets.
System Information
After pressing the “System Information” button on the
touchscreen, the following settings will be available:
Setting Name Selectable Options
Software License System Software Information Screen
NOTE:
When this feature is selected, a “Software License” screen will appear, displaying the system software version.
638 MULTIMEDIA
Page 641 of 718

STEERING WHEEL AUDIO CONTROLS
The remote sound system controls are located on the rear
surface of the steering wheel at the three and nine o’clock
positions. Both controls are rocker-type switches with a
push-button in the center.
The right-hand control is a rocker-type switch with a
push-button in the center and controls the volume and
mode of the sound system. Pushing the top of the rocker
switch will increase the volume, and pushing the bottom of
the rocker switch will decrease the volume.Pushing the center button will make the radio switch
between the various modes available (AM/FM/SXM or
Media etc.)
The left-hand control is a rocker-type switch with a push-
button in the center. The function of the left-hand control is
different depending on which mode you are in.
The following describes the left-hand control operation in
each mode.
Radio Operation
Pushing the top of the switch will “Seek” up for the next
listenable station and pushing the bottom of the switch will
“Seek” down for the next listenable station.
The button located in the center of the left-hand control
will tune to the next preset station that you have pro-
grammed in the radio preset button.
Media Mode
Pushing the top of the switch once goes to the next track on
the selected media (AUX/USB/Bluetooth). Pushing the
bottom of the switch once goes to the beginning of the
current track, or to the beginning of the previous track if it
is within eight seconds after the current track begins to
play.
Steering Wheel Audio Controls (Back View Of Steering
Wheel)
10
MULTIMEDIA 639
Page 680 of 718
Media
Uconnect offers connections via USB, Bluetooth and auxil-
iary ports (if equipped). Voice operation is only available
for connected USB and AUX devices.
Push the VR button
. After the beep, say one of the
following commands and follow the prompts to switch
your media source or choose an artist.
• “Change source to Bluetooth”
• “Change source to AUX”
• “Change source to USB”
• “Play artist Beethoven”; “ Play albumGreatest Hits”; “
Play song Moonlight Sonata”; “ Play genreClassical”
TIP: Press the Browse button on the touchscreen to see all
of the music on your USB device. Your Voice Command
must match exactlyhow the artist, album, song and genre
information is displayed.
Uconnect 4C/4C NAV Radio
Uconnect 4 Media
678 MULTIMEDIA
Page 683 of 718

2. Listen to the Uconnect prompts. After the beep, repeatone of the pre-defined messages and follow the system
prompts.
PRE-DEFINED VOICE TEXT REPLY RESPONSES
Yes. Stuck in traffic. See you later.No. Start without
me. I’ll be late.
Okay. Where are you? I will be minuteslate.
Call me. Are you there
yet?
I’ll call you later. I need directions.See you in
of minutes.
I’m on my way. Can’t talk right
now.
I’m lost. Thanks.
TIP: Your mobile phone must have the full implementation
of the Message Access Profile (MAP) to take advantage of
this feature. For details about MAP, visit
UconnectPhone.com. Apple iPhone iOS 6 or later supports reading
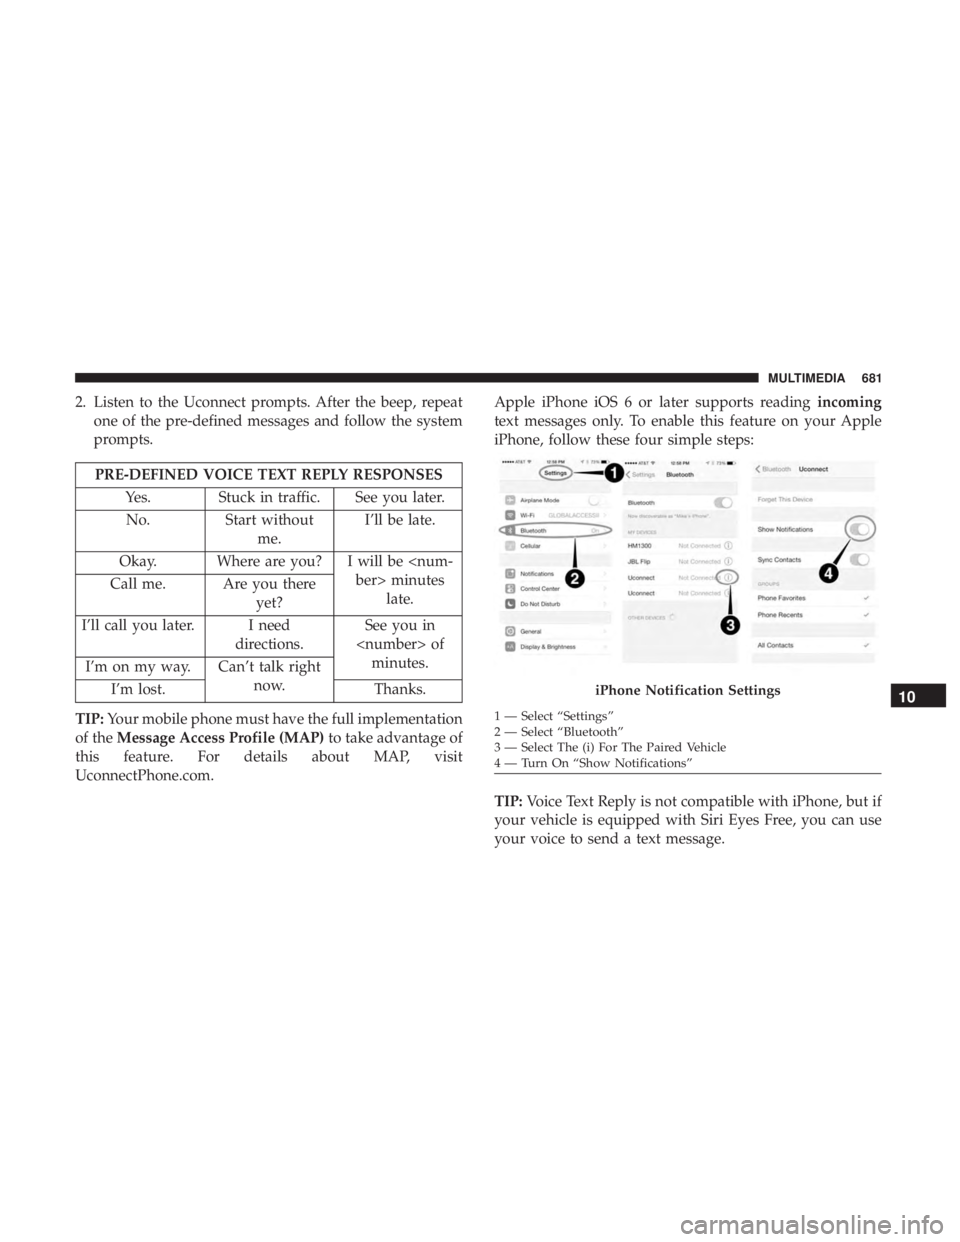
incoming
text messages only. To enable this feature on your Apple
iPhone, follow these four simple steps:
TIP: Voice Text Reply is not compatible with iPhone, but if
your vehicle is equipped with Siri Eyes Free, you can use
your voice to send a text message.
iPhone Notification Settings
1 — Select “Settings”
2 — Select “Bluetooth”
3 — Select The (i) For The Paired Vehicle
4 — Turn On “Show Notifications”
10
MULTIMEDIA 681