Page 17 of 20

17F Optional equipment
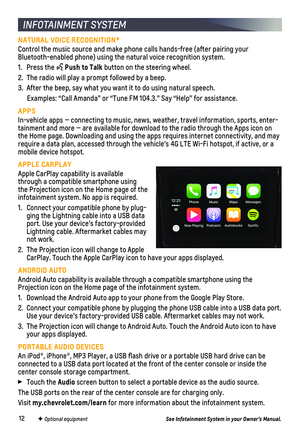
SETTING CRUISE CONTROL
1. Press the On/Off button. The Cruise Control symbol will illuminate in white on the instrument cluster.
2. When traveling at the desired speed, press the SET– position to set the speed. The symbol will illuminate in green.
ADJUSTING CRUISE CONTROL
RES+ Resume/Accelerate
Press to resume a set speed. When the sys-tem is active, press to increase speed.
SET– Set/Coast
When active, press to decrease speed.
Cancel
Press the button, or press the brake pedal, to cancel the Cruise Control without
erasing the set speed from memory.
The set speed is erased when Cruise Control or the vehicle ignition is t\
urned off.
ADAPTIVE CRUISE CONTROLF
The system maintains the set speed and a following gap — the time bet\
ween your vehicle and a vehicle detected directly ahead — by accelerating or braking au\
tomatically while you continue to steer.
Press the Following Gap button to select a gap setting of Far, Medium or Near. This is also the Forward Collision AlertF setting.
Press and hold the Cancel button to switch between regular Cruise Control and Adaptive Cruise Control.
See Driving and Operating in your Owner’s Manual.
The Traction Select system automatically adjusts various vehicle control\
systems based on driving preferences, weather and road conditions.
Rotate the Driver Mode Control knob on the center console to select:
Tour (front-wheel drive models) or Tour (AWD models)
All-Wheel Drive (AWD models)
Snow (front-wheel drive models)
Off-Road (AWD models)
Tow/HaulF
The AWD indicator will illuminate when an all-wheel drive mode is select\
ed.
Note: The modes displayed vary depending on vehicle equipment.
See Driving and Operating in your Owner’s Manual.
CRUISE CONTROL
TRACTION SELECT
Page 18 of 20

18
When the vehicle is on, the auto heated seats and auto heated steering w\
heel or auto ventilated seats will activate based on the vehicle’s interior temper\
ature. Manually turn off the heated or ventilated seats using the seat controls. Manually tur\
n off the heated steering wheel using the steering wheel control.
To turn the auto heated seats and auto ventilated seats on or off, go to\
Settings > Vehicle > Climate and Air Quality > Auto Heated Seats or Auto Cooled Sea\
ts.
See Instruments and Controls in your Owner’s Manual.
AUTO HEATED/VENTILATED SEATSF
F Optional equipment
AUTOMATIC CLIMATE CONTROLSF
Driver’s Temperature Control
AUTO Automatic OperationF
A/C Air Conditioning Control
Passenger’s Temperature Control
REAR Rear Window Defogger
Driver’s Heated/ Ventilated Seat ButtonsF
Passenger’s Heated/Ventilated Seat ButtonsF
Air Delivery Modes: Defog Vent Floor
Recirculation Mode
SYNC Link passenger’s temperature setting to driver’s settingF
Power Fan Controls
MAX Defrost
AUTOMATIC OPERATION
Press AUTO.
Set the temperature.
The system automatically controls the fan speed, air delivery, air condi\
tioning, and
recirculation functions. Allow time for the system to reach the set temp\
erature. If a function is manually adjusted, automatic operation for that function is \
turned off.
REAR CLIMATE CONTROLS
The rear climate control settings can be adjusted using the control pane\
l on the rear of the center console or the rear climate display on the infotainment scree\
n.
To lock/unlock the rear controls from the front seat, select Rear Contro\
l Lockout on the infotainment screen.
See Climate Controls in your Owner’s Manual.
Page 19 of 20

19
UNDERFLOOR REAR CARGO STORAGE
Lift up the rear cargo floor for additional storage space.
Remove the storage bin to access the spare tire. Refer to your Owner’s Manual for instructions.
See Storage in your Owner’s Manual.
The Low Tire Pressure warning light on the instrument cluster illuminates wh\
en one or more of the vehicle’s tires is significantly underinflated. Fi\
ll the tires to the proper tire pressures listed on the Tire and Loading Information label located \
below the driver’s door latch. Current tire pressures can be viewed on the Driver Informati\
on Center.
The Tire Fill Alert provides visual and audible alerts to help when infl\
ating a tire to the recommended tire pressure. When the recommended pressure is reached, the\
horn sounds and the turn signals change from flashing to solid.
See Vehicle Care in your Owner’s Manual.
To open the fuel door, press and release the center of the rear edge of the door. It will pop out slightly. Pull the door open.
The vehicle’s capless fuel system does not have a fuel cap. Fully insert the fuel pump nozzle before starting to fill the tank.
Note: When using a portable gas can, insert the funnel adapter, stored with the spare tire, into the capless fuel fill.
See Driving and Operating in your Owner’s Manual.
CARGO STORAGE
TIRE PRESSURE MONITOR
REFUELING THE VEHICLE
SUNROOF/SUNSHADEF
Press and release the SLIDE switch to express-open the sunroof.
Press and release the Close switch to express-close the sunroof.
To open the sunshade, press the latch button on the handle while pushing\
up to unlatch it.
To close the sunshade, pull the handle forward until it latches.
See Keys, Doors and Windows in your Owner’s Manual.
F Optional equipment
Page 20 of 20
 \
TTY Users: 1-888-889-2438
As the owner of a new Chevrolet, you are automatically enrolled in the C\")
20
ROADSIDE ASSISTANCE
1-800-CHEV-USA (1-800-243-8872) \
TTY Users: 1-888-889-2438
As the owner of a new Chevrolet, you are automatically enrolled in the C\
hevrolet Roadside Assistance program for up to 5 years/60,000 miles, whichever occurs fi\
rst, at no expense to you. Chevrolet’s Roadside Assistance toll-free number is staffed b\
y a team of trained advisors who are available 24 hours a day, 365 days a year, to contact a\
service provider for light services (fuel delivery, jump-starts, flat tire and lock-ou\
ts) or make arrange-ments to tow your vehicle to the nearest Chevrolet dealer for any repair\
s.
OnStar Roadside Assistance
If you have a current OnStar Safety & Security plan, push the blue OnStar button or red Emergency button to get the help you need. An OnStar advisor will use GPS technolo\
gy to pinpoint your vehicle location and contact the nearest service provid\
er.
To learn more about OnStar services, press the blue OnStar button, visit onstar.com, call 1-888-4-ONSTAR (1-888-466-7827), or refer to your Owner’s Manual.
CHEVROLET OWNER CENTER
MYCHEVROLET MOBILE APP
Get to know your vehicle inside and out with the Chevrolet Owner Center.\
Check out
personalized information, including an online Owner’s Manual and help\
ful how-to videos, track your service history and warranty status, manage your OnStar and C\
onnected Services vehicle plans, review your current Vehicle Diagnostics report (\
active service account required) and more. Create an account today at my.chevrolet.com.
!84149418=A!
Certain restrictions, precautions and safety procedures apply to your ve\
hicle. Please read your Owner’s Manual for complete instructions. All information contained in this guide is ba\
sed on the latest information available at the time of printing and is subject to change without notice. Copyright \
2018 General Motors. All rights reserved.
We recommend always using ACDelco or genuine GM service parts.
Download the myChevrolet app to your compatible smartphone (or device)\
and, if your vehicle is properly equipped, you can start or turn off your engine, loc\
k or unlock your doors, view key diagnostic information, set parking information and more\
.
The app is available on select Apple and Android devices. Service availa\
bility, features and functionality vary by vehicle, device and data plan. Device data con\
nection required. Visit onstar.com for more details. Download the mobile app from your compatible mobile device’s app store.
84149418 A
Page:
< prev 1-8 9-16 17-24