2019 CHEVROLET SILVERADO four wheel drive
[x] Cancel search: four wheel drivePage 251 of 474

Chevrolet Silverado Owner Manual (GMNA-Localizing-U.S./Canada/Mexico-
1500-11698642) - 2019 - CRC - 2/20/19
250 Driving and Operating
When in Terrain Mode, the vehicle
will shift automatically but may hold
a lower gear longer to maximize
engine torque. The steering will
change to provide more precise
control. A unique pedal map,
transmission shift pattern, and rpm
control are utilized to give better
control at lower speeds and over
rough terrain. When the vehicle
comes to a stop, Vehicle Hold is
engaged. TCS will be optimized for
maximum torque transfer across
axles, and Active Braking During Lift
Throttle will be engaged.
Active Braking During Lift Throttle:
.Automatically applies light
braking, similar to heavy engine
braking of four-wheel-drive low.
. In D (Drive), the vehicle will
apply light braking until the
vehicle is at idle speeds. In
Manual L1 and Manual L2,
moderate braking may stop the
vehicle.
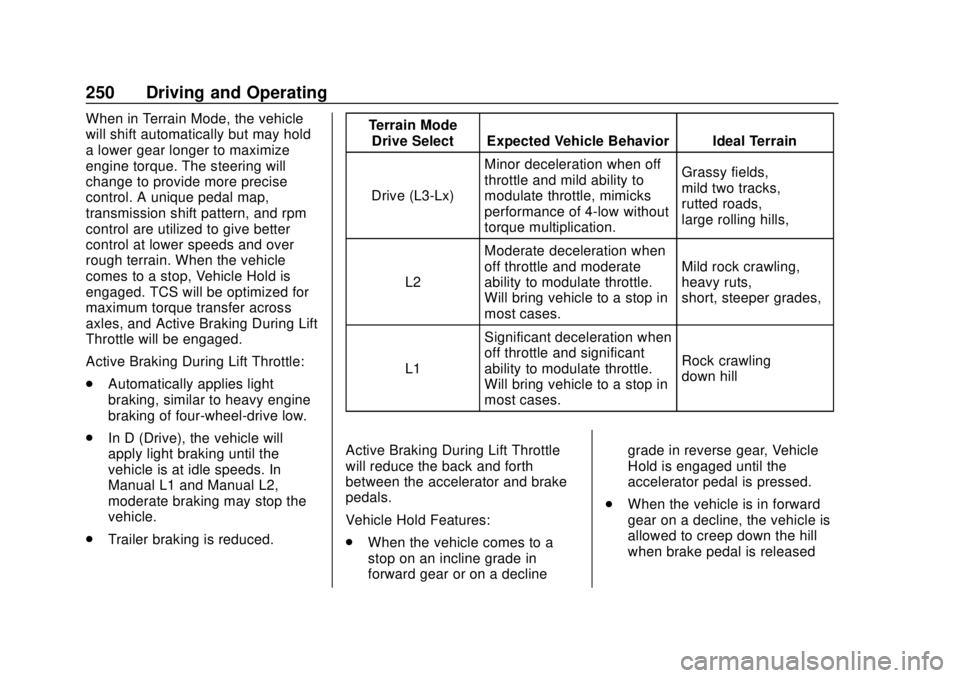
. Trailer braking is reduced. Terrain Mode
Drive Select Expected Vehicle Behavior Ideal Terrain
Drive (L3-Lx) Minor deceleration when off
throttle and mild ability to
modulate throttle, mimicks
performance of 4-low without
torque multiplication. Grassy fields,
mild two tracks,
rutted roads,
large rolling hills,
L2 Moderate deceleration when
off throttle and moderate
ability to modulate throttle.
Will bring vehicle to a stop in
most cases. Mild rock crawling,
heavy ruts,
short, steeper grades,
L1 Significant deceleration when
off throttle and significant
ability to modulate throttle.
Will bring vehicle to a stop in
most cases. Rock crawling
down hill
Active Braking During Lift Throttle
will reduce the back and forth
between the accelerator and brake
pedals.
Vehicle Hold Features:
. When the vehicle comes to a
stop on an incline grade in
forward gear or on a decline grade in reverse gear, Vehicle
Hold is engaged until the
accelerator pedal is pressed.
. When the vehicle is in forward
gear on a decline, the vehicle is
allowed to creep down the hill
when brake pedal is released
Page 282 of 474

Chevrolet Silverado Owner Manual (GMNA-Localizing-U.S./Canada/Mexico-
1500-11698642) - 2019 - CRC - 2/20/19
Driving and Operating 281
Warning (Continued)
provide a means of escape
in the unlikely event the
vehicle slides into the water.
. If the boat launch surface is
slippery, have the driver
remain in the vehicle with
the brake pedal applied
while the boat is being
launched. The boat launch
can be especially slippery at
low tide when part of the
ramp was previously
submerged at high tide. Do
not back onto the ramp to
launch the boat if you are
not sure the vehicle can
maintain traction.
. Do not move the vehicle if
someone is in the path of
the trailer. Some parts of the
trailer might be underwater
and not visible to people
who are assisting in
launching the boat. Disconnect the wiring to the trailer
before backing the trailer into the
water to prevent damage to the
electrical circuits on the trailer.
Reconnect the wiring to the trailer
after removing the trailer from the
water. If the trailer has electric
brakes that can function when the
trailer is submerged, it might help to
leave the electrical trailer connector
attached to maintain trailer brake
functionality while on the boat ramp.
To back the trailer into the water:
1. If equipped, place the vehicle in four-wheel-drive high.
2. Slowly back down the boat ramp until the boat is floating,
but no further than necessary.
3. Press and hold the brake pedal, but do not shift into
P (Park) yet.
4. Have someone place chocks under the front wheels of the
vehicle.
5. Gradually release the brake pedal to allow the chocks to
absorb the load of the trailer. 6. Reapply the brake pedal. Then
apply the parking brake and
shift into P (Park).
7. Release the brake pedal.
Pulling the Trailer from the Water
To pull the trailer out of the water: 1. Press and hold the brake pedal and apply the Electric Parking
Brake.
2. Start the engine and shift into gear.
3. Release the parking brake.
4. Let up on the brake pedal.
5. Drive slowly until the tires are clear of the chocks.
6. Stop and have someone pick up and store the chocks.
7. Slowly pull the trailer from the water.
8. Once the vehicle and trailer have been driven from the
sloped part of the boat ramp,
the vehicle can be shifted from
four-wheel-drive high. Shift into
Page 313 of 474

Chevrolet Silverado Owner Manual (GMNA-Localizing-U.S./Canada/Mexico-
1500-11698642) - 2019 - CRC - 2/20/19
312 Vehicle Care
Vehicle Care
General Information
General Information . . . . . . . . . . 313
California Proposition65 Warning . . . . . . . . . . . . . . . . . 314
California Perchlorate Materials Requirements . . . . . 314
Accessories and Modifications . . . . . . . . . . . . . . . . 314
Vehicle Checks
Doing Your OwnService Work . . . . . . . . . . . . . . . 315
Hood . . . . . . . . . . . . . . . . . . . . . . . . . 315
Engine Compartment Overview . . . . . . . . . . . . . . . . . . . . 317
Engine Oil . . . . . . . . . . . . . . . . . . . . 322
Engine Oil Life System . . . . . . . 324
Automatic Transmission Fluid . . . . . . . . . . . . . . . . . . . . . . . . 326
Engine Air Filter Life System . . . . . . . . . . . . . . . . . . . . . . 326
Engine Air Cleaner/Filter . . . . . . 327
Cooling System . . . . . . . . . . . . . . 328
Engine Overheating . . . . . . . . . . 332
Overheated Engine Protection Operating Mode . . . . . . . . . . . . . 334
Engine Fan . . . . . . . . . . . . . . . . . . . 334 Washer Fluid . . . . . . . . . . . . . . . . . 335
Brakes . . . . . . . . . . . . . . . . . . . . . . . 336
Brake Pad Life System . . . . . . . 336
Brake Fluid . . . . . . . . . . . . . . . . . . . 337
Battery - North America . . . . . . 338
Four-Wheel Drive . . . . . . . . . . . . . 341
Front Axle . . . . . . . . . . . . . . . . . . . . 341
Rear Axle . . . . . . . . . . . . . . . . . . . . 342
Noise Control System . . . . . . . . 343
Starter Switch Check . . . . . . . . . 344
Ignition Transmission Lock
Check . . . . . . . . . . . . . . . . . . . . . . . 344
Park Brake and P (Park) Mechanism Check . . . . . . . . . . 344
Wiper Blade Replacement . . . . 345
Glass Replacement . . . . . . . . . . 346
Windshield Replacement . . . . . 346
Gas Strut(s) . . . . . . . . . . . . . . . . . . 346
Headlamp Aiming
Headlamp Aiming . . . . . . . . . . . . 347
Bulb Replacement
Bulb Replacement . . . . . . . . . . . . 347
Halogen Bulbs . . . . . . . . . . . . . . . . 347
LED Lighting . . . . . . . . . . . . . . . . . 348
Headlamps, Front Turn Signal, Sidemarker, and Parking
Lamps . . . . . . . . . . . . . . . . . . . . . . 348 Taillamps, Turn Signal,
Stoplamps, and Back-Up
Lamps . . . . . . . . . . . . . . . . . . . . . . 349
Center High-Mounted Stoplamp (CHMSL) and
Cargo Lamp . . . . . . . . . . . . . . . . . 350
License Plate Lamp . . . . . . . . . . 350
Electrical System
Electrical System Overload . . . 351
Fuses and Circuit Breakers . . . 351
Engine Compartment Fuse Block . . . . . . . . . . . . . . . . . . . . . . . . 352
Instrument Panel Fuse Block (Right) . . . . . . . . . . . . . . . . . . . . . . 355
Instrument Panel Fuse Block (Left) . . . . . . . . . . . . . . . . . 358
Wheels and Tires
Tires . . . . . . . . . . . . . . . . . . . . . . . . . . 360
All-Season Tires . . . . . . . . . . . . . . 361
Winter Tires . . . . . . . . . . . . . . . . . . 361
Low-Profile Tires . . . . . . . . . . . . . 362
All-Terrain Tires . . . . . . . . . . . . . . . 362
Tire Sidewall Labeling . . . . . . . . 362
Tire Designations . . . . . . . . . . . . . 365
Tire Terminology and
Definitions . . . . . . . . . . . . . . . . . . 366
Tire Pressure . . . . . . . . . . . . . . . . . 369
Tire Pressure for High-Speed
Operation . . . . . . . . . . . . . . . . . . . 370
Page 342 of 474

Chevrolet Silverado Owner Manual (GMNA-Localizing-U.S./Canada/Mexico-
1500-11698642) - 2019 - CRC - 2/20/19
Vehicle Care 341
For vehicles equipped with the Stop/
Start system:1. Install the negative battery cable to the battery
sensor stud.
2. Install the negative battery cable nut to the battery sensor
stud and tighten.
3. Turn the ignition on.
For vehicles not equipped with the
Stop/Start system: 1. Install the negative battery cable clamp to the negative
battery post.
2. Tighten the negative battery cable nut.
3. Turn the ignition on.
Four-Wheel Drive
Transfer Case
When to Check Lubricant
Refer to Maintenance Schedule
0 417 to determine when to check
the lubricant.
1. Fill Plug
2. Drain Plug
To get an accurate reading, the
vehicle should be on a level
surface.
If the level is below the bottom of
the fill plug (1) hole, located on the
transfer case, some lubricant will
need to be added. Add enough
lubricant to raise the level to the
bottom of the fill plug (1) hole. Use
care not to overtighten the plug. When to Change Lubricant
Refer to
Maintenance Schedule
0 417 to determine how often to
change the lubricant.
What to Use
Refer to Recommended Fluids and
Lubricants 0427 to determine what
kind of lubricant to use.
Front Axle
When to Check and Change
Lubricant
It is not necessary to regularly
check front axle fluid unless a leak
is suspected, or an unusual noise is
heard. A fluid loss could indicate a
problem. Have it inspected and
repaired.
How to Check Lubricant
To get an accurate reading, the
vehicle should be on a level
surface.
Page 375 of 474

Chevrolet Silverado Owner Manual (GMNA-Localizing-U.S./Canada/Mexico-
1500-11698642) - 2019 - CRC - 2/20/19
374 Vehicle Care
the valve stem. When the
recommended pressure is reached,
the horn sounds once.
If the turn signal lamp does not flash
within 15 seconds after starting to
inflate the tire, the tire fill alert has
not been activated or is not working.
If the hazard warning flashers are
on, the tire fill alert visual feedback
will not work properly.
The TPMS will not activate the tire
fill alert properly under the following
conditions:
.There is interference from an
external device or transmitter.
. The air pressure from the
inflation device is not sufficient
to inflate the tire.
. There is a malfunction in
the TPMS.
. There is a malfunction in the
horn or turn signal lamps.
. The identification code of the
TPMS sensor is not registered to
the system. .
The battery of the TPMS sensor
is low.
If the tire fill alert does not operate
due to TPMS interference, move the
vehicle about 1 m (3 ft) back or
forward and try again. If the tire fill
alert feature is not working, use a
tire pressure gauge.
TPMS Sensor Matching
Process
Each TPMS sensor has a unique
identification code. The identification
code needs to be matched to a new
tire/wheel position after rotating the
vehicle’s tires or replacing one or
more of the TPMS sensors. Also,
the TPMS sensor matching process
should be performed after replacing
a spare tire with a road tire
containing the TPMS sensor. The
malfunction light and the DIC
message should go off at the next
ignition cycle. The sensors are
matched to the tire/wheel positions,
using a TPMS relearn tool, in the
following order: driver side front tire,
passenger side front tire, passenger
side rear tire, and driver side rear. See your dealer for service or to
purchase a relearn tool. A TPMS
relearn tool can also be purchased.
See Tire Pressure Monitor Sensor
Activation Tool at
www.gmtoolsandequipment.com or
call 1-800-GM TOOLS
(1-800-468-6657).
There are two minutes to match the
first tire/wheel position, and
five minutes overall to match all four
tire/wheel positions. If it takes
longer, the matching process stops
and must be restarted.
The TPMS sensor matching
process is:
1. Set the parking brake.
2. Turn the ignition on without starting the vehicle.
Page 376 of 474

Chevrolet Silverado Owner Manual (GMNA-Localizing-U.S./Canada/Mexico-
1500-11698642) - 2019 - CRC - 2/20/19
Vehicle Care 375
3. Uplevel DIC Only: Make surethe Tire Pressure info page
option is turned on. The info
pages on the DIC can be
turned on and off through the
Options menu. See Driver
Information Center (DIC) (Base
Level) 0160 or
Driver Information Center (DIC)
(Midlevel and Uplevel) 0161.
4. If the vehicle has an uplevel DIC, use the DIC controls on
the right side of the steering
wheel to scroll to the Tire
Pressure screen under the DIC
info page.
If the vehicle has a base level
DIC, use the trip odometer
reset stem to scroll to the Tire
Pressure screen.
5. If the vehicle has an uplevel DIC, press and hold the
thumbwheel located in the
center of the DIC controls on
the right side of the steering
wheel. If the vehicle has a base level
DIC, press and hold the trip
odometer reset stem for about
five seconds. A message
asking if the process should
begin should appear. Select
yes and press the trip
odometer reset stem to confirm
the selection.
The horn sounds twice to
signal the receiver is in relearn
mode and the TIRE
LEARNING ACTIVE message
displays on the DIC screen.
6. Start with the driver side front tire.
7. Place the relearn tool against the tire sidewall, near the valve
stem. Then press the button to
activate the TPMS sensor.
A horn chirp confirms that the
sensor identification code has
been matched to this tire and
wheel position.
8. Proceed to the passenger side front tire, and repeat the
procedure in Step 7. 9. Proceed to the passenger side
rear tire, and repeat the
procedure in Step 7.
10. Proceed to the driver side rear tire, and repeat the procedure
in Step 7. The horn sounds two
times to indicate the sensor
identification code has been
matched to the driver side rear
tire, and the TPMS sensor
matching process is no longer
active. The TIRE LEARNING
ACTIVE message on the DIC
display screen goes off.
11. Turn the vehicle off.
12. Set all four tires to the recommended air pressure
level as indicated on the Tire
and Loading Information label.
Trailer Tire Pressure
Monitoring Operation
If equipped, the Trailer Tire
Pressure Monitoring System
(TTPMS) is designed to monitor the
pressure of the trailer tires and warn
the driver when a low pressure
condition exists. TTPMS sensors for
four tires are provided. The system
Page 381 of 474

Chevrolet Silverado Owner Manual (GMNA-Localizing-U.S./Canada/Mexico-
1500-11698642) - 2019 - CRC - 2/20/19
380 Vehicle Care
sidewall near the tire size. If the
tires have an all-season tread
design, the TPC Spec number
will be followed by MS for mud
and snow. SeeTire Sidewall
Labeling 0362 for additional
information.
GM recommends replacing worn
tires in complete sets of four (six
for dual rear wheels). Uniform
tread depth on all tires will help
to maintain the performance of
the vehicle. Braking and
handling performance may be
adversely affected if all the tires
are not replaced at the same
time. If proper rotation and
maintenance have been done,
all four tires (six for dual rear
wheels) should wear out at
about the same time. See Tire
Rotation 0377 for information
on proper tire rotation. However,
if it is necessary to replace only
one axle set of worn tires, place the new tires on the rear axle
(two for single rear wheels, four
for dual rear wheels).
{Warning
Tires could explode during
improper service. Attempting
to mount or dismount a tire
could cause injury or death.
Only your dealer or authorized
tire service center should
mount or dismount the tires.
{Warning
Mixing tires of different sizes,
brands, or types may cause
loss of control of the vehicle,
resulting in a crash or other
vehicle damage. Use the
correct size, brand, and type
of tires on all wheels.
(Continued)
Warning (Continued)
This vehicle may have a
different size spare than the
road tires originally installed
on the vehicle. When new, the
vehicle included a spare tire
and wheel assembly with a
similar overall diameter as the
road tires and wheels, so it is
all right to drive on it. The
spare tire was developed for
use on this vehicle and will not
affect vehicle handling.
{Warning
Using bias-ply tires on the
vehicle may cause the wheel
rim flanges to develop cracks
after many miles of driving.
A tire and/or wheel could fail
suddenly and cause a crash.
Use only radial-ply tires with
the wheels on the vehicle.
Page 387 of 474

Chevrolet Silverado Owner Manual (GMNA-Localizing-U.S./Canada/Mexico-
1500-11698642) - 2019 - CRC - 2/20/19
386 Vehicle Care
Warning (Continued)
anything else, you or others could
be badly injured or killed if the
vehicle slips off the jack. If a jack
is provided with the vehicle, only
use it for changing a flat tire.
If a tire goes flat, avoid further tire
and wheel damage by driving slowly
to a level place, well off the road,
if possible. Turn on the hazard
warning flashers. See Hazard
Warning Flashers 0181.
{Warning
Changing a tire can be
dangerous. The vehicle can slip
off the jack and roll over or fall
causing injury or death. Find a
level place to change the tire. To
help prevent the vehicle from
moving:
1. Set the parking brake firmly. (Continued)
Warning (Continued)
2. Put the shift lever inP (Park).
3. For vehicles with four-wheel drive with an N (Neutral)
transfer case position, be
sure the transfer case is in a
drive gear —not in
N (Neutral).
4. Turn off the engine and do not restart while the vehicle
is raised.
5. Do not allow passengers to remain in the vehicle.
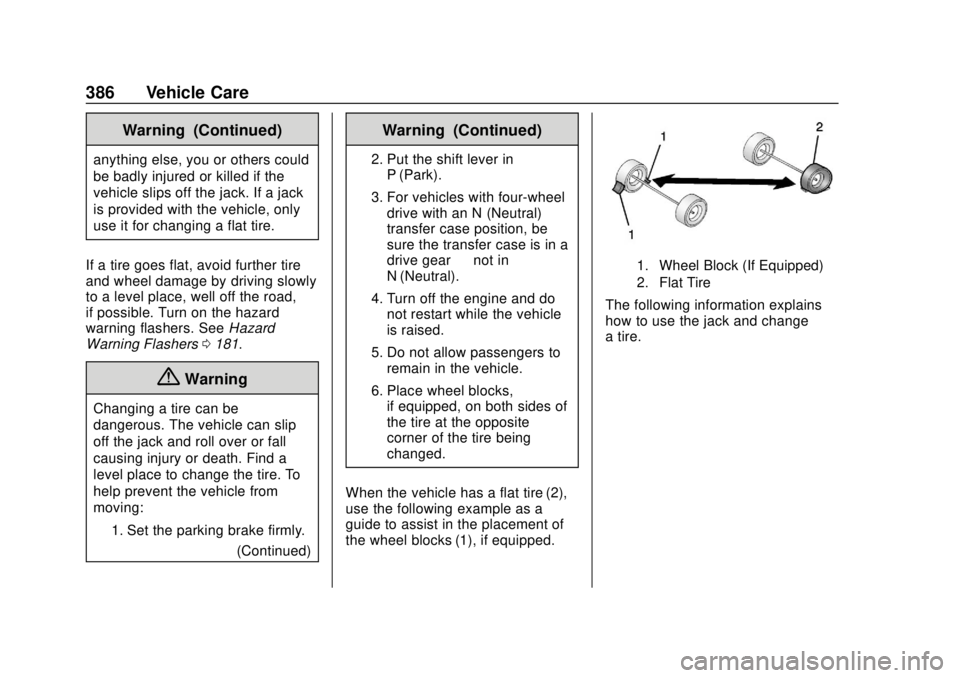
6. Place wheel blocks, if equipped, on both sides of
the tire at the opposite
corner of the tire being
changed.
When the vehicle has a flat tire (2),
use the following example as a
guide to assist in the placement of
the wheel blocks (1), if equipped.
1. Wheel Block (If Equipped)
2. Flat Tire
The following information explains
how to use the jack and change
a tire.