2019 CHEVROLET SILVERADO wheel
[x] Cancel search: wheelPage 328 of 474

Chevrolet Silverado Owner Manual (GMNA-Localizing-U.S./Canada/Mexico-
1500-11698642) - 2019 - CRC - 2/20/19
Vehicle Care 327
3. PressTon the steering wheel,
or press the trip odometer reset
stem if the vehicle does not
have DIC controls, to move to
the Reset/Disable display area.
Select Reset, then press the
thumbwheel or press the reset
stem for several seconds.
4. Press the thumbwheel or the reset stem to confirm the reset.
Engine Air Cleaner/Filter
The engine air cleaner/filter is on
the driver side of the engine
compartment. See Engine
Compartment Overview 0317.
When to Inspect the Engine Air
Cleaner/Filter
If the vehicle is not equipped with
the engine air filter life system, see
Maintenance Schedule 0417 for
intervals on inspecting and
replacing changing the engine air
cleaner/filter.
How to Inspect/Replace the
Engine Air Cleaner/Filter
Do not start the engine or have the
engine running with the engine air
cleaner/filter housing open. Before
removing the engine air cleaner/
filter, make sure that the engine air
cleaner/filter housing and nearby
components are free of dirt and
debris. Do not clean the engine air
cleaner/filter or components with
water or compressed air.
To inspect or replace the engine air
cleaner/filter:
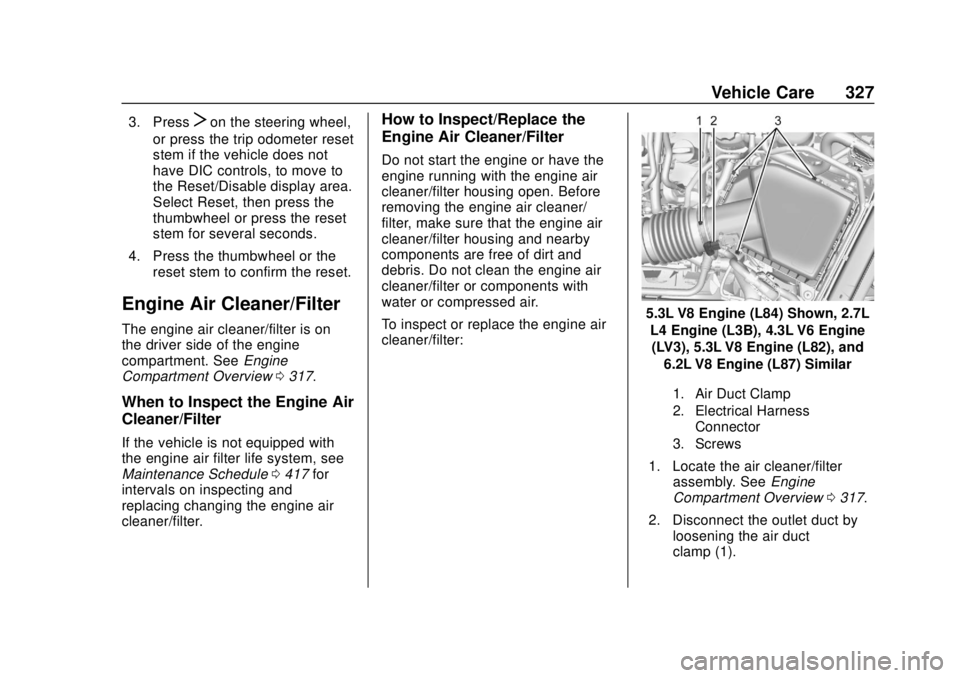
5.3L V8 Engine (L84) Shown, 2.7L
L4 Engine (L3B), 4.3L V6 Engine(LV3), 5.3L V8 Engine (L82), and
6.2L V8 Engine (L87) Similar
1. Air Duct Clamp
2. Electrical Harness Connector
3. Screws
1. Locate the air cleaner/filter assembly. See Engine
Compartment Overview 0317.
2. Disconnect the outlet duct by loosening the air duct
clamp (1).
Page 337 of 474

Chevrolet Silverado Owner Manual (GMNA-Localizing-U.S./Canada/Mexico-
1500-11698642) - 2019 - CRC - 2/20/19
336 Vehicle Care
Brakes
Disc brake pads have built-in wear
indicators that make a high-pitched
warning sound when the brake pads
are worn and new pads are needed.
The sound can come and go or be
heard all the time the vehicle is
moving, except when applying the
brake pedal firmly.
{Warning
The brake wear warning sound
means that soon the brakes will
not work well. That could lead to
a crash. When the brake wear
warning sound is heard, have the
vehicle serviced.
Caution
Continuing to drive with worn-out
brake pads could result in costly
brake repair.Some driving conditions or climates
can cause a brake squeal when the
brakes are first applied or lightly
applied. This does not mean
something is wrong with the brakes.
Properly torqued wheel nuts are
necessary to help prevent brake
pulsation. When tires are rotated,
inspect brake pads for wear and
evenly tighten wheel nuts in the
proper sequence to torque
specifications in
Capacities and
Specifications 0432.
Brake linings should always be
replaced as complete axle sets.
Brake Pedal Travel
See your dealer if the brake pedal
does not return to normal height,
or if there is a rapid increase in
pedal travel. This could be a sign
that brake service may be required.
Replacing Brake System Parts
Always replace brake system parts
with new, approved replacement
parts. If this is not done, the brakes
may not work properly. The braking
performance expected can change in many other ways if the wrong
replacement brake parts are
installed or parts are improperly
installed.
Brake Pad Life System
When to Change Brake Pads
This vehicle has a system that
estimates the remaining life of the
front and rear brake pads. Brake
pad life is displayed in the Driver
Information Center (DIC), along with
a percentage for each axle. The
system must be reset every time the
brake pads are changed.
When the system has determined
that the brake pads need to be
replaced, a message will display,
which may include mileage
remaining.
Brake pads should always be
replaced as complete axle sets.
How to Reset the Brake Pad
Life System
The system will automatically detect
when significantly worn brake pads
are replaced. When the ignition is
Page 338 of 474

Chevrolet Silverado Owner Manual (GMNA-Localizing-U.S./Canada/Mexico-
1500-11698642) - 2019 - CRC - 2/20/19
Vehicle Care 337
turned on after new pads and wear
sensors are installed, a message
will display. Follow the prompts to
reset the system.
The brake pad life system can also
be manually reset:1. Display Brake Pad Life on the DIC. See Driver Information
Center (DIC) (Base Level)
0 160 or
Driver Information Center (DIC)
(Midlevel and Uplevel) 0161.
2. Press the thumbwheel or the trip odometer reset stem if the
vehicle does not have DIC
buttons. Select front or rear
pads as appropriate.
3. Select YES on the confirmation message, or press the trip
odometer reset stem on a base
level DIC. Repeat for pads on
the other axle if they were also
replaced.How to Disable the Brake Pad
Life System
The brake pad life system can be
turned off. This may be necessary if
aftermarket brake pads without wear
sensors are installed. When the
system is turned off, the front and
rear brake pad life percentages will
not display. However, the built-in
wear indicators that make a
high-pitched warning sound when
the brake pads are worn can still
determine when the pads should be
replaced. See Brakes0336.
To turn off the brake pad life system: 1. Display Brake Pad Life on the DIC. See Driver Information
Center (DIC) (Base Level)
0 160 or
Driver Information Center (DIC)
(Midlevel and Uplevel) 0161.
2. Select DISABLE.
To turn the brake pad life system
back on, follow the above steps but
select ENABLE in Step 2.
Brake Fluid
The brake master cylinder reservoir
is filled with GM approved DOT 4
brake fluid as indicated on the
reservoir cap. See Engine
Compartment Overview 0317 for
the location of the reservoir.
Checking Brake Fluid
With the vehicle in P (Park) on a
level surface, the brake fluid level
should be between the minimum
and maximum marks on the brake
fluid reservoir.
There are only two reasons why the
brake fluid level in the reservoir may
go down:
. Normal brake lining wear. When
new linings are installed, the
fluid level goes back up.
Page 342 of 474

Chevrolet Silverado Owner Manual (GMNA-Localizing-U.S./Canada/Mexico-
1500-11698642) - 2019 - CRC - 2/20/19
Vehicle Care 341
For vehicles equipped with the Stop/
Start system:1. Install the negative battery cable to the battery
sensor stud.
2. Install the negative battery cable nut to the battery sensor
stud and tighten.
3. Turn the ignition on.
For vehicles not equipped with the
Stop/Start system: 1. Install the negative battery cable clamp to the negative
battery post.
2. Tighten the negative battery cable nut.
3. Turn the ignition on.
Four-Wheel Drive
Transfer Case
When to Check Lubricant
Refer to Maintenance Schedule
0 417 to determine when to check
the lubricant.
1. Fill Plug
2. Drain Plug
To get an accurate reading, the
vehicle should be on a level
surface.
If the level is below the bottom of
the fill plug (1) hole, located on the
transfer case, some lubricant will
need to be added. Add enough
lubricant to raise the level to the
bottom of the fill plug (1) hole. Use
care not to overtighten the plug. When to Change Lubricant
Refer to
Maintenance Schedule
0 417 to determine how often to
change the lubricant.
What to Use
Refer to Recommended Fluids and
Lubricants 0427 to determine what
kind of lubricant to use.
Front Axle
When to Check and Change
Lubricant
It is not necessary to regularly
check front axle fluid unless a leak
is suspected, or an unusual noise is
heard. A fluid loss could indicate a
problem. Have it inspected and
repaired.
How to Check Lubricant
To get an accurate reading, the
vehicle should be on a level
surface.
Page 358 of 474

Chevrolet Silverado Owner Manual (GMNA-Localizing-U.S./Canada/Mexico-
1500-11698642) - 2019 - CRC - 2/20/19
Vehicle Care 357
The vehicle may not be equipped
with all of the fuses, relays, and
features shown.Fuses Usage
F1 Right doors
F2 Left doors
F3 Universal remote system
F4 –
F5 –
F6 Front blower
F8 Lumbar switch
F10 Body control module 6/Body control
module 7
F11 Seat/CLM
F12 Body control module 3/Body control
module 5
F14 Mirrors/Windows module
F17 Steering wheel controls
F18 VPM/OBS DET Fuses Usage
F19 DLIS
F20 Cooled seats
F21 NOT R/C
F22 Heated steering wheel
F23 MISC R/C
F24 Instrument panel cluster ignition/
Overhead
F25 Heating, ventilation, and air conditioning
ignition/Heating,
ventilation, and air
conditioning auxiliary
F26 USB ports/Special equipment option
retained accessory
power
F27 Accessory power outlet/retained
accessory power
F28 Accessory power outlet/Battery Fuses Usage
F30 Sensing and diagnostic module/
Parking brake
F31 Body control module 4
F32 Special equipment option/Data link
connection
F33 Body control module 8
F34 Cargo lamp
F40 CGM
F41 Infotainment 1
F42 TCP
F43 –
F44 AVM
F45 Body control module 2
F46 Heating, ventilation, and air conditioning/
Battery 1
F47 Instrument panel cluster/Battery
F48 Transmission control module
Page 361 of 474

Chevrolet Silverado Owner Manual (GMNA-Localizing-U.S./Canada/Mexico-
1500-11698642) - 2019 - CRC - 2/20/19
360 Vehicle Care
RelaysUsage
K5 MFEG minor 2
K6 MFEG major 2
K7 Anti-theft
K8 –Wheels and Tires
Tires
Every new GM vehicle has
high-quality tires made by a
leading tire manufacturer. See
the warranty manual for
information regarding the tire
warranty and where to get
service. For additional
information refer to the tire
manufacturer.
{Warning
.Poorly maintained and
improperly used tires are
dangerous.
.Overloading the tires can
cause overheating as a
result of too much
flexing. There could be a
blowout and a serious
crash. See Vehicle Load
Limits 0210.
(Continued)
Warning (Continued)
.Underinflated tires pose
the same danger as
overloaded tires. The
resulting crash could
cause serious injury.
Check all tires frequently
to maintain the
recommended pressure.
Tire pressure should be
checked when the tires
are cold.
.Overinflated tires are
more likely to be cut,
punctured, or broken by
a sudden impact —such
as when hitting a pothole.
Keep tires at the
recommended pressure.
.Worn or old tires can
cause a crash. If the
tread is badly worn,
replace them.
(Continued)
Page 362 of 474

Chevrolet Silverado Owner Manual (GMNA-Localizing-U.S./Canada/Mexico-
1500-11698642) - 2019 - CRC - 2/20/19
Vehicle Care 361
Warning (Continued)
.Replace any tires that
have been damaged by
impacts with potholes,
curbs, etc.
.Improperly repaired tires
can cause a crash. Only
the dealer or an
authorized tire service
center should repair,
replace, dismount, and
mount the tires.
.Do not spin the tires in
excess of 56 km/h
(35 mph) on slippery
surfaces such as snow,
mud, ice, etc. Excessive
spinning may cause the
tires to explode.
All-Season Tires
This vehicle may come with
all-season tires. These tires are
designed to provide good overallperformance on most road surfaces
and weather conditions. Original
equipment tires designed to GM's
specific tire performance criteria
have a TPC specification code
molded onto the sidewall. Original
equipment all-season tires can be
identified by the last two characters
of this TPC code, which will
be
“MS.”
Consider installing winter tires on
the vehicle if frequent driving on
snow or ice-covered roads is
expected. All-season tires provide
adequate performance for most
winter driving conditions, but they
may not offer the same level of
traction or performance as winter
tires on snow or ice-covered roads.
See Winter Tires 0361.
Winter Tires
This vehicle was not originally
equipped with winter tires. Winter
tires are designed for increased
traction on snow and ice-covered
roads. Consider installing winter
tires on the vehicle if frequent
driving on ice or snow covered roads is expected. See your dealer
for details regarding winter tire
availability and proper tire selection.
Also, see
Buying New Tires 0379.
With winter tires, there may be
decreased dry road traction,
increased road noise, and shorter
tread life. After changing to winter
tires, be alert for changes in vehicle
handling and braking.
If using winter tires:
. Use tires of the same brand and
tread type on all four wheel
positions.
. Use only radial ply tires of the
same size, load range, and
speed rating as the original
equipment tires.
Winter tires with the same speed
rating as the original equipment tires
may not be available for H, V, W, Y,
and ZR speed rated tires. If winter
tires with a lower speed rating are
chosen, never exceed the tire's
maximum speed capability.
Page 363 of 474

Chevrolet Silverado Owner Manual (GMNA-Localizing-U.S./Canada/Mexico-
1500-11698642) - 2019 - CRC - 2/20/19
362 Vehicle Care
Low-Profile Tires
If the vehicle has 275/60R20 or
275/50R22 size tires, they are
classified as low-profile tires.Caution
Low-profile tires are more
susceptible to damage from road
hazards or curb impact than
standard profile tires. Tire and/or
wheel assembly damage can
occur when coming into contact
with road hazards like potholes,
or sharp edged objects, or when
sliding into a curb. The warranty
does not cover this type of
damage. Keep tires set to the
correct inflation pressure and
when possible, avoid contact with
curbs, potholes, and other road
hazards.
All-Terrain Tires
This vehicle may have all-terrain
tires. These tires provide good
performance on most road surfaces,
weather conditions, and for off-road
driving. See Off-Road Driving 0201.
The tread pattern on these tires may
wear more quickly than other tires.
Consider rotating the tires more
frequently than at 12 000 km
(7,500 mi) intervals if irregular wear
is noted when the tires are
inspected. See Tire Inspection
0 377.
Tire Sidewall Labeling
Useful information about a tire is
molded into the sidewall. The
examples show a typical
passenger and light truck tire
sidewall.
Passenger (P-Metric)/Spare Tire
(1) Tire Size:The tire size code
is a combination of letters and
numbers used to define a
particular tire's width, height,
aspect ratio, construction type,
and service description. See the
“Tire Size” illustration later in this
section for more detail.
(2) TPC Spec (Tire
Performance Criteria
Specification)
:Original
equipment tires designed to
GM's specific tire performance
criteria have a TPC specification