2019 CHEVROLET SILVERADO 2500 air filter
[x] Cancel search: air filterPage 217 of 489

Chevrolet Silverado LD 1500 and Silverado 2500/3500 Owner Manual (GMNA-
Localizing-U.S./Canada-12162993) - 2019 - crc - 4/4/18
216 Climate Controls
Climate Controls
Climate Control Systems
Climate Control Systems (withHeater Only) . . . . . . . . . . . . . . . . 216
Climate Control Systems (with Air Conditioning) . . . . . . . . . . . . 218
Dual Automatic Climate Control System . . . . . . . . . . . . . 220
Air Vents
Air Vents . . . . . . . . . . . . . . . . . . . . . 223
Maintenance
Passenger Compartment AirFilter . . . . . . . . . . . . . . . . . . . . . . . . 223
Service . . . . . . . . . . . . . . . . . . . . . . . 224
Climate Control Systems
Climate Control Systems (with Heater Only)
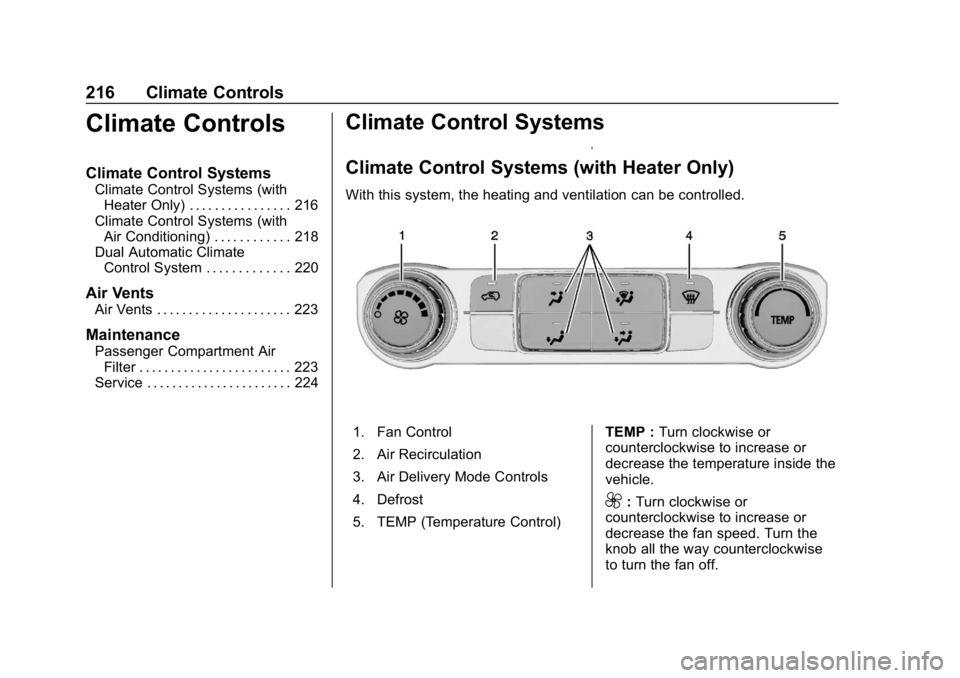
With this system, the heating and ventilation can be controlled.
1. Fan Control
2. Air Recirculation
3. Air Delivery Mode Controls
4. Defrost
5. TEMP (Temperature Control) TEMP :
Turn clockwise or
counterclockwise to increase or
decrease the temperature inside the
vehicle.
9: Turn clockwise or
counterclockwise to increase or
decrease the fan speed. Turn the
knob all the way counterclockwise
to turn the fan off.
Page 224 of 489

Chevrolet Silverado LD 1500 and Silverado 2500/3500 Owner Manual (GMNA-
Localizing-U.S./Canada-12162993) - 2019 - crc - 4/4/18
Climate Controls 223
Air Vents
Use the sliding knobs on the center
and side air vents to direct the
airflow. Use the thumbwheels near
the air vents to open or close off the
airflow.
Air vents blow warm air on the side
windows in cold weather. If Floor,
Defog, or Defrost modes are
selected, a small amount of air will
come from the vents close to the
window. If the airflow is shut off
using the thumbwheels, warm air
will be directed to the other
instrument panel vents. This is
normal operation.
Use the thumbwheels to turn vent
airflow on or off based on the mode
selected.
Operation Tips
.Clear away any ice, snow,
or leaves from air inlets at the
base of the windshield that could
block the flow of air into the
vehicle. .
Clear snow off the hood to
improve visibility and help
decrease moisture drawn into
the vehicle.
. Keep the path under the front
seats clear of objects to help
circulate the air inside of the
vehicle more effectively.
. Use of non-GM approved hood
deflectors can adversely affect
the performance of the system.
Check with your dealer before
adding equipment to the outside
of the vehicle.
Maintenance
Passenger Compartment
Air Filter
The filter reduces the dust, pollen,
and other airborne irritants from
outside air that is pulled into the
vehicle.
The filter should be replaced as part
of routine scheduled maintenance.
See Maintenance Schedule 0430.
To find out what type of filter to use,
see Maintenance Replacement
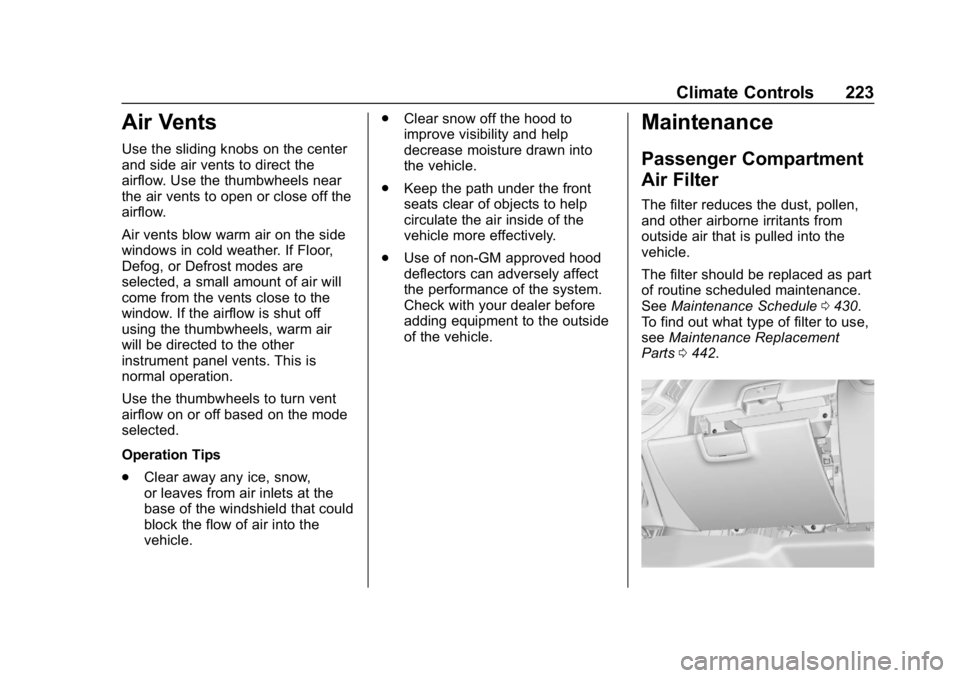
Parts 0442.
Page 225 of 489

Chevrolet Silverado LD 1500 and Silverado 2500/3500 Owner Manual (GMNA-
Localizing-U.S./Canada-12162993) - 2019 - crc - 4/4/18
224 Climate Controls
1. Open the lower glove box doorcompletely.
2. Remove the four screws from around the lower glove box.
The door does not need to be
removed to access the screws.
3. Close the lower glove box doorand pull it from its frame to
remove the entire unit.
4. Release the two tabs holding
the service door. Open the
service door and remove the
old filter.
5. Install the new air filter.
6. Close the service door and secure the tabs.
7. Reverse the steps to reinstall the glove box.
See your dealer if additional
assistance is needed.
Service
All vehicles have a label underhood
that identifies the refrigerant used in
the vehicle. The refrigerant system
should only be serviced by trained
and certified technicians. The air
conditioning evaporator should
never be repaired or replaced by
one from a salvage vehicle.
It should only be replaced by a new
evaporator to ensure proper and
safe operation.
During service, all refrigerants
should be reclaimed with proper
equipment. Venting refrigerants
directly to the atmosphere is harmful
to the environment and may also
create unsafe conditions based on
inhalation, combustion, frostbite,
or other health-based concerns.
The air conditioning system requires
periodic maintenance. See
Maintenance Schedule 0430.
Page 324 of 489

Chevrolet Silverado LD 1500 and Silverado 2500/3500 Owner Manual (GMNA-
Localizing-U.S./Canada-12162993) - 2019 - crc - 4/4/18
Vehicle Care 323
Vehicle Care
General Information
General Information . . . . . . . . . . 324
California Proposition65 Warning . . . . . . . . . . . . . . . . . 325
California Perchlorate Materials Requirements . . . . . 325
Accessories and Modifications . . . . . . . . . . . . . . . . 325
Vehicle Checks
Doing Your OwnService Work . . . . . . . . . . . . . . . 326
Hood . . . . . . . . . . . . . . . . . . . . . . . . . 326
Engine Compartment Overview . . . . . . . . . . . . . . . . . . . . 328
Engine Oil . . . . . . . . . . . . . . . . . . . . 331
Engine Oil Life System . . . . . . . 333
Automatic Transmission Fluid (6-Speed Transmission) . . . . . 335
Automatic Transmission Fluid (8-Speed Transmission) . . . . . 337
Engine Air Cleaner/Filter . . . . . . 338
Cooling System . . . . . . . . . . . . . . 339
Engine Overheating . . . . . . . . . . 343
Overheated Engine Protection Operating Mode . . . . . . . . . . . . . 344
Engine Fan . . . . . . . . . . . . . . . . . . . 345 Power Steering Fluid (1500
Series) . . . . . . . . . . . . . . . . . . . . . . 345
Power Steering Fluid (2500/ 3500 Series) . . . . . . . . . . . . . . . . 345
Washer Fluid . . . . . . . . . . . . . . . . . 346
Brakes . . . . . . . . . . . . . . . . . . . . . . . 347
Brake Fluid . . . . . . . . . . . . . . . . . . . 348
Battery - North America . . . . . . 349
Four-Wheel Drive . . . . . . . . . . . . . 350
Front Axle . . . . . . . . . . . . . . . . . . . . 350
Rear Axle . . . . . . . . . . . . . . . . . . . . 351
Noise Control System . . . . . . . . 352
Starter Switch Check . . . . . . . . . 354
Automatic Transmission Shift
Lock Control Function
Check . . . . . . . . . . . . . . . . . . . . . . . 354
Ignition Transmission Lock Check . . . . . . . . . . . . . . . . . . . . . . . 354
Park Brake and P (Park) Mechanism Check . . . . . . . . . . 354
Wiper Blade Replacement . . . . 355
Windshield Replacement . . . . . 356
Gas Strut(s) . . . . . . . . . . . . . . . . . . 356
Headlamp Aiming
Headlamp Aiming . . . . . . . . . . . . 357
Bulb Replacement
Bulb Replacement . . . . . . . . . . . . 357
Halogen Bulbs . . . . . . . . . . . . . . . . 357 High Intensity Discharge (HID)
Lighting . . . . . . . . . . . . . . . . . . . . . 358
LED Lighting . . . . . . . . . . . . . . . . . 358
Headlamps, Front Turn Signal, Sidemarker, and Parking
Lamps . . . . . . . . . . . . . . . . . . . . . . 358
Fog Lamps . . . . . . . . . . . . . . . . . . . 359
Taillamps (Chassis Cab Models) . . . . . . . . . . . . . . . . . . . . . 359
Taillamps, Turn Signal, Stoplamps, and Back-Up
Lamps . . . . . . . . . . . . . . . . . . . . . . 359
Center High-Mounted Stoplamp (CHMSL) and
Cargo Lamp . . . . . . . . . . . . . . . . . 361
Electrical System
Electrical System Overload . . . 361
Fuses and Circuit Breakers . . . 362
Engine Compartment FuseBlock . . . . . . . . . . . . . . . . . . . . . . . . 362
Instrument Panel Fuse Block (Right) . . . . . . . . . . . . . . . . . . . . . . 366
Instrument Panel Fuse Block (Left) . . . . . . . . . . . . . . . . . 367
Wheels and Tires
Tires . . . . . . . . . . . . . . . . . . . . . . . . . . 370
All-Season Tires . . . . . . . . . . . . . . 370
Winter Tires . . . . . . . . . . . . . . . . . . 371
Low-Profile Tires . . . . . . . . . . . . . 371
Page 330 of 489

Chevrolet Silverado LD 1500 and Silverado 2500/3500 Owner Manual (GMNA-
Localizing-U.S./Canada-12162993) - 2019 - crc - 4/4/18
Vehicle Care 329
1. Positive (+) Terminal. SeeJump Starting - North America
0408.
2. Battery - North America 0349.
3. Coolant Surge Tank and Pressure Cap. See Cooling
System 0339.
4. Engine Air Cleaner/Filter 0338.
5. Automatic Transmission Dipstick (If Equipped). See
“How to Check Automatic
Transmission Fluid” under
Automatic Transmission Fluid
(6-Speed Transmission) 0335
or Automatic Transmission
Fluid (8-Speed Transmission)
0 337.
6. Remote Negative (–) Location (Out of View). See Jump
Starting - North America 0408.
7. Engine Cooling Fans (Out of View). See Cooling System
0 339.
8. Engine Oil Fill Cap. See “When
to Add Engine Oil” under
Engine Oil 0331. 9. Engine Oil Dipstick. See
“Checking Engine Oil” under
Engine Oil 0331.
10. Windshield Washer Fluid Reservoir. See “Adding Washer
Fluid” under Washer Fluid
0 346.
11. Brake Fluid Reservoir. See Brake Fluid 0348.
12. Engine Compartment Fuse
Block 0362.
Page 332 of 489

Chevrolet Silverado LD 1500 and Silverado 2500/3500 Owner Manual (GMNA-
Localizing-U.S./Canada-12162993) - 2019 - crc - 4/4/18
Vehicle Care 331
1. Positive (+) Terminal. SeeJump Starting - North America
0408.
2. Battery - North America 0349.
3. Coolant Surge Tank and Pressure Cap. See Cooling
System 0339.
4. Engine Air Cleaner/Filter 0338.
5. Automatic Transmission Dipstick (If Equipped). See
“How to Check Automatic
Transmission Fluid” under
Automatic Transmission Fluid
(6-Speed Transmission) 0335
or Automatic Transmission
Fluid (8-Speed Transmission)
0 337.
6. Engine Oil Dipstick. See “Checking Engine Oil” under
Engine Oil 0331.
7. Engine Oil Fill Cap. See “When
to Add Engine Oil” under
Engine Oil 0331.
8. Engine Cooling Fan (Out of View). See Cooling System
0 339. 9. Remote Negative (–) Location.
See Jump Starting - North
America 0408.
10. Power Steering Fluid Reservoir.
SeePower Steering Fluid
(1500 Series) 0345 orPower
Steering Fluid (2500/3500
Series) 0345.
11. Windshield Washer Fluid Reservoir. See “Adding Washer
Fluid” under Washer Fluid
0 346.
12. Brake Fluid Reservoir. See Brake Fluid 0348.
13. Auxiliary Battery (If Equipped). SeeBattery - North America
0 349.
14. Engine Compartment Fuse
Block 0362.
If the vehicle has a diesel engine
and/or an Allison Transmission, see
the Duramax diesel supplement.Engine Oil
For diesel engine vehicles, see
“Engine Oil” in the Duramax diesel
supplement.
To ensure proper engine
performance and long life, careful
attention must be paid to engine oil.
Following these simple, but
important steps will help protect
your investment:
. Use engine oil approved to the
proper specification and of the
proper viscosity grade. See
“Selecting the Right Engine Oil”
in this section.
. Check the engine oil level
regularly and maintain the
proper oil level. See “Checking
Engine Oil” and“When to Add
Engine Oil” in this section.
. Change the engine oil at the
appropriate time. See Engine Oil
Life System 0333.
. Always dispose of engine oil
properly. See “What to Do with
Used Oil” in this section.
Page 336 of 489

Chevrolet Silverado LD 1500 and Silverado 2500/3500 Owner Manual (GMNA-
Localizing-U.S./Canada-12162993) - 2019 - crc - 4/4/18
Vehicle Care 335
Automatic Transmission
Fluid (6-Speed
Transmission)
When to Check and Change
Automatic Transmission Fluid
It is usually not necessary to check
the transmission fluid level. The only
reason for fluid loss is a
transmission leak or overheated
transmission. If a small leak is
suspected, then use the following
checking procedures to check the
fluid level. However, if there is a
large leak, then it may be necessary
to have the vehicle towed to a
dealer service department and have
it repaired before driving the vehicle
further.
Caution
Use of the incorrect automatic
transmission fluid may damage
the vehicle, and the damage may
not be covered by the vehicle
warranty. Always use the(Continued)
Caution (Continued)
automatic transmission fluid listed
inRecommended Fluids and
Lubricants 0440.
Change the fluid and filter at the
scheduled maintenance intervals
listed in Maintenance Schedule
0 430. Be sure to use the
transmission fluid listed in
Recommended Fluids and
Lubricants 0440.
How to Check Automatic
Transmission Fluid
Caution
Too much or too little fluid can
damage the transmission. Too
much can mean that some of the
fluid could come out and fall on
hot engine parts or exhaust
system parts, starting a fire. Too
little fluid could cause the (Continued)
Caution (Continued)
transmission to overheat. Be sure
to get an accurate reading if
checking the transmission fluid.
Before checking the fluid level,
prepare the vehicle: 1. Start the engine and park the vehicle on a level surface.
Keep the engine running.
2. Apply the parking brake and place the shift lever in P (Park).
3. With your foot on the brake pedal, move the shift lever
through each gear range,
pausing for about
three seconds in each range.
Then, move the shift lever back
to P (Park).
4. Allow the engine to idle (500– 800 rpm) for at least
one minute. Slowly release the
brake pedal.
5. Keep the engine running and check the transmission fluid
temperature on the Driver
Page 339 of 489

Chevrolet Silverado LD 1500 and Silverado 2500/3500 Owner Manual (GMNA-
Localizing-U.S./Canada-12162993) - 2019 - crc - 4/4/18
338 Vehicle Care
transmission leak or overheated
transmission. This vehicle is not
equipped with a transmission fluid
level dipstick. There is a special
procedure for checking and
changing the transmission fluid in
these vehicles. Because this
procedure is difficult, this should be
done at the dealer. Contact the
dealer for additional information or
the procedure can be found in the
service manual. SeePublication
Ordering Information 0458.
Caution
Use of the incorrect automatic
transmission fluid may damage
the vehicle, and the damage may
not be covered by the vehicle
warranty. Always use the correct
automatic transmission fluid. See
Recommended Fluids and
Lubricants 0440.
Change the fluid and filter at the
scheduled maintenance intervals
listed in Maintenance Schedule
0 430. Be sure to use the transmission fluid listed in
Recommended Fluids and
Lubricants
0440.
Engine Air Cleaner/Filter
If the vehicle has a diesel engine,
see “8-Cylinder Pickup Models”
under “Engine Air Cleaner/Filter” in
the Duramax diesel supplement for
the correct inspection and
replacement procedures.
The engine air cleaner/filter is on
the passenger side of the engine
compartment. See Engine
Compartment Overview 0328.
When to Inspect the Engine Air
Cleaner/Filter
For intervals on changing and
inspecting the engine air filter, see
Maintenance Schedule 0430.
How to Inspect the Engine Air
Cleaner/Filter
Do not start the engine or have the
engine running with the engine air
cleaner/filter housing open. Before
removing the engine air cleaner/
filter, make sure that the engine air cleaner/filter housing and nearby
components are free of dirt and
debris. Remove the engine air
cleaner/filter. Lightly tap and shake
the engine air cleaner/filter (away
from the vehicle), to release loose
dust and dirt. Inspect the engine air
cleaner/filter for damage, and
replace if damaged. Do not clean
the engine air cleaner/filter or
components with water or
compressed air.
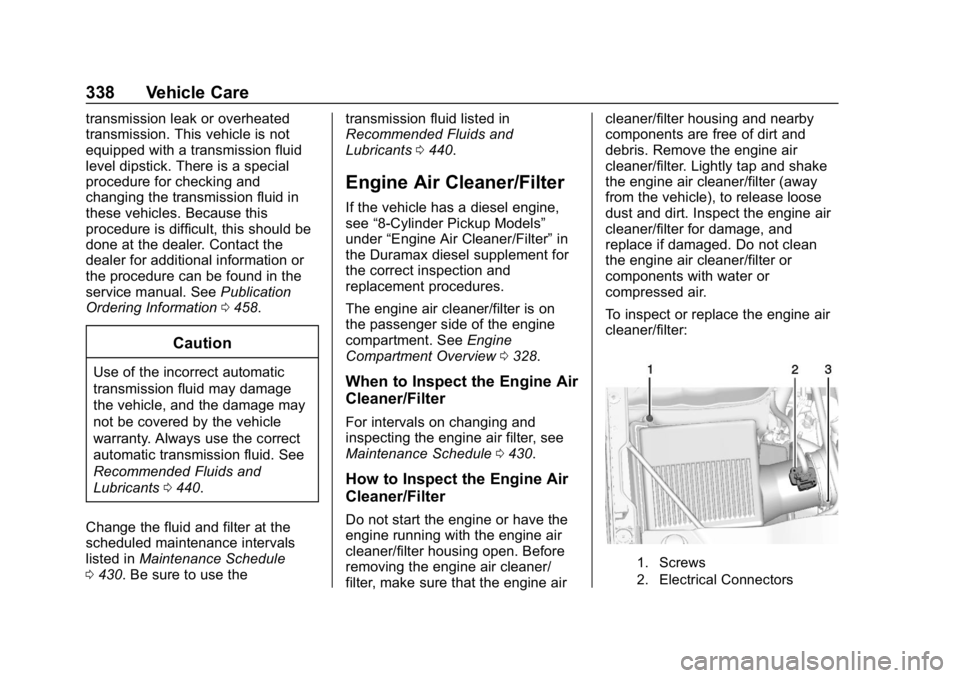
To inspect or replace the engine air
cleaner/filter:
1. Screws
2. Electrical Connectors