2019 CHEVROLET SILVERADO 1500 LD jump start
[x] Cancel search: jump startPage 255 of 490
Chevrolet Silverado LD 1500 and Silverado 2500/3500 Owner Manual (GMNA-
Localizing-U.S./Canada-12162993) - 2019 - crc - 7/30/18
254 Driving and Operating
Torque Lock
If you are parking on a hill and you
do not shift the transmission into
P (Park) properly, the weight of the
vehicle may put too much force on
the parking pawl in the
transmission. You may find it difficult
to pull the shift lever out of P (Park).
This is called torque lock. To
prevent torque lock, set the parking
brake and then shift into P (Park)
properly before you leave the
driver seat.
When you are ready to drive, move
the shift lever out of P (Park) before
you release the parking brake.
If torque lock does occur, you may
need to have another vehicle push
yours a little uphill to take some of
the pressure from the parking pawl
in the transmission. You will then be
able to pull the shift lever out of
P (Park).
Shifting out of Park
This vehicle is equipped with an
electronic shift lock release system.
The shift lock release system is
designed to prevent movement of
the shift lever out of P (Park), unless
the ignition is on and the brake
pedal is applied.
The shift lock release is always
functional except in the case of an
uncharged or low voltage (less than
9 volt) battery.
If the vehicle has an uncharged
battery or a battery with low voltage,
try charging or jump starting the
battery. SeeJump Starting - North
America 0409.
To shift out of P (Park): 1. Apply the brake pedal.
2. Move the shift lever to the desired position. If you still are unable to shift out of
P (Park):
1. Ease the pressure on the shift lever.
2. While holding down the brake pedal, push the shift lever all
the way into P (Park).
3. Move the shift lever to the desired position.
If you are still having a problem
shifting, then have the vehicle
serviced soon.
Parking over Things
That Burn
{Warning
Things that can burn could touch
hot exhaust parts under the
vehicle and ignite. Do not park
over papers, leaves, dry grass,
or other things that can burn.
Page 326 of 490
Chevrolet Silverado LD 1500 and Silverado 2500/3500 Owner Manual (GMNA-
Localizing-U.S./Canada-12162993) - 2019 - crc - 7/30/18
Vehicle Care 325
All-Terrain Tires . . . . . . . . . . . . . . . 373
Tire Sidewall Labeling . . . . . . . . 373
Tire Designations . . . . . . . . . . . . . 375
Tire Terminology andDefinitions . . . . . . . . . . . . . . . . . . 377
Tire Pressure . . . . . . . . . . . . . . . . . 379
Tire Pressure for High-Speed Operation . . . . . . . . . . . . . . . . . . . 381
Tire Pressure Monitor System . . . . . . . . . . . . . . . . . . . . . . 381
Tire Pressure Monitor Operation . . . . . . . . . . . . . . . . . . . 382
Tire Inspection . . . . . . . . . . . . . . . . 386
Tire Rotation . . . . . . . . . . . . . . . . . 387
When It Is Time for New Tires . . . . . . . . . . . . . . . . . . . . . . . . 389
Buying New Tires . . . . . . . . . . . . . 390
Different Size Tires and Wheels . . . . . . . . . . . . . . . . . . . . . . 391
Uniform Tire Quality Grading . . . . . . . . . . . . . . . . . . . . . 392
Wheel Alignment and Tire Balance . . . . . . . . . . . . . . . . . . . . . 393
Wheel Replacement . . . . . . . . . . 394
Tire Chains . . . . . . . . . . . . . . . . . . . 395
If a Tire Goes Flat . . . . . . . . . . . . 395
Tire Changing . . . . . . . . . . . . . . . . 397
Full-Size Spare Tire . . . . . . . . . . 408Jump Starting
Jump Starting - North America . . . . . . . . . . . . . . . . . . . . . 409
Towing the Vehicle
Towing the Vehicle . . . . . . . . . . . 413
Recreational VehicleTowing . . . . . . . . . . . . . . . . . . . . . . 413
Appearance Care
Exterior Care . . . . . . . . . . . . . . . . . 419
Interior Care . . . . . . . . . . . . . . . . . . 424
Floor Mats . . . . . . . . . . . . . . . . . . . . 427
General Information
For service and parts needs, visit
your dealer. You will receive
genuine GM parts and GM-trained
and supported service people.
Genuine GM parts have one of
these marks:
Page 327 of 490
Chevrolet Silverado LD 1500 and Silverado 2500/3500 Owner Manual (GMNA-
Localizing-U.S./Canada-12162993) - 2019 - crc - 7/30/18
326 Vehicle Care
California Proposition
65 Warning
{Warning
Most motor vehicles, including
this one, as well as many of its
service parts and fluids, contain
and/or emit chemicals known to
the State of California to cause
cancer and birth defects or other
reproductive harm. Engine
exhaust, many parts and
systems, many fluids, and some
component wear by-products
contain and/or emit these
chemicals. For more information
go to www.P65Warnings.ca.gov/
passenger-vehicle.
See Battery - North America 0350
and Jump Starting - North America
0 409 and the back cover.
California Perchlorate
Materials Requirements
Certain types of automotive
applications, such as airbag
initiators, seat belt pretensioners,
and lithium batteries contained in
Remote Keyless Entry transmitters,
may contain perchlorate materials.
Special handling may be necessary.
For additional information, see
www.dtsc.ca.gov/hazardouswaste/
perchlorate.
Accessories and
Modifications
Adding non-dealer accessories or
making modifications to the vehicle
can affect vehicle performance and
safety, including such things as
airbags, braking, stability, ride and
handling, emissions systems,
aerodynamics, durability, and
electronic systems like antilock
brakes, traction control, and stability
control. These accessories or
modifications could even cause
malfunction or damage not covered
by the vehicle warranty. Damage to suspension components
caused by modifying vehicle height
outside of factory settings will not be
covered by the vehicle warranty.
Damage to vehicle components
resulting from modifications or the
installation or use of non-GM
certified parts, including control
module or software modifications, is
not covered under the terms of the
vehicle warranty and may affect
remaining warranty coverage for
affected parts.
GM Accessories are designed to
complement and function with other
systems on the vehicle. See your
dealer to accessorize the vehicle
using genuine GM Accessories
installed by a dealer technician.
Also, see
Adding Equipment to the
Airbag-Equipped Vehicle 089.
Page 331 of 490

Chevrolet Silverado LD 1500 and Silverado 2500/3500 Owner Manual (GMNA-
Localizing-U.S./Canada-12162993) - 2019 - crc - 7/30/18
330 Vehicle Care
1. Positive (+) Terminal. SeeJump Starting - North America
0409.
2. Battery - North America 0350.
3. Coolant Surge Tank and Pressure Cap. See Cooling
System 0340.
4. Engine Air Cleaner/Filter 0339.
5. Automatic Transmission Dipstick (If Equipped). See
“How to Check Automatic
Transmission Fluid” under
Automatic Transmission Fluid
(6-Speed Transmission) 0336
or Automatic Transmission
Fluid (8-Speed Transmission)
0 338.
6. Remote Negative (–) Location (Out of View). See Jump
Starting - North America 0409.
7. Engine Cooling Fans (Out of View). See Cooling System
0 340.
8. Engine Oil Fill Cap. See “When
to Add Engine Oil” under
Engine Oil 0332. 9. Engine Oil Dipstick. See
“Checking Engine Oil” under
Engine Oil 0332.
10. Windshield Washer Fluid Reservoir. See “Adding Washer
Fluid” under Washer Fluid
0 347.
11. Brake Fluid Reservoir. See Brake Fluid 0349.
12. Engine Compartment Fuse
Block 0363.
Page 333 of 490
Chevrolet Silverado LD 1500 and Silverado 2500/3500 Owner Manual (GMNA-
Localizing-U.S./Canada-12162993) - 2019 - crc - 7/30/18
332 Vehicle Care
1. Positive (+) Terminal. SeeJump Starting - North America
0409.
2. Battery - North America 0350.
3. Coolant Surge Tank and Pressure Cap. See Cooling
System 0340.
4. Engine Air Cleaner/Filter 0339.
5. Automatic Transmission Dipstick (If Equipped). See
“How to Check Automatic
Transmission Fluid” under
Automatic Transmission Fluid
(6-Speed Transmission) 0336
or Automatic Transmission
Fluid (8-Speed Transmission)
0 338.
6. Engine Oil Dipstick. See “Checking Engine Oil” under
Engine Oil 0332.
7. Engine Oil Fill Cap. See “When
to Add Engine Oil” under
Engine Oil 0332.
8. Engine Cooling Fan (Out of View). See Cooling System
0 340. 9. Remote Negative (–) Location.
See Jump Starting - North
America 0409.
10. Power Steering Fluid Reservoir.
SeePower Steering Fluid
(1500 Series) 0346 orPower
Steering Fluid (2500/3500
Series) 0346.
11. Windshield Washer Fluid Reservoir. See “Adding Washer
Fluid” under Washer Fluid
0 347.
12. Brake Fluid Reservoir. See Brake Fluid 0349.
13. Auxiliary Battery (If Equipped). SeeBattery - North America
0 350.
14. Engine Compartment Fuse
Block 0363.
If the vehicle has a diesel engine
and/or an Allison Transmission, see
the Duramax diesel supplement.Engine Oil
For diesel engine vehicles, see
“Engine Oil” in the Duramax diesel
supplement.
To ensure proper engine
performance and long life, careful
attention must be paid to engine oil.
Following these simple, but
important steps will help protect
your investment:
. Use engine oil approved to the
proper specification and of the
proper viscosity grade. See
“Selecting the Right Engine Oil”
in this section.
. Check the engine oil level
regularly and maintain the
proper oil level. See “Checking
Engine Oil” and“When to Add
Engine Oil” in this section.
. Change the engine oil at the
appropriate time. See Engine Oil
Life System 0334.
. Always dispose of engine oil
properly. See “What to Do with
Used Oil” in this section.
Page 352 of 490
Chevrolet Silverado LD 1500 and Silverado 2500/3500 Owner Manual (GMNA-
Localizing-U.S./Canada-12162993) - 2019 - crc - 7/30/18
Vehicle Care 351
Warning (Continued)
not careful. SeeJump Starting -
North America 0409 for tips on
working around a battery without
getting hurt.
Infrequent Usage: Remove the
black, negative (−) cable from the
battery to keep the battery from
running down.
Extended Storage: Remove the
black, negative (−) cable from the
battery or use a battery trickle
charger.
Four-Wheel Drive
Transfer Case
When to Check Lubricant
Refer to Maintenance Schedule
0 431 to determine when to check
the lubricant.
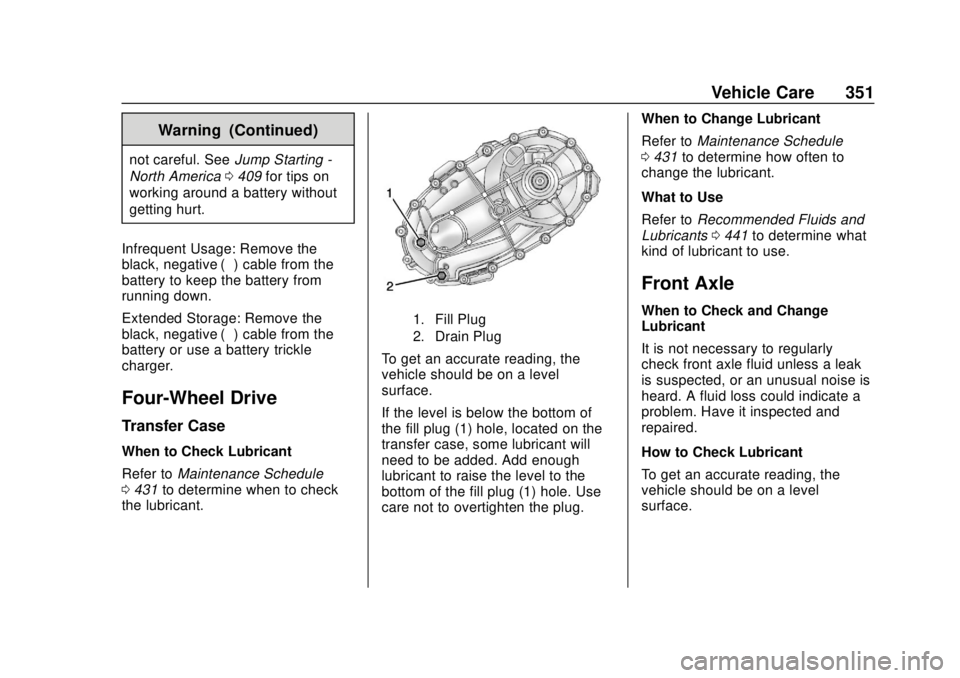
1. Fill Plug
2. Drain Plug
To get an accurate reading, the
vehicle should be on a level
surface.
If the level is below the bottom of
the fill plug (1) hole, located on the
transfer case, some lubricant will
need to be added. Add enough
lubricant to raise the level to the
bottom of the fill plug (1) hole. Use
care not to overtighten the plug. When to Change Lubricant
Refer to
Maintenance Schedule
0 431 to determine how often to
change the lubricant.
What to Use
Refer to Recommended Fluids and
Lubricants 0441 to determine what
kind of lubricant to use.
Front Axle
When to Check and Change
Lubricant
It is not necessary to regularly
check front axle fluid unless a leak
is suspected, or an unusual noise is
heard. A fluid loss could indicate a
problem. Have it inspected and
repaired.
How to Check Lubricant
To get an accurate reading, the
vehicle should be on a level
surface.
Page 410 of 490
Chevrolet Silverado LD 1500 and Silverado 2500/3500 Owner Manual (GMNA-
Localizing-U.S./Canada-12162993) - 2019 - crc - 7/30/18
Vehicle Care 409
Jump Starting
Jump Starting - North
America
For more information about the
vehicle battery, seeBattery - North
America 0350.
If the vehicle's battery (or batteries)
has run down, you may want to use
another vehicle and some jumper
cables to start your vehicle. Be sure
to use the following steps to do it
safely.
{Warning
WARNING: Battery posts,
terminals, and related
accessories contain lead and lead
compounds, chemicals known to
the State of California to cause
cancer and birth defects or other
reproductive harm. Batteries also
contain other chemicals known to
the State of California to cause
cancer. WASH HANDS AFTER
(Continued)
Warning (Continued)
HANDLING.For more information
go to www.P65Warnings.ca.gov/
passenger-vehicle.
See California Proposition
65 Warning 0326 and the back
cover.
{Warning
Batteries can hurt you. They can
be dangerous because:
. They contain acid that can
burn you.
. They contain gas that can
explode or ignite.
. They contain enough
electricity to burn you.
If you do not follow these steps
exactly, some or all of these
things can hurt you.
Caution
Ignoring these steps could result
in costly damage to the vehicle
that would not be covered by the
vehicle warranty. Trying to start
the vehicle by pushing or pulling it
will not work, and it could damage
the vehicle.
1. Check the other vehicle. It must have a 12-volt battery
with a negative ground system.
Caution
If the other vehicle does not have
a 12-volt system with a negative
ground, both vehicles can be
damaged. Only use a vehicle that
has a 12-volt system with a
negative ground for jump starting.
2. If you have a vehicle with a diesel engine with two
batteries, you should know
before you begin that,
especially in cold weather, you
Page 411 of 490
Chevrolet Silverado LD 1500 and Silverado 2500/3500 Owner Manual (GMNA-
Localizing-U.S./Canada-12162993) - 2019 - crc - 7/30/18
410 Vehicle Care
may not be able to get enough
power from a single battery in
another vehicle to start your
diesel engine. If your vehicle
has more than one battery,
using the battery that is closer
to the starter will reduce
electrical resistance. This is
located on the passenger side,
in the rear of the engine
compartment.
3. Get the vehicles close enough so the jumper cables can
reach, but be sure the vehicles
are not touching each other.
If they are, it could cause an
unwanted ground connection.
You would not be able to start
your vehicle, and the bad
grounding could damage the
electrical systems.
To avoid the possibility of the
vehicles rolling, set the parking
brake firmly on both vehicles
involved in the jump start
procedure. Put the automatic
transmission in P (Park) or a
manual transmission in Neutral
before setting the parking brake. If you have a
four-wheel-drive vehicle, be
sure the transfer case is in a
drive gear, not in N (Neutral).
Caution
If any accessories are left on or
plugged in during the jump
starting procedure, they could be
damaged. The repairs would not
be covered by the vehicle
warranty. Whenever possible, turn
off or unplug all accessories on
either vehicle when jump starting.
4. Turn the ignition off on both vehicles. Unplug unnecessary
accessories plugged into the
accessory power outlets. Turn
off the radio and all the lamps
that are not needed. This will
avoid sparks and help save
both batteries. And it could
save the radio! 5. Open the hood on the other
vehicle and locate the
positive (+) and negative (−)
terminal locations on that
vehicle.
The positive (+) terminal is
under a red plastic cover at the
positive battery post. To
uncover the positive (+)
terminal, open the red plastic
cover.
For more information on the
location of the remote
positive (+) and remote
negative (−) terminals, see
Engine Compartment Overview
0329.
{Warning
An electric fan can start up even
when the engine is not running
and can injure you. Keep hands,
clothing, and tools away from any
underhood electric fan.