2019 CHEVROLET CORVETTE parking brake
[x] Cancel search: parking brakePage 254 of 367

Chevrolet Corvette Owner Manual (GMNA-Localizing-U.S./Canada/Mexico-
12032182) - 2019 - crc - 5/8/18
Vehicle Care 253
heard. A fluid loss could indicate a
problem. Have it inspected and
repaired.
How to Check Lubricant
To get an accurate reading, the
vehicle should be on a level
surface.
The fluid level should be at or within
13 mm (0.5 in) of the bottom of the
fill plug hole threads. If it is at this
level, no additional fluid is needed.
If the fluid level is below 13 mm
(0.5 in), add fluid until it is above
this level.
What to Use
To add lubricant when the level is
low or to completely refill after
draining, seeRecommended Fluids
and Lubricants 0321. Then fill to
within 13 mm (0.5 in) of the bottom
of the fill plug hole threads with the
required lubricant.
Starter Switch Check
{Warning
When you are doing this
inspection, the vehicle could
move suddenly. If the vehicle
moves, you or others could be
injured.
1. Before starting this check, be sure there is enough room
around the vehicle.
2. Firmly apply both the parking brake and the regular brake.
See Electric Parking Brake
0 195. Do not use the accelerator
pedal, and be ready to turn off
the engine immediately if it
starts.
3. For automatic transmission vehicles, try to start the engine
in each gear. The vehicle
should start only in P (Park) or
N (Neutral). If the vehicle starts
in any other position, contact
your dealer for service.
For manual transmission
vehicles, put the shift lever in
Neutral, push the clutch pedal
down halfway, and try to start
the engine. The vehicle should
start only when the clutch
pedal is pushed down all the
way to the floor. If the vehicle
starts when the clutch pedal is
not pushed all the way down,
contact your dealer for service.
Page 255 of 367
Chevrolet Corvette Owner Manual (GMNA-Localizing-U.S./Canada/Mexico-
12032182) - 2019 - crc - 5/8/18
254 Vehicle Care
Park Brake and P (Park)
Mechanism Check
{Warning
When you are doing this check,
the vehicle could begin to move.
You or others could be injured
and property could be damaged.
Make sure there is room in front
of the vehicle in case it begins to
roll. Be ready to apply the regular
brake at once should the vehicle
begin to move.
Park on a fairly steep hill, with the
vehicle facing downhill. Keeping
your foot on the regular brake, set
the parking brake.
. To check the parking brake's
holding ability: With the engine
running and the transmission in
N (Neutral), slowly remove foot
pressure from the regular brake
pedal. Do this until the vehicle is
held by the parking brake only. .
To check the P (Park)
mechanism's holding ability:
With the engine running, shift to
P (Park). Then release the
parking brake followed by the
regular brake.
Contact your dealer if service is
required.
Wiper Blade Replacement
Windshield wiper blades should be
inspected for wear and cracking.
Replacement blades come in
different types and are removed in
different ways. For proper type and
length, see Maintenance
Replacement Parts 0323.
To replace the windshield wiper
blade: 1. Open the hood.
2. Pull the windshield wiper assembly away from the
windshield.
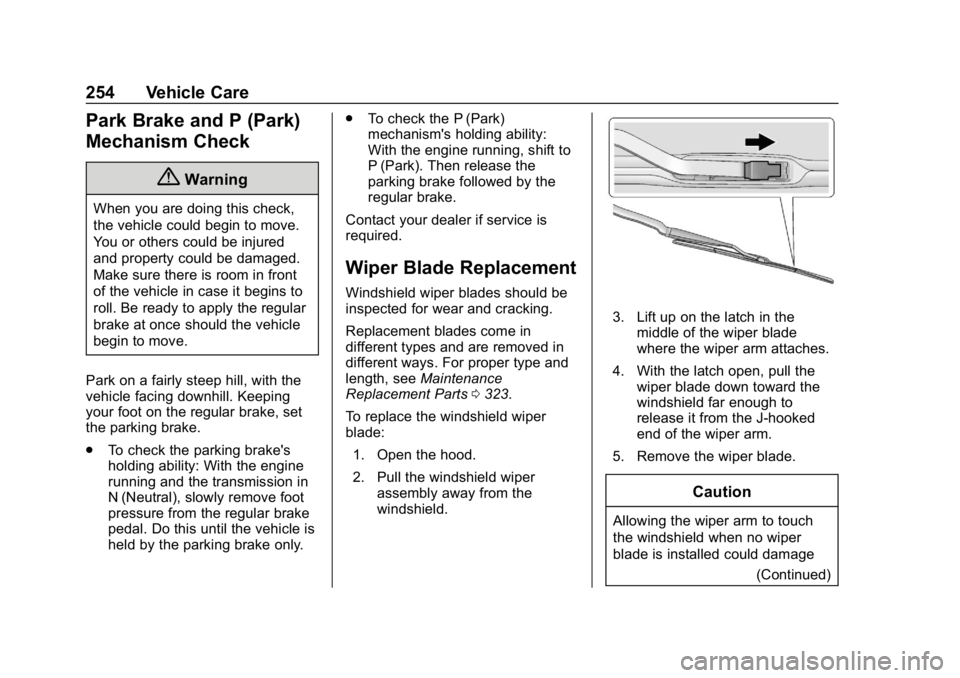
3. Lift up on the latch in themiddle of the wiper blade
where the wiper arm attaches.
4. With the latch open, pull the wiper blade down toward the
windshield far enough to
release it from the J-hooked
end of the wiper arm.
5. Remove the wiper blade.
Caution
Allowing the wiper arm to touch
the windshield when no wiper
blade is installed could damage (Continued)
Page 262 of 367

Chevrolet Corvette Owner Manual (GMNA-Localizing-U.S./Canada/Mexico-
12032182) - 2019 - crc - 5/8/18
Vehicle Care 261
FusesUsage
31 Heated seat module / run,crank
supply
32 Starter
36 Body control module 7
39 Intrusion module / Human machine
interface module
40 Steering column lock
41 ABS valves
43 - / Fuel tank zone module batt
44 Center stack
45 Auxiliary outlet
46 Radio
47 Display
48 Interior rearview mirror
49 Logistics Fuses
Usage
50 Engine / Transmission
51 Ignition –odd
52 Ignition –even
53 Fuel pump prime / Miscellaneous
powertrain loads
54 - / Fuel injector control module
power ignition 2
55 Engine control module 1
58 Data link connector
63 Seat fan
64 Fuel pump power module
65 Cluster
67 Exhaust valve 1
71 Horn
73 –/ Fuel tank zone
module ignition
74 Headlamp wash Fuses
Usage
75 AC clutch
76 –/ Rear
transmission
coolant pump
77 Engine outside position
78 Engine control module 2 /
Transmission
control module
79 Electric parking brake
81 Continuous variable real time
dampening
82 Intercooler
83 Left headlamp
84 Right headlamp
85 High-beam headlamps
86 Washer pump
87 Exhaust valve 2
88 Reverse lockout
Page 288 of 367
Chevrolet Corvette Owner Manual (GMNA-Localizing-U.S./Canada/Mexico-
12032182) - 2019 - crc - 5/8/18
Vehicle Care 287
{Warning
Special tools and procedures are
required to service a run-flat tire.
If these special tools and
procedures are not used, injury or
vehicle damage may occur.
Always be sure the proper tools
and procedures, as described in
the service manual, are used.
If this vehicle does not have run-flat
tires and a tire goes flat, avoid
further tire and wheel damage by
driving slowly to a level place, well
off the road, if possible. Turn on the
hazard warning flashers. See
Hazard Warning Flashers 0142.
1. Turn on the hazard warning flashers.
2. Set the parking brake firmly.
3. Put an automatic transmission in P (Park) or a manual
transmission in 1 (First) or
R (Reverse).
4. Turn off the ignition. 5. Inspect the flat tire.{Warning
Driving on a flat tire will cause
permanent damage to the tire.
Re-inflating a tire after it has been
driven on while severely
underinflated or flat may cause a
blowout and a serious crash.
Never attempt to re-inflate a tire
that has been driven on while
severely underinflated or flat.
Have your dealer or an authorized
tire service center repair or
replace the flat tire as soon as
possible.
If this vehicle has a tire sealant kit
and the tire has been separated
from the wheel, has damaged
sidewalls, or has a puncture larger
than 6 mm (0.25 in), the tire is too
severely damaged for the tire
sealant and compressor kit to be
effective. If the tire has a puncture
less than 6 mm (0.25 in) in the tread
area of the tire, see Tire Sealant
and Compressor Kit 0287.
Tire Sealant and
Compressor Kit
{Warning
Idling a vehicle in an enclosed
area with poor ventilation is
dangerous. Engine exhaust may
enter the vehicle. Engine exhaust
contains carbon monoxide (CO)
which cannot be seen or smelled.
It can cause unconsciousness
and even death. Never run the
engine in an enclosed area that
has no fresh air ventilation. For
more information, see Engine
Exhaust 0186.
{Warning
Overinflating a tire could cause
the tire to rupture and you or
others could be injured. Be sure
to read and follow the tire sealant
and compressor kit instructions
(Continued)
Page 297 of 367

Chevrolet Corvette Owner Manual (GMNA-Localizing-U.S./Canada/Mexico-
12032182) - 2019 - crc - 5/8/18
296 Vehicle Care
Caution
Ignoring these steps could result
in costly damage to the vehicle
that would not be covered by the
vehicle warranty. Trying to start
the vehicle by pushing or pulling it
will not work, and it could damage
the vehicle.
The battery is under a battery cover
in the hatch/trunk area on the
passenger side under the carpet.
Before you connect the cables, here
are some basic things you should
know. Positive (+) will go to the
positive (+) terminal. Negative (−)
will go the negative (−) terminal.
1. Discharged Battery Positive (+) Terminal
2. Discharged Battery Negative (−) Terminal
3. Good Battery Negative (−) Terminal
4. Good Battery Positive (+) Terminal
1. Check the other vehicle. It must have a 12-volt battery
with a negative ground system.
Caution
If the other vehicle does not have
a 12-volt system with a negative
ground, both vehicles can be
damaged. Only use a vehicle that
has a 12-volt system with a
negative ground for jump starting.
2. Get the vehicles close enough so the jumper cables can
reach, but be sure the vehicles
are not touching each other.
If they are, it could cause a
ground connection you do not
want. You would not be able to
start the vehicle, and the bad
grounding could damage the
electrical systems.
To avoid the possibility of the
vehicles rolling, set the parking
brake firmly on both vehicles
involved in the jump start
procedure. Put an automatic
transmission in P (Park) or a
manual transmission in Neutral
before setting the parking
brakes.
Page 305 of 367
Chevrolet Corvette Owner Manual (GMNA-Localizing-U.S./Canada/Mexico-
12032182) - 2019 - crc - 5/8/18
304 Vehicle Care
Replace the wiper blades if they are
worn or damaged. Damage can be
caused by extreme dusty
conditions, sand, salt, heat, sun,
snow, and ice.
Weatherstrips
Apply weatherstrip lubricant on
weatherstrips to make them last
longer, seal better, and not stick or
squeak. Lubricate weatherstrips at
least once a year. Hot, dry climates
require more frequent application.
Black marks from rubber material on
painted surfaces can be removed by
rubbing with a clean cloth. See
Recommended Fluids and
Lubricants0321.
Tires
Use a stiff brush with tire cleaner to
clean the tires.
Caution
Using petroleum-based tire
dressing products on the vehicle
may damage the paint finish and/
(Continued)
Caution (Continued)
or tires. When applying a tire
dressing, always wipe off any
overspray from all painted
surfaces on the vehicle.
Wheels and Wheel Trim
Use a soft, clean cloth with mild
soap and water to clean the wheels.
After rinsing thoroughly with clean
water, dry with a soft, clean towel.
A wax may then be applied.
Caution
Chrome wheels and chrome
wheel trim may be damaged if the
vehicle is not washed after driving
on roads that have been sprayed
with magnesium chloride or
calcium chloride. These are used
on roads for conditions such as
dust and ice. Always wash the
chrome with soap and water after
exposure.
Caution
To avoid surface damage on
wheels and wheel trim, do not
use strong soaps, chemicals,
abrasive polishes, cleaners,
or brushes. Use only GM
approved cleaners. Do not drive
the vehicle through an automatic
car wash that uses silicone
carbide tire/wheel cleaning
brushes. Damage could occur
and the repairs would not be
covered by the vehicle warranty.
Brake System
Visually inspect brake lines and
hoses for proper hook-up, binding,
leaks, cracks, chafing, etc. Inspect
disc brake pads for wear and rotors
for surface condition. Inspect drum
brake linings/shoes for wear or
cracks. Inspect other brake parts,
including drums, wheel cylinders,
calipers, parking brake, master
cylinder, brake fluid reservoir,
Page 314 of 367

Chevrolet Corvette Owner Manual (GMNA-Localizing-U.S./Canada/Mexico-
12032182) - 2019 - crc - 5/8/18
Service and Maintenance 313
.Visually inspect steering,
suspension, and chassis
components for damage,
including cracks or tears in the
rubber boots, loose or missing
parts, or signs of wear at least
once a year. See Exterior Care
0 300.
. Inspect power steering for
proper attachment, connections,
binding, leaks, cracks,
chafing, etc.
. Visually inspect halfshafts and
drive shafts for excessive wear,
lubricant leaks, and/or damage
including: tube dents or cracks,
constant velocity joint or
universal joint looseness,
cracked or missing boots, loose
or missing boot clamps, center
bearing excessive looseness,
loose or missing fasteners, and
axle seal leaks.
. Check restraint system
components. See Safety System
Check 072.
. Visually inspect fuel system for
damage or leaks. .
Visually inspect exhaust system
and nearby heat shields for
loose or damaged parts.
. Lubricate body components. See
Exterior Care 0300.
. Check starter switch. See Starter
Switch Check 0253.
. Check parking brake and
automatic transmission park
mechanism. See Park Brake and
P (Park) Mechanism Check
0 254.
. Check accelerator pedal for
damage, high effort, or binding.
Replace if needed.
. Visually inspect gas strut for
signs of wear, cracks, or other
damage. Check the hold open
ability of the strut. If the hold
open is low, service the gas
strut. See Gas Strut(s) 0255.
Page 357 of 367

Chevrolet Corvette Owner Manual (GMNA-Localizing-U.S./Canada/Mexico-
12032182) - 2019 - crc - 5/8/18
356 Index
IndexA
Accessories andModifications . . . . . . . . . . . . . . . . . . 220
Accessory Power . . . . . . . . . . . . . . . 183
Active Fuel Management . . . . . . . 185
Active Rev Match . . . . . . . . . . . . . . . 193
Add-On Electrical Equipment . . . 216
Additional Information OnStar . . . . . . . . . . . . . . . . . . . . . . . 346
Additional Maintenance
and Care . . . . . . . . . . . . . . . . . . . . . . 318
Adjustments Lumbar, Front Seats . . . . . . . . . . . . 60
Air Cleaner/Filter, Engine . . . . . . . 239
Air Conditioning . . . . . . . . . . . . . . . . 151
Air Dam, Front . . . . . . . . . . . . . . . . . . 179
Air Filter, Passenger
Compartment . . . . . . . . . . . . . . . . . 155
Air Vents . . . . . . . . . . . . . . . . . . . . . . . 155
Airbag System
Check . . . . . . . . . . . . . . . . . . . . . . . . . . 84
How Does an AirbagRestrain? . . . . . . . . . . . . . . . . . . . . . 77
Passenger Sensing System . . . . 79
What Makes an Airbag
Inflate? . . . . . . . . . . . . . . . . . . . . . . . . 77
What Will You See after an Airbag Inflates? . . . . . . . . . . . . . . . 77 Airbag System (cont'd)
When Should an Airbag
Inflate? . . . . . . . . . . . . . . . . . . . . . . . . 76
Where Are the Airbags? . . . . . . . . 75
Airbags Adding Equipment to theVehicle . . . . . . . . . . . . . . . . . . . . . . . . 83
Passenger Status Indicator . . . .112
Readiness Light . . . . . . . . . . . . . . .112
Servicing Airbag-Equipped Vehicles . . . . . . . . . . . . . . . . . . . . . . . 83
System Check . . . . . . . . . . . . . . . . . . 74
Alarm Vehicle Security . . . . . . . . . . . . . . . . 41
Antilock Brake System (ABS) . . . 195 Warning Light . . . . . . . . . . . . . . . . . .117
Appearance Care Exterior . . . . . . . . . . . . . . . . . . . . . . . 300
Interior . . . . . . . . . . . . . . . . . . . . . . . . 306
Assistance Program, Roadside . . . . . . . . . . . . . . . . . . . . . . 334
Assistance Systems for Parking and Backing . . . . . . . . . . 210
Automatic Dimming Mirrors . . . . . . . . . . . . . . . . 45
Door Locks . . . . . . . . . . . . . . . . . . . . . 37
Headlamp System . . . . . . . . . . . . 141
Transmission . . . . . . . . . . . . . . . . . 187