Page 9 of 404

Chevrolet Blazer (GMNA-Localizing-U.S./Canada/Mexico-12461541) - 2019 -
CRC - 3/11/19
8 In Brief
Initial Drive
Information
This section provides a brief
overview about some of the
important features that may or may
not be on your specific vehicle.
For more detailed information, refer
to each of the features which can be
found later in this owner’s manual.
Stop/Start System
The Stop/Start system will shut off
the engine to help conserve fuel.
It has components designed for the
increased number of starts.
When the brakes are applied and
the vehicle is at a complete stop,
the engine may turn off. When
stopped, the tachometer displays
AUTO STOP. SeeTachometer
0 130. When the brake pedal is
released or the accelerator pedal is
pressed, the engine will restart. See
Stop/Start System 0195.
Remote Keyless Entry
(RKE) System
The Remote Keyless Entry (RKE)
transmitter may work up to
60 m (197 ft) away from the vehicle.
With Remote Start and Power
Liftgate
Press the button on the side of the
RKE transmitter to remove the key.
Never pull the key out without
pressing the button. The key can be
used for all locks. See Keys026.
K:Press to unlock the driver door
or all doors depending on vehicle
personalization settings.
Q: Press to lock all doors.
Lock and unlock feedback can be
personalized. See Vehicle
Personalization 0151.
b:If equipped with the power
liftgate, press twice quickly until the
liftgate begins to move.
7: Press and release to initiate the
vehicle locator. Press and hold for at
least three seconds to sound the
panic alarm. Press
7again to
cancel the panic alarm.
See Keys 026 and
Remote Keyless Entry (RKE)
System Operation 027.
Remote Vehicle Start
If equipped, the engine can be
started from outside of the vehicle.
Starting the Vehicle
1. Press and releaseQon the
RKE transmitter.
2. Immediately press and hold
/
for at least four seconds or until
the turn signal lamps flash.
Page 10 of 404

Chevrolet Blazer (GMNA-Localizing-U.S./Canada/Mexico-12461541) - 2019 -
CRC - 3/11/19
In Brief 9
Start the vehicle normally after
entering.
When the vehicle starts, the parking
lamps will turn on.
Remote start can be extended.
Canceling a Remote Start
To cancel a remote start, do one of
the following:
.Press and hold
/until the
parking lamps turn off.
. Turn on the hazard warning
flashers.
. Turn the vehicle on and then off.
See Remote Vehicle Start 034.
Door Locks
To lock or unlock the vehicle from
the outside:
.
Press
QorKon the Remote
Keyless Entry (RKE) transmitter.
. Use the key. The key lock
cylinder is covered with a cap.
See Door Locks 035. To lock or unlock the vehicle from
the inside, press
QorKon the
power door lock switch. Pulling an
interior door handle will unlock the
door. Pulling the handle again
unlatches it.
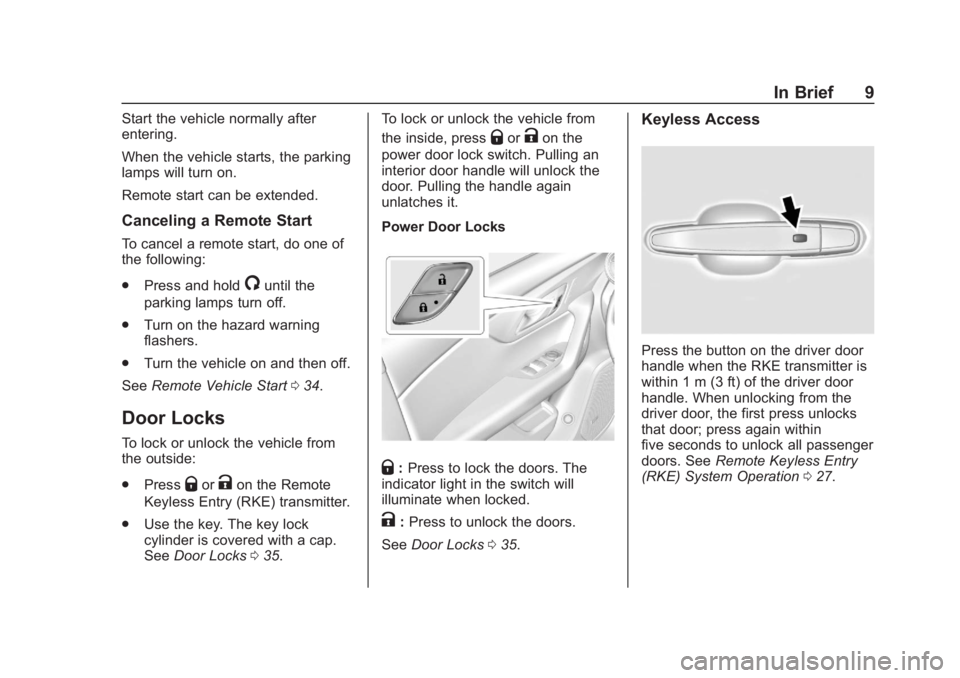
Power Door Locks
Q: Press to lock the doors. The
indicator light in the switch will
illuminate when locked.
K: Press to unlock the doors.
See Door Locks 035.
Keyless Access
Press the button on the driver door
handle when the RKE transmitter is
within 1 m (3 ft) of the driver door
handle. When unlocking from the
driver door, the first press unlocks
that door; press again within
five seconds to unlock all passenger
doors. See Remote Keyless Entry
(RKE) System Operation 027.
Page 11 of 404

Chevrolet Blazer (GMNA-Localizing-U.S./Canada/Mexico-12461541) - 2019 -
CRC - 3/11/19
10 In Brief
Liftgate
To unlock the liftgate, pressKon
the power door lock switch or
press
Kon the Remote Keyless
Entry (RKE) transmitter twice to
unlock all doors. Press the touch
pad in the liftgate handle and lift up.
See Remote Keyless Entry (RKE)
System Operation 027.
Use the pull cup to lower and close
the liftgate. Do not press the touch
pad while closing the liftgate. This
will cause the liftgate to be
unlatched.
Power Liftgate Operation
If equipped with a power liftgate, the
switch is on the driver door. The
vehicle must be in P (Park).
Choose the power liftgate mode by
selecting MAX or 3/4. Press
8.
The driver door must be unlocked.
On the RKE transmitter press
b
twice quickly until the liftgate starts
moving.
Press any liftgate button while the
liftgate is moving to stop it. Pressing
again reverses the direction.
To close, presslon the bottom
of the liftgate.
To disable the power liftgate
function, select OFF on the liftgate
switch. See Liftgate040.
Page 12 of 404

Chevrolet Blazer (GMNA-Localizing-U.S./Canada/Mexico-12461541) - 2019 -
CRC - 3/11/19
In Brief 11
Windows
Power windows work when the
ignition is on, in ACC/ACCESSORY,
or when Retained Accessory
Power (RAP) is active. See
Retained Accessory Power (RAP)
0197.
Using the window switch, press to
open or pull to close the window.
The windows may be temporarily
disabled if they are used repeatedly
within a short time.
See Power Windows 053.
Seat Adjustment
Manual Seats
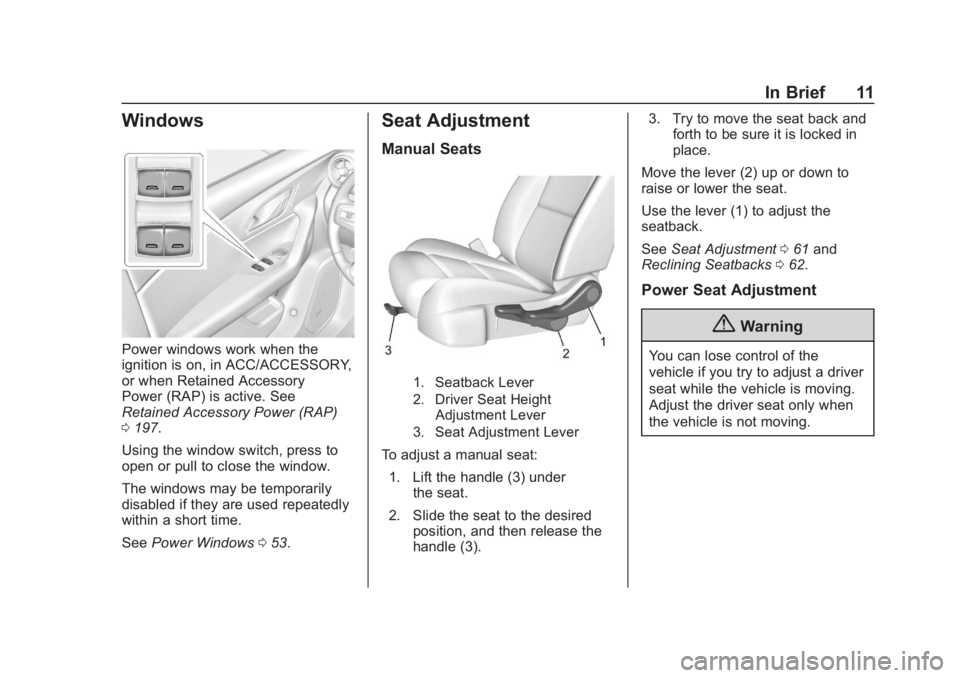
1. Seatback Lever
2. Driver Seat Height
Adjustment Lever
3. Seat Adjustment Lever
To adjust a manual seat:
1. Lift the handle (3) under the seat.
2. Slide the seat to the desired position, and then release the
handle (3). 3. Try to move the seat back and
forth to be sure it is locked in
place.
Move the lever (2) up or down to
raise or lower the seat.
Use the lever (1) to adjust the
seatback.
See Seat Adjustment 061 and
Reclining Seatbacks 062.
Power Seat Adjustment
{Warning
You can lose control of the
vehicle if you try to adjust a driver
seat while the vehicle is moving.
Adjust the driver seat only when
the vehicle is not moving.
Page 13 of 404

Chevrolet Blazer (GMNA-Localizing-U.S./Canada/Mexico-12461541) - 2019 -
CRC - 3/11/19
12 In Brief
To adjust the seat:
.Move the seat forward or
rearward by sliding the control
forward or rearward.
. If equipped, raise or lower the
front part of the seat cushion by
moving the front of the control
up or down.
. Raise or lower the entire seat by
moving the rear of the control up
or down.
To adjust the seatback, see
Reclining Seatbacks 062.
To adjust the lumbar support, see
Lumbar Adjustment 062.
Memory Features
If equipped, memory seats allow two
drivers to save and recall their
unique seat positions for driving the
vehicle, and a shared exit position
for getting out of the vehicle. Other
feature positions may also be
saved, such as power mirrors and
power steering wheel, if equipped.
Memory positions are linked to RKE
transmitter 1 or 2 for automatic
memory recalls.
Before saving, adjust all available
memory feature positions. Turn the
ignition on and then press and
release SET; a beep will sound. Then immediately press and hold 1,
2, or
B(Exit) until two beeps
sound. To manually recall these
positions, press and hold 1, 2, or
B
until the saved position is reached.
When Seat Entry Memory is
enabled in vehicle personalization,
positions previously saved to
memory buttons 1 and 2 are
recalled when the ignition is
changed from off to on or
ACC/ACCESSORY.
When Seat Exit Memory is enabled
in vehicle personalization, the
feature automatically recalls the
previously saved exit position when
exiting the vehicle.
Memory adjustments may not be
available upon delivery or after
service until the steps in “Saving
Memory Positions” are performed.
See Memory Seats 064.
Second Row Seats
Either side of the seatback can be
folded for more cargo space.
See Rear Seats 068.
Page 14 of 404

Chevrolet Blazer (GMNA-Localizing-U.S./Canada/Mexico-12461541) - 2019 -
CRC - 3/11/19
In Brief 13
Heated and Ventilated
Seats
Heated and Ventilated Seat
Buttons Shown, Heated Seat Buttons Similar
If available, the buttons are near the
climate controls on the center stack.
To operate, the engine must be
running.
Press
LorMto heat the driver or
passenger seat. Press
{orC, if available, to
ventilate the driver or passenger
seat. A ventilated seat has a fan
that pulls or pushes air through the
seat. The air is not cooled.
Press the button once for the
highest setting. With each press of
the button, the seat will change to
the next lower setting, and then to
the off setting. The indicator lights
below the buttons indicate three for
the highest setting and one for the
lowest. If the heated seats are on
high, the level may automatically be
lowered after approximately
30 minutes.
See Heated and Ventilated Front
Seats 067.
Head Restraint
Adjustment
Do not drive until the head restraints
for all occupants are installed and
adjusted properly.
To achieve a comfortable seating
position, change the seatback
recline angle as little as necessary while keeping the seat and the head
restraint height in the proper
position.
See
Head Restraints 059 and
Reclining Seatbacks 062.
Seat Belts
Refer to the following sections for
important information on how to use
seat belts properly:
.
Seat Belts 071
. How to Wear Seat Belts Properly
072
Page 15 of 404

Chevrolet Blazer (GMNA-Localizing-U.S./Canada/Mexico-12461541) - 2019 -
CRC - 3/11/19
14 In Brief
.Lap-Shoulder Belt 074
. Lower Anchors and Tethers for
Children (LATCH System) 098
Passenger Sensing
System
The passenger sensing system
turns off the front outboard
passenger frontal airbag under
certain conditions. No other airbag
is affected by the passenger
sensing system. See Passenger
Sensing System 085.
The passenger airbag status
indicator will light on the overhead
console when the vehicle is started.
See Passenger Airbag Status
Indicator 0134.
Mirror Adjustment
Exterior
To adjust the mirrors:
1. Press
jor|to choose the
driver or passenger mirror.
2. Press the arrows on the control pad to move each mirror in the
desired direction.
See Power Mirrors 049.
Interior
Adjustment
Adjust the rearview mirror to clearly
view the area behind the vehicle.
Manual Rearview Mirror
For vehicles with a manual rearview
mirror, push the tab forward for
daytime use and pull it rearward for
nighttime use to avoid the glare of
the headlamps from behind. See
Manual Rearview Mirror 050.
Automatic Dimming Rearview
Mirror
If equipped, automatic dimming
reduces the glare of the headlamps
from behind. The dimming feature
comes on when the vehicle is
started. See Automatic Dimming
Rearview Mirror 050.
Rear Camera Mirror
If equipped, this automatic dimming
rearview mirror provides a wide
angle camera view of the area
behind the vehicle. Adjust the mirror
Page 16 of 404

Chevrolet Blazer (GMNA-Localizing-U.S./Canada/Mexico-12461541) - 2019 -
CRC - 3/11/19
In Brief 15
for a clear view of the area behind
the vehicle while the display is off.
SeeRear Camera Mirror 051.
Steering Wheel
Adjustment
To adjust the steering wheel:
1. Pull the lever down.
2. Move the steering wheel up or down.
3. Pull or push the steering wheel closer or away from you.
4. Pull the lever up to lock the steering wheel in place. Do not adjust the steering wheel
while driving.
Power Tilt and Telescoping
Steering Wheel
If equipped, the control is on the left
side of the steering column.
.
Push the control up or down to
tilt the steering wheel up
or down.
. Push the control forward or
rearward to move the steering
wheel toward the front or rear of
the vehicle.
Do not adjust the steering wheel
while driving.
Interior Lighting
Dome Lamps
The dome lamp controls are in the
overhead console.
To operate, press the following
buttons:
jOFF : Press to turn off the
dome lamps when a door is open.
An indicator light on the button will
turn on when the dome lamp
override is activated. Press
j
OFF again to deactivate this feature