Page 17 of 20
. If no vehicle is detected ahead,")
17
FOLLOWING DISTANCE INDICATOR♦ – The following distance to the vehicle ahead is indicated in seconds under the Info menu on the Driver Information Center (DIC). If no vehicle is detected ahead, dashes are displayed. To display the Following Distance Indicator, go to Options > Info Pages on the DIC.
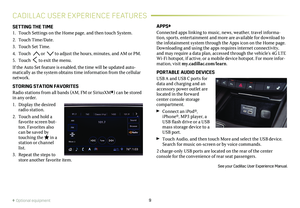
FRONT♦ AND REAR PARK ASSIST – During low-speed parking maneuvers, the system provides “distance to closest object” infor-mation on the Driver Information Center and the Safety Alert Seat pulses or a beep sounds (if selected). When an object is very close, the Safety Alert Seat pulses or 5 beeps sound (if selected).
Press the Park Assist button (B) on the center of the instrument panel to turn the system on or off.
REAR CROSS TRAFFIC ALERT♦ – When in Reverse, the system warns of cross traffic coming in either direction by displaying a red alert on the infotainment screen and the left or right side of the Safety Alert Seat pulses or beeps sound (if selected).
To turn the system on or off, go to Settings > Vehicle > Collision/Detection Systems > Rear Cross Traffic Alert.
REAR VISION CAMERA – When the vehicle is in Reverse below 8 mph, a view of the area behind the vehicle displays on the infotain-ment screen.
SURROUND VISION♦ – The Surround Vision system displays the area surrounding the vehicle along with rear or front camera views on the infotainment screen. The system operates when the vehicle is in Reverse or Drive while moving less than 8 mph. Camera view buttons are at the bottom of the screen.
See Driving and Operating in your Owner's Manual.
DRIVER ASSISTANCE SYSTEMSAUTOMATIC PARKING ASSIST
WITH BRAKING♦
The Automatic Parking Assist with Braking system steers the vehi-cle and applies the brakes at idle speed to help you park the vehicle while you follow commands and control the gear selection.
1. While in Drive, press the Parking Assist button (C) on the center of the instrument panel. A beep sounds and a parking assist display is shown on the infotainment screen. The system will begin searching for a large enough parking space.
2. To switch between parallel and per-pendicular parking, touch the Parking Type screen button. To search for a parking space to the right or left, touch the Parking Side screen button.
3. Once a space is found, shift the
vehicle into Reverse or Drive as
directed and follow the instructions on the info-tainment screen. The
vehicle auto-matically steers and brakes, moving at idle speed into a detected parking space. The driver must
follow the instructions, select gears, and override braking and acceleration as needed. Parking Complete will be displayed and a beep will sound when the park-ing maneuver is complete.
See Driving and Operating in your Owner's Manual.
♦ Optional equipment
BAC
Page 18 of 20

18
ELECTRIC PARKING BRAKE
To apply the parking brake, press the
Parking Brake switch on the left side of the instrument panel.
To release the parking brake, turn on the
ignition, press the brake pedal, and then press the switch.
Note: The parking brake will automatically release if the vehicle is run\
ning, placed into gear, and an attempt is made to drive away.
See Driving and Operating in your Owner's Manual.
The rear camera mirror provides a wider, less obstructed field of view to assist when driving, chang-ing lanes and checking traffic conditions.
A. On/Off
Pull or push the lever at the bottom of the mirror to turn the video display on or off.
B. Selection Control Press and release the button to select the brightness, tilt or zoom feature.
C. + / – Press and release either button to adjust the selected feature.
See Keys, Doors and Windows in your Owner's Manual.
REAR CAMERA MIRROR♦
The traction control system limits wheelspin in difficult driving conditions. The system turns on automatically every time the
vehicle is started. Turn off traction control if the vehicle is stuck and rocking the vehicle is required.
Press the Traction Control button on the center console to turn traction control off or on again. The Traction Control Off light will illuminate on the instrument cluster when the
system is off.
See Driving and Operating in your Owner's Manual.
TRACTION CONTROL
TIRE PRESSURE MONITOR
The Low Tire Pressure warning light on the instrument cluster illuminates when one or more of the vehicle’s tires is significantly underinflated. Fill the tires to the proper tire pressures listed on the Tire and Loading Information label, located below the driver’s door latch. Current tire pressures can be viewed on the Driver Information Center.
Refer to your Owner's Manual for information about normal monthly tire maintenance.
See Vehicle Care in your Owner's Manual.
ABC
Page 19 of 20
 transmitter twice.
Press the Power Liftgate knob on the driver’s door.
Press the touchpad und")
19
OPEN/CLOSE THE POWER LIFTGATE
Press the Power Liftgate button on the Remote Keyless Entry (RKE) transmitter twice.
Press the Power Liftgate knob on the driver’s door.
Press the touchpad under the liftgate handle to open the
liftgate.
Press the button next to the pull handle to close the liftgate.
PROGRAMMING THE LIFTGATE HEIGHT
1. Turn the Power Liftgate knob to the 3/4 mode position.
2. Open the liftgate.
3. Adjust the liftgate manually to the desired height.
4. To save the setting, press and hold the button next to the pull handle for 3 seconds. The turn
signals flash and a beep sounds when the
setting is saved.
HANDS-FREE OPERATION♦
To open or close the liftgate hands-free, stand facing the vehicle behind the left rear wheel. Kick your foot straight under the left corner of the rear bumper (A).
The RKE transmitter must be within 3 feet of the liftgate.
PROJECTED LOGO♦
The vehicle logo is projected on the ground (B) near the rear
bumper, indicating the kicking motion location for hands-free operation, when an RKE transmitter is detected within 6 feet of the liftgate. The logo is shown for 1 minute, depending on operating conditions.
See Keys, Doors and Windows in your Owner's Manual.
POWER LIFTGATE♦
♦ Optional equipment
A
B
Page 20 of 20
 and, if your vehicle is properly equipped, you can start or turn off you")
20
!23272684=A!
OWNER PRIVILEGES™
myCADILLAC MOBILE APP
Download the myCadillac app to your compatible smartphone (or device) and, if your vehicle is properly equipped, you can start or turn off your engine, lock or unlock your doors, view key diagnostic information, set parking information and more.
The app is available on select Apple and Android devices. Service availability, features and functionality vary by vehicle, device and data plan. Device data connection required. Visit onstar.com for more details. Download the mobile app from your compatible mobile device’s app store.
CADILLAC ONLINE OWNER CENTER
Create an account at my.cadillac.com to access personalized infor-mation, including an online Owner’s Manual and helpful how-to videos, track your service history and warranty status, manage your OnStar and Connected Services vehicle plans, review your current Vehicle Diagnostics report (active service account required) and more.
ROADSIDE ASSISTANCE 1-800-224-1400 TTY Users: 1-888-889-2438
Roadside Assistance provides every Cadillac owner with the
advantage of contacting a Cadillac advisor and, when appropriate, a Cadillac-trained dealer technician who can provide on-site services, including towing service, battery jump-starting, lock-out service, fuel delivery and flat tire assistance. Services are provided for up to 6 years/70,000 miles, whichever occurs first.
OnStar® Roadside Assistance
If you have a current OnStar Safety & Security plan, push the blue OnStar button or red Emergency button to get the help you need. An OnStar advisor will use GPS technology to pinpoint your vehicle location and contact the nearest service provider.
To learn more about OnStar services, press the blue OnStar button, visit onstar.com, call 1-888-4-ONSTAR (1-888-466-7827), or refer to your Owner's Manual.
CUSTOMER ASSISTANCE 1-800-458-8006
Cadillac Customer Assistance is available anytime to answer
questions or provide additional information.
Certain restrictions, precautions and safety procedures apply to your ve\
hicle. Please read your Owner's Manual for complete instructions. All information contained in this guide is based on the latest information available at the time of printing and is subject to change without notice. Copyright 2018 by General Motors. All rights reserved.
We recommend always using ACDelco or genuine GM service parts.
Page:
< prev 1-8 9-16 17-24