Page 17 of 20

17F Optional equipment
Lane Change Alert with Side Blind Zone AlertF — While driving, the system displays a
warning symbol on the left or right side mirror when a vehicle is detected in that side blind zone area or rapidly approaching that area. The warning symbol flashes if a turn
signal is activated when a vehicle has been detected on the same side.
To turn the system on or off, go to Settings > Vehicle > Collision/Detection Systems > Lane Change Alert.
Lane Keep Assist with Lane Departure WarningF — The system may help you avoid col-lisions due to unintentional lane departures. The Lane Keep Assist Indicator is green on the instrument cluster if the system is available to assist. If the vehicle approaches a detected lane marking without using a turn signal in that direction, the system may assist by gently turning the steering wheel and displaying an amber .
If active driver steering is not detected, the amber may flash and 3 beeps may sound on the side of the departure direction as the lane marking is crossed. The Lane Keep Assist system does not continuously steer the vehicle; the driver needs to steer and be in complete control of the vehicle.
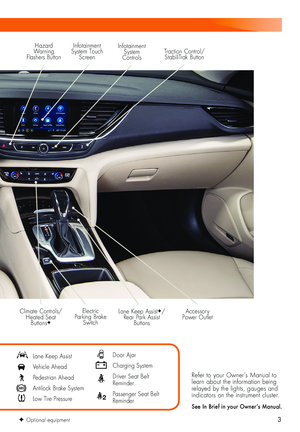
To turn the system on or off, press the
Lane Keep Assist button (A) on the front of the center console.
Rear Vision Camera — When the vehicle is in Reverse, a view of the area behind the vehicle displays on the infotainment screen. Vehicle speed must be below 8 mph.
Rear Cross Traffic AlertF — When the vehicle is in Reverse, the system warns of cross-traffic coming in either direction by displaying a red alert on the infotainment screen and beeps sound.
Rear Park Assist — During low-speed park-ing maneuvers, the system provides “distance to closest object” information on the Driver Information Center. A beep sounds when an object is detected and 5 beeps sound when an object is very close.
To turn Rear Park Assist and Rear Cross Traffic Alert on or off, press the Rear Park Assist button (B) on the front of the center console.
See Driving and Operating in your Owner’s Manual.
DRIVER ASSISTANCE SYSTEMS
BA
Page 18 of 20

18F Optional equipment
CRUISE CONTROL
Setting Cruise Control
1. Press the On/Off button. The Cruise Control symbol will illuminate in white on the instrument cluster.
2. When traveling at the desired speed, press down the SET– switch to set the speed. The symbol will illuminate in green on the instrument cluster.
Adjusting Cruise Control
RES+ Resume/Accelerate
Press up to resume a set speed. When active, press up to increase speed.
SET– Set/Coast
When active, press down to decrease speed.
Cancel
Press the button, or press the brake pedal, to cancel the Cruise Control without erasing the set speed from memory.
The set speed is erased when Cruise Control or the vehicle ignition is turned off.
Adaptive Cruise ControlF
The system maintains the set speed and a following gap — the time between your vehicle and a vehicle detected directly ahead — by accelerating or braking automatically while you continue to steer.
Press the Following Gap button to select a gap setting of Far, Medium or Near. This is also the Forward Collision AlertF setting.
Press and hold the Cancel button to switch between regular Cruise Control and Adaptive Cruise Control.
See Driving and Operating in your Owner’s Manual.
Driver Shift Control
Driver Shift Control is a manual mode that allows the driver to shift gears manually. It can be used to drive the vehicle in a sportier manner, or to downshift when driving on a downhill grade to provide engine braking.
1. From the Drive (D) position, move the shift lever left to the +/– position.
2. Tap the shift lever forward (+) to upshift or rear-ward (–) to downshift. The current gear is shown on the Driver Information Center.
If vehicle speed is too high or too low for the requested gear, the shift will not occur. When coming to a stop, the transmission will downshift automatically.
See Driving and Operating in your Owner’s Manual.
AUTOMATIC TRANSMISSION
Page 19 of 20

19
Cargo Tie-Down System
The cargo tie-down system can be adjusted to secure a variety of items on the cargo floor.
Press the button on the tie-down to insert or remove each tie-down in the rails (A).
Press the button on the tie-down to slide it to the required position. Fold up the tie-down to use it.
Cargo Cover Pull the cover handle rearward to extend the cargo cover. Once extended, pull the han-dle up to engage the cover in the side retainers. Pull the handle rearward and down to release the cover.
Pull up the release lever (B) on the right side of the cargo cover to remove the cover. Lift up the right side of the cover first to remove it from the side retainer. When installing the cover, insert the left side of the cover first in the side retainer.
See Storage in your Owner’s Manual.
CARGO STORAGE
REFUELING THE VEHICLE
TIRE PRESSURE MONITOR
To open the fuel door, press and release the center of the rear edge of the door. It will pop out slightly. Pull the door open.
The vehicle’s capless fuel system does not have a fuel cap. Fully insert the fuel pump nozzle before starting to fill the tank.
Note: When using a portable gas can, insert the funnel adapter, stored under the cargo floor, into the capless fuel fill.
See Driving and Operating in your Owner’s Manual.
The Low Tire Pressure warning light on the instrument cluster illuminates when one or more of the vehicle’s tires is significantly underinflated. Fill the tires to the proper tire pres-sures listed on the Tire and Loading Information label located below the driver’s door latch. Current tire pressures can be viewed on the Driver Information Center.
See Vehicle Care in your Owner’s Manual.
B
A
Page 20 of 20

20
ROADSIDE ASSISTANCE
1-800-252-1112 TTY Users: 1-888-889-2438
As the owner of a new Buick, you are automatically enrolled in the Buick Roadside Assistance program for up to 6 years/70,000 miles, whichever occurs first, at no expense to you. Buick’s Roadside Assistance toll-free number is staffed by a team of trained advisors who are available 24 hours a day, 365 days a year, to contact a service provider for light services (fuel delivery, jump-starts, flat tire and lock-outs) or make arrangements to tow your vehicle to the nearest Buick dealer for any repairs.
OnStar Roadside Assistance
If you have a current OnStar Safety & Security plan, push the blue OnStar button or red Emergency button to get the help you need. An OnStar advisor will use GPS technology to pinpoint your vehicle location and contact the nearest service provider.
To learn more about OnStar services, press the blue OnStar button, visit onstar.com, call 1-888-4-ONSTAR (1-888-466-7827), or refer to your Owner's Manual.
Certain restrictions, precautions and safety procedures apply to your vehicle. Please read your Owner’s Manual for complete instructions. All information contained in this guide is based on the latest information available at the time of printing and is subject to change without notice. Copyright 2018 General Motors. All rights reserved.
We recommend always using ACDelco or genuine GM service parts.
!84414198=A!84414198 A
Get to know your vehicle inside and out with the Buick Owner Center. Check out personal-ized information, including an online Owner’s Manual and helpful how-to videos, track your service history and warranty status, manage your OnStar and Connected Services vehicle plans, review your current Vehicle Diagnostics report (active service account required) and more. Create an account today at my.buick.com.
Download the myBuick app to your compatible smartphone (or device) and, if your vehicle is properly equipped, you can start or turn off your engine, lock or unlock your doors, view key diagnostic information, set parking information and more.
The app is available on select Apple and Android devices. Service availability, features and functionality vary by vehicle, device and data plan. Device data connection required. Visit onstar.com for more details. Download the mobile app from your compatible mobile device’s app store.
BUICK OWNER CENTER
MYBUICK MOBILE APP
Page:
< prev 1-8 9-16 17-24