2019 BUICK REGAL SPORTBACK light
[x] Cancel search: lightPage 87 of 391
Buick Regal Owner Manual (GMNA-Localizing-U.S./Canada-12163021) -
2019 - CRC - 11/14/18
86 Seats and Restraints
{Warning
If the airbag readiness light ever
comes on and stays on, it means
that something may be wrong
with the airbag system. To help
avoid injury to yourself or others,
have the vehicle serviced right
away. SeeAirbag Readiness
Light 0134 for more information,
including important safety
information.
If the On Indicator Is Lit for a
Child Restraint
The passenger sensing system is
designed to turn off the front
outboard passenger frontal airbag
and knee airbag if the system
determines that an infant is present
in a child restraint. If a child restraint
has been installed and the ON
indicator is lit:
1. Turn the vehicle off.
2. Remove the child restraint from the vehicle. 3. Remove any additional items
from the seat such as blankets,
cushions, seat covers, seat
heaters, or seat massagers.
4. Reinstall the child restraint following the directions
provided by the child restraint
manufacturer and refer to
Securing Child Restraints (With
the Seat Belt in the Rear Seat)
0103 orSecuring Child
Restraints (With the Seat Belt
in the Front Seat) 0105.
Make sure the seat belt
retractor is locked by pulling
the shoulder belt all the way
out of the retractor when
installing the child restraint,
even if the child restraint is
equipped with a seat belt lock
off. When the retractor lock is
set, the belt can be tightened
but not pulled out of the
retractor. 5. If, after reinstalling the child
restraint and restarting the
vehicle, the ON indicator is still
lit, turn the vehicle off. Then
slightly recline the vehicle
seatback and adjust the seat
cushion, if adjustable, to make
sure that the vehicle seatback
is not pushing the child
restraint into the seat cushion.
Also make sure the child
restraint is not trapped under
the vehicle head restraint.
If this happens, adjust the head
restraint. See Head Restraints
0 58.
6. Restart the vehicle.
The passenger sensing system may
or may not turn off the airbags for a
child in a child restraint depending
upon the child's size. It is better to
secure the child restraint in a rear
seat. Never put a rear-facing child
restraint in the front seat, even if the
ON indicator is not lit.
Page 90 of 391
Buick Regal Owner Manual (GMNA-Localizing-U.S./Canada-12163021) -
2019 - CRC - 11/14/18
Seats and Restraints 89
The operation of the airbag system
can also be affected by changing,
including improperly repairing or
replacing, any parts of the following:
.Airbag system, including airbag
modules, front or side impact
sensors, sensing and diagnostic
module, or airbag wiring
. Front seats, including stitching,
seams or zippers
. Seat belts
. Steering wheel, instrument
panel, overhead console, ceiling
trim, or pillar garnish trim
. Inner door seals, including
speakers
Your dealer and the service manual
have information about the location
of the airbag modules and sensors,
sensing and diagnostic module, and
airbag wiring along with the proper
replacement procedures.
In addition, the vehicle has a
passenger sensing system for the
front outboard passenger position,
which includes sensors that are part
of the passenger seat. The passenger sensing system may not
operate properly if the original seat
trim is replaced with non-GM
covers, upholstery, or trim; or with
GM covers, upholstery, or trim
designed for a different vehicle. Any
object, such as an aftermarket seat
heater or a comfort-enhancing pad
or device, installed under or on top
of the seat fabric, could also
interfere with the operation of the
passenger sensing system. This
could either prevent proper
deployment of the passenger
airbag(s) or prevent the passenger
sensing system from properly
turning off the passenger airbag(s).
See
Passenger Sensing System
0 84.
If the vehicle has rollover roof-rail
airbags, see Different Size Tires
and Wheels 0295 for additional
important information.
If the vehicle must be modified
because you have a disability and
have questions about whether the
modifications will affect the vehicle's
airbag system, or if you have
questions about whether the airbag system will be affected if the vehicle
is modified for any other reason, call
Customer Assistance. See
Customer Assistance Offices
0354.
Airbag System Check
The airbag system does not need
regularly scheduled maintenance or
replacement. Make sure the airbag
readiness light is working. See
Airbag Readiness Light 0134.
Caution
If an airbag covering is damaged,
opened, or broken, the airbag
may not work properly. Do not
open or break the airbag
coverings. If there are any
opened or broken airbag
coverings, have the airbag
covering and/or airbag module
replaced. For the location of the
airbags, see Where Are the
Airbags? 079. See your dealer
for service.
Page 91 of 391
Buick Regal Owner Manual (GMNA-Localizing-U.S./Canada-12163021) -
2019 - CRC - 11/14/18
90 Seats and Restraints
Replacing Airbag System
Parts after a Crash
{Warning
A crash can damage the airbag
systems in the vehicle.
A damaged airbag system may
not properly protect you and your
passenger(s) in a crash, resulting
in serious injury or even death. To
help make sure the airbag
systems are working properly
after a crash, have them
inspected and any necessary
replacements made as soon as
possible.
If an airbag inflates, you will need to
replace airbag system parts. See
your dealer for service.
If the airbag readiness light stays on
after the vehicle is started or comes
on when you are driving, the airbag
system may not work properly. Have
the vehicle serviced right away. See
Airbag Readiness Light 0134.
Child Restraints
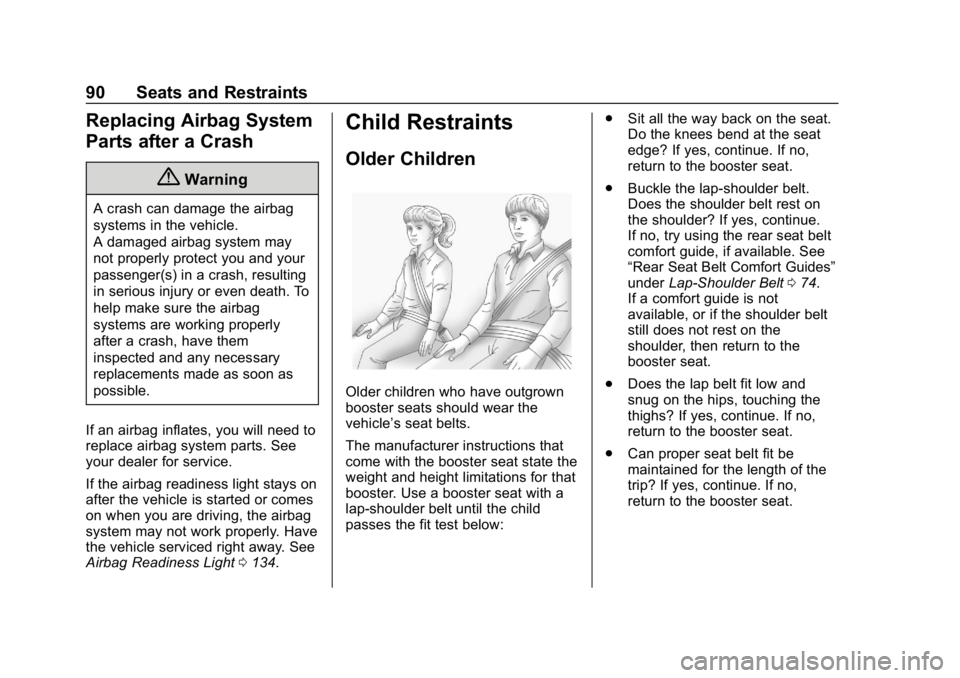
Older Children
Older children who have outgrown
booster seats should wear the
vehicle’s seat belts.
The manufacturer instructions that
come with the booster seat state the
weight and height limitations for that
booster. Use a booster seat with a
lap-shoulder belt until the child
passes the fit test below: .
Sit all the way back on the seat.
Do the knees bend at the seat
edge? If yes, continue. If no,
return to the booster seat.
. Buckle the lap-shoulder belt.
Does the shoulder belt rest on
the shoulder? If yes, continue.
If no, try using the rear seat belt
comfort guide, if available. See
“Rear Seat Belt Comfort Guides”
under Lap-Shoulder Belt 074.
If a comfort guide is not
available, or if the shoulder belt
still does not rest on the
shoulder, then return to the
booster seat.
. Does the lap belt fit low and
snug on the hips, touching the
thighs? If yes, continue. If no,
return to the booster seat.
. Can proper seat belt fit be
maintained for the length of the
trip? If yes, continue. If no,
return to the booster seat.
Page 107 of 391
Buick Regal Owner Manual (GMNA-Localizing-U.S./Canada-12163021) -
2019 - CRC - 11/14/18
106 Seats and Restraints
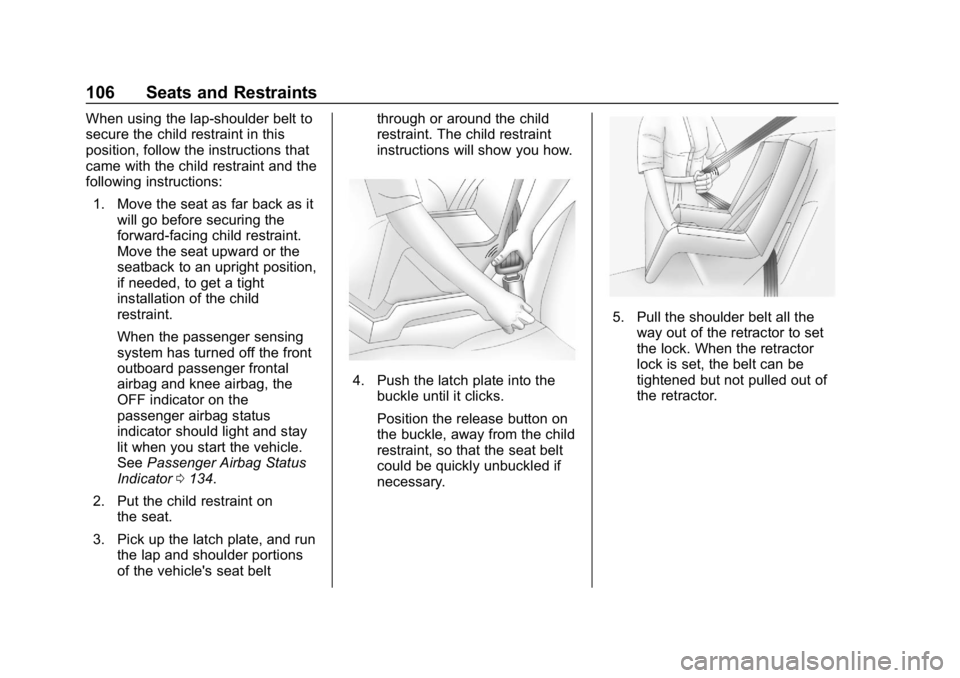
When using the lap-shoulder belt to
secure the child restraint in this
position, follow the instructions that
came with the child restraint and the
following instructions:1. Move the seat as far back as it will go before securing the
forward-facing child restraint.
Move the seat upward or the
seatback to an upright position,
if needed, to get a tight
installation of the child
restraint.
When the passenger sensing
system has turned off the front
outboard passenger frontal
airbag and knee airbag, the
OFF indicator on the
passenger airbag status
indicator should light and stay
lit when you start the vehicle.
See Passenger Airbag Status
Indicator 0134.
2. Put the child restraint on the seat.
3. Pick up the latch plate, and run the lap and shoulder portions
of the vehicle's seat belt through or around the child
restraint. The child restraint
instructions will show you how.
4. Push the latch plate into the
buckle until it clicks.
Position the release button on
the buckle, away from the child
restraint, so that the seat belt
could be quickly unbuckled if
necessary.
5. Pull the shoulder belt all theway out of the retractor to set
the lock. When the retractor
lock is set, the belt can be
tightened but not pulled out of
the retractor.
Page 110 of 391
Buick Regal Owner Manual (GMNA-Localizing-U.S./Canada-12163021) -
2019 - CRC - 11/14/18
Seats and Restraints 109
Temporary Hood Repair
If the rear of the hood is raised, the
hood may be repositioned
temporarily if a towing service is not
available.
{Warning
Before beginning the procedure,
read all the instructions. Failure to
read and follow the instructions
could injure you or others, and
damage the vehicle.
{Warning
After the hood has lifted, the hood
hinge and latch area may be hot.
Do not touch the pedestrian
protection system components.
Allow the engine to cool before
attempting any repair.
{Warning
You or others could be injured
when the hood is lowered or
latched.
Be sure to keep fingers and other
body parts away from the edge of
the hood and fenders.
1. Place both hands on top of the right corner of the hood near
the windshield and push the
hood down quickly.
If the hood does not latch, push
down again with slightly more
force until the hood is latched
securely.
2. Repeat the previous step to latch the left side of the hood.
3. Pull up on the rear corners of the hood to make sure the
hood is latched securely and
will not lift.
{Warning
Do not drive the vehicle if the
hood is not securely latched at
both rear corners and the front
latch.
Operating your vehicle without the
hood securely latched can lead to
a collision resulting in damage to
your vehicle, damage to other
property, personal injury, or even
death.
4. Drive directly to a dealer for service. If you cannot go in for
service immediately, have the
vehicle towed.
Some noise will occur when
the vehicle is driven while the
hood is temporarily
repositioned.
If you do not have the system
repaired, the pedestrian protection
system will not be operable in the
event of another crash or frontal
impact involving a pedestrian. See
your dealer for service immediately.
Page 117 of 391
Buick Regal Owner Manual (GMNA-Localizing-U.S./Canada-12163021) -
2019 - CRC - 11/14/18
116 Instruments and Controls
Instruments and
Controls
Controls
Steering Wheel Adjustment . . . 117
Steering Wheel Controls . . . . . . 117
Heated Steering Wheel . . . . . . . 117
Horn . . . . . . . . . . . . . . . . . . . . . . . . . . 117
Windshield Wiper/Washer . . . . 117
Rear Window Wiper/Washer . . . . . . . . . . . . . . . . . . . . . . 118
Compass . . . . . . . . . . . . . . . . . . . . . 119
Clock . . . . . . . . . . . . . . . . . . . . . . . . . 119
Power Outlets . . . . . . . . . . . . . . . . 119
Wireless Charging . . . . . . . . . . . . 120
Warning Lights, Gauges, and
Indicators
Warning Lights, Gauges, and Indicators . . . . . . . . . . . . . . . . . . . 123
Instrument Cluster . . . . . . . . . . . . 124
Speedometer . . . . . . . . . . . . . . . . . 130
Odometer . . . . . . . . . . . . . . . . . . . . . 130
Tachometer . . . . . . . . . . . . . . . . . . . 130
Fuel Gauge . . . . . . . . . . . . . . . . . . . 130
Engine Oil Temperature Gauge
(Uplevel) . . . . . . . . . . . . . . . . . . . . 131 Engine Coolant Temperature
Gauge . . . . . . . . . . . . . . . . . . . . . . 132
Voltmeter Gauge (Uplevel) . . . 132
Seat Belt Reminders . . . . . . . . . 133
Airbag Readiness Light . . . . . . . 134
Passenger Airbag Status Indicator . . . . . . . . . . . . . . . . . . . . 134
Charging System Light . . . . . . . 135
Malfunction Indicator Lamp (Check Engine Light) . . . . . . . . 135
Brake System Warning Light . . . . . . . . . . . . . . . . . . . . . . . . 137
Electric Parking Brake Light . . . . . . . . . . . . . . . . . . . . . . . . 138
Service Electric Parking Brake Light . . . . . . . . . . . . . . . . . . . . . . . . 138
Antilock Brake System (ABS) Warning Light . . . . . . . . . . . . . . . 138
Lane Keep Assist (LKA) Light . . . . . . . . . . . . . . . . . . . . . . . . 139
Vehicle Ahead Indicator . . . . . . 139
Traction Off Light . . . . . . . . . . . . . 139
StabiliTrak OFF Light . . . . . . . . . 140
Traction Control System (TCS)/ StabiliTrak Light . . . . . . . . . . . . . 140
Engine Coolant Temperature Warning Light . . . . . . . . . . . . . . . 140
Tire Pressure Light . . . . . . . . . . . 141
Engine Oil Pressure Light . . . . 141
Low Fuel Warning Light . . . . . . 142 Security Light . . . . . . . . . . . . . . . . . 142
High-Beam On Light . . . . . . . . . . 142
Adaptive Forward Lighting
(AFL) Light . . . . . . . . . . . . . . . . . . 142
Front Fog Lamp Light . . . . . . . . . 143
Lamps On Reminder . . . . . . . . . 143
Cruise Control Light . . . . . . . . . . 143
Door Ajar Light . . . . . . . . . . . . . . . 143
Information Displays
Driver Information
Center (DIC) . . . . . . . . . . . . . . . . 144
Head-Up Display (HUD) . . . . . . 149
Vehicle Messages
Vehicle Messages . . . . . . . . . . . . 152
Engine Power Messages . . . . . 152
Vehicle Speed Messages . . . . . 153
Vehicle Personalization
Vehicle Personalization . . . . . . . 153
Universal Remote System
Universal Remote System . . . . 158
Universal Remote System Programming . . . . . . . . . . . . . . . 158
Universal Remote System Operation . . . . . . . . . . . . . . . . . . . 161
Page 118 of 391
Buick Regal Owner Manual (GMNA-Localizing-U.S./Canada-12163021) -
2019 - CRC - 11/14/18
Instruments and Controls 117
Controls
Steering Wheel
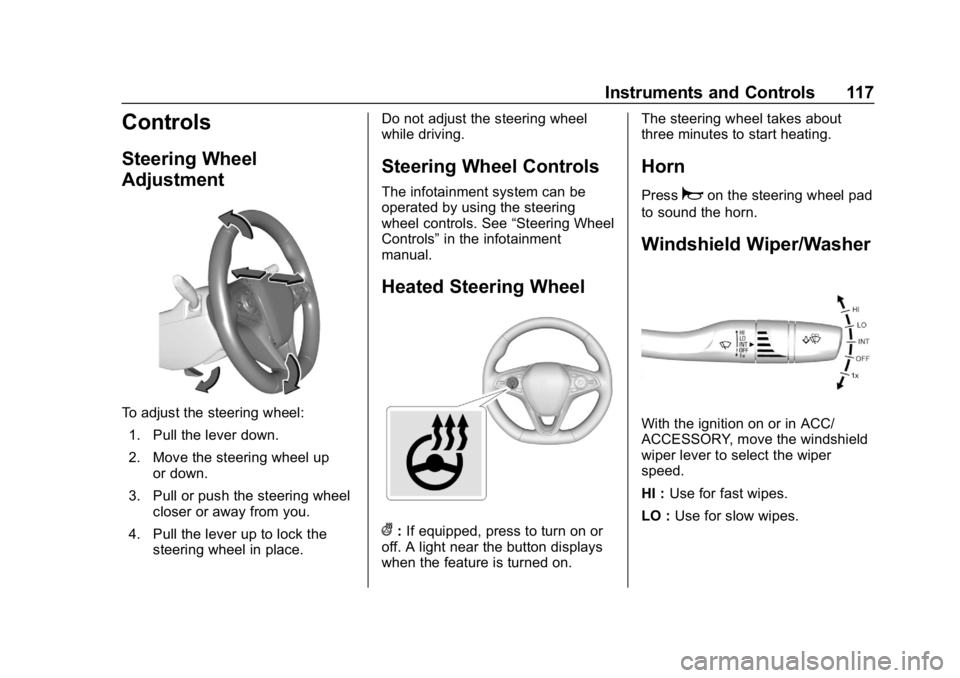
Adjustment
To adjust the steering wheel:1. Pull the lever down.
2. Move the steering wheel up or down.
3. Pull or push the steering wheel closer or away from you.
4. Pull the lever up to lock the steering wheel in place. Do not adjust the steering wheel
while driving.
Steering Wheel Controls
The infotainment system can be
operated by using the steering
wheel controls. See
“Steering Wheel
Controls” in the infotainment
manual.
Heated Steering Wheel
(: If equipped, press to turn on or
off. A light near the button displays
when the feature is turned on. The steering wheel takes about
three minutes to start heating.
Horn
Pressaon the steering wheel pad
to sound the horn.
Windshield Wiper/Washer
With the ignition on or in ACC/
ACCESSORY, move the windshield
wiper lever to select the wiper
speed.
HI : Use for fast wipes.
LO : Use for slow wipes.
Page 124 of 391
Buick Regal Owner Manual (GMNA-Localizing-U.S./Canada-12163021) -
2019 - CRC - 11/14/18
Instruments and Controls 123
(INCLUDING, BUT NOT LIMITED
TO, PROCUREMENT OF
SUBSTITUTE GOODS OR
SERVICES; LOSS OF USE, DATA,
OR PROFITS; OR BUSINESS
INTERRUPTION) HOWEVER
CAUSED AND ON ANY THEORY
OF LIABILITY, WHETHER IN
CONTRACT, STRICT LIABILITY,
OR TORT (INCLUDING
NEGLIGENCE OR OTHERWISE)
ARISING IN ANY WAY OUT OF
THE USE OF THIS SOFTWARE,
EVEN IF ADVISED OF THE
POSSIBILITY OF SUCH DAMAGE.Warning Lights,
Gauges, and
Indicators
Warning lights and gauges can
signal that something is wrong
before it becomes serious enough
to cause an expensive repair or
replacement. Paying attention to the
warning lights and gauges could
prevent injury.Some warning lights come on briefly
when the engine is started to
indicate they are working. When
one of the warning lights comes on
and stays on while driving, or when
one of the gauges shows there may
be a problem, check the section that
explains what to do. Waiting to do
repairs can be costly and even
dangerous.