2019 AUDI Q7 Red
[x] Cancel search: RedPage 354 of 394

Emergencyassistance
Emergencyassistance
Generalinformation
>Parkthevehicleasfaraspossiblefrommoving
trafficinthe eventofabreakdown.Intheevent
ofaflattire,parkthevehicleonalevelsurface.
Ifyouareonasteephill,beespeciallycareful.
>Set theparkingbrake.
>Switchtheemergencyflasherson.
>Havethepassengersexitthevehicle.They
shouldmovetoasafeplace,forexamplebe-
hindaguardrail.
ZXWARNING
Follow thesteps givenabove.Thisisforyour
protectionandtheforthesafetyofotherson
theroad.
Equipment
Vehicletoolkit,tiremobilitykit,and
vehiclejack
Appliesto:vehicleswiththevehicletoolkit,tiremobilitykit,
andvehiclejack
Thevehicletoolkit,vehiclejack,tiremobilitykit
andcompressorarestoredintheluggagecom-
partmentunderthecargofloorcover.Liftthe
cargofloorusingthehandle.
ZAWARNING
Improperuseofthevehiclejackcancausese-
riouspersonalinjuries.
—Neverusethescrewdriverhexheadtotight-
enwheelbolts,sincetheboltscannotattain
thenecessarytighteningtorqueifyouuse
thehexhead,potentiallycausinganacci-
dent.
— Thefactory-suppliedjackisintendedonly
foryourvehiclemodel.Undernocircum-
stances
shoulditbeusedtoliftheavyvehi-
clesorotherloads;youriskinjuringyour-
self.
—Neverstarttheenginewhenthevehicleis
raised,whichcouldcauseanaccident.
—Supportthevehiclesecurelywithappropri-
atestandsifworkistobeperformedunder-
352
neaththevehicle;otherwise,thereisapo-
tentialriskforinjury.
—NeverusethejacksuppliedwithyourAudi
onanothervehicle,particularlyonaheavier
one.Thejackisonlysuitableforuseonthe
vehicleitcamewith.
G)Tips
Thevehiclejackinyourvehicleismainte-
nance-free.
Tiremobilitykit
>Readandfollowtheimportantsafetyprecau-
tions>page352.
>Set theparkingbrake.
>Selectthe"P"selectorleverposition.
>Checkifarepairwiththetiremobilitykitispos-
sible>page352.
UTeRamee)Tiina
B8K-1475
Fig.272Tire: tiredamagethatcannotberepaired
Thetirerepairisonlymeantfortemporaryuse.
Changethedamagedtireassoonaspossible
SA.
Ifthetireispiercedby anobjectsuchasanail,
donotremovetheobjectfromthetire.
Thetiremobilitykitcanbe usedattemperatures
aslowas -4°F(-20°C).
Thetiremobilitykitmustnotbeused:
—Ifthetirehascutsorpuncturesthatare larger
than0.16in(4mm)@©fig.272
—Iftherimisdamaged@)
Page 356 of 394

Emergencyassistance
Inflatingatire
>Movetheswitch(8)>fig.274onthecompres-
sorintopositionI.
>Inflatethetiretobetween29psi(200kPA)
and36psi(250kPA)andreadthepressureon
thegauge.
>Ifthistirepressureisnotreached,removethe
fillerhose.Driveslowlyapproximately33feet
(10m)forwardorinreversesothatthesealant
canbedistributedinthetire.Inflatethetire
again>A\.
Z\WARNING
—Readandfollowthemanufacturer'ssafety
precautionsonthecompressorandinthein-
structionsonthebottleofsealant.
—Ifatirepressureof29psi(200kPA)cannot
reachedafterinflatingfor6minutes,then
thetireistooseverelydamaged.Donotcon-
tinuedriving.
—Ifthetirecannotberepairedwiththetire
sealant,seeanauthorizedAudidealerorau-
thorizedAudiServiceFacilityforassistance.
G)Tips
Donotoperatethecompressorformorethan
sixminutescontinuously,oritcanoverheat.
Oncethecompressorhascooled,youcancon-
tinuetouseit.
Completing
>Affixthestickerthatsays"max.50mph(max.
80km/h)"thatisprovidedwiththetiremobili-
tykitwithinthedriver'sfieldofvision.
>Stopthevehicleafterdrivingforabout10mi-
nutesandcheckthetirepressure.
>
Ifthetirepressureislowerthan19psi(130
kPA),thenthetireistooseverelydamaged.Do
notcontinuedriving.
ZA\WARNING
Payattentiontothefollowingafterrepairing
thetire:
—Donotdrivefasterthan50mph(80km/h).
—Avoidhardacceleration,heavybraking,and
fastcornering.
354
— Thevehiclemaybecomemoredifficultto
control.
—Ifthetireistooseverelydamaged,seean
authorizedAudidealerorauthorizedAudi
ServiceFacilityforassistance.
@)Forthesakeoftheenvironment
Youcangivetheusedtiresealantbottletoan
authorizedAudidealerorauthorizedAudi
ServiceFacilityfor disposal.
G)Tips
Remembertoobtainanewbottleofsealant
fromanauthorizedAudidealerorauthorized
AudiServiceFacilityafterrepairingatire.
Changingatire
Youmustcompletethepreparationbefore
changingatire.
>Readandfollowtheimportantsafetyprecau-
tions>page352.
>Set theparkingbrake.
>Selectthe"P"selectorleverposition.
>Whentowingatrailer:disconnectthetrailer
fromyourvehicle.
>Layout thevehicletoolkit>page352andthe
sparetire.
>Switchonwheelchangemode*intheInfotain-
mentsystem:[MENU]button>Vehicle> left
controlbutton>Service&checks>Airsuspen-
sion:wheelchange.
>Switchtheignitionoff.
Thevehiclejackmode*switchesoffautomatically
atspeedsabove6mph(10km/h).
ZA\WARNING
Whenusingthevehiclejack*onaroadwitha
steephillorwhenoffroad,youmusttakeex-
tra
precautionstopreventthevehiclefrom
rolling.Usesuitableobjectstoblockthefront
andbackofthewheelthatisdiagonalfrom
thewheelwiththeflattire.>
Page 357 of 394

4M0012721BG
Emergencyassistance
ZA\WARNING
Youoryourpassengerscouldbeinjuredwhile
changingawheelifyoudonotfollowthese
safetyprecautions:
—Ifyouhaveaflattire,moveasafedistance
offtheroad.Turnofftheengine,turnthe
emergencyflashersonanduseotherwarn-
ingdevicestoalertothermotorists.
—Makesurethatpassengerswaitinasafe
place
awayfromthevehicleandwellaway
fromtheroadandtraffic.
—Tohelppreventthevehiclefrommoving
suddenlyandpossiblyslippingoffthejack*,
alwaysfullysettheparkingbrakeandblock
thefrontandbackofthewheeldiagonally
oppositethewheelbeingchanged.When
onefrontwheelisliftedofftheground,
placingtheAutomaticTransmissioninP
(Park)willnotpreventthevehiclefrom mov-
ing.
—Beforeyouchangeawheel, besurethe
groundislevelandfirm.Ifnecessary,usea
sturdyboardunderthejack*.
—Alwaysstorethevehicletoolkit,thejack*
andthereplacedtireintheluggagecom-
partment>page62.
G)Tips
—Obeyalllaws.
—Beforechangingthewheel,youmustacti-
vatethejackingmode*,sothattheauto-
maticcontrolsfortheairsuspension*do
notmakeitmoredifficulttoliftthevehicle
withthejack*>page356.
Removingthecaps
NF
—o~~
a
Fig.275Wheel:wheelboltswith caps
B4L-1337
>Slidetheplasticclipfromthevehicletoolkit
ontothe capuntilitengages>fig.275.
>Removethecapwiththeplasticclip.
Looseningthewheelbolts
|
=
xo.a
iN
Fig.276Wheel:looseningthewheelbolt
>Slidethewheelwrenchfromthevehicletoolkit
allthewayontothewheelbolt.
>Turn thewheelboltapproximatelyoneturnto
theleft-arrow-.Toachievetherequiredtorque,
holdtheendofthewheelwrench.Ifthewheel
boltwillnotloosen,presscarefullyonthe
wheelwrenchwithyourfoot.Hold ontotheve-
hiclesecurelywhiledoingthisandmakesure
yourfootingisstable.
Z\WARNING
Toreducetheriskofanaccident,onlyloosen
thewheelboltsgentlyoneturnbeforeraising
thevehiclewiththevehiclejack*.
355
Page 358 of 394

Emergencyassistance
Raisingthevehicle
B4M-0178
RAZ-0258
Fig.278Sill:positioningthevehiclejack
> Placethevehiclejack*fromthevehicletoolkit
onafirmsurface.Useaflat,stablesupportif
necessary.Onaslipperysurfacesuchastile,
youshoulduseanon-slippadsuchasarubber
mat>/\.
> Findthemarkingonthesillthatisclosestto
thetirethatwillbechanged>fig.277.Behind
themarking,thereisaliftingpointontheside
sillforthevehiclejack*.
>Usingthe hexsocketwrench(3)fromthevehi-
cletoolkit,turnthevehiclejack*undertheLift-
ingpointonthesidesilluntilitishighenough
[email protected]
natedplasticmount.
>Alignthevehiclejack*sothearm@engagesin
thedesignatedliftingpointinthedoorsilland
the base@)liesflatontheground.Thebase(2)
mustbedirectlyunderthemountingpoint(@).
>Toliftthevehicle,positiontheratchet@)from
thevehicletoolkitwiththecorrectsideonthe
hexsocketwrench@).
> Movetheratchet(@)clockwisebackandforth
untilthewheelliftsupslightlyfromthe
ground.
356
ANWARNING
—Makesurethevehiclejack*isstable.There
isariskofinjurywhenthegroundisslippery
orsoft,becausethevehiclejack*couldslide
orsink.
—Onlyraiseyourvehiclewiththevehiclejack*
providedbythefactory.Ifyouuseavehicle
jackdesignedforanothervehicle,yourvehi-
clecouldslipandcauseinjury.
—Positionthevehiclejack*onlyatthedesig-
natedmountingpointsonthesidesilland
alignthejack.Otherwise,thevehiclejack*
couldslipandcauseaninjuryifitdoesnot
have
sufficientholdonthevehicle.
—Vehicleswithairsuspension”:changesin
temperatureorloadcanaffecttheheightof
thestoppedvehicle.
—To reducetheriskofanaccident,neverstart
theenginewhenthevehicleisraised.
—Toreducetheriskofinjury,supportthevehi-
clesecurelywithsuitablestandsifworkisto
beperformedunderneaththevehicle.
ZXWARNING
Tohelppreventinjurytoyourselfandyour
passengers:
—Donotraisethevehicleuntilyouaresure
thejack*issecurelyengaged.
—Passengersmustnotremaininthevehicle
whenitisjackedup.
—Makesurethatpassengerswaitinasafe
place
awayfromthevehicleandwellaway
fromtheroadandtraffic.
—Makesurejackpositioniscorrect,adjustas
necessaryandthencontinuetoraisethe
jack*.
—Ifworkhastobedoneunderthevehicle,en-
surethatitissafelysupportedonsuitable
stands-riskofinjury!
—Neverstarttheenginewhenthevehicleis
onthejack*-riskofaccident!
@)Note
Donotliftthevehiclebythesill.Positionthe
vehiclejack*onlyatthedesignatedmounting
pointsonthesidesill.Otherwise,yourvehicle
couldbedamaged.
Page 359 of 394

4M0012721BG
Emergencyassistance
@Tips
Thevehiclejackmode*switchesoffautomati-
callyatspeedsabove6mph(10km/h).
Removingandinstallingawheel
g
= x
io)gE
Fig.280Wheel:alignmentpininthe tophole
Removingawheel
>Removethetopwheelboltcompletelyusing
thehexsocketinthescrewdriverhandlefrom
thevehicletoolkit>fig.279andplaceitona
cleansurface.
>Theninstallthealignmentpinfromthevehicle
toolkitintheemptywheelboltholebyhand
>fig.280.
»Removetherestofthewheelbolts.
>Removethewheel>(@).Thealignmentpinre-
mainsintheholewhiledoingthis.
Installingawheel
Readthedirectionson>page357wheninstal-
lingunidirectionaltires.
>Slidethewheelonoverthealignmentpin>@.
>Installthewheelboltsandtightenthemgently
usingthehexsocket.
>Removethealignmentpinandtightenthere-
mainingwheelbolt.
>Carefullylowerthevehicleusingthevehicle
jack*.
>Tighten thewheelboltsinadiagonalpattern
usingthewheelwrench.
The wheelboltsmustbecleanandloosenand
tighteneasily.Checkthecontactsurfacesforthe
wheelandhub.Contaminantsonthesesurfaces
mustberemovedbeforeinstallingthewheel.
Z\WARNING
Neverusethehexsocketinthescrewdriver
handleorthehexsocketwrenchwiththe
ratchettoloosenortightenthewheelbolts.
Youwillnotattaintherequiredtightening
specification,whichwillincreasetheriskofan
accident.
CG)Note
Whenremovingorinstallingthe wheel, the
rimcouldhitthebrakerotoranddamagethe
rotor.Workcarefullyandhaveasecondper-
sonhelp you.
(i)Tips
—Whenmountingtireswithunidirectional
treaddesignmakesurethetreadpatternis
pointedtherightway>page357.
—Thewheelboltsshould becleanandeasyto
turn.Checkfordirtandcorrosiononthe
matingsurfacesofboth thewheelandthe
hub.Removealldirtfromthesesurfacesbe-
foreremountingthe wheel.
Unidirectionaltires
Aunidirectionaltireprofileisidentifiedbyarrows
onthetiresidewallthatpointintherunningdi-
rection.Youmustalways maintainthespecified
runningdirection.Thisisnecessarytoensurethe
tire'soptimumperformanceinregardtoadhe-
sion,runningnoise,andfriction,andtoreduce
theriskofhydroplaning.
Tobenefitfullyfromtheadvantagesoftheuni-
directionaltiredesign,youshouldreplacefaulty
tiresassoonaspossibleandrestorethecorrect
runningdirectiononallofthetires.
357
Page 360 of 394

Emergencyassistance
>Reinstallthecapsonthewheelboltsifnecessa-
ry.
>Storethevehicletoolkitinitsdesignated
place.
>Storethereplacedtiresecurelyintheluggage
compartment>page62.
>Checkthetirepressureontheinstalledwheel
assoonaspossible.
>CorrectthetirepressureandstoreitintheIn-
fotainmentsystem>page344.
>Thewheelbolttighteningspecificationmustbe
120ftlbs(160Nm).Haveitcheckeditassoon
as possiblewithatorquewrench.Drivecareful-
lyuntilthen.
>Havethefaultywheelreplacedasquicklyas
possible.
Gi)Tips
—Ifyounoticethatthewheelboltsarecor-
rodedanddifficulttoturnwhilechanginga
tire,theyshouldbereplacedbeforeyou
check thetighteningtorque.
—Driveatreducedspeeduntilyouhavethe
tighteningtorqueschecked.
Notesonwheelchanging
Pleasereadtheinformation>page333ifyou
aregoingtouseareplacementtirewhichisdif-
ferentfromthetiresonyourvehicle.
Afteryouchangeatire:
—Checkthetirepressureonthereplacement
tireimmediatelyafterinstallation.
—Havethewheelbolttighteningtorque
checkedwithatorquewrenchassoonaspos-
siblebyyourauthorizedAudidealerorquali-
fiedworkshop.
— Withsteelandalloywheelrims,thewheel
boltsarecorrectlytightenedat atorqueof
120ftlbs(160Nm).
—Ifyounoticethatthewheelboltsarecorroded
anddifficulttoturnwhilechangingatire,
theyshouldbereplacedbeforeyoucheckthe
tighteningtorque.
358
—Replacetheflattirewithanewone andhave
itinstalledonyourvehicleassoonaspossi-
ble.Remountthewheelcover.
Untilthen,drivewithextracareandatreduced
speeds.
Z\WARNING
—Ifyouaregoingtoequipyourvehiclewith
tiresorrimswhichdifferfromthosewhich
werefactoryinstalled,thenbesuretoread
theinformation>page333.
—Alwaysmakesurethedamagedwheelor
evenaflattireandthejack*andtoolkitare
properlysecuredintheluggagecompart-
mentandarenotlooseinthepassenger
compartment.
—Inanaccidentorsuddenmaneuverthey
couldflyforward,injuringanyoneintheve-
hicle.
—Alwaysstoredamagedwheel,jack*and
toolssecurelyintheluggagecompartment.
Otherwise,inanaccidentorsuddenmaneu-
vertheycouldflyforward,causinginjuryto
passengersinthevehicle.
Page 361 of 394

4M0012721BG
Fusesandbulbs
Afuse thathasblownwillhavemetalstripsthat
haveburnedthrough.
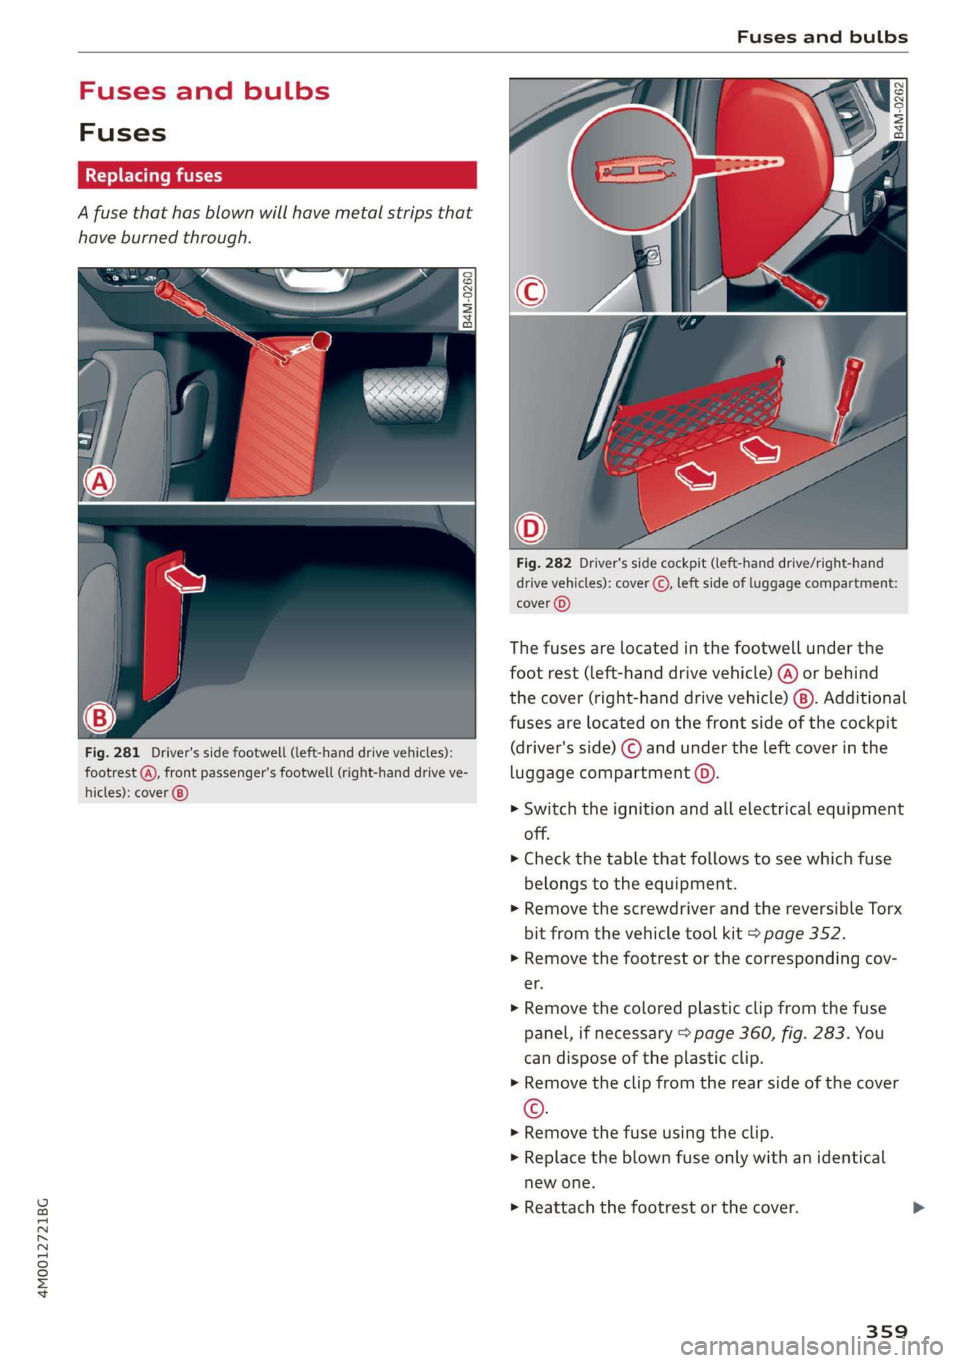
Fig.281Driver'ssidefootwell(left-handdrivevehicles):
footrest rontpassenger'sfootwell(right-handdrive ve-
hicles):cover®)
Fig.282Driver'ssidecockpit(left-handdrive/right-hand
drivevehicles):cover©,leftsideofluggagecompartment:
cover()
Thefusesarelocatedinthefootwellunderthe
footrest(left-handdrivevehicle)(@)orbehind
thecover(right-handdrivevehicle)
fusesarelocatedonthefrontsideofthecockpit
(driver'sside)©andundertheleftcoverinthe
luggagecompartment©
>Switchtheignitionandallelectricalequipment
off.
»Checkthetablethatfollowstoseewhichfuse
belongstotheequipment.
>RemovethescrewdriverandthereversibleTorx
bitfromthevehicletoolkit>page352.
>Removethefootrestorthecorrespondingcov-
er.
>Removethecoloredplasticclipfromthefuse
panel,ifnecessary>page360,fig.283.You
candisposeoftheplasticclip.
>Removetheclipfromtherearsideofthecover
(Cc).
>Removethefuseusingtheclip.
>Replace theblownfuseonlywithanidentical
newone.
»Reattachthefootrestorthecover.
359
Page 362 of 394

Fusesandbulbs
Fusecoloridentification
ColorCurrentrating
inamps
Black1
Purple3
Lightbrown5
Brownes)
Red 10
BlueiS
Yellow20
Whiteortransparent/|25
Green30
Orange40
ZAWARNING
Donotrepairfusesandneverreplaceablown
fusewithonethathasahigheramprating.
Thiscancausedamagetotheelectricalsys-
temandincreasestheriskoffire.
cyNote
Ifanewfuseburnsoutagainshortlyafteryou
haveinstalledit,havetheelectricalsystem
checkedassoonaspossibleby anauthorized
AudidealerorauthorizedAudiServiceFacili-
ty.
G)Tips
—Thefollowingtabledoesnotlistfuseloca-
tionsthatarenotused.
—Someoftheequipmentlistedinthefollow-
ingtablesappliesonlytocertainmodelver-
sionsorcertainoptionalequipment.
360
Fuseassignment-driver's/front
passenger'sfootwell
Fig.283Driver'sfootwell(left-handdrivevehicle):fuse
panelwithplasticclip
2
Fig.284Frontpassenger'sfootwell(right-handdrive vehi-
cle):fusepanelwithplasticclip
2
=
g|
== a
B4M-0147
>