2019 AUDI E-TRON timer
[x] Cancel search: timerPage 86 of 310

Warm and cold
between switching the ignition off and on
again.
— Only use the fragrance function* in modera-
tion and take any other passengers and ani-
mals into consideration when using the
function.
— An overlap of different scents or odors could
cause discomfort.
— If there is discomfort, reduce the intensity
or switch the fragrance function* off.
— Only use fragrances that are approved by
Audi.
Adjusting the vents
You can open and close the vents using the
thumbwheels. The levers adjust the direction of
the airflow from the vents.
Additional settings
You can adjust additional settings.
> Applies to: MMI: Select on the home screen:
VEHICLE > Air conditioning > ©.
Fragrance
Applies to: vehicles with fragrance function
Using Fragrance selection, you can select the fra-
grance and see the fill level of the fragrance.
You can select the strength of the scent with Fra-
grance level.
Footwell temperature*
You can adjust the footwell temperature for the
driver and front passenger.
NIM ia alee
Applies to: vehicles with air quality display
You can display information about the air quality.
> Applies to: MMI: Select on the home screen:
VEHICLE > Air conditioning > Air quality.
Pollutant filter
A pollutant filter cleans the air in the vehicle inte-
rior when the blower is switched on.
A schematic display represents the effectiveness
of the filter. The display visualizes the amount of
pollutant particles in the vehicle interior in com-
parison to the surroundings.
G) Tips
For optimal air quality in the vehicle interior,
close all windows and doors and activate A/C
cooling mode, the AUTO function, and recircu-
lation mode.
Auxiliary climate control
Applies to: vehicles with auxiliary climate control
The auxiliary climate control switches on depend-
ing on the outside temperature and the tempera-
ture set in the climate control system. You can
switch the climate control on or off immediately
as well as set a timer in the MMI.
Requirement: the charge level of the high-volt-
age battery must be sufficient.
G) Tips
— The temperature that the auxiliary climate
control adjusts to depends on the last tem-
perature that was set.
— Using the auxiliary climate control while
charging can also reduce the charge level of
the high-voltage battery.
— Starting or stopping the vehicle will not
switch off the auxiliary climate control auto-
matically.
Applies to: vehicles with auxiliary climate control
Select on the home screen: VEHICLE > Air condi-
tioning > F
Immediate start
You can immediately switch the auxiliary climate
control on and off using the F button. When this
function is switched on, a colored bar lights up
over the button and the remaining time is dis-
played.
Page 87 of 310

4KE012721BB
Warm and cold
The auxiliary climate control will run for a maxi-
mum of 30 minutes after the immediate start.
Timer programming
You can set up to two timers for the departure
time. Each one of the timers can be activated.
> Select one timer.
> Set the date and select Next.
>» Set the time (departure time) and select OK.
> Activate the timer with CD.
By setting the departure time, you determine
when your vehicle should reach the desired tem-
perature. The departure time can be a maximum
of six days in the future. The auxiliary climate
control will continue to run approximately ten
minutes after the departure time is reached.
After switching off the ignition
Information about the active timer(s) will appear
on the upper display after switching off the igni-
tion. You can start the set climate control set-
tings immediately with the § button, or go to the
auxiliary climate control menu with the > button.
@ Tips
— Make sure the time and date match in the
system settings so that the timer can func-
tion correctly > page 231.
— The auxiliary climate control can also be
switched on and off immediately when a
timer is set.
— The auxiliary climate control can continue to
run after the departure time is reached.
— You can operate the climate control in the
vehicle interior using the charging timer
while the high-voltage battery is charging.
The climate control output depends on the
power socket capacity.
Additional settings
> Applies to: MMI: Select on the home screen:
VEHICLE > Air conditioning > Auxiliary air con-
ditioning > ©.
Start air conditioning after unlocking*
If this function is activated, the climate control
will continue to run for five minutes after the ve-
hicle has been unlocked.
Comfort auxiliary air conditioning*
Applies to: vehicles with comfort auxiliary climate control
You can set if the steering wheel heating* and
seat heating or seat ventilation should also be
automatically activated with auxiliary climate
control. You can select the respective zones.
Automatic glass surface defogging*
Applies to: vehicles with comfort auxiliary climate control
You can set if the rear window and mirrors should
also be heated during auxiliary climate control.
2 There is a malfunction in the auxiliary air
conditioning.
If this message appears, there is a system mal-
function. Drive immediately to an authorized Au-
di dealer or authorized Audi Service Facility to
have the malfunction repaired.
8s
Page 108 of 310

High-voltage system
Charging at household and industrial sockets
or at public charging stations with
alternating current (AC)
The vehicle's high-voltage battery can be charged
with alternating current (AC) via the charging
port (5). Depending on the vehicle equipment,
there may be a second charging port ©) on the
opposite side of the vehicle. Both charging ports
have the same charging power. You can use
whichever charging port is more convenient for
your charging setup. When using one charging
port, the opposite charging port is locked.
Quick charging at public direct current (DC)
charging stations
The vehicle’s high-voltage battery can be charged
at a direct current (DC) charging station via the
charging port on the driver's side (). There is a
significant decrease in charging time. The charg-
ing cable being used may be a maximum of 30 m.
Charging time
The duration of the charging process may vary
based on the following factors:
— Sockets being used (household or industrial
sockets)
— Country-specific system voltage, current
strength and number of available phases
— Household connection
— The value set for the charging power level on
the Audi charging system control unit
— Fluctuations in the system voltage
— The temperature outside the vehicle
— The temperature of the high-voltage battery
and the Audi charging system control unit.
— Settings for the climate control inside the vehi-
cle
— Current capacity of the charging connector
— Whether the ignition is on or off
ec e laa eed
ZA\ WARNING
Short circuiting, electric shock, explosions,
fire and severe burns can result from not
charging the battery correctly (for example,
disregarding general safety precautions, using
unsuitable or damaged sockets and charging
cables, and charging at an unsuitable electri-
cal equipment) and can lead to serious and fa-
tal injuries.
— Only charge at sockets that are installed cor-
rectly, that are tested and that are not dam-
aged, or at electrical equipment that is func-
tioning correctly.
— Never use damaged and/or dirty charging
equipment. Check the charging equipment
for damage before every use.
— Never modify or repair any electrical compo-
nents, especially the high-voltage system.
— Never charge in areas at risk for explosions.
The components in the charging equipment
can trigger sparks, which can cause flamma-
ble or explosive fumes to ignite. To reduce
the risk of explosions, especially in garages,
make sure the Audi e-tron charging system
control unit is at least 19 inches (50 cm)
above the floor when charging.
— Never use the charging equipment with an
extension cord, a cable reel, a power strip,
or an adapter, for example, a travel adapter
or timer.
— Do not touch the contacts on the vehicle
charging port or charging equipment.
— Do not insert any objects in the vehicle
charging port or in the charging equipment.
— Always protect the sockets and connections
from water, moisture and other fluids.
— Never charge with both vehicle charging
ports at the same time.
— Only use the charging equipment provided
by the factory or the charging station cable.
Z\ WARNING
Applies to: Audi charging systems
Sockets that are installed incorrectly can
cause electric shock or fire when charging the
high-voltage battery using the vehicle charg-
ing connection.
— Read all information and safety precautions
for Audi charging systems before using
them.
— Monitor the Audi charging system if it is be-
ing used near children.
106
Page 110 of 310

High-voltage system
Charging
Fig. 89 Opening the charging unit cover (example: left side
of the vehicle)
Fig. 90 Charging unit: charging port and LED (example)
Connecting the charging cable
Requirement: the “P” gear must be selected, the
parking brake must be set, and drive ready mode
must have ended.
— If necessary, remove the charging cable from
the vehicle > page 113, Transport.
— Remove the cap from the charging cable if nec-
essary.
— First connect the charging cable to the power
supply, or remove it from the charging station.
— Unwind the charging cable completely.
— Unlock the vehicle.
— Press the center of the button @ to open the
charging unit cover on the driver's side or front
passenger's side.
— If you would like to use quick charging at public
direct current (DC) charging stations, open the
charging port cover (4).
— Plug the charging connector into the vehicle
charging port.
108
Starting to charge automatically (immediate
charging)
If charging is not delayed with a timer, the charg-
ing process will begin immediately. If necessary,
the charging station may need to be activated.
Follow the manufacturer guidelines and operat-
ing instructions for the charging station.
You can also adjust the charging process to your
preferences > page 110, Setting the charging
target, > page 111, Setting the timer,
=> page 111, Advanced charging settings.
While charging
The charging display on the charging unit @) will
pulse green while charging. It will pulse & in
the instrument cluster. A label on the charging
unit @) informs you about the various displays
=> page 109.
Depending on the selected view > page 12, the
following information about the charging process
is displayed in the instrument cluster:
— GY: range
— IK: remaining charging time until the charging
process is complete
— ©: current battery charge level
— ©: date and time of when the charging process
was completed
—(&: charging speed (additional range per hour)
—4: charging power (depends on the selected
power source)
To access the charging process information at a
later time, select in the instrument cluster: Vehi-
cle functions tab > [=] button > Charging.
The charging connector is locked while charging
and cannot be removed.
Canceling or completing charging
You can interrupt the charging process at any
time.
— Unlock the vehicle.
— Press the center of the button @.
— Remove the charging connector. If the charging
connector is not removed within 30 seconds, it
will automatically relock and the charging proc-
ess may continue.
Page 111 of 310
4KE012721BB
High-voltage system
—If the battery has been charged to the desired
level, the charging unit cover will automatically
relock. Otherwise, the cover must be manually
locked. To do this, press the center of the but-
ton @,.
— Disconnect the charging cable from the power
supply if necessary or return it securely to the
charging station.
— Install the protective caps on the charging ca-
ble again.
— If you are transporting the charging cable in
the vehicle, store it securely > page 113.
If the charging connector cannot be removed,
you must unlock it manually > page 111.
ing, drive immediately to an authorized Audi
dealer or authorized Audi Service Facility
and have the malfunction corrected to re-
duce the risk of injury.
ZA WARNING
— When closing the cover on the charging
unit, make sure the area where the cover is
closing is clear to reduce the risk of injury.
— Do not disconnect the charging cable from
the socket or the vehicle charging port while
the vehicle is charging. End the charging
process before removing the charging cable
from the socket in order to reduce the risk of
damaging the connector contacts from
sparks.
— Never drive with the charging unit open. If
the cover on the charging unit is open, it
could hit other road users and potentially
cause injury.
— If a charging unit is damaged, the vehicle
must not be charged at the damaged charg-
ing port or at the charging port on the other
side* to reduce the risk of injury.
— If the charging unit is damaged or the
charging unit cover cannot close or is miss-
@) Note
— If you drive with an open charging unit, both
the cover and the electronics installed be-
hind it could be damaged. Check before ev-
ery drive after charging if the cover is
locked.
— Applies to: vehicles with charging ports on
the driver and front passenger’s side: Never
attempt to charge the vehicle using both
charging ports at the same time, because
this could damage the charging infrastruc-
ture.
(i) Tips
— Applies to: MMI: in addition to other set-
tings, you can also select if the charging
connector should be released automatically
after the immediate charging process is
complete. To do this, select on the home
screen: VEHICLE > Charging & Efficiency >
Charging > <3 > DC connector: unlock after
charging ends.
— The parking brake may make noises when
connecting the charging connector.
— Remove ice and snow in the charging unit
using a hand brush and solvent-free deicing
spray.
— The vehicle radio and TV systems may have
limited reception when charging the vehicle.
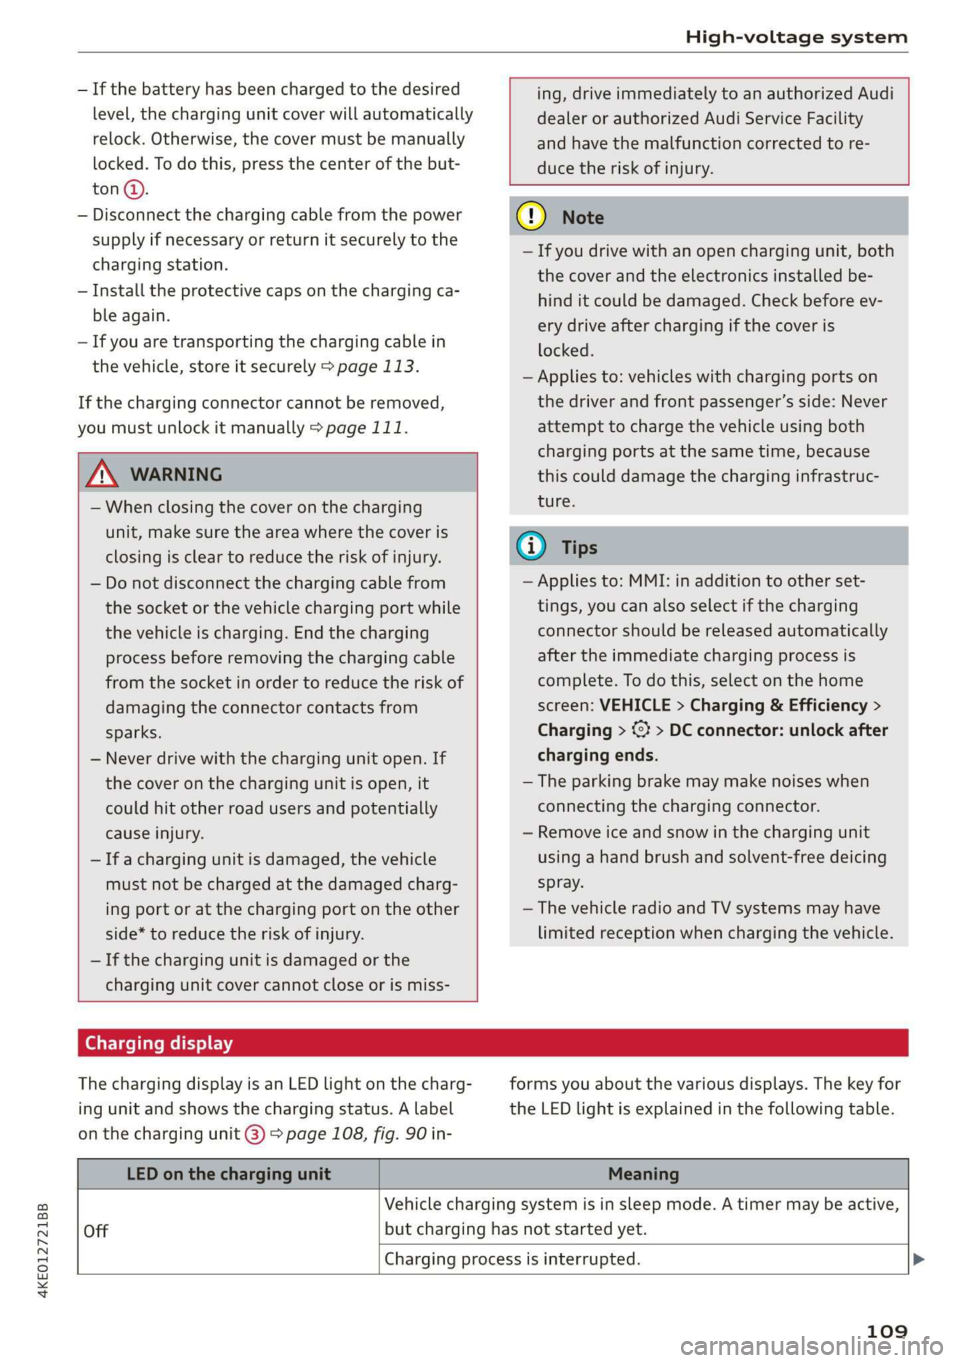
Charging display
The charging display is an LED light on the charg-
ing unit and shows the charging status. A label
on the charging unit @) > page 108, fig. 90 in-
forms you about the various displays. The key for
the LED light is explained in the following table.
LED on the charging unit Meaning
Vehicle charging system is in sleep mode. A timer may be active,
Off but charging has not started yet.
Charging process is interrupted. >
109
Page 112 of 310

High-voltage system
LED on the charging unit Meaning
White Pulsing
Connection between the power source and the vehicle is being
established.
Green
Pulsing The high-voltage battery is charging.
Flashing A timer is active, but charging has not started yet.
On High-voltage battery charging process is completed.
Yellow
On
No power supply was recognized even though the charging cable
is plugged in. Have the power supply or power supply system in-
spected. When using the Audi charging system, check the status
displays on the unit > table on page 115. See an authorized Au-
di dealer or authorized Audi Service Facility for assistance if nec-
essary.
Flashing
The vehicle is not secured from rolling away. Check if “P” is en-
gaged and the parking brake is set. If the LED continues to
flash, see an authorized Audi dealer or authorized Audi Service
Facility for assistance.
Red
On
The charging connector may not be able to lock correctly in the
vehicle charging port. Check if the charging connector is insert-
ed correctly. Remove the charging connector and plug it in the
charging port again, or use a different charging station. If the
LED stays turned on, there is a malfunction either in the vehicle
charging system or at the power source. See an authorized Audi
dealer or authorized Audi Service Facility for assistance if neces-
sary.
Both charging unit covers are open. Try to close one of the cov-
ers by hand. If the LED stays turned on, the high-voltage battery
may not be charging. See an authorized Audi dealer or author-
ized Audi Service Facility for assistance.
The outside temperature is too low or too high.
@ Tips
The operation status indicated by the LED on
> Applies to: MMI: Select on the home screen:
VEHICLE > Charging & Efficiency > Charging.
>» When the timer is displayed, swipe your finger
the charging unit are is displayed in the in-
strument cluster gy.
Setting the charging target
You can set the charging target, meaning you can
set the maximum charge level to which the high-
voltage battery should be charged. The charging
target can be set between 50% and 100%. For
daily usage, Audi recommends setting the charg-
ing target at 80%. This can extend the service life
of the high-voltage battery. Before long trips, Au-
di recommends setting the charging target at
100% for the highest possible range.
110
on the display toward the right.
> Press on the right section of the battery charge
level display.
> Set the desired charging target.
G) Tips
If you set the charging target lower than the
current battery charge level while charging,
then the charging process will be canceled. If
you set the charging target above the current
battery charge level again, then the charging
process will resume. This does not apply if you
are charging at a charging station, where you
have authenticated yourself manually. If this >
Page 113 of 310

4KE012721BB
High-voltage system
is the case, authenticate yourself again at the
charging station.
Sytem nas
By setting a timer, you determine when your vehi-
cle should reach the desired charging target.
When the timer is activated, it will be run regu-
larly at the set time. In addition to the charging
target, you can also specify if your vehicle should
be heated or cooled to the temperature set in the
climate control system. You can turn on multiple
timers at the same time. The active timer is indi-
cated by the respective number in © in the upper
section of the display.
> Applies to: MMI: Select on the home screen:
VEHICLE > Charging & Efficiency > Charging.
> When the charging target is displayed, swipe
your finger on the display toward the left.
Multiple timers are displayed that you can set
separately.
> To set a timer, select > in the line for the de-
sired timer.
> Select one ore more days of the week and select
Next.
> Set the desired departure time and select OK.
> To also activate the climate control with a tim-
er, select F.
> To turn ona timer, select CD.
> To activate the timer that is turned on, select
©. A colored bar will turn on in the button.
If the set departure time for the timer is too
soon, the desired charging target may not be
reached.
G) Tips
It is not possible to charge using the timer at
some charging stations.
Advanced charging settings
With the advanced charging settings, you can de-
fine
addresses at which certain charging settings
should apply (for example, charging target, mini-
mum charge). If your vehicle is in the vicinity of
the address, the charging settings will be auto-
matically applied.
> Applies to: MMI: Select on the home screen:
VEHICLE > Charging & Efficiency > Charging >
<2} > Advanced charging settings.
> To define new settings for a certain address, se-
lect +. Follow the instructions in the display.
> To edit existing settings for a certain address,
press the respective button.
> To delete existing settings for a certain ad-
dress, select Z.
Emergency release
You can release the charging unit cover or the
charging connector manually.
Fig. 91 Motor compartment: emergency release
Charging unit cover emergency release
> Open the hood > page 236.
> Open the cover in the motor compartment on
the side of the applicable charging port.
> Loosen the red loop (@ from the retainer and
then pull on the loop carefully >@.
> If necessary, open the charging unit cover by
hand.
Manually releasing the charging connector
If you are not able to pull the charging connector
out of the vehicle charging port, there may bea
malfunction. You must use the emergency re-
lease to release the vehicle charging connector.
Requirement: the “P” gear must be selected, the
vehicle must be unlocked, and the charging proc-
ess must be complete or must have been can-
celed.
> End the charging process > page 108, Cancel-
ing or completing charging.
> Open the hood & page 236.
111
Page 189 of 310

4KE012721BB
Audi connect
services. The cell phone network, for exam-
ple, must be available to use these services.
Applies to: vehicles with Audi connect vehicle control
> Register at my.audi.com.
> Set the key user > page 28.
> Install the myAudi app on your mobile device
and log in with your login information.
G@) Tips
It may also be necessary to enter your 4-digit
PIN set at my.audi.com when accessing some
Audi connect vehicle control services.
Yate]
Applies to: vehicles with Audi connect vehicle control
Depending on the country and the vehicle equip-
ment, the following services may be available:
Remote locking and unlocking
Requirement: the vehicle must be parked and the
ignition must be switched off.
This service allows you to unlock or lock your ve-
hicle.
Vehicle status report
This service transfers driver information system
data to a server. Depending on the vehicle equip-
ment, certain data may be accessed, such as the
remaining range or mileage. The values may dif-
fer from the values displayed in the vehicle.
Car Finder
This service transmits the parking location to a
server when the ignition is switched off. The vehi-
cle location, your location, or the route to your
vehicle can be displayed. The new parking loca-
tion cannot be determined with this service if the
vehicle is moved after shutting the vehicle off
and without switching the ignition on and off
again, for example if the vehicle is towed or sto-
len.
Online Audi service request
Requirement: the service must be activated on-
line at my.audi.com and an authorized Audi deal-
er or authorized Audi service facility must be se-
lected.
This service transmits service-relevant data to
your selected authorized Audi dealer or author-
ized Audi service facility. They will contact you
before your next service appointment.
Stolen Vehicle Locator
This service assists you in locating your vehicle if
it is stolen.
— Contact the police. You receive a Case ID.
— Call the service hotline and give your Case ID.
The service hotline will forward the established
data to the police. You receive the Audi Service
hotline number when you purchase your vehicle.
Trip data
Depending on the vehicle equipment, certain
driver information system data is transmitted to
a server. An overview of your trips with the values
from the short-term memory/long-term memory
can be displayed, for example, the driving dura-
tion. The values may differ from the values dis-
played in the vehicle.
Remote charging
Requirement: the ignition must be switched off
when changing the charging mode.
You can start the charging process remotely with
the service.
— Charging mode: immediate charging or delayed
charging (timer)
— Program the timer
— Deactivate or activate the timer
For additional information, see > page 105.
Auxiliary climate control
Requirement: the ignition must be switched off
when starting or stopping climate control.
You can control the climate control in your vehi-
cle remotely using these services.
187
>