Page 89 of 196
 USING THE MANUAL
GEARBOX
To engage the gears, fully depress the
clutch pedal and put the gear lever
into the required position (the diagram
is shown on the knob fig. 76).
113)
21)
To engage reverse R")
USING THE MANUAL
GEARBOX
To engage the gears, fully depress the
clutch pedal and put the gear lever
into the required position (the diagram
is shown on the knob fig. 76).
113)
21)
To engage reverse R from neutral,
move the lever to the right and then
backwards.
IMPORTANT Reverse can only be
engaged when the vehicle is completely
stationary. With the engine running,
wait for at least 2 seconds with the
clutch pedal fully pressed before
engaging reverse to prevent damage to
the gears and grating.
WARNING
113)Press the clutch pedal fully to change
gears correctly. It is therefore essential
that there is nothing under the pedals:
make sure the mats are lying flat and do
not get in the way of the pedals.
WARNING
21)Do not drive with your hand resting on
the gear lever as the force exerted, even
if slight, could lead over time to premature
wear of the gearbox internal components.
USING THE
ROBOTISED
SEQUENTIAL
TRANSMISSION
(where provided)
The car can be equipped with an
electronically controlled manual
transmission that allows two operating
modes: “MANUAL” and “AUTO”.
With the car stationary and the key at
MAR (ignition-operated electrical
services on), the screen displays the
engaged gear and the active operating
mode (automatic = AUTO or manual
= no display).
76AB0A0301C77AB0A0334C
87
Page 90 of 196
 STARTING THE CAR
NOTES
On starting, the system sets itself to
AUTO mode.
Using the 1, N, R buttons with the
brake pedal pressed, 1stgear, neutral
(N) or reverse (R) can be engaged.
Using the 1, N, R b")
STARTING THE CAR
NOTES
On starting, the system sets itself to
AUTO mode.
Using the 1, N, R buttons with the
brake pedal pressed, 1stgear, neutral
(N) or reverse (R) can be engaged.
Using the 1, N, R buttons without
pressing the brake pedal, the system
does not change gear.
The levers on the steering wheel will
not engage any gear, even with the
brake pedal pressed.
If the car is switched off with SPORT
or NORMAL modes active, the mode
previously set is kept when the engine
is restarted.
OPERATING MODE
The transmission can function in two
operating modes:
the first is manual (MANUAL). In this
mode the driver decides directly when
to shift, using the "+” fig. 78 lever on
the steering wheel to shift up, or the "–"
to shift down. If the request is accepted
by the system, when the gear change
is completed, the display shows the
new gear engaged.
the second, completely automatic
(AUTO), in which the system decides
when to change gear. A gear change
can be requested using the control
lever without having to deactivate this
mode: this function, known as “gear
suggestion”, suspends the automatic
mode for the time necessary to select
the gear requested by the driver.
22)
To turn automatic operation (AUTO) on,
press the A/M button on the gearbox
panel fig. 77; when it is on, the word
AUTO and the engaged gear are shown
on the display. When AUTO mode is
deactivated, the transmission passes to
MANUAL mode.
“Kick Down” function
The "Kick Down" function is also
available: if necessary (for example
when overtaking), pressing the
accelerator pedal fully over the
hardening point, the system downshifts
one or more gears (if the rpm allows
it) in order to provide suitable power
and torque for the acceleration
requested by the driver.
STARTING THE ENGINE
To start the engine press the brake
pedal: the system engages neutral (N)
automatically. When the starting
procedure is complete, you can hold
the brake pedal down and press the 1
or R buttons on the transmission panel
to engage 1
stor reverse (R) gear
respectively.
MOVING THE CAR
You may set off in the car in both 1st
gear and 2ndgear (advisable on road
surfaces with poor grip) and also in
reverse gear (R). The gears can only be
engaged by pressing the brake pedal.
Proceed as follows:
press the brake pedal;
press the 1 button on the gearbox
panel;
operate the “+” shift paddle while
holding down the brake pedal (only for
setting off in 2
ndgear);
78AB0A0335C
88
STARTING AND DRIVING
Page 91 of 196
 release the brake pedal and press
the accelerator pedal (quickly pressing
the pedal fully down and turning off
the ASR, if provided, results in a “lively”
departure).
Engaging reverse gear (R)
To")
release the brake pedal and press
the accelerator pedal (quickly pressing
the pedal fully down and turning off
the ASR, if provided, results in a “lively”
departure).
Engaging reverse gear (R)
To engage reverse gear, press the R
button on the gearbox panel instead of
the 1 button.
Engaging neutral (N)
Press the (N) button to engage neutral.
Neutral (N) can only be engaged with
accelerator pedal released, regardless
of the brake pedal’s status (pressed
or not). In any case, pressing the brake
pedal is recommended.
ACOUSTIC SIGNAL
For safety reasons, there is a buzzer
warning when parking the car with the
gearbox in neutral (N) (the warning is
heard when the ignition key is turned to
the STOP position).
With the car stationary, the engine
running and (1
st), (2nd) or (R) engaged,
the system activates the buzzer and
automatically puts the transmission in
neutral (N) when:
the accelerator and/or brake pedal
are not operated for at least 3 minutes;
the brake pedal is pressed for longer
than 10 minutes;
the driver's door is opened and the
accelerator pedal or the brake pedal
are not operated for at least 1.5
seconds;
a fault has been detected in the
transmission.
PARKING THE CAR
To park safely, you must engage 1stor
reverse (R) gear, with your foot on
the brake pedal and, if there is a
gradient, operate the handbrake. Wait
until the indication of the gear engaged
disappears on the display before
releasing the brake pedal.
IMPORTANT NEVER leave the car with
the transmission in neutral (N).
IMPORTANT NOTES
With car stationary and gear
engaged, always keep the brake pedal
pressed until you decide to set off,
then release the brake and accelerate
gradually.
During prolonged stops with the
engine running, it is advisable to keep
the transmission in neutral (N).
In order to safeguard the efficiency
of the clutch, do not use the
accelerator to keep the car stationary
(e.g. when stopped on an incline); if the
clutch overheats it could be damaged.
Use the brake pedal or the handbrake
instead and use the accelerator pedal
only when you decide to set off.
Only use 2ndgear when you need
greater control for setting off on
surfaces with poor grip.
If you have to engage 1stgear with
reverse gear (R) engaged, or vice versa,
only do so when the car is completely
stationary and with the brake pedal
pressed.
Although it is strongly inadvisable, if
you are driving downhill and, for
unexpected reasons, you let the car
move forward with the transmission in
neutral (N), when there is a request
to engage a gear, depending on the
actual speed of the car, the system will
automatically engage the best gear
for the correct transmission of drive
torque to the wheels.
89
Page 92 of 196
 When necessary, you can engage
1stgear, reverse (R) or neutral (N) with
the engine off, the key at AVV and
the brake pressed. In this case, it is
advisable to change allowing at least 5
seconds to ela")
When necessary, you can engage
1stgear, reverse (R) or neutral (N) with
the engine off, the key at AVV and
the brake pressed. In this case, it is
advisable to change allowing at least 5
seconds to elapse between one gear
change and the next to safeguard
the operation of the hydraulic system
and the pump in particular.
Fully and quickly depressing the
accelerator pedal activates a function
that allows a "lively" departure.
For starting uphill, accelerating
gradually but fully immediately after
having released the handbrake or the
brake pedal allows the engine to greatly
increase the rpm and tackle the
steepest gradients with more torque to
the wheels.
WARNING
22)Using the levers incorrectly (levers
pushed towards the dashboard) could
break them.
SPORT FUNCTION
When the SPORT button 1 fig. 79 is
pressed, the sports driving setting
is turned on giving greater
responsiveness during acceleration, an
increase in drive torque and more
precise steering with greater effort
required on the steering wheel.
When this function is on, the word
SPORT 1 fig. 80 is lit up in the display
and the instrument panel shows a
dedicated screen.
Press the button again to turn the
function off and restore the normal
driving setting.
IMPORTANT When the SPORT button
is pressed, the function is activated
about 5 seconds later.IMPORTANT During acceleration, when
the SPORT function is used, the
steering may shudder, which is typical
of a sports setting.
NOTE For vehicles equipped with an
Akrapovic exhaust system, a
considerable increase in engine sound
can be heard when the SPORT mode is
activated. This is caused by opening
the valve located in the Akrapovic
exhaust, which improves performance.
79AB0A0351C
80AB0A0360C
90
STARTING AND DRIVING
Page 93 of 196
 PARKING SENSORS
(where provided)
Parking sensors are located in the rear
bumper to detect and inform the driver,
through an acoustic and visual warning,
of the presence of obstacles at the
rear part o")
PARKING SENSORS
(where provided)
Parking sensors are located in the rear
bumper to detect and inform the driver,
through an acoustic and visual warning,
of the presence of obstacles at the
rear part of the car. The sound may be
intermittent or continuous depending
on the distance from the obstacle.
ACTIVATION
The sensors are automatically activated
when reverse gear is engaged. As the
obstacle behind the vehicle gets closer
to the car, the acoustic signal becomes
more frequent.
ACOUSTIC SIGNAL
When reverse gear is engaged and
there is an obstacle behind the car, an
acoustic warning is activated. The
frequency of the acoustic warning
increases as the distance between the
obstacle and the bumper decreases,
becoming continuous when the
distance is less than 30 cm.
Detection distances
If several obstacles are detected by the
sensors, only the nearest one is
considered.When parking, take the utmost care
over obstacles that may be above
or under the sensor.
Objects close to the car are not
detected under certain circumstances
and could therefore cause damage
to the car or be damaged.
114)
23) 24)
INDICATIONS ON
DISPLAY
When the sensors are activated, the
screen shown in fig. 81 appears on the
display.In addition to the acoustic warning,
information about the presence and
distance from the obstacle is given
visually on the instrument panel display.
The coloured arcs at the rear of the
car indicate that an obstacle has been
detected. The system indicates a
detected obstacle by displaying an arc
according to the distance of the
obstacle and its position in relation to
the car. If an objects is detected to the
rear of the car (to the side or at the
centre), the display shows an flashing
arc in the corresponding zone and
an intermittent sound is emitted. As the
car approaches the object, the display
shows one or more flashing arcs that
approach the car, and the sound
becomes more frequent until it
becomes continuous. The colour on the
display depends on the distance from
and position of the obstacle. As the
distance between the car and obstacle
decreases, the arcs change from yellow
to flashing red (to the right, at the
centre or to the left).
81AB0A0390C
91
Page 94 of 196
 WARNING
23)For correct operation of the system,
sensors must always be clean from mud,
dirt, snow or ice. Be careful not to scratch
or damage the sensors while cleaning
them. Avoid using dry, rough or")
WARNING
23)For correct operation of the system,
sensors must always be clean from mud,
dirt, snow or ice. Be careful not to scratch
or damage the sensors while cleaning
them. Avoid using dry, rough or hard
cloths. The sensors must be washed using
clean water, with the addition of vehicle
shampoo if necessary. When using special
washing equipment such as high pressure
jets or steam cleaning, clean the sensors
very quickly keeping the jet more than
10 cm away.
24)Have interventions on the bumper in
the area of the sensors carried out only by
an Abarth Dealership. Interventions on
the bumper that are not carried out
properly may compromise the operation of
the parking sensors.
WARNING
114)Parking and other dangerous
manoeuvres are, however, always the
driver’s responsibility. While carrying out
these manoeuvres, always make sure that
no people (especially children) or animals
are in the area concerned. The parking
sensors are an aid for the driver, but the
driver must never allow their attention
to lapse during potentially dangerous
manoeuvres, even those executed at low
speeds.
REFUELLING THE
VEHICLE
Stop the engine before refuelling.
IMPORTANT Never introduce leaded
petrol to the tank, even in small
amounts in an emergency, as this
would damage the catalytic converter
beyond repair.
REFUELLING CAPACITY
To ensure that you fill the tank
completely, top up twice after the first
click of the fuel supply gun. Further
top-ups could cause faults in the fuel
supply system.
FUEL TANK CAP
Plug 2 fig. 82 is fitted with a cable that
secures it to flap 1 so that it cannot
be lost.Unscrew cap 2 using the ignition key.
The sealing may cause a slight pressure
increase in the tank. A little breathing
off, while slackening the cap is
absolutely normal. When refuelling,
fasten the plug to the device inside the
flap as shown in fig. 82.
115)
82AB0A0058C
92
STARTING AND DRIVING
Page 95 of 196
Fuels - identification of
vehicle compatibility.
Graphic symbol for
consumer information in
accordance with
EN16942
The symbols shown below facilitated
recognising the correct fuel type to
be used on your car.
Before proceeding with refuelling,
check the symbols inside the fuel filler
flap (where provided) and compare
them with the symbols shown on the
fuel pump (where provided).
Symbols for petrol powered cars
E5:Unleaded petrol containing up to
2.7% (m/m) oxygen and with maximum
5.0% (V/V) ethanol compliant with
EN228.
E10:Unleaded petrol containing up to
3.7% (m/m) oxygen and with maximum
10.0% (V/V) ethanol compliant with
EN228.
WARNING
115)Do not approach naked flames or lit
cigarettes to the fuel tank filler: fire risk.
Keep your face away from the fuel filler to
prevent breathing in harmful vapours.
93
Page 96 of 196
IN AN EMERGENCY
A punctured tyre or a burnt-out bulb?
At times, a problem may interfere
with our journey.
The pages on emergencies can help
you to deal with critical situations
independently and with calm.
In an emergency we recommend that
you call the freephone number found in
the Warranty Booklet.
It is also possible to call the 00 800
3428 0000 freephone number to
search the nearest Abarth Authorised
Dealership.HAZARD WARNING LIGHTS........... 95
CHANGING A BULB ....................... 95
REPLACING AN EXTERIOR BULB ..100
REPLACING FUSES........................103
“FIX&GO” KIT ..................................108
JUMP STARTING ............................110
FUEL CUT-OFF SYSTEM ................111
TOWING THE VEHICLE ..................112
94
IN AN EMERGENCY
 1
1 2
2 3
3 4
4 5
5 6
6 7
7 8
8 9
9 10
10 11
11 12
12 13
13 14
14 15
15 16
16 17
17 18
18 19
19 20
20 21
21 22
22 23
23 24
24 25
25 26
26 27
27 28
28 29
29 30
30 31
31 32
32 33
33 34
34 35
35 36
36 37
37 38
38 39
39 40
40 41
41 42
42 43
43 44
44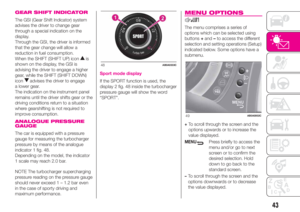 45
45 46
46 47
47 48
48 49
49 50
50 51
51 52
52 53
53 54
54 55
55 56
56 57
57 58
58 59
59 60
60 61
61 62
62 63
63 64
64 65
65 66
66 67
67 68
68 69
69 70
70 71
71 72
72 73
73 74
74 75
75 76
76 77
77 78
78 79
79 80
80 81
81 82
82 83
83 84
84 85
85 86
86 87
87 88
88 89
89 90
90 91
91 92
92 93
93 94
94 95
95 96
96 97
97 98
98 99
99 100
100 101
101 102
102 103
103 104
104 105
105 106
106 107
107 108
108 109
109 110
110 111
111 112
112 113
113 114
114 115
115 116
116 117
117 118
118 119
119 120
120 121
121 122
122 123
123 124
124 125
125 126
126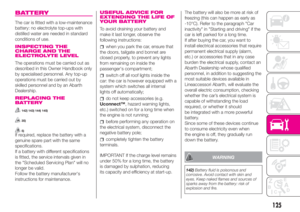 127
127 128
128 129
129 130
130 131
131 132
132 133
133 134
134 135
135 136
136 137
137 138
138 139
139 140
140 141
141 142
142 143
143 144
144 145
145 146
146 147
147 148
148 149
149 150
150 151
151 152
152 153
153 154
154 155
155 156
156 157
157 158
158 159
159 160
160 161
161 162
162 163
163 164
164 165
165 166
166 167
167 168
168 169
169 170
170 171
171 172
172 173
173 174
174 175
175 176
176 177
177 178
178 179
179 180
180 181
181 182
182 183
183 184
184 185
185 186
186 187
187 188
188 189
189 190
190 191
191 192
192 193
193 194
194 195
195 Fuels - identification of
vehicle compatibility.
Graphic symbol for
consumer information in
accordance with
EN16942
The symbols shown below facilitated
recognising the correct fuel type to
be used on")
 IN AN EMERGENCY
A punctured tyre or a burnt-out bulb?
At times, a problem may interfere
with our journey.
The pages on emergencies can help
you to deal with critical situations
independently and with")